标签:自启 sdi trace 好的 inter [] evel 访问权限 数据
【apk静默安装】是android应用的一个重要功能,一般用在app自动更新等方面。静默安装在android里面是指不需要界面或用户参与的app安装动作,且需要系统已获root权限。安装完成后一般通过接收广播的方式启动App服务。
【app自启动】是常用功能,一般通过接收系统启动广播实现。
a. 自定义权限
<permission
        android:name="app.permission.install"
        android:protectionLevel="normal">
</permission>
其中android:name是自定义权限名称,android:protectionLevel是表示权限等级。
自定义权限android:protectionLevel有四个设置选项分别是:normal、dangerous、signature、signatureOrSystem,依次指明默认的低风险权限等级、涉及用户私有数据或系统级别组件的高风险权限等级、统一签名权限等级、系统级签名权限等级。此处用默认权限。
b. service标签加入权限限制(执行端必须拥有该权限才能访问)
<service
            android:name=".×××Service"
            android:enabled="true"
            android:exported="true"
            android:permission="app.permission.install">
    <intent-filter>
            <action android:name="×××.×××"/>
    </intent-filter>
</service><uses-permission android:name="app.permission.install"/>
<receiver android:name=".Broadcast.SilenceInstallReceiver"
            android:enabled="true"
            android:exported="true">
    <intent-filter>
            <action android:name="android.intent.action.PACKAGE_ADDED"/>
            <data android:scheme="package"/>
    </intent-filter>
</receiver>
广播接收器:
public class SilenceInstallReceiver2 extends BroadcastReceiver {
    @Override
    public void onReceive(Context context, Intent intent) {
        // 接收安装广播
        if (intent.getAction().equals("android.intent.action.PACKAGE_ADDED")) {
            startApp(context);
        }
    }

    /**
     * 启动app
     */
    public void startApp(Context context) {
        /**
         * 启动service
         */
        Intent intent1 = new Intent();
        intent1.setPackage("×××.×××"); //设置被执行启动操作app包名
        intent1.setAction("×××.×××"); //设置被执行启动操作app中service的自定义intent
        context.startService(intent1);

        /**
         * 启动activity
         */
        Intent intent2= new Intent();
        ComponentName componentName = new ComponentName(
                "×××.×××",  //被执行启动操作app的包名
                "×××.×××");   //被执行启动操作app的activity包路径
        intent2.setFlags(Intent.FLAG_ACTIVITY_NEW_TASK);//
        intent2.setComponent(componentName);
        context.startActivity(intent2);
    }
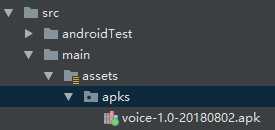
}项目中apk存储位置:

具体代码:
/**
 * 将assets下的需要安装的apk文件复制到本地可读写目录
 */
public List<String> extractApkToLocal() {
    List<String> apkListLocal = new ArrayList<>();
    InputStream is = null;
    FileOutputStream fos = null;
    String[] files;
    String assetsDir = "apks";
    String localPath;
    try {
        File file = new File(apkPath);
        FileUtils.createOrExistsDir(file);
        files = mContext.getAssets().list(assetsDir);
        for (String f : files) {
            is = getAssets().open(assetsDir + "/" + f);
            localPath = apkPath + "/" + f;
            apkListLocal.add(localPath);
            fos = new FileOutputStream(new File(localPath));
            byte[] temp = new byte[1024];
            int i = 0;
            while ((i = is.read(temp)) > 0) {
                fos.write(temp, 0, i);
            }
        }
    } catch (IOException e) {
        e.printStackTrace();
    } finally {
        if (is != null) {
            try {
                is.close();
            } catch (IOException e) {
                e.printStackTrace();
            }
        }
        if (fos != null) {
            try {
                fos.close();
            } catch (IOException e) {
                e.printStackTrace();
            }
        }
    }
    return apkListLocal;
}具体代码:
public boolean slientInstall() {
    List<String> apkList;
    apkList = extractApkToLocal(); //获取apk本地路径
    boolean result = false;
    for (String path : apkList) {
        File file = new File(path);
        Process process = null;
        OutputStream out = null;
        if (file.exists()) {
            try {
                process = Runtime.getRuntime().exec("su");
                out = process.getOutputStream();
                DataOutputStream dataOutputStream = new DataOutputStream(out);

                // 更改本地apk文件权限,方便执行安装操作
                dataOutputStream.writeBytes("chmod 777 " + file.getPath()
                        + "\n");

                // 进行安装
                dataOutputStream.writeBytes("LD_LIBRARY_PATH=/vendor/lib:/system/lib pm install -r "
                        + file.getPath());
                dataOutputStream.flush();
                dataOutputStream.close();
                out.close();
                int value = process.waitFor();

                // 成功
                if (value == 0) {
                    result = true;
                    // 失败
                } else if (value == 1) {
                    result = false;
                    // 未知情况
                } else {
                    result = false;
                }
            } catch (IOException e) {
                e.printStackTrace();
            } catch (InterruptedException e) {
                e.printStackTrace();
            }
            if (!result) {
                result = true;
            }
        }
    return result;
}<uses-permission android:name="android.permission.RECEIVE_BOOT_COMPLETED"/>
<receiver
        android:name=".Broadcast.BootReceiver"
        android:enabled="true">
    <intent-filter>
        <!-- 这是开机启动发送的广播意图-->
        <action android:name="android.intent.action.BOOT_COMPLETED"/>
    </intent-filter>
</receiver>
广播接收器:
public class BootReceiver extends BroadcastReceiver {
    @Override
    public void onReceive(Context context, Intent intent) {
        Log.e("BootReceiver:", "收到开机广播");
        //开启服务
        Intent startVoiceService = new Intent(context, ×××.class);
        context.startService(startVoiceService);
    }
}静默安装有它的局限性,需要通过系统的超级用户(root)进行操作任务,所以对系统安全性不高的情况有较强的实用性。此文是在查询各方面资料基础上实现的,旨在抛砖引玉,希望集思广益后有更好的实现方案!
标签:自启 sdi trace 好的 inter [] evel 访问权限 数据
原文地址:https://www.cnblogs.com/chanfee/p/9409217.html