标签:|| ubi 100% uek 127.0.0.1 hasd chm login rod
环境介绍
OS: Oracle Enterprise Linux 6.4 (For RAC Nodes)
DB: GI and Database 12.1.0.2
所需介质
p17694377_121020_Linux-x86-64_1of8.zip
p17694377_121020_Linux-x86-64_2of8.zip
p17694377_121020_Linux-x86-64_3of8.zip
p17694377_121020_Linux-x86-64_4of8.zip
上述软件1-2介质是DB软件,3-4是GRID软件。
– 这里只给出Oracle相关的,操作系统以及其他软件请自身准备。
操作系统信息
RAC节点服务器:
(以node1节点为例)
[root@xsyy1 ~]# cat /etc/redhat-release
Red Hat Enterprise Linux Server release 6.4 (Santiago)
[root@xsyy1 ~]# uname -a
Linux xsyy1 2.6.39-400.17.1.el6uek.x86_64 #1 SMP Fri Feb 22 18:16:18 PST 2013 x86_64 x86_64 x86_64 GNU/Linux
[root@xsyy1 ~]# grep MemTotal /proc/meminfo
MemTotal: 65952032 kB
[root@xsyy1 ~]# grep SwapTotal /proc/meminfo
SwapTotal: 131070972 kB
[root@xsyy1 ~]# df -h
文件系统 容量 已用 可用 已用%% 挂载点
/dev/sdd2 1.7T 39G1.6T 3% /
tmpfs 32G 624M31G 2% /dev/shm
/dev/sdd1 9.7G195M 9.0G 3% /boot
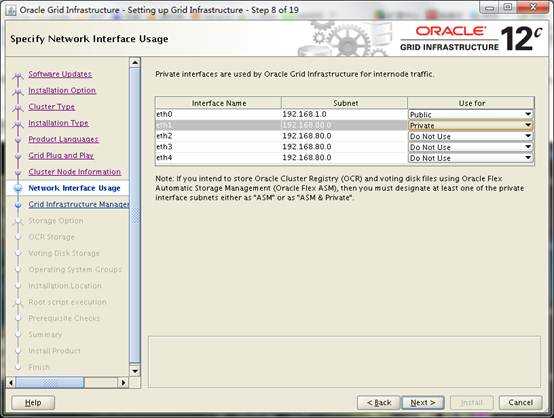
网络配置信息:
备注: 每个节点服务器至少需要两个网卡,eth0用于PUBLIC,而eth1用于Private
(节点1)
[root@xsyy1 ~]# ifconfig
eth0 Link encap:Ethernet HWaddr 6C:92:BF:2A:7F:8A
inet addr:172.16.28.24Bcast:172.16.28.255Mask:255.255.255.0
inet6 addr: fe80::6e92:bfff:fe2a:7f8a/64 Scope:Link
UP BROADCAST RUNNING MULTICAST MTU:1500 Metric:1
RX packets:23832511 errors:0 dropped:93 overruns:0 frame:0
TX packets:24962108 errors:0 dropped:0 overruns:0 carrier:0
collisions:0 txqueuelen:1000
RX bytes:25937636908 (24.1 GiB) TX bytes:29336937458 (27.3 GiB)
eth0:1 Link encap:Ethernet HWaddr 6C:92:BF:2A:7F:8A
inet addr:172.16.28.52Bcast:172.16.28.255Mask:255.255.255.0
UP BROADCAST RUNNING MULTICAST MTU:1500 Metric:1
eth0:2 Link encap:Ethernet HWaddr 6C:92:BF:2A:7F:8A
inet addr:172.16.28.39Bcast:172.16.28.255Mask:255.255.255.0
UP BROADCAST RUNNING MULTICAST MTU:1500 Metric:1
eth1 Link encap:Ethernet HWaddr 6C:92:BF:2A:7F:8B
inet addr:10.1.20.24 Bcast:10.1.20.255 Mask:255.255.255.0
inet6 addr: fe80::6e92:bfff:fe2a:7f8b/64 Scope:Link
UP BROADCAST RUNNING MULTICAST MTU:1500 Metric:1
RX packets:15029998 errors:0 dropped:0 overruns:0 frame:0
TX packets:12761273 errors:0 dropped:0 overruns:0 carrier:0
collisions:0 txqueuelen:1000
RX bytes:12231984673 (11.3 GiB) TX bytes:8970357010 (8.3 GiB)
eth1:1 Link encap:Ethernet HWaddr 6C:92:BF:2A:7F:8B
inet addr:169.254.169.99Bcast:169.254.255.255Mask:255.255.0.0
UP BROADCAST RUNNING MULTICAST MTU:1500 Metric:1
lo Link encap:Local Loopback
inet addr:127.0.0.1 Mask:255.0.0.0
inet6 addr: ::1/128 Scope:Host
UP LOOPBACK RUNNING MTU:16436 Metric:1
RX packets:6453002 errors:0 dropped:0 overruns:0 frame:0
TX packets:6453002 errors:0 dropped:0 overruns:0 carrier:0
collisions:0 txqueuelen:0
RX bytes:6450405692 (6.0 GiB) TX bytes:6450405692 (6.0 GiB)
(节点2)
[root@xsyy2 ~]# ifconfig
eth0 Link encap:Ethernet HWaddr 6C:92:BF:2A:7C:D6
inet addr:172.16.28.28 Bcast:172.16.28.255 Mask:255.255.255.0
inet6 addr: fe80::6e92:bfff:fe2a:7cd6/64 Scope:Link
UP BROADCAST RUNNING MULTICAST MTU:1500Metric:1
RX packets:12895198 errors:0 dropped:93 overruns:0 frame:0
TX packets:2639578 errors:0 dropped:0 overruns:0 carrier:0
collisions:0 txqueuelen:1000
RX bytes:17559461040 (16.3 GiB) TX bytes:231832259 (221.0 MiB)
eth0:1 Link encap:Ethernet HWaddr 6C:92:BF:2A:7C:D6
inet addr:172.16.28.53 Bcast:172.16.28.255 Mask:255.255.255.0
UP BROADCAST RUNNING MULTICAST MTU:1500Metric:1
eth1 Link encap:Ethernet HWaddr 6C:92:BF:2A:7C:D7
inet addr:10.1.20.28 Bcast:10.1.20.255 Mask:255.255.255.0
inet6 addr: fe80::6e92:bfff:fe2a:7cd7/64 Scope:Link
UP BROADCAST RUNNING MULTICAST MTU:1500Metric:1
RX packets:12764698 errors:0 dropped:0 overruns:0 frame:0
TX packets:15034054 errors:0 dropped:0 overruns:0 carrier:0
collisions:0 txqueuelen:1000
RX bytes:8973128258 (8.3 GiB) TX bytes:12234670411 (11.3 GiB)
eth1:1 Link encap:Ethernet HWaddr 6C:92:BF:2A:7C:D7
inet addr:169.254.87.215 Bcast:169.254.255.255 Mask:255.255.0.0
UP BROADCAST RUNNING MULTICAST MTU:1500Metric:1
lo Link encap:Local Loopback
inet addr:127.0.0.1 Mask:255.0.0.0
inet6 addr: ::1/128 Scope:Host
UP LOOPBACK RUNNING MTU:16436Metric:1
RX packets:2213075 errors:0 dropped:0 overruns:0 frame:0
TX packets:2213075 errors:0 dropped:0 overruns:0 carrier:0
collisions:0 txqueuelen:0
RX bytes:1213870175 (1.1 GiB) TX bytes:1213870175 (1.1 GiB)
确认防火墙和SELinux是禁用的
(以Node1为例,两个节点相同)
[root@xsyy1 ~]# iptables -L
Chain INPUT (policy ACCEPT)
target prot opt source destination
Chain FORWARD (policy ACCEPT)
target prot opt source destination
Chain OUTPUT (policy ACCEPT)
target prot opt source destination
如果防火墙没禁用,那么通过如下方式修改:
[root@xsyy1 ~]# service iptables stop
[root@xsyy1 ~]# chkconfig iptables off
[root@xsyy1 ~]# getenforce
Disabled
如果SELinux没有被禁止,那就通过如下方式修改:
[root@xsyy1 ~]# cat /etc/selinux/config
-- 改成SELINUX=disabled
# This file controls the state of SELinux on the system.
# SELINUX= can take one of these three values:
# enforcing - SELinux security policy is enforced.
# permissive - SELinux prints warnings instead of enforcing.
# disabled - No SELinux policy is loaded.
SELINUX=disabled
# SELINUXTYPE= can take one of these two values:
# targeted - Targeted processes are protected,
# mls - Multi Level Security protection.
SELINUXTYPE=targeted
临时关闭selinux
[root@xsyy1 ~]# setenforce 0
正式部署安装
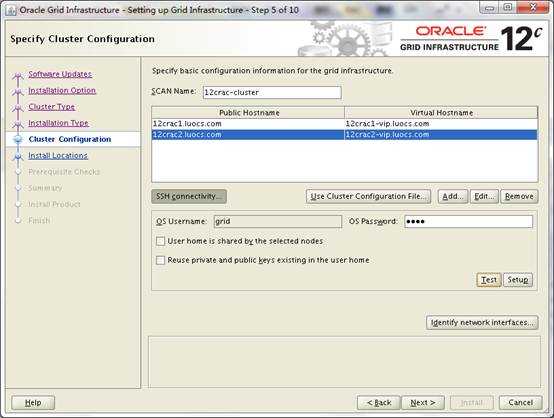
1、配置/etc/hosts
修改/etc/hosts文件,前两行不动,添加hostname对应信息。
(以Node1为例,两个节点相同)
[root@xsyy1 ~]# cat /etc/hosts
127.0.0.1 localhost localhost.localdomain localhost4 localhost4.localdomain4
::1 localhost localhost.localdomain localhost6 localhost6.localdomain6
# For Public
172.16.28.24 xsyy1
172.16.28.28 xsyy2
# For VIP
172.16.28.52 xsyyvip1
172.16.28.53 xsyyvip2
# For Private IP
10.1.20.24 xsyypriv1
10.1.20.28 xsyypriv2
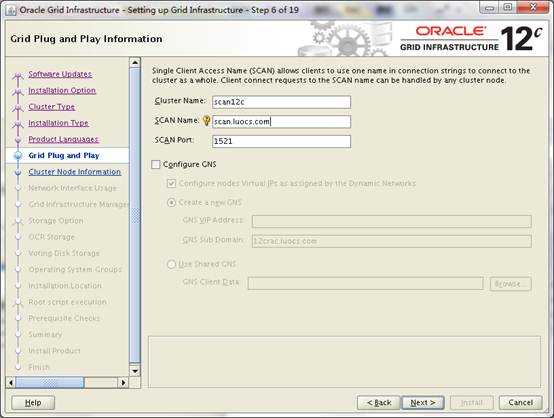
# For SCAN IP
172.16.28.39 scanip
3、系统配置
【两个节点相同】
修改/etc/sysctl.conf,添加如下内容:
fs.file-max = 6815744
kernel.sem = 250 32000 100 128
kernel.shmmni = 4096
kernel.shmall = 1073741824
kernel.shmmax = 4398046511104
net.core.rmem_default = 262144
net.core.rmem_max = 4194304
net.core.wmem_default = 262144
net.core.wmem_max = 1048576
fs.aio-max-nr = 1048576
net.ipv4.ip_local_port_range = 9000 65500
生效:
[root@12c ~]# sysctl -p
修改/etc/security/limits.conf,添加如下内容:
grid soft nofile 1024
grid hard nofile 65536
grid soft nproc 2047
grid hard nproc 16384
grid soft stack 10240
grid hard stack 32768
oracle soft nofile 1024
oracle hard nofile 65536
oracle soft nproc 2047
oracle hard nproc 16384
oracle soft stack 10240
oracle hard stack 32768
修改/etc/pam.d/login
在 /etc/pam.d/login 文件中添加或编辑下面一行内容:
session required pam_limits.so
修改/etc/profile
[root@rac1 ~]# cat /etc/profile
if [ $USER = "grid" ] || [ $USER = "oracle" ]; then
if [ $SHELL = "/bin/ksh" ]; then
ulimit -p 16384
ulimit -n 65536
else
ulimit -u 16384 -n 65536
fi
fi
4、配置YUM源并安装所需包
先将默认的yum配置文件删除或者移动,然后创建一个新的
(以Node1为例,两个节点相同)
[root@xsyy1 ~]# cd /etc/yum.repos.d
[root@xsyy1 yum.repos.d]# mkdir bk
[root@xsyy1 yum.repos.d]# mv public-yum-ol6.repo bk/
[root@xsyy1 yum.repos.d]# vi gdmsacs.repo
-- 添加如下内容
[Oracle]
name=OEL
baseurl=file:///mnt/Server
gpgcheck=0
enabled=1
将光驱挂载上
[root@xsyy1 yum.repos.d]# mount /dev/cdrom /mnt
mount: block device /dev/sr0 is write-protected, mounting read-only
下面就可以Yum方式安装所需包了
[root@xsyy1 yum.repos.d]# yum -y install binutils compat-libstdc++-33 elfutils-libelf \
elfutils-libelf-devel elfutils-libelf-devel-static gcc gcc-c++ glibc glibc-common \
glibc-devel kernel-headers ksh libaio libaio-devel libgcc libgomp libstdc++ libstdc++-devel \
make numactl-devel sysstat unixODBC unixODBC-devel pdksh compat-libcap1
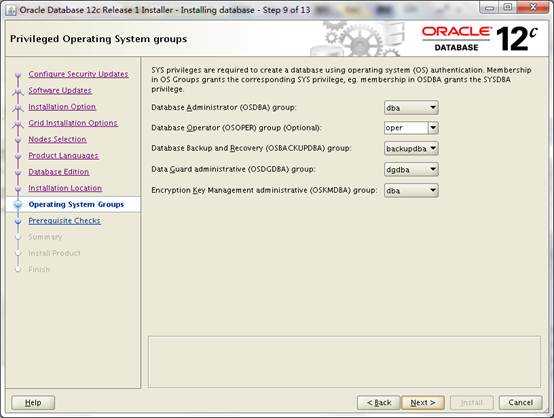
5、创建用户和组
(以Node1为例,两个节点相同)
创建组:
[root@xsyy1 ~]# /usr/sbin/groupadd -g 54321 oinstall
[root@xsyy1 ~]# /usr/sbin/groupadd -g 54322 dba
[root@xsyy1 ~]# /usr/sbin/groupadd -g 54323 oper
[root@xsyy1 ~]# /usr/sbin/groupadd -g 54324 backupdba
[root@xsyy1 ~]# /usr/sbin/groupadd -g 54325 dgdba
[root@xsyy1 ~]# /usr/sbin/groupadd -g 54327 asmdba
[root@xsyy1 ~]# /usr/sbin/groupadd -g 54328 asmoper
[root@xsyy1 ~]# /usr/sbin/groupadd -g 54329 asmadmin
创建用户:
[root@xsyy1 ~]# /usr/sbin/useradd -u 54321 -g oinstall -G asmadmin,asmdba,asmoper,dba grid
[root@xsyy1 ~]# /usr/sbin/useradd -u 54322 -g oinstall -G dba,backupdba,dgdba,asmadmin oracle
设置口令:
[root@xsyy1 ~]# passwd grid
[root@xsyy1 ~]# passwd oracle
6、创建安装目录以及授权
(以Node1为例,两个节点相同)
[root@xsyy1 ~]# mkdir -p /u01/app/grid
[root@xsyy1 ~]# mkdir -p /u01/app/12.1.0/grid
[root@xsyy1 ~]# mkdir -p /u01/app/oracle/product/12.1.0/db_1
[root@xsyy1 ~]# chown -R grid.oinstall /u01
[root@xsyy1 ~]# chown -R oracle.oinstall /u01/app/oracle
[root@xsyy1 ~]# chmod -R 775 /u01
7、配置境变量
节点1: grid用户
[root@xsyy1 ~]# vi /home/grid/.bash_profile
export TMP=/tmp
export TMPDIR=$TMP
export ORACLE_HOSTNAME=xsyy1.gdmsa.gov.cn
export ORACLE_BASE=/u01/app/grid
export ORACLE_HOME=/u01/app/12.1.0/grid
export ORACLE_SID=+ASM1
export PATH=/usr/sbin:$PATH
export PATH=$ORACLE_HOME/bin:$PATH
export LD_LIBRARY_PATH=$ORACLE_HOME/lib:/lib:/usr/lib
export CLASSPATH=$ORACLE_HOME/JRE:$ORACLE_HOME/jlib:$ORACLE_HOME/rdbms/jlib
alias sqlplus="rlwrap sqlplus"
#Oracle用户
[root@xsyy1 ~]# vi /home/oracle/.bash_profile
export PATH
export TMP=/tmp
export TMPDIR=$TMP
export ORACLE_BASE=/u01/app/oracle
export ORACLE_HOME=$ORACLE_BASE/product/12.1.0/db_1
export ORACLE_SID=gxshis1
export PATH=/usr/sbin:$PATH
export PATH=$ORACLE_HOME/bin:$PATH
export LD_LIBRARY_PATH=$ORACLE_HOME/lib:/lib:/usr/lib
export CLASSPATH=$ORACLE_HOME/JRE:$ORACLE_HOME/jlib:$ORACLE_HOME/rdbms/jlib
节点2:
[root@xsyy2 ~]# vi /home/grid/.bash_profile
export TMP=/tmp
export TMPDIR=$TMP
export ORACLE_HOSTNAME=xsyy1.gdmsa.gov.cn
export ORACLE_BASE=/u01/app/grid
export ORACLE_HOME=/u01/app/12.1.0/grid
export ORACLE_SID=+ASM1
export PATH=/usr/sbin:$PATH
export PATH=$ORACLE_HOME/bin:$PATH
export LD_LIBRARY_PATH=$ORACLE_HOME/lib:/lib:/usr/lib
export CLASSPATH=$ORACLE_HOME/JRE:$ORACLE_HOME/jlib:$ORACLE_HOME/rdbms/jlib
alias sqlplus="rlwrap sqlplus"
[root@xsyy2 ~]# vi /home/oracle/.bash_profile
export TMP=/tmp
export TMPDIR=$TMP
export ORACLE_BASE=/u01/app/oracle
export ORACLE_HOME=$ORACLE_BASE/product/12.1.0/db_1
export ORACLE_SID=gxshis2
export PATH=/usr/sbin:$PATH
export PATH=$ORACLE_HOME/bin:$PATH
export LD_LIBRARY_PATH=$ORACLE_HOME/lib:/lib:/usr/lib
export CLASSPATH=$ORACLE_HOME/JRE:$ORACLE_HOME/jlib:$ORACLE_HOME/rdbms/jlib
8、Iscsi挂载磁盘并配置UDEV
[root@12cr ~]# yum -y install iscsi-initiator-utils
[root@12cr ~]# service iscsid start
[root@12cr ~]# chkconfig iscsid on
[root@12cr ~]# iscsiadm -m discovery -t sendtargets -p 192.168.80.140:3260
[ OK ] iscsid: [OK ]
192.168.80.140:3260,1 iqn.2006-01.com.openfiler:tsn.3a9cad78121d
[root@12cr ~]# service iscsi restart
Stopping iscsi: [ OK ]
Starting iscsi: [ OK ]
[root@xsyy1 ~]# fdisk -l
Disk /dev/sda: 53.7 GB, 53687091200 bytes
255 heads, 63 sectors/track, 6527 cylinders
Units = cylinders of 16065 * 512 = 8225280 bytes
Sector size (logical/physical): 512 bytes / 512 bytes
I/O size (minimum/optimal): 512 bytes / 512 bytes
Disk identifier: 0x00046ecd
Device Boot Start End BlocksId System
/dev/sda1 * 1 26 204800 83 Linux
Partition 1 does not end on cylinder boundary.
/dev/sda2 26 664 5120000 82 Linux swap / Solaris
Partition 2 does not end on cylinder boundary.
/dev/sda3 664 6528 47102976 83 Linux
Disk /dev/sdb: 2147 MB, 2147483648 bytes
67 heads, 62 sectors/track, 1009 cylinders
Units = cylinders of 4154 * 512 = 2126848 bytes
Sector size (logical/physical): 512 bytes / 512 bytes
I/O size (minimum/optimal): 512 bytes / 512 bytes
Disk identifier: 0x00000000
Disk /dev/sdc: 10.5 GB, 10502537216 bytes
64 heads, 32 sectors/track, 10016 cylinders
Units = cylinders of 2048 * 512 = 1048576 bytes
Sector size (logical/physical): 512 bytes / 512 bytes
I/O size (minimum/optimal): 512 bytes / 512 bytes
Disk identifier: 0x00000000
Disk /dev/sdd: 6610 MB, 6610223104 bytes
204 heads, 62 sectors/track, 1020 cylinders
Units = cylinders of 12648 * 512 = 6475776 bytes
Sector size (logical/physical): 512 bytes / 512 bytes
I/O size (minimum/optimal): 512 bytes / 512 bytes
Disk identifier: 0x00000000
Disk /dev/sdf: 8388 MB, 8388608000 bytes
64 heads, 32 sectors/track, 8000 cylinders
Units = cylinders of 2048 * 512 = 1048576 bytes
Sector size (logical/physical): 512 bytes / 512 bytes
I/O size (minimum/optimal): 512 bytes / 512 bytes
Disk identifier: 0x00000000
Disk /dev/sde: 8388 MB, 8388608000 bytes
64 heads, 32 sectors/track, 8000 cylinders
Units = cylinders of 2048 * 512 = 1048576 bytes
Sector size (logical/physical): 512 bytes / 512 bytes
I/O size (minimum/optimal): 512 bytes / 512 bytes
Disk identifier: 0x00000000
Disk /dev/sdg: 5335 MB, 5335154688 bytes
165 heads, 62 sectors/track, 1018 cylinders
Units = cylinders of 10230 * 512 = 5237760 bytes
Sector size (logical/physical): 512 bytes / 512 bytes
I/O size (minimum/optimal): 512 bytes / 512 bytes
Disk identifier: 0x00000000
这里只用了sde、sdf、sdg,其他的是给别的集群使用的。
//i in b c d e f g h;
[root@xsyy1 ~]# for i in e f g;do
> echo "KERNEL==\"sd*\", BUS==\"scsi\", PROGRAM==\"/sbin/scsi_id --whitelisted --replace-whitespace --device=/dev/\$name\", RESULT==\"`/sbin/scsi_id --whitelisted --replace-whitespace --device=/dev/sd$i`\", NAME=\"asm-disk$i\", OWNER=\"grid\", GROUP=\"asmadmin\", MODE=\"0660\""
> done
KERNEL=="sd*", BUS=="scsi", PROGRAM=="/sbin/scsi_id --whitelisted --replace-whitespace --device=/dev/$name", RESULT=="14f504e46494c450058444273784d2d64705a6a2d544c4756", NAME="asm-diske", OWNER="grid", GROUP="asmadmin", MODE="0660"
KERNEL=="sd*", BUS=="scsi", PROGRAM=="/sbin/scsi_id --whitelisted --replace-whitespace --device=/dev/$name", RESULT=="14f504e46494c45003030365263642d32714a702d6866744c", NAME="asm-diskf", OWNER="grid", GROUP="asmadmin", MODE="0660"
KERNEL=="sd*", BUS=="scsi", PROGRAM=="/sbin/scsi_id --whitelisted --replace-whitespace --device=/dev/$name", RESULT=="14f504e46494c45006c58576a76452d716d50492d71436c76", NAME="asm-diskg", OWNER="grid", GROUP="asmadmin", MODE="0660"
配置UDEV: 将上述内容拷贝至节点
(以Node1为例,两个节点相同)
[root@xsyy1 ~]# vi /etc/udev/rules.d/99-oracle-asmdevices.rules
-- 添加如下内容:
KERNEL=="sd*", BUS=="scsi", PROGRAM=="/sbin/scsi_id --whitelisted --replace-whitespace --device=/dev/$name", RESULT=="14f504e46494c45003030365263642d32714a702d6866744c", NAME="asm-data", OWNER="grid", GROUP="asmadmin", MODE="0660"
KERNEL=="sd*", BUS=="scsi", PROGRAM=="/sbin/scsi_id --whitelisted --replace-whitespace --device=/dev/$name", RESULT=="14f504e46494c450058444273784d2d64705a6a2d544c4756", NAME="asm-fra", OWNER="grid", GROUP="asmadmin", MODE="0660"
KERNEL=="sd*", BUS=="scsi", PROGRAM=="/sbin/scsi_id --whitelisted --replace-whitespace --device=/dev/$name", RESULT=="14f504e46494c45006c58576a76452d716d50492d71436c76", NAME="asm-crs", OWNER="grid", GROUP="asmadmin", MODE="0660"
--重启UDEV:
[root@xsyy1 ~]# /sbin/start_udev
Starting udev: [ OK ]
--检查共享设备的所属关系和权限:
[root@xsyy1 ~]# ls -l /dev/asm*
brw-rw---- 1 grid asmadmin 8, 96 Jun 29 21:56 /dev/asm-crs
brw-rw---- 1 grid asmadmin 8, 64 Jun 29 21:56 /dev/asm-data
brw-rw---- 1 grid asmadmin 8, 80 Jun 29 21:56 /dev/asm-fra
9、禁用NTP服务
(以Node1为例,两个节点相同)
[root@xsyy1 ~]# chkconfig ntpd off
[root@xsyy1 ~]# mv /etc/ntp.conf /etc/ntp.conf.bak
[root@xsyy1 ~]# rm /var/run/ntpd.pid
10、解压介质
节点1:
[root@xsyy1 ~]# chown -R grid.oinstall /install/
[root@xsyy1 ~]# chown oracle.oinstall /install/linuxamd64_12c_database_*
[root@xsyy1 ~]# chmod 775 /install
[root@xsyy1 ~]# su - grid
[root@xsyy1 ~]# cd /install/
[grid@xsyy1 install]$ unzip linuxamd64_12c_grid_1of2.zip
[grid@xsyy1 install]$ unzip linuxamd64_12c_grid_2of2.zip
[root@xsyy1 ~]# su - oracle
[oracle@xsyy1 install]$ unzip linuxamd64_12c_database_1of2.zip
解压之后大小为:
[oracle@xsyy1 install]$ du -sh grid
2.1G grid
[oracle@xsyy1 install]$ du -sh database/
2.6G database/
安装cvu相关rpm包:
[root@xsyy1 ~]# cd /install/grid/rpm/
[root@xsyy1 rpm]# rpm -ivh cvuqdisk-1.0.9-1.rpm
Preparing...########################################### [100%]
Using default group oinstall to install package
1:cvuqdisk########################################### [100%]
拷贝到节点2并安装:
[root@xsyy1 rpm]# scp cvuqdisk-1.0.9-1.rpm xsyy2:/install
[root@xsyy2 install]# rpm -ivh cvuqdisk-1.0.9-1.rpm
Preparing...########################################### [100%]
Using default group oinstall to install package
1:cvuqdisk ########################################### [100%]
SSH配置
/usr/bin/ssh-keygen -t rsa
/usr/bin/ssh-keygen -t dsa
把4个文件合成一个文件
注意权限要是是644
chmod 644 authorized_keys
在节点RAC2进行的操作
[oracle@RAC2 ~]$ ls -a
. .bash_history .bash_profile.emacs .mozilla .viminfo
.. .bash_logout .bashrc .kde.ssh .Xauthority
[oracle@RAC2 ~]$ cd .ssh
[oracle@RAC2 .ssh]$ ls
id_dsa id_dsa.pub id_rsaid_rsa.pub
[oracle@RAC2 .ssh]$ scp id_dsa.pub rac1:/home/oracle/.ssh/id_dsa.pub2
oracle@rac1‘s password:
id_dsa.pub100% 601 0.6KB/s00:00
[oracle@RAC2 .ssh]$ ls
id_dsa id_dsa.pub id_rsaid_rsa.pub known_hosts
[oracle@RAC2 .ssh]$ scp id_rsa.pub rac1:/home/oracle/.ssh/id_rsa.pub2
oracle@rac1‘s password:
id_rsa.pub
再到RAC1节点
cat id_dsa.pubid_dsa.pub2 id_rsa.pub id_rsa.pub2 > authorized_keys
scp authorized_keysrac2:/home/oracle/.ssh
之后要测试一下(如果都不需要密码,得到时间后。就说明ssh 对等性配置成功。)
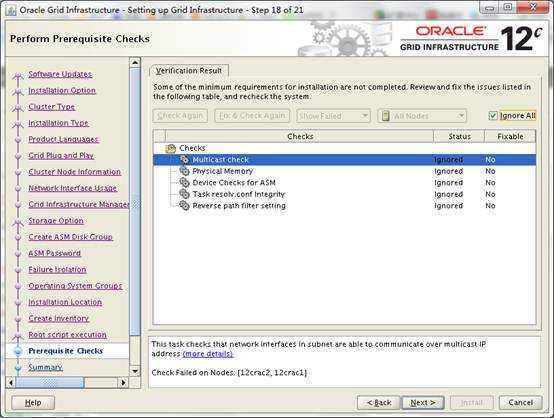
11、校验
这里只贴失败的项,其中第一个是物理内存不足问题,Oracle推荐每节点至少4GB内存空间,我这里只有2G;第二个问题是配置DNS,这个问题我们可以忽略。
节点1:
[grid@xsyy1 grid]$ ./runcluvfy.sh stage -pre crsinst -n xsyy1,xsyy2 -verbose
Check: Total memory
Node Name Available Required Status
------------ ------------------------ ------------------------ ----------
xsyy2 1.9567GB (2051748.0KB) 4GB (4194304.0KB) failed
xsyy1 1.9567GB (2051748.0KB) 4GB (4194304.0KB) failed
Result: Total memory check failed
Result: Default user file creation mask check passed
Checking integrity of file "/etc/resolv.conf" across nodes
Checking the file "/etc/resolv.conf" to make sure only one of domain and search entries is defined
"domain" and "search" entries do not coexist in any "/etc/resolv.conf" file
Checking if domain entry in file "/etc/resolv.conf" is consistent across the nodes...
"domain" entry does not exist in any "/etc/resolv.conf" file
Checking if search entry in file "/etc/resolv.conf" is consistent across the nodes...
Checking file "/etc/resolv.conf" to make sure that only one search entry is defined
More than one "search" entry does not exist in any "/etc/resolv.conf" file
All nodes have same "search" order defined in file "/etc/resolv.conf"
Checking DNS response time for an unreachable node
Node Name Status
------------------------------------------------------------
xsyy1 failed
xsyy2 failed
PRVF-5636 : The DNS response time for an unreachable node exceeded "15000" ms on following nodes: xsyy1,xsyy2
Check for integrity of file "/etc/resolv.conf" failed
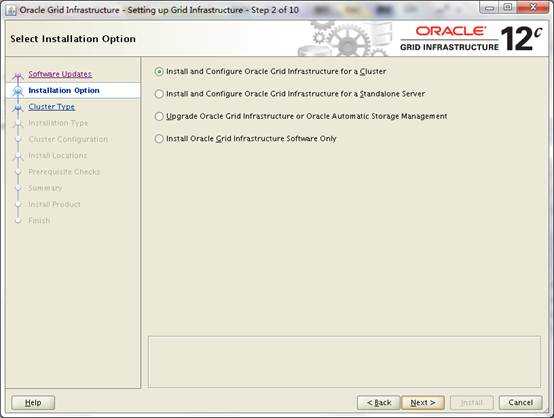
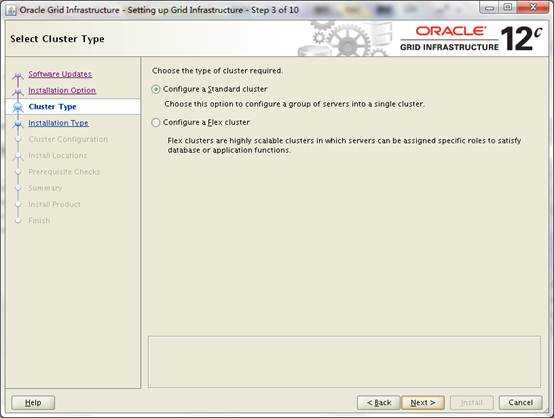
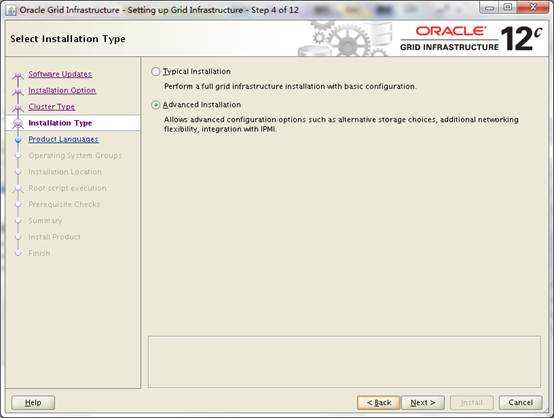
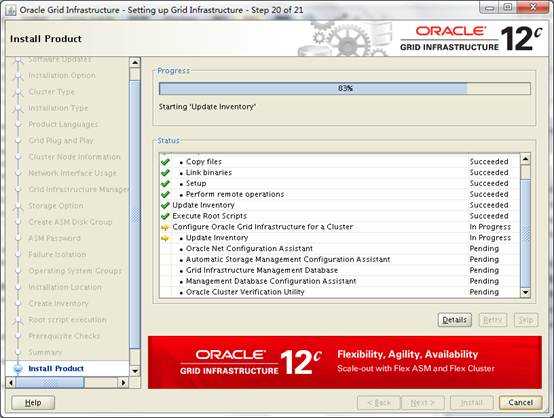
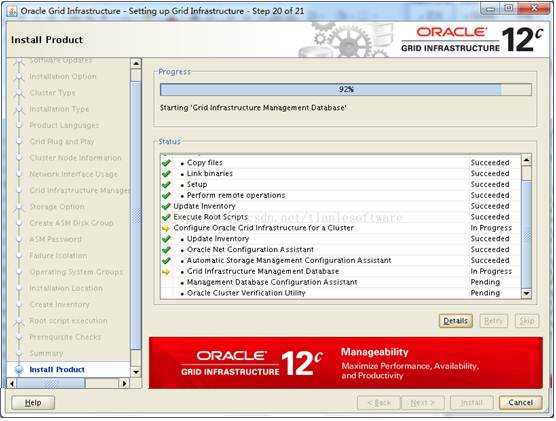
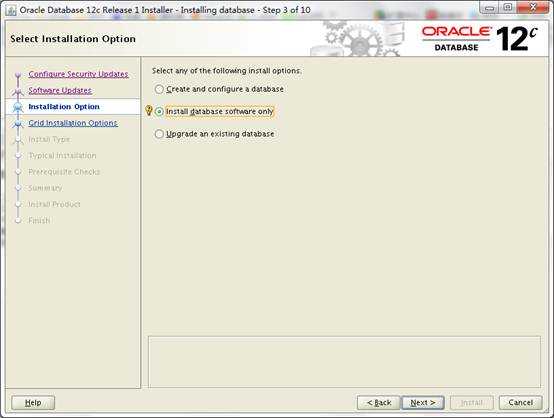
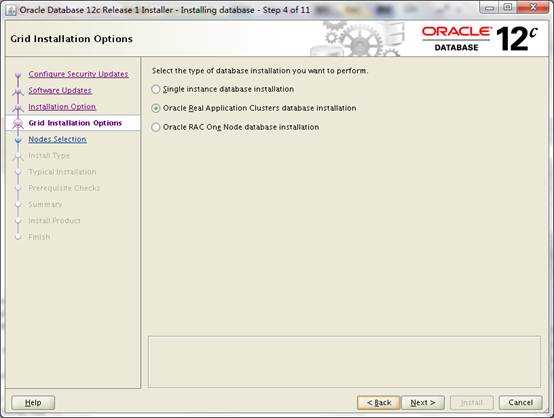
12、安装
1)安装GI
[root@12cr ~]# su - grid
[grid@12cr ~]$ cd /install/grid/
我打开Xmanager - Passive,设置DISPLAY,调用runInstaller启动OUI
[grid@12cr grid]$ export DISPLAY=192.168.1.1:0.0
[grid@12cr grid]$ ./runInstaller


这里有几项校验不过去,这几个都忽略。
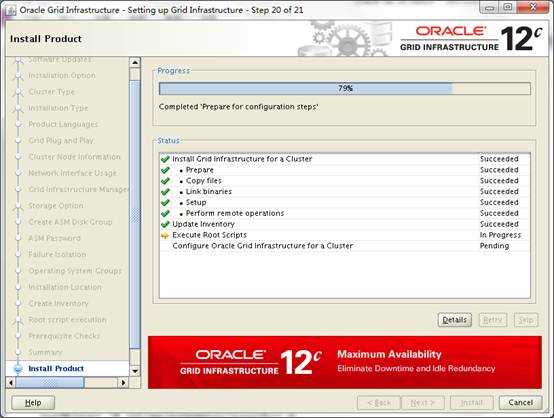
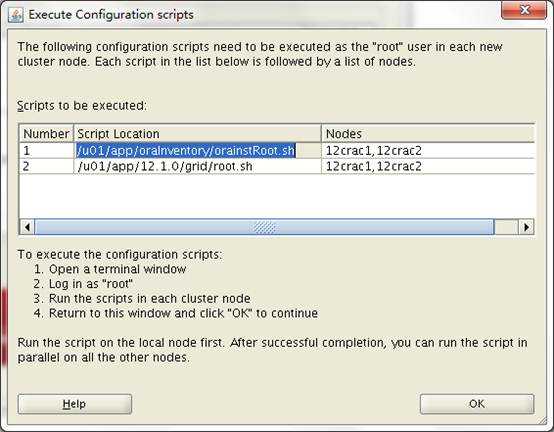
脚本输出内容:
[root@xsyy1 ~]# /u01/app/oraInventory/orainstRoot.sh
Changing permissions of /u01/app/oraInventory.
Adding read,write permissions for group.
Removing read,write,execute permissions for world.
Changing groupname of /u01/app/oraInventory to oinstall.
The execution of the script is complete.
节点1:
[root@xsyy1 ~]# /u01/app/12.1.0/grid/root.sh
Performing root user operation for Oracle 12c
The following environment variables are set as:
ORACLE_OWNER= grid
ORACLE_HOME= /u01/app/12.1.0/grid
Enter the full pathname of the local bin directory: [/usr/local/bin]:
Copying dbhome to /usr/local/bin ...
Copying oraenv to /usr/local/bin ...
Copying coraenv to /usr/local/bin ...
Creating /etc/oratab file...
Entries will be added to the /etc/oratab file as needed by
Database Configuration Assistant when a database is created
Finished running generic part of root script.
Now product-specific root actions will be performed.
Using configuration parameter file: /u01/app/12.1.0/grid/crs/install/crsconfig_params
2013/07/01 00:30:25 CLSRSC-363: User ignored prerequisites during installation
OLR initialization - successful
root wallet
root wallet cert
root cert export
peer wallet
profile reader wallet
pa wallet
peer wallet keys
pa wallet keys
peer cert request
pa cert request
peer cert
pa cert
peer root cert TP
profile reader root cert TP
pa root cert TP
peer pa cert TP
pa peer cert TP
profile reader pa cert TP
profile reader peer cert TP
peer user cert
pa user cert
2013/07/01 00:31:22 CLSRSC-330: Adding Clusterware entries to file ‘oracle-ohasd.conf‘
CRS-4133: Oracle High Availability Services has been stopped.
CRS-4123: Oracle High Availability Services has been started.
CRS-4133: Oracle High Availability Services has been stopped.
CRS-4123: Oracle High Availability Services has been started.
CRS-2673: Attempting to stop ‘ora.drivers.acfs‘ on ‘xsyy1‘
CRS-2677: Stop of ‘ora.drivers.acfs‘ on ‘xsyy1‘ succeeded
CRS-2672: Attempting to start ‘ora.evmd‘ on ‘xsyy1‘
CRS-2672: Attempting to start ‘ora.mdnsd‘ on ‘xsyy1‘
CRS-2676: Start of ‘ora.mdnsd‘ on ‘xsyy1‘ succeeded
CRS-2676: Start of ‘ora.evmd‘ on ‘xsyy1‘ succeeded
CRS-2672: Attempting to start ‘ora.gpnpd‘ on ‘xsyy1‘
CRS-2676: Start of ‘ora.gpnpd‘ on ‘xsyy1‘ succeeded
CRS-2672: Attempting to start ‘ora.cssdmonitor‘ on ‘xsyy1‘
CRS-2672: Attempting to start ‘ora.gipcd‘ on ‘xsyy1‘
CRS-2676: Start of ‘ora.cssdmonitor‘ on ‘xsyy1‘ succeeded
CRS-2676: Start of ‘ora.gipcd‘ on ‘xsyy1‘ succeeded
CRS-2672: Attempting to start ‘ora.cssd‘ on ‘xsyy1‘
CRS-2672: Attempting to start ‘ora.diskmon‘ on ‘xsyy1‘
CRS-2676: Start of ‘ora.diskmon‘ on ‘xsyy1‘ succeeded
CRS-2676: Start of ‘ora.cssd‘ on ‘xsyy1‘ succeeded
ASM created and started successfully.
Disk Group RACCRS created successfully.
CRS-2672: Attempting to start ‘ora.crf‘ on ‘xsyy1‘
CRS-2672: Attempting to start ‘ora.storage‘ on ‘xsyy1‘
CRS-2676: Start of ‘ora.storage‘ on ‘xsyy1‘ succeeded
CRS-2676: Start of ‘ora.crf‘ on ‘xsyy1‘ succeeded
CRS-2672: Attempting to start ‘ora.crsd‘ on ‘xsyy1‘
CRS-2676: Start of ‘ora.crsd‘ on ‘xsyy1‘ succeeded
CRS-4256: Updating the profile
Successful addition of voting disk d883c23a7bfc4fdcbf418c9f631bd0af.
Successfully replaced voting disk group with +RACCRS.
CRS-4256: Updating the profile
CRS-4266: Voting file(s) successfully replaced
## STATE File Universal Id File Name Disk group
-- ----- ----------------- --------- ---------
1. ONLINE d883c23a7bfc4fdcbf418c9f631bd0af (/dev/asm-crs) [RACCRS]
Located 1 voting disk(s).
CRS-2791: Starting shutdown of Oracle High Availability Services-managed resources on ‘xsyy1‘
CRS-2673: Attempting to stop ‘ora.crsd‘ on ‘xsyy1‘
CRS-2677: Stop of ‘ora.crsd‘ on ‘xsyy1‘ succeeded
CRS-2673: Attempting to stop ‘ora.storage‘ on ‘xsyy1‘
CRS-2673: Attempting to stop ‘ora.mdnsd‘ on ‘xsyy1‘
CRS-2673: Attempting to stop ‘ora.gpnpd‘ on ‘xsyy1‘
CRS-2673: Attempting to stop ‘ora.drivers.acfs‘ on ‘xsyy1‘
CRS-2677: Stop of ‘ora.storage‘ on ‘xsyy1‘ succeeded
CRS-2673: Attempting to stop ‘ora.ctssd‘ on ‘xsyy1‘
CRS-2673: Attempting to stop ‘ora.evmd‘ on ‘xsyy1‘
CRS-2673: Attempting to stop ‘ora.asm‘ on ‘xsyy1‘
CRS-2677: Stop of ‘ora.drivers.acfs‘ on ‘xsyy1‘ succeeded
CRS-2677: Stop of ‘ora.mdnsd‘ on ‘xsyy1‘ succeeded
CRS-2677: Stop of ‘ora.gpnpd‘ on ‘xsyy1‘ succeeded
CRS-2677: Stop of ‘ora.evmd‘ on ‘xsyy1‘ succeeded
CRS-2677: Stop of ‘ora.ctssd‘ on ‘xsyy1‘ succeeded
CRS-2677: Stop of ‘ora.asm‘ on ‘xsyy1‘ succeeded
CRS-2673: Attempting to stop ‘ora.cluster_interconnect.haip‘ on ‘xsyy1‘
CRS-2677: Stop of ‘ora.cluster_interconnect.haip‘ on ‘xsyy1‘ succeeded
CRS-2673: Attempting to stop ‘ora.cssd‘ on ‘xsyy1‘
CRS-2677: Stop of ‘ora.cssd‘ on ‘xsyy1‘ succeeded
CRS-2673: Attempting to stop ‘ora.crf‘ on ‘xsyy1‘
CRS-2677: Stop of ‘ora.crf‘ on ‘xsyy1‘ succeeded
CRS-2673: Attempting to stop ‘ora.gipcd‘ on ‘xsyy1‘
CRS-2677: Stop of ‘ora.gipcd‘ on ‘xsyy1‘ succeeded
CRS-2793: Shutdown of Oracle High Availability Services-managed resources on ‘xsyy1‘ has completed
CRS-4133: Oracle High Availability Services has been stopped.
CRS-4123: Starting Oracle High Availability Services-managed resources
CRS-2672: Attempting to start ‘ora.mdnsd‘ on ‘xsyy1‘
CRS-2672: Attempting to start ‘ora.evmd‘ on ‘xsyy1‘
CRS-2676: Start of ‘ora.mdnsd‘ on ‘xsyy1‘ succeeded
CRS-2676: Start of ‘ora.evmd‘ on ‘xsyy1‘ succeeded
CRS-2672: Attempting to start ‘ora.gpnpd‘ on ‘xsyy1‘
CRS-2676: Start of ‘ora.gpnpd‘ on ‘xsyy1‘ succeeded
CRS-2672: Attempting to start ‘ora.gipcd‘ on ‘xsyy1‘
CRS-2676: Start of ‘ora.gipcd‘ on ‘xsyy1‘ succeeded
CRS-2672: Attempting to start ‘ora.cssdmonitor‘ on ‘xsyy1‘
CRS-2676: Start of ‘ora.cssdmonitor‘ on ‘xsyy1‘ succeeded
CRS-2672: Attempting to start ‘ora.cssd‘ on ‘xsyy1‘
CRS-2672: Attempting to start ‘ora.diskmon‘ on ‘xsyy1‘
CRS-2676: Start of ‘ora.diskmon‘ on ‘xsyy1‘ succeeded
CRS-2789: Cannot stop resource ‘ora.diskmon‘ as it is not running on server ‘xsyy1‘
CRS-2676: Start of ‘ora.cssd‘ on ‘xsyy1‘ succeeded
CRS-2672: Attempting to start ‘ora.cluster_interconnect.haip‘ on ‘xsyy1‘
CRS-2672: Attempting to start ‘ora.ctssd‘ on ‘xsyy1‘
CRS-2676: Start of ‘ora.ctssd‘ on ‘xsyy1‘ succeeded
CRS-2676: Start of ‘ora.cluster_interconnect.haip‘ on ‘xsyy1‘ succeeded
CRS-2672: Attempting to start ‘ora.asm‘ on ‘xsyy1‘
CRS-2676: Start of ‘ora.asm‘ on ‘xsyy1‘ succeeded
CRS-2672: Attempting to start ‘ora.storage‘ on ‘xsyy1‘
CRS-2676: Start of ‘ora.storage‘ on ‘xsyy1‘ succeeded
CRS-2672: Attempting to start ‘ora.crf‘ on ‘xsyy1‘
CRS-2676: Start of ‘ora.crf‘ on ‘xsyy1‘ succeeded
CRS-2672: Attempting to start ‘ora.crsd‘ on ‘xsyy1‘
CRS-2676: Start of ‘ora.crsd‘ on ‘xsyy1‘ succeeded
CRS-6023: Starting Oracle Cluster Ready Services-managed resources
CRS-6017: Processing resource auto-start for servers: xsyy1
CRS-6016: Resource auto-start has completed for server xsyy1
CRS-6024: Completed start of Oracle Cluster Ready Services-managed resources
CRS-4123: Oracle High Availability Services has been started.
2013/07/01 00:38:01 CLSRSC-343: Successfully started Oracle clusterware stack
CRS-2672: Attempting to start ‘ora.asm‘ on ‘xsyy1‘
CRS-2676: Start of ‘ora.asm‘ on ‘xsyy1‘ succeeded
CRS-2672: Attempting to start ‘ora.RACCRS.dg‘ on ‘xsyy1‘
CRS-2676: Start of ‘ora.RACCRS.dg‘ on ‘xsyy1‘ succeeded
2013/07/01 00:39:51 CLSRSC-325: Configure Oracle Grid Infrastructure for a Cluster ... succeeded
节点2:
[root@xsyy2 ~]# /u01/app/12.1.0/grid/root.sh
Performing root user operation for Oracle 12c
The following environment variables are set as:
ORACLE_OWNER= grid
ORACLE_HOME= /u01/app/12.1.0/grid
Enter the full pathname of the local bin directory: [/usr/local/bin]:
Copying dbhome to /usr/local/bin ...
Copying oraenv to /usr/local/bin ...
Copying coraenv to /usr/local/bin ...
Creating /etc/oratab file...
Entries will be added to the /etc/oratab file as needed by
Database Configuration Assistant when a database is created
Finished running generic part of root script.
Now product-specific root actions will be performed.
Using configuration parameter file: /u01/app/12.1.0/grid/crs/install/crsconfig_params
2013/07/01 00:42:51 CLSRSC-363: User ignored prerequisites during installation
OLR initialization - successful
2013/07/01 00:43:18 CLSRSC-330: Adding Clusterware entries to file ‘oracle-ohasd.conf‘
CRS-4133: Oracle High Availability Services has been stopped.
CRS-4123: Oracle High Availability Services has been started.
CRS-4133: Oracle High Availability Services has been stopped.
CRS-4123: Oracle High Availability Services has been started.
CRS-2791: Starting shutdown of Oracle High Availability Services-managed resources on ‘xsyy2‘
CRS-2673: Attempting to stop ‘ora.drivers.acfs‘ on ‘xsyy2‘
CRS-2677: Stop of ‘ora.drivers.acfs‘ on ‘xsyy2‘ succeeded
CRS-2793: Shutdown of Oracle High Availability Services-managed resources on ‘xsyy2‘ has completed
CRS-4133: Oracle High Availability Services has been stopped.
CRS-4123: Starting Oracle High Availability Services-managed resources
CRS-2672: Attempting to start ‘ora.evmd‘ on ‘xsyy2‘
CRS-2672: Attempting to start ‘ora.mdnsd‘ on ‘xsyy2‘
CRS-2676: Start of ‘ora.evmd‘ on ‘xsyy2‘ succeeded
CRS-2676: Start of ‘ora.mdnsd‘ on ‘xsyy2‘ succeeded
CRS-2672: Attempting to start ‘ora.gpnpd‘ on ‘xsyy2‘
CRS-2676: Start of ‘ora.gpnpd‘ on ‘xsyy2‘ succeeded
CRS-2672: Attempting to start ‘ora.gipcd‘ on ‘xsyy2‘
CRS-2676: Start of ‘ora.gipcd‘ on ‘xsyy2‘ succeeded
CRS-2672: Attempting to start ‘ora.cssdmonitor‘ on ‘xsyy2‘
CRS-2676: Start of ‘ora.cssdmonitor‘ on ‘xsyy2‘ succeeded
CRS-2672: Attempting to start ‘ora.cssd‘ on ‘xsyy2‘
CRS-2672: Attempting to start ‘ora.diskmon‘ on ‘xsyy2‘
CRS-2676: Start of ‘ora.diskmon‘ on ‘xsyy2‘ succeeded
CRS-2789: Cannot stop resource ‘ora.diskmon‘ as it is not running on server ‘xsyy2‘
CRS-2676: Start of ‘ora.cssd‘ on ‘xsyy2‘ succeeded
CRS-2672: Attempting to start ‘ora.cluster_interconnect.haip‘ on ‘xsyy2‘
CRS-2672: Attempting to start ‘ora.ctssd‘ on ‘xsyy2‘
CRS-2676: Start of ‘ora.ctssd‘ on ‘xsyy2‘ succeeded
CRS-2676: Start of ‘ora.cluster_interconnect.haip‘ on ‘xsyy2‘ succeeded
CRS-2672: Attempting to start ‘ora.asm‘ on ‘xsyy2‘
CRS-2676: Start of ‘ora.asm‘ on ‘xsyy2‘ succeeded
CRS-2672: Attempting to start ‘ora.storage‘ on ‘xsyy2‘
CRS-2676: Start of ‘ora.storage‘ on ‘xsyy2‘ succeeded
CRS-2672: Attempting to start ‘ora.crf‘ on ‘xsyy2‘
CRS-2676: Start of ‘ora.crf‘ on ‘xsyy2‘ succeeded
CRS-2672: Attempting to start ‘ora.crsd‘ on ‘xsyy2‘
CRS-2676: Start of ‘ora.crsd‘ on ‘xsyy2‘ succeeded
CRS-6017: Processing resource auto-start for servers: xsyy2
CRS-2673: Attempting to stop ‘ora.LISTENER_SCAN1.lsnr‘ on ‘xsyy1‘
CRS-2672: Attempting to start ‘ora.ons‘ on ‘xsyy2‘
CRS-2677: Stop of ‘ora.LISTENER_SCAN1.lsnr‘ on ‘xsyy1‘ succeeded
CRS-2673: Attempting to stop ‘ora.scan1.vip‘ on ‘xsyy1‘
CRS-2677: Stop of ‘ora.scan1.vip‘ on ‘xsyy1‘ succeeded
CRS-2672: Attempting to start ‘ora.scan1.vip‘ on ‘xsyy2‘
CRS-2676: Start of ‘ora.scan1.vip‘ on ‘xsyy2‘ succeeded
CRS-2672: Attempting to start ‘ora.LISTENER_SCAN1.lsnr‘ on ‘xsyy2‘
CRS-2676: Start of ‘ora.ons‘ on ‘xsyy2‘ succeeded
CRS-2676: Start of ‘ora.LISTENER_SCAN1.lsnr‘ on ‘xsyy2‘ succeeded
CRS-6016: Resource auto-start has completed for server xsyy2
CRS-6024: Completed start of Oracle Cluster Ready Services-managed resources
CRS-4123: Oracle High Availability Services has been started.
2013/07/01 00:48:43 CLSRSC-343: Successfully started Oracle clusterware stack
2013/07/01 00:49:05 CLSRSC-325: Configure Oracle Grid Infrastructure for a Cluster ... succeeded

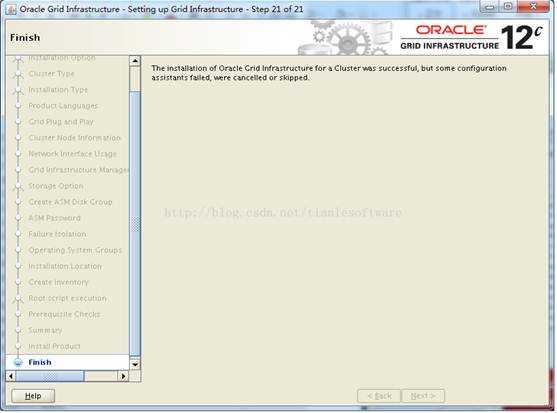
Oracle Cluster Verification 将在Oracle Database 安装中完成。
忽略错误,至此GRID 安装完成
查看状态:
检查scan配置
[grid@xsyy1 ~]$ cluvfy comp scan
[grid@xsyy1 ~]$ crsctl check cluster
[grid@xsyy1 ~]$ crsctl stat res -t
--------------------------------------------------------------------------------
Name Target StateServer State details
--------------------------------------------------------------------------------
Local Resources
--------------------------------------------------------------------------------
ora.LISTENER.lsnr
ONLINE ONLINExsyy1 STABLE
ONLINE ONLINExsyy2 STABLE
ora.RACCRS.dg
ONLINEONLINE xsyy1 STABLE
ONLINE ONLINExsyy2 STABLE
ora.asm
ONLINE ONLINExsyy1Started,STABLE
ONLINE ONLINExsyy2 Started,STABLE
ora.net1.network
ONLINE ONLINExsyy1 STABLE
ONLINE ONLINExsyy2 STABLE
ora.ons
ONLINE ONLINExsyy1 STABLE
ONLINEONLINE xsyy2 STABLE
--------------------------------------------------------------------------------
Cluster Resources
--------------------------------------------------------------------------------
ora.xsyy1.vip
1 ONLINE ONLINExsyy1 STABLE
ora.xsyy2.vip
1 ONLINE ONLINExsyy2 STABLE
ora.LISTENER_SCAN1.lsnr
1 ONLINE ONLINExsyy2 STABLE
ora.LISTENER_SCAN2.lsnr
1 ONLINE ONLINExsyy1 STABLE
ora.LISTENER_SCAN3.lsnr
1 ONLINE ONLINExsyy1 STABLE
ora.MGMTLSNR
1 ONLINE ONLINExsyy1 169.254.88.173 192.1
68.80.150,STABLE
ora.cvu
1 ONLINE ONLINExsyy1 STABLE
ora.mgmtdb
1 ONLINE ONLINExsyy1 Open,STABLE
ora.oc4j
1 ONLINEONLINE xsyy1 STABLE
ora.scan1.vip
1 ONLINE ONLINExsyy2 STABLE
ora.scan2.vip
1 ONLINE ONLINExsyy1 STABLE
ora.scan3.vip
1 ONLINE ONLINExsyy1 STABLE
--------------------------------------------------------------------------------
如果此前配置了ssh,需要在此配置load ssh key
[oracle@xsyy1 ~]$ exec /usr/bin/ssh-agent $SHELL
[oracle@xsyy1 ~]$ /usr/bin/ssh-add
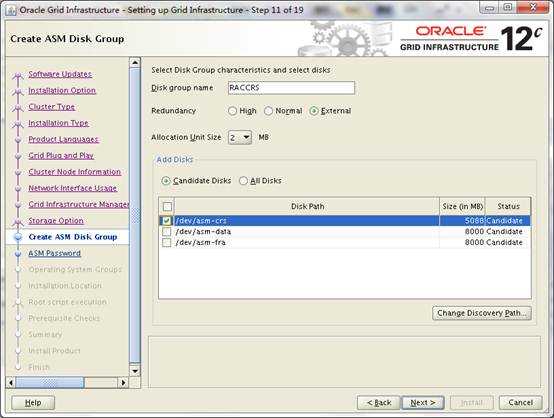
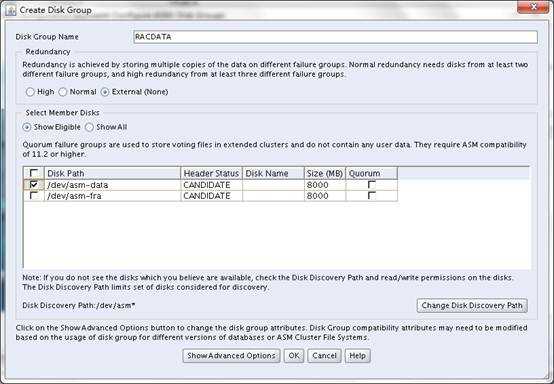
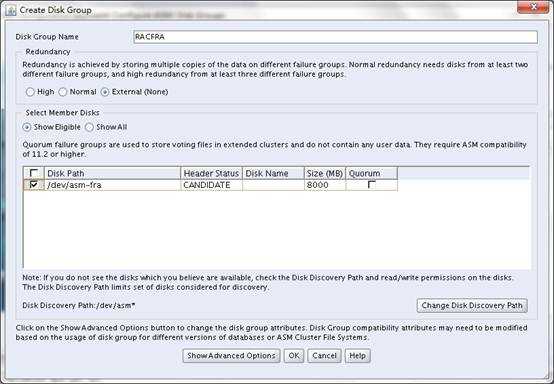
2)创建ASM磁盘组
节点1:
[grid@xsyy1 ~]$ export DISPLAY=192.168.1.1:0.0
[grid@xsyy1 ~]$ asmca
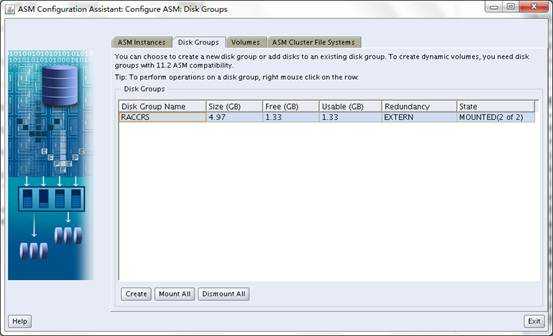
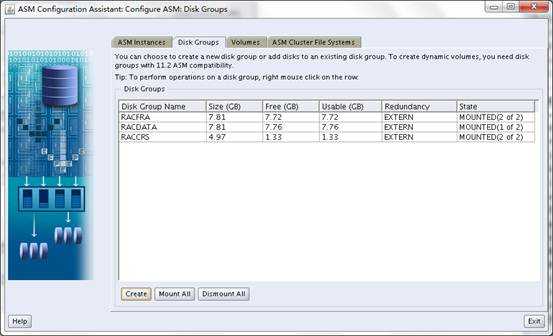
建立data和fra 磁盘组
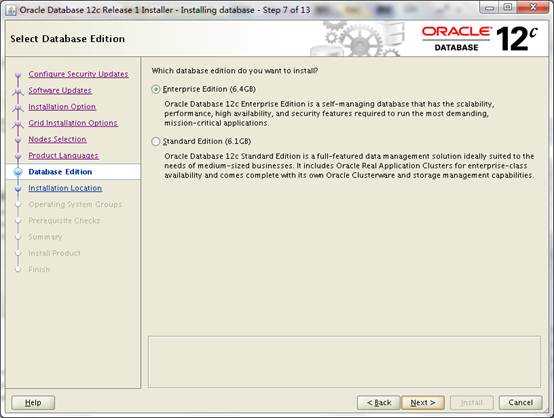
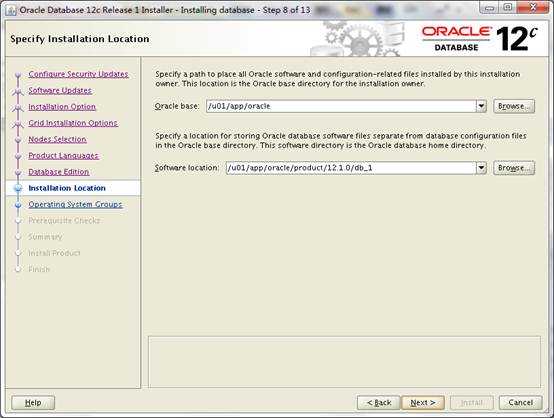
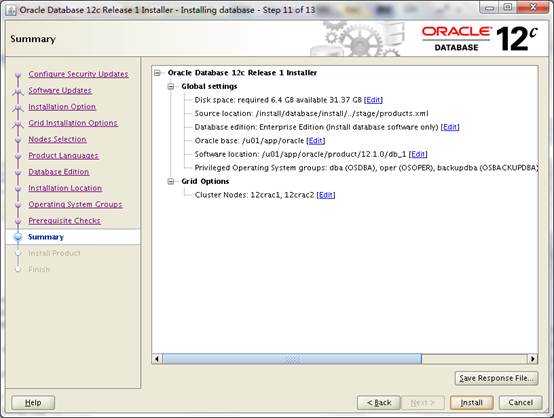
3)安装RDBMS软件
节点1:
[root@xsyy1 ~]# su - oracle
[oracle@xsyy1 ~]$ cd /install/database/
[oracle@xsyy1 database]$ export DISPLAY=192.168.1.1:0.0
[oracle@xsyy1 database]$ ./runInstaller


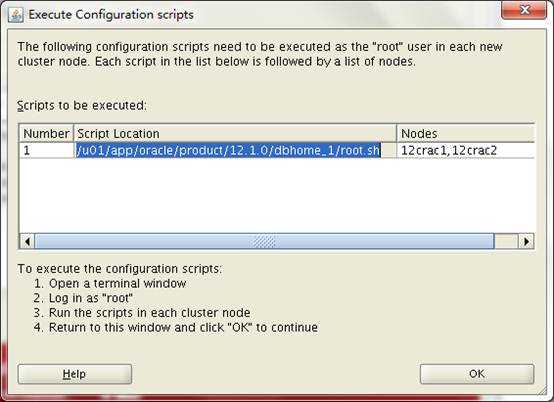
执行脚本:
节点1:
[root@xsyy1 ~]# /u01/app/oracle/product/12.1.0/dbhome_1/root.sh
Performing root user operation for Oracle 12c
The following environment variables are set as:
ORACLE_OWNER= oracle
ORACLE_HOME= /u01/app/oracle/product/12.1.0/dbhome_1
Enter the full pathname of the local bin directory: [/usr/local/bin]:
The contents of "dbhome" have not changed. No need to overwrite.
The contents of "oraenv" have not changed. No need to overwrite.
The contents of "coraenv" have not changed. No need to overwrite.
Entries will be added to the /etc/oratab file as needed by
Database Configuration Assistant when a database is created
Finished running generic part of root script.
Now product-specific root actions will be performed.
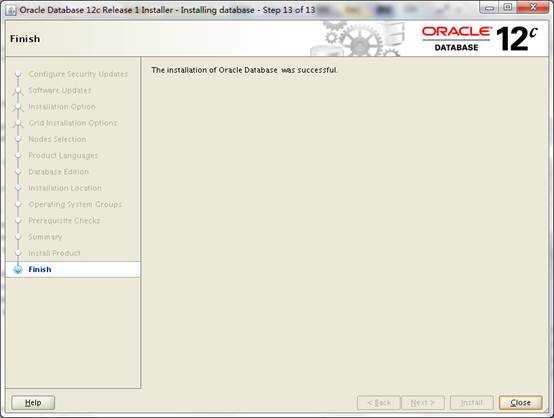
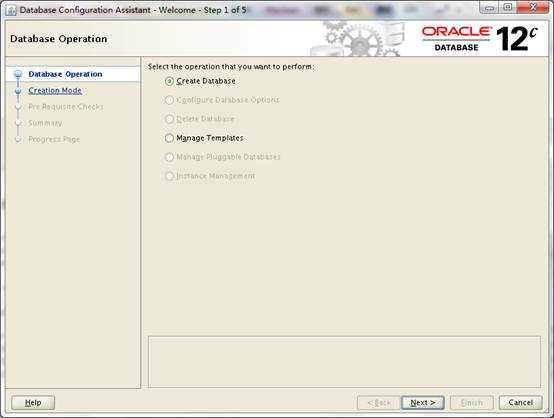
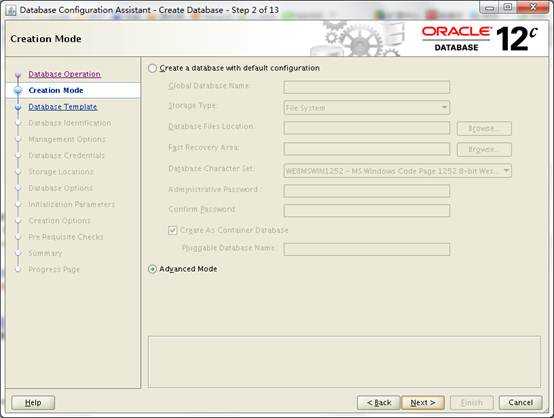
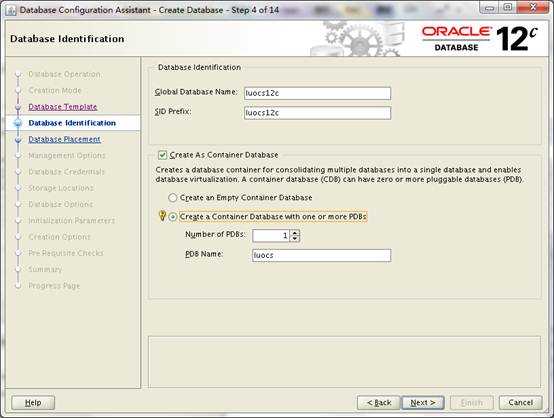
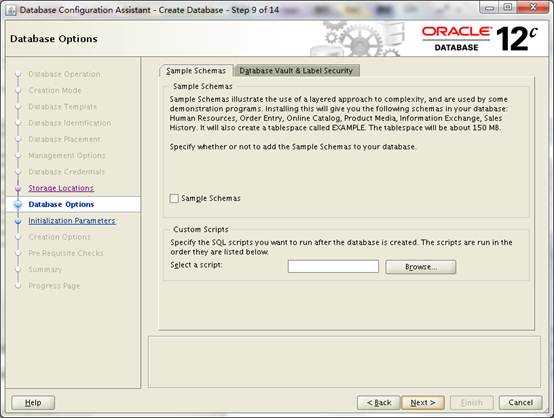
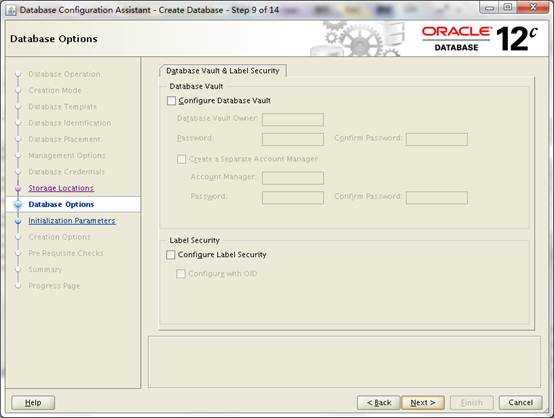
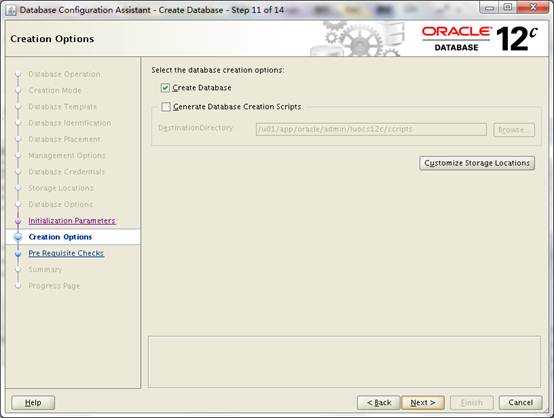
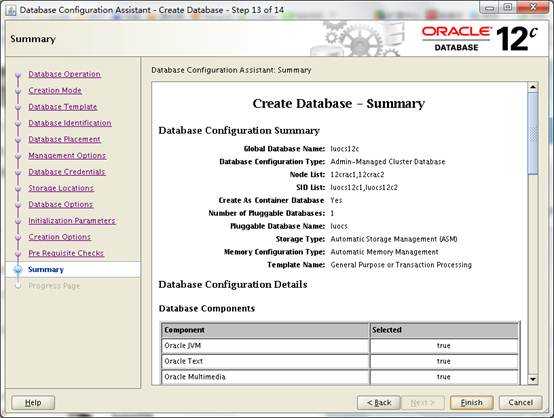
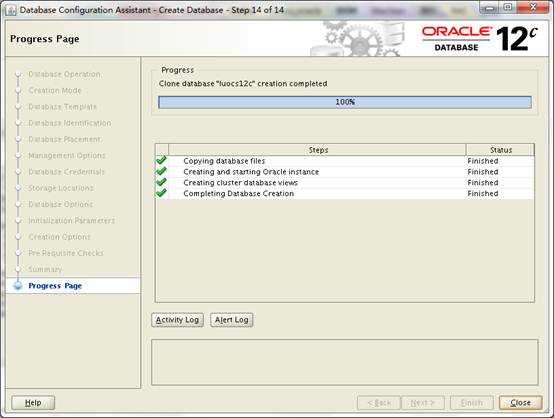
4)创建数据库
[oracle@xsyy1 ~]$ dbca
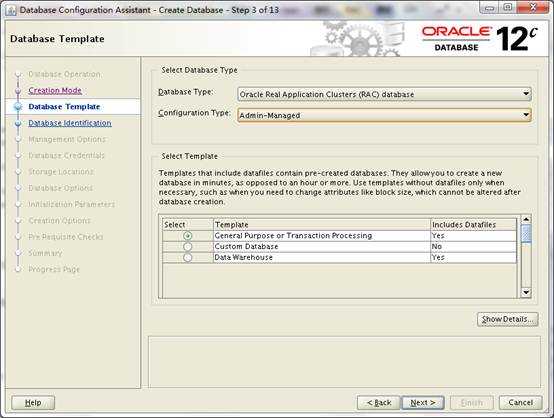
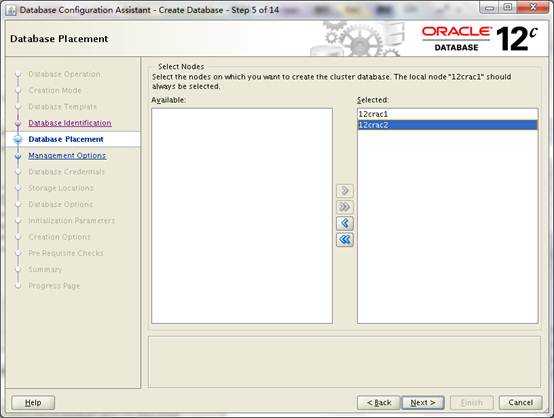
选择server pool为两个节点
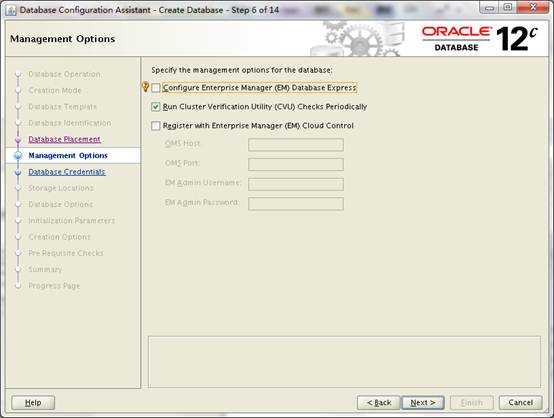
勾上此选项,系统自动完善此前grid安装中的未执行的步骤.

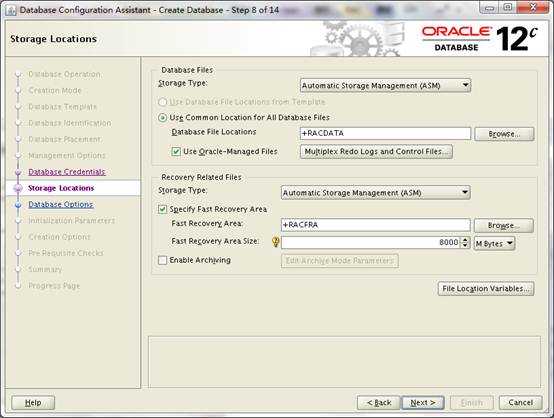
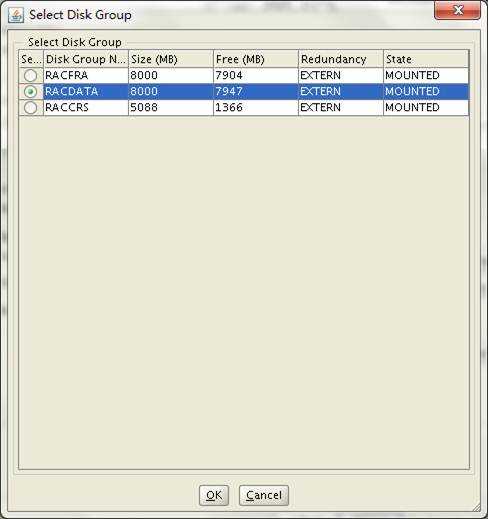
点浏览选择ASM磁盘组
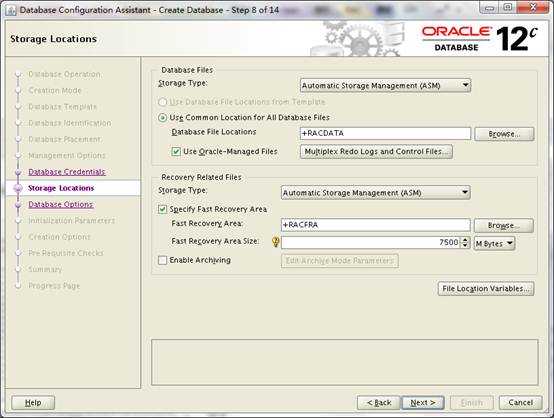
字符集根据需要进行选择

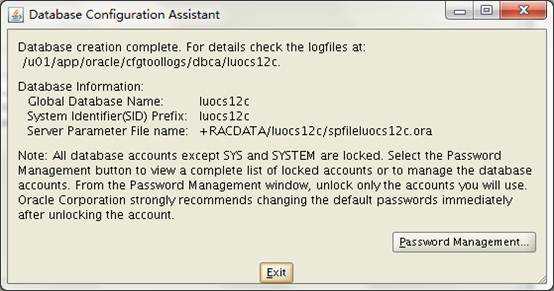
13、最终结果
资源状态:
[grid@xsyy1 ~]$ crsctl stat res -t
--------------------------------------------------------------------------------
Name Target StateServer State details
--------------------------------------------------------------------------------
Local Resources
--------------------------------------------------------------------------------
ora.LISTENER.lsnr
ONLINE ONLINExsyy1 STABLE
ONLINE ONLINExsyy2 STABLE
ora.RACCRS.dg
ONLINE ONLINExsyy1 STABLE
ONLINE ONLINExsyy2 STABLE
ora.RACDATA.dg
ONLINE ONLINExsyy1 STABLE
ONLINE ONLINExsyy2 STABLE
ora.RACFRA.dg
ONLINE ONLINExsyy1 STABLE
ONLINE ONLINExsyy2 STABLE
ora.asm
ONLINE ONLINExsyy1Started,STABLE
ONLINE ONLINExsyy2Started,STABLE
ora.net1.network
ONLINE ONLINExsyy1 STABLE
ONLINE ONLINExsyy2 STABLE
ora.ons
ONLINE ONLINExsyy1 STABLE
ONLINE ONLINExsyy2 STABLE
--------------------------------------------------------------------------------
Cluster Resources
--------------------------------------------------------------------------------
ora.xsyy1.vip
1 ONLINE ONLINExsyy1 STABLE
ora.xsyy2.vip
1 ONLINE ONLINExsyy2 STABLE
ora.LISTENER_SCAN1.lsnr
1 ONLINE ONLINExsyy2 STABLE
ora.LISTENER_SCAN2.lsnr
1 ONLINE ONLINExsyy1 STABLE
ora.LISTENER_SCAN3.lsnr
1 ONLINE ONLINExsyy1 STABLE
ora.MGMTLSNR
1 ONLINE ONLINExsyy1 169.254.88.173 192.1
68.80.150,STABLE
ora.cvu
1 ONLINE ONLINExsyy1 STABLE
ora.gdmsacs12c.db
1 ONLINE ONLINExsyy1 Open,STABLE
2 ONLINE ONLINExsyy2 Open,STABLE
ora.mgmtdb
1 ONLINE ONLINExsyy1 Open,STABLE
ora.oc4j
1 ONLINE ONLINExsyy1 STABLE
ora.scan1.vip
1 ONLINE ONLINExsyy2 STABLE
ora.scan2.vip
1 ONLINE ONLINExsyy1 STABLE
ora.scan3.vip
1 ONLINE ONLINExsyy1 STABLE
--------------------------------------------------------------------------------
RAC数据库配置信息
[grid@xsyy1 ~]$ srvctl config database -d gdmsacs12c
Database unique name: gdmsacs12c
Database name: gdmsacs12c
Oracle home: /u01/app/oracle/product/12.1.0/dbhome_1
Oracle user: oracle
Spfile: +RACDATA/gdmsacs12c/spfilegdmsacs12c.ora
Password file: +RACDATA/gdmsacs12c/orapwgdmsacs12c
Domain:
Start options: open
Stop options: immediate
Database role: PRIMARY
Management policy: AUTOMATIC
Server pools: gdmsacs12c
Database instances: gdmsacs12c1,gdmsacs12c2
Disk Groups: RACFRA,RACDATA
Mount point paths:
Services:
Type: RAC
Start concurrency:
Stop concurrency:
Database is administrator managed
[grid@xsyy1 ~]$ srvctl status database -d gdmsacs12c
Instance gdmsacs12c1 is running on node xsyy1
Instance gdmsacs12c2 is running on node xsyy2
[grid@xsyy1 ~]$ srvctl status listener
Listener LISTENER is enabled
Listener LISTENER is running on node(s): xsyy1,xsyy2
实例状态:
sys@GDMSACS12C> select instance_name, status from gv$instance;
INSTANCE_NAME STATUS
---------------- ------------
gdmsacs12c1 OPEN
gdmsacs12c2 OPEN
sys@GDMSACS12C> col open_time for a25
sys@GDMSACS12C> col name for a10
sys@GDMSACS12C> select CON_ID, NAME, OPEN_MODE, OPEN_TIME, CREATE_SCN, TOTAL_SIZE from v$pdbs;
CON_ID NAME OPEN_MODE OPEN_TIME CREATE_SCN TOTAL_SIZE
---------- ---------- ---------- ------------------------- ---------- ----------
2 PDB$SEED READ ONLY 01-JUL-13 04.33.07.302 PM 1720772 283115520
3 GDMSACS READ WRITE 01-JUL-13 04.38.41.339 PM 1934986 288358400
查看归档启用与否:
sys@GDMSACS12C> archive log list
Database log mode No Archive Mode
Automatic archivalDisabled
Archive destinationUSE_DB_RECOVERY_FILE_DEST
Oldest online log sequence 15
Current log sequence 16
现在手动开启:
[oracle@xsyy1 ~]$ srvctl stop database -d gdmsacs12c
[oracle@xsyy1 ~]$ srvctl start database -d gdmsacs12c -o mount
节点1:
[oracle@xsyy1 ~]$ sqlplus / as sysdba
SQL*Plus: Release 12.1.0.1.0 Production on Mon Jul 1 17:13:58 2014
Copyright (c) 1982, 2014, Oracle. All rights reserved.
Connected to:
Oracle Database 12c Enterprise Edition Release 12.1.0.1.0 - 64bit Production
With the Partitioning, Real Application Clusters, Automatic Storage Management, OLAP,
Advanced Analytics and Real Application Testing options
idle> alter database archivelog;
Database altered.
idle> alter database open;
Database altered.
节点2:
[oracle@xsyy2 ~]$ sqlplus / as sysdba
SQL*Plus: Release 12.1.0.1.0 Production on Mon Jul 1 17:17:07 2014
Copyright (c) 1982, 2014, Oracle. All rights reserved.
Connected to:
Oracle Database 12c Enterprise Edition Release 12.1.0.1.0 - 64bit Production
With the Partitioning, Real Application Clusters, Automatic Storage Management, OLAP,
Advanced Analytics and Real Application Testing options
SQL> alter database open;
Database altered.
这样RAC已经运行于归档模式了
sys@GDMSACS12C> archive log list
Database log mode Archive Mode
Automatic archivalEnabled
Archive destinationUSE_DB_RECOVERY_FILE_DEST
Oldest online log sequence 15
Next log sequence to archive 16
Current log sequence 16
附录A
【节点1】【节点2】相同操作。
#yum install smartmontools
#yum install oracleasm-support
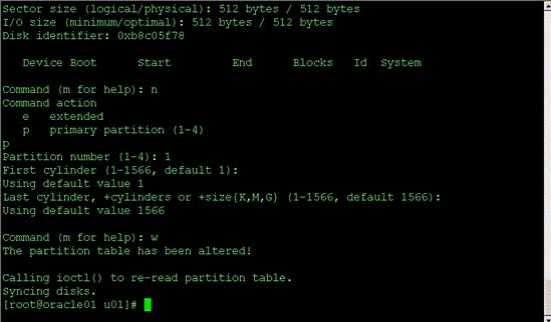
先对硬盘分区 fdisk /dev/sdb …… (根据需要 sde sdf sdg 均同样操作)
#oracle asm configure –i

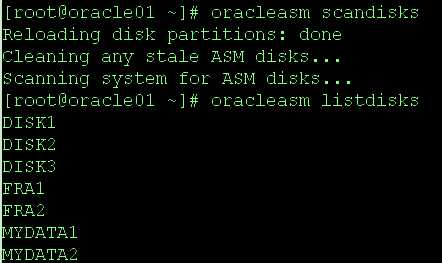
建立 ASM 盘
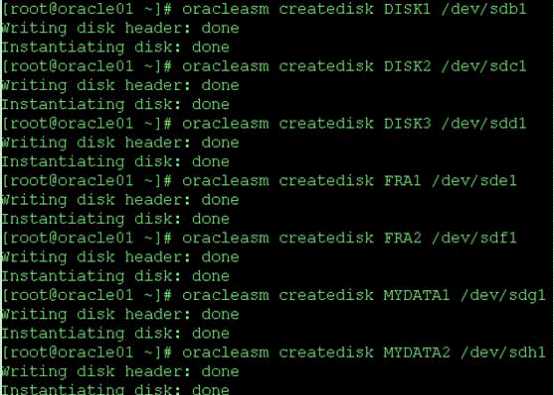
在每个节点: #oracleasm scandisks
标签:|| ubi 100% uek 127.0.0.1 hasd chm login rod
原文地址:https://www.cnblogs.com/liang545621/p/9416881.html