标签:sina ace count catalog sep 文献 target standard install
After building Presto for the first time, you can load the project into your IDE and run the server. We recommend using IntelliJ IDEA. Because Presto is a standard Maven project, you can import it into your IDE using the root pom.xml file
既然Presto的github首页推荐我们在IDEA运行服务器,那么我们就用IDEA来吧。
git clone https://github.com/prestodb/presto.gitgit checkout 0.207这里注意应该直接克隆项目,而不是下载代码导入IDEA,否则在后面构建程序的时候可能会出现关于git-comment-id-plugin的错误。
在运行项目的时候,出现例如在presto-parser模块Cannot resolve symbol ‘SqlBaseParser缺少代码的错误,这是因为源码不带anltr4的生成代码。可以在根目录运行生成anltr4代码的命令。
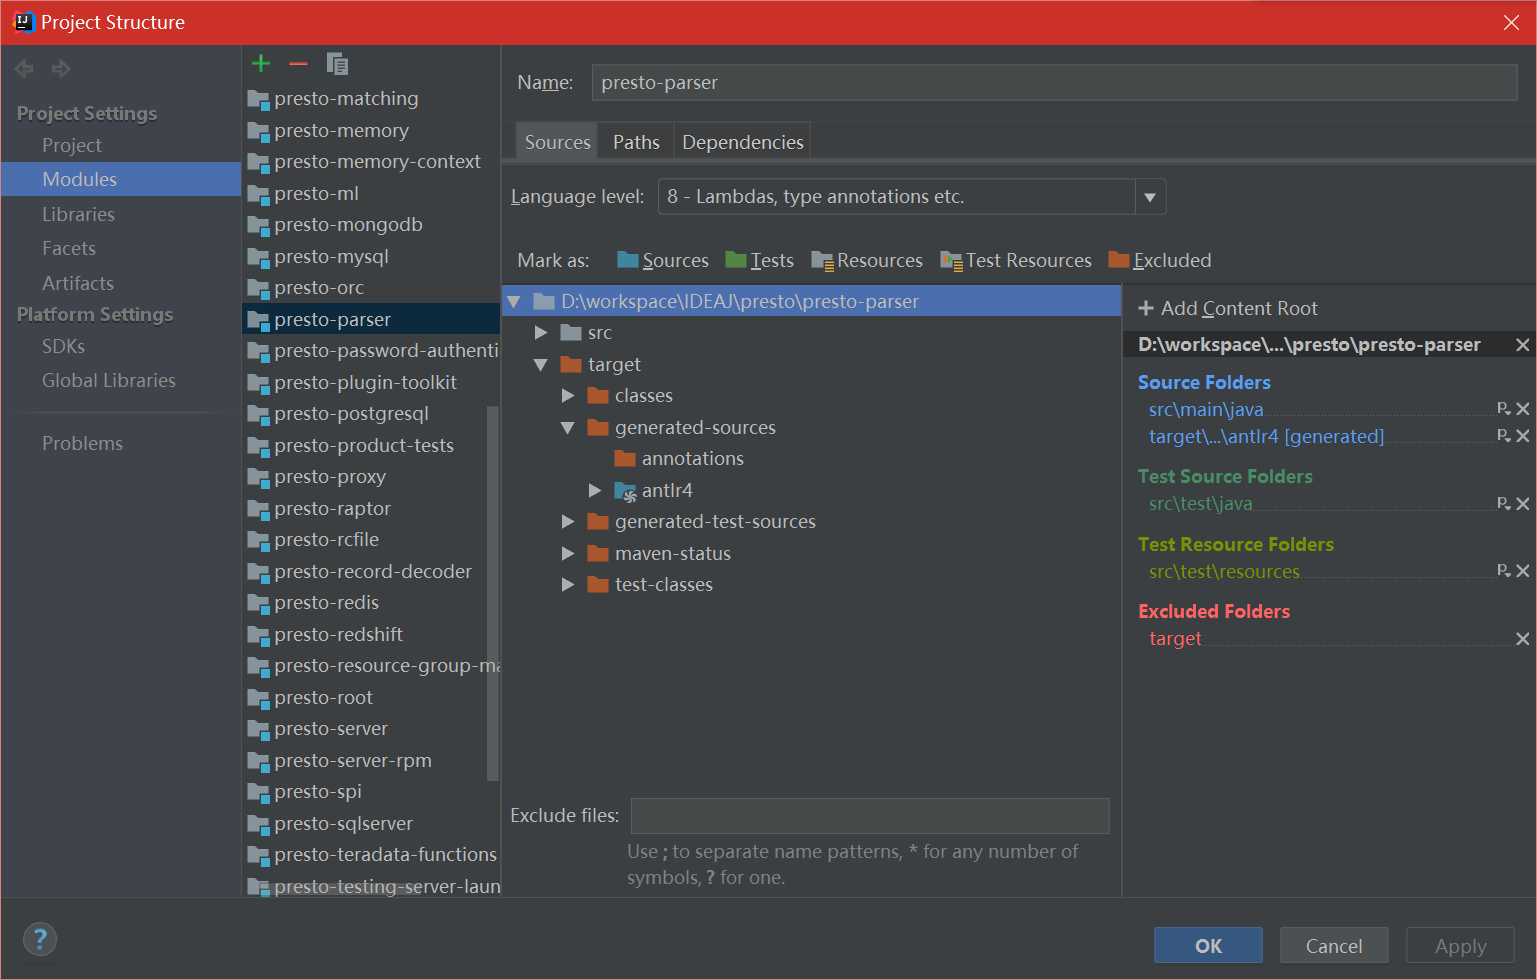
mvn antlr4:antlr4在执行命令完成后,错误依旧没有消失,我们可以看看项目的结构。File -> Project Structure -> Modules -> presto-parser,将presto-parser的target -> generated-sources ->anltr4设置为Sources

Requirements
Mac OS X or Linux
Java 8 Update 92 or higher (8u92+), 64-bit. Both Oracle JDK and OpenJDK are supported.
Maven 3.3.9+ (for building)
Python 2.4+ (for running with the launcher script)
官网好像不支持windows,不过没关系,我们动些手脚让windows也能运行。
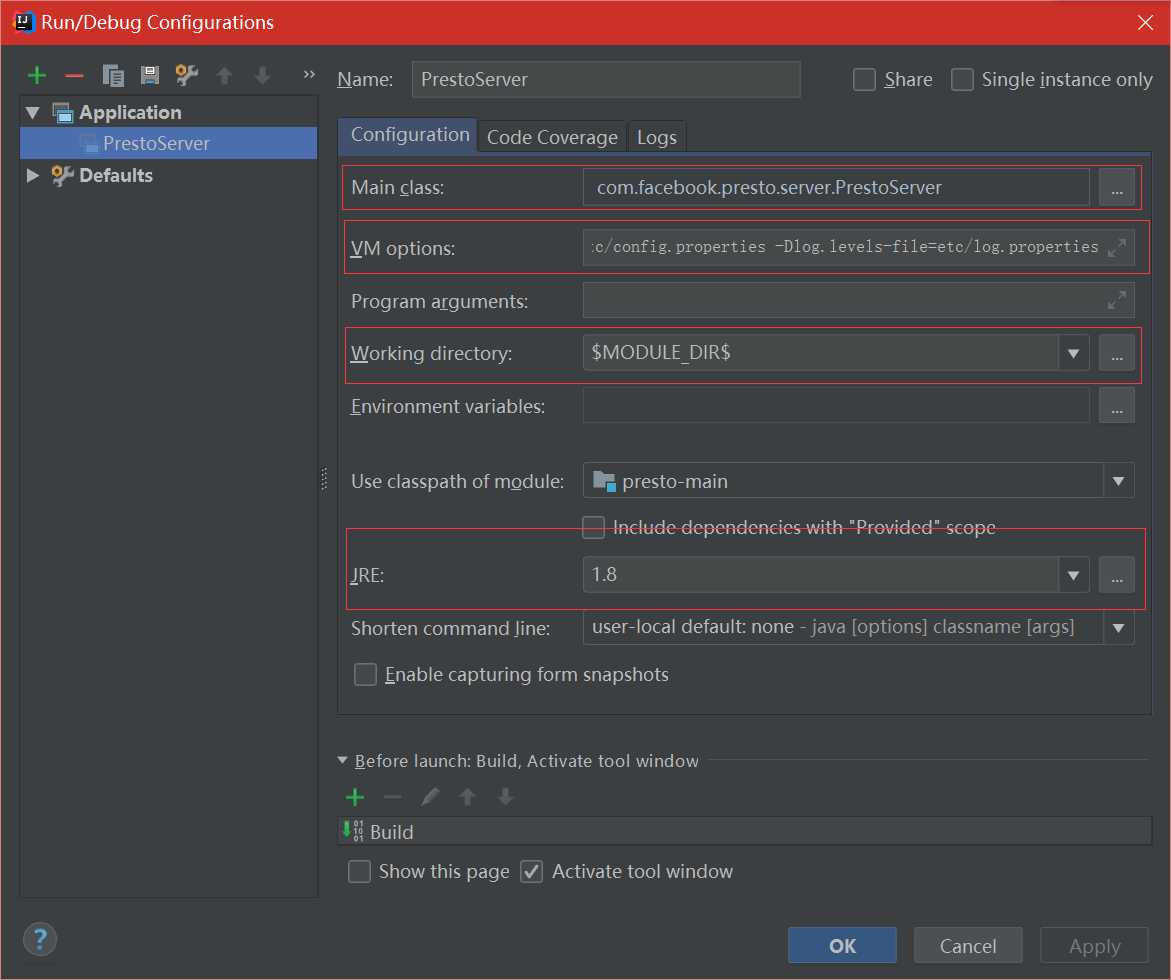
Presto comes with sample configuration that should work out-of-the-box for development. Use the following options to create a run configuration:
Main Class: com.facebook.presto.server.PrestoServer
VM Options: -ea -XX:+UseG1GC -XX:G1HeapRegionSize=32M -XX:+UseGCOverheadLimit -XX:+ExplicitGCInvokesConcurrent -Xmx2G -Dconfig=etc/config.properties -Dlog.levels-file=etc/log.properties
Working directory: $MODULE_DIR$
Use classpath of module: presto-main
按照下图设置好,就行:

注释presto-main模块PrestoSystemRequirements的代码,相关代码片段用IDEA搜索功能查找
failRequirement("Presto requires Linux or Mac OS X (found %s)", osName);修改文件描述符大小限制(手动改成10000):
private static OptionalLong getMaxFileDescriptorCount()
    {
        try {
            MBeanServer mbeanServer = ManagementFactory.getPlatformMBeanServer();
            //Object maxFileDescriptorCount = mbeanServer.getAttribute(ObjectName.getInstance(OPERATING_SYSTEM_MXBEAN_NAME), "MaxFileDescriptorCount");
            Object maxFileDescriptorCount = 10000;
            return OptionalLong.of(((Number) maxFileDescriptorCount).longValue());
        }
        catch (Exception e) {
            return OptionalLong.empty();
        }
    }
下面a/b步骤可以根据目的选一个,a步不包含任何插件,可以快速调试接口。b步包含完整插件,有完整的功能:
a、接下来,把PluginManager的插件注释掉,
        /*for (File file : listFiles(installedPluginsDir)) {
            if (file.isDirectory()) {
                loadPlugin(file.getAbsolutePath());
            }
        }

        for (String plugin : plugins) {
            loadPlugin(plugin);
}*/把etc/catalog的配置文件全部改名为.properties.bak。
b、下载presto-server-0.207.tar.gz文件,解压到任意目录,把这里边的plugin目录作为IDEA工程的plugin目录,需要打开文件PluginManagerConfig.java,做如下修改:
//    private File installedPluginsDir = new File("plugin");
private File installedPluginsDir = new File("D:\\presto-server-0.207\\plugin");etc/catalog的配置文件根据需要改名为.properties.bak。
最后运行PrestoServer。
参考文献:
https://github.com/prestodb/presto
https://blog.csdn.net/sinat_27545249/article/details/72852148
标签:sina ace count catalog sep 文献 target standard install
原文地址:https://www.cnblogs.com/ginponson/p/9500663.html