标签:开发 保存数据 javadoc 设置 package 功能 blog xxx 不能
目录
首发日期:2018-08-25
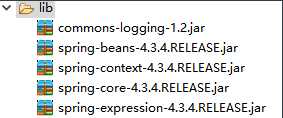
本次环境基于spring4.3.4
在官网下载:
下载地址:http://repo.spring.io/libs-release-local/org/springframework/spring/
解压压缩包:
ps:上面所引入的依赖包仅能实现基本功能,但比如spring的事务管理、aop这些还需要引入其他的包,这些包将在下面的各个模块中讲。
由于spring很多时候都是提出解决方案,所以下面介绍spring将根据解决方案来讲。
package work.domain;
public class User {
    private String name;
    private int age;
    public String getName() {
        return name;
    }
    public void setName(String name) {
        this.name = name;
    }
    public int getAge() {
        return age;
    }
    public void setAge(int age) {
        this.age = age;
    }
    @Override
    public String toString() {
        return "User [name=" + name + ", age=" + age + "]";
    }
}<?xml version="1.0" encoding="UTF-8"?>
<beans xmlns="http://www.springframework.org/schema/beans"
xmlns:xsi="http://www.w3.org/2001/XMLSchema-instance"
xsi:schemaLocation="
http://www.springframework.org/schema/beans http://www.springframework.org/schema/beans/spring-beans.xsd">
<!-- 配置bean,让spring管理这个类的创建 -->
<bean id="user" class="work.domain.User"></bean>
</beans>创建测试类,获取spring创建的对象:
package work.test;
import org.junit.Test;
import org.springframework.context.ApplicationContext;
import org.springframework.context.support.ClassPathXmlApplicationContext;
import work.domain.User;
public class Demo1 {
 @Test
 public void test1() {
     //读取上下文
     ApplicationContext context=new ClassPathXmlApplicationContext("applicationContext.xml");
     //根据id来获取spring实例化对象
     User user = (User) context.getBean("user");
     user.setName("李雷");
     user.setAge(9);
     //能够使用就说明已经被实例化了
     System.out.println(user);
 }
}
上面的示例使用可以说明spring帮我们创建了对象。
如何在applicationContext.xml中配置:
xsd约束:
spring-framework-4.2.4.RELEASE\docs\spring-framework-reference\html\xsd-configuration.html的the beans schema中。【xsd-configuration.html是spring的配置文件的所有xsd配置的参考文件,可以根据不同配置来查找到不同的xsd配置】bean
属性
示例:
<bean id="user" name="name_user" class="work.domain.User"></bean>如何在代码中获取spring创建的对象:
先读取上下文,然后利用上下文的getBean方法获取实例化对象:
public void test1() {
      //读取上下文
      ApplicationContext context=new ClassPathXmlApplicationContext("applicationContext.xml");
      //获取方法1:根据id来获取spring实例化对象
      User user = (User) context.getBean("user");
      //获取方法2:也可以根据name来获取spring对象
      User user2 = (User) context.getBean("name_user");
      user.setName("李雷");
      user.setAge(9);
      //能够使用就说明已经被实例化了
      System.out.println(user);
      System.out.println(user2);
}默认情况下,生成的类是单例的,并且spring一开启就会实例化对象。也就是说,默认情况下,在不同代码中多次使用一个类的对象都是同一个对象。【可以通过配置来改变】
applicationContext.xml的文件名是可以改变的,但默认获取的时候文件名就是这个,考虑到遵循规范,这里不讲解怎么更改获取的文件名。
spring创建类对象的本质是通过工厂来获取类对象。
由于本质是工厂模式,所以它是有利于进行接口化编程的,我们可以在配置文件中很方便地更改它的实现类。比如:
修改前:
<bean id="calc" class="work.domain.Calc">修改后(只需要修改配置文件,就能给接口提供不同的实现类):
<!-- 假如功能升级了!给它一个新的实现类。 -->
<bean id="calc" class="work.domain.SuperCalc">spring创建的对象也可以称为bean
spring帮我们实例化的有几种方式,默认是调用无参构造方法来实例化。
默认无参实例化(所以如果没有无参构造函数,将报错):
<bean id="user" name="name_user" class="work.domain.User"></bean>注入构造方法参数,带参数实例化:(这个涉及DI内容,具体后面讲)
    <bean id="user" name="name_user" class="work.domain.User">
      <!-- 向 User(String name, int age)构造方法注入参数,然后实例化  -->
      <constructor-arg name="name" value="lilei" ></constructor-arg>
      <constructor-arg name="age" value="18" ></constructor-arg>
    </bean>
调用静态实例工厂方法得到对象:
静态工厂编写
public class MyBeanFactory {
  public static User createUser() {
      return new User();
  }
}
applicationContext.xml编写
<!-- class是工厂类路径,factory-method是静态获取对象的方法 -->
     <bean id="factory_user"  class="work.factory.MyBeanFactory" factory-method="createUser"></bean>
调用非静态实例工厂方法得到对象:
工厂编写
public class MyBeanFactory {
  public  User createU() {
      return new User();
  }
}
applicationContext.xml编写
  <!-- 先实例化工厂 -->
   <bean id="myBeanFactory" class="work.factory.MyBeanFactory" ></bean>
   <!-- 利用工厂对象来获取对象,factory-bean是上面工厂bean的id,factory-method是获取对象的方法名  -->
<bean id="user" factory-bean="myBeanFactory" factory-method="createU"></bean>在上面说过了,默认情况下,Bean的创建是单例的,但是可以通过bean中的scope属性来配置Bean的创建方式(同时也有作用范围)。
scope
取值:
示例:
<bean id="userAction" class="work.action.UserAction" scope="prototype"></bean>依赖注入。依赖是指某些功能可能依赖某些属性,只有有了对应的属性才能执行功能。当使用了IOC之后,可能需要把某些属性(也包括对象)注入给生成的对象,那么可以使用DI。
DI是spring的一个很好的属性注入解决方案,如果你不使用DI的话,你可能需要使用接口或者通过继承类来完成属性注入。
使用DI之后,当通过IoC来创建对象的时候,IoC也会同时处理依赖管理,帮助我们把协助类注入到目标类中(有构造器注入、set注入等方法)。
像IoC一样,依赖注入也是有利于接口化编程的,当我们注入的属性是一个对象时,如果使用接口名来管理注入,那么我们可以很轻易地更改注入的接口实现类。
属性注入是创建对象的时候,为对象注入属性。
构造方法方式注入:要求类中必须要有与注入参数对应的构造方法
类的编写:
package work.domain;
public class User {
    private String name;
    private int age;
    private Account account;
    public User() {
        super();
    }
    public User(String name, int age) {
        super();
        this.name = name;
        this.age = age;
    }
    public String getName() {
        return name;
    }
    public void setName(String name) {
        this.name = name;
    }
    public int getAge() {
        return age;
    }
    public void setAge(int age) {
        this.age = age;
    }
    public Account getAccount() {
        return account;
    }
    public void setAccount(Account account) {
        this.account = account;
    }
}
applicationContext.xml的编写:
    <bean id="account" class="work.domain.Account"></bean>
    <bean id="user"  class="work.domain.User">
         <!--  向 User(String name, int age)构造方法注入参数,然后实例化  -->
         <!-- name是属性名,value是属性值,如果属性需要一个类对象,使用ref来注入,值为bean中的id或name -->
        <constructor-arg name="name" value="lilei" ></constructor-arg>
        <constructor-arg name="age" value="18" ></constructor-arg>
        <constructor-arg name="account" ref="account" ></constructor-arg>
    </bean>
set方法方式,要求类中必须提供注入参数对应的setter方法
类的编写:
package work.domain;
public class User {
    private String name;
    private int age;
    private Account account;
    public User() {
        super();
    }
    public User(String name, int age) {
        super();
        this.name = name;
        this.age = age;
    }
    public String getName() {
        return name;
    }
    public void setName(String name) {
        this.name = name;
    }
    public int getAge() {
        return age;
    }
    public void setAge(int age) {
        this.age = age;
    }
    public Account getAccount() {
        return account;
    }
    public void setAccount(Account account) {
        this.account = account;
    }
}
applicationContext.xml的编写:
    <bean id="account" class="work.domain.Account"></bean>
    <bean id="user"  class="work.domain.User">
         <!--  使用setter来注入参数  -->
         <!-- name是属性名,value是属性值,如果属性需要一个类对象,使用ref来注入,值为bean中的id或name -->
        <property name="name" value="织女"></property>
        <property name="age" value="1000"></property>
        <property name="account"  ref="account"></property>
    </bean>
上面提到了基本类型属性和对象类型属性的注入,由于集合类型多,所以留到这里再讲:
类的编写(包含了数组,list,set,map):
package work.domain;

import java.util.List;
import java.util.Map;
import java.util.Set;

public class CollectionBean {
  private String[] array;
  private List list;
  private Set set;
  private Map map;
  public void setArray(String[] array) {
      this.array = array;
  }
  public void setList(List list) {
      this.list = list;
  }
  public void setSet(Set set) {
      this.set = set;
  }
  public void setMap(Map map) {
      this.map = map;
  }
  public String[] getArray() {
      return array;
  }
  public List getList() {
      return list;
  }
  public Set getSet() {
      return set;
  }
  public Map getMap() {
      return map;
  }
}
applicationContext.xml编写
<bean id="collecionBean" class="work.domain.CollectionBean" >
      <!--数组类型的属性注入,name是属性名,数组的元素使用list中的value包裹,也可以使用array中的value包裹;注入的是对象的时候,可以使用ref包裹 -->
      <property name="array">
          <list>
              <value>牛郎</value>
              <value>织女</value>
          </list>
      </property>
      <!-- List类型的属性注入,name是属性名,数组的元素使用list中的value包裹 -->
      <property name="list">
          <list>
              <value>二郎神</value>
              <value>华山</value>
          </list>
      </property>
      <!-- Set类型的属性注入,name是属性名,数组的元素使用set中的value包裹 -->
      <property name="set">
          <set>
              <value>孙悟空</value>
              <value>白骨精</value>
          </set>
      </property>
      <!-- Map类型的属性注入,name是属性名,数组的元素使用entry包裹,如果注入的是对象,那么可以使用key-ref和value-ref来注入 -->
      <property name="map">
          <map>
              <entry key="爱" value="520" ></entry>
              <entry key="一生一世" value="1314" ></entry>
          </map>
      </property>
   </bean>
属性注入方式还有一种接口注入,接口注入通常使用于资源来自于外界的情况,比如当数据库连接资源来自于外部的时候就可以使用接口注入。这个知识点这里不讲,有兴趣自查。
applicationContext.xml配置
导入xsd:

applicationContext.xml中配置组件扫描:
,分隔。 <!-- 配置组件扫描,base-package是扫描的包,扫描的包下类的相关注解会把类注册成bean -->
<context:component-scan base-package="work.domain"></context:component-scan>给类加上注解@Component("person"):
package work.domain;

import org.springframework.stereotype.Component;
//添加注解
@Component("person")  //相当于在applicationContext.xml中配置<bean id="person" class="work.domain.Person" />
public class Person {
    private String name;
    private int age;
    public String getName() {
        return name;
    }
    public void setName(String name) {
        this.name = name;
    }
    public int getAge() {
        return age;
    }
    public void setAge(int age) {
        this.age = age;
    }
}
上面配置完毕,就可以像XML配置方式一样使用Context上下文获取对象了。
@Component:修饰一个类,代表这个类的对象交给spring去生成
<bean id="person" class="....." />在类上使用@Scope注解指定Bean的作用范围。
@Scope
属性:
示例:
@Component
@Scope("prototype")对于类的注解,需要开启IoC上面的组件扫描【组件扫描的时候也会扫描到用于属性注入的注解】;如果仅仅使用注解来进行属性注入,则不需要组件扫描,直接使用下面的。【很多时候,我们可能会使用xml来配置bean,注解来配置属性注入】
<!--只会扫描属性上的注解-->
<context:annotation-config></context:annotation-config>
spring AOP的底层实现技术就是动态代理技术。为了帮助了解AOP底层原理,这里基于jdk动态代理对动态代理技术简单演示。【仅作理解,不写太严谨的代码】
创建一个接口
public interface SchoolPerson {
  public void read();
  public void save();
}
定义一个实现接口的类
package work.domain;
public class Student implements SchoolPerson {
  public void read() {
      System.out.println("read");
  }
  public void save() {
      System.out.println("save");
  }
}
创建一个代理器
package work.utils;

import java.lang.reflect.InvocationHandler;
import java.lang.reflect.Method;
import java.lang.reflect.Proxy;

import work.domain.SchoolPerson;

public class JDKProxy implements InvocationHandler {
  //被代理的对象
  private SchoolPerson sp;
  //把对象传给代理器,让它生成一个代理对象
  public JDKProxy(SchoolPerson sp) {
      this.sp = sp;
  }
  //生成代理对象,并绑定代理方法
  public SchoolPerson createProxy() {
      SchoolPerson proxyStu = (SchoolPerson) Proxy.newProxyInstance(sp.getClass().getClassLoader(), sp.getClass().getInterfaces(), this);
      return proxyStu;
  }
  @Override
  public Object invoke(Object proxy, Method method, Object[] args) throws Throwable {
      if(method.getName().equals("save")) {
          System.out.println("增强功能执行---。");
          return  method.invoke(sp, args);
      }
      return method.invoke(sp, args);
  }
}
测试:
package work.test;
import org.junit.Test;
import work.domain.SchoolPerson;
import work.domain.Student;
import work.utils.JDKProxy;

public class Demo2 {
  @Test
  public void test1() {
      SchoolPerson sp=new Student();
      JDKProxy proxy = new JDKProxy(sp);
      SchoolPerson createProxy = proxy.createProxy();
        //调用方法,测试是否被增强
      createProxy.save();
      /*测试结果:
       * 增强功能执行---。
          save
       */
  }
}
前置通知before:在目标方法之前执行通知里面的操作
正常返回通知after-returning:目标方法正常执行完成之后,进行通知里面的操作
环绕通知around:目标方法执行之前和目标方法执行完成之后,进行通知里面的操作
异常抛出通知after-throw:发生异常时,进行通知里面的操作
后置(最终)通知after:运行完成时,无论是否发生异常,都进行通知里面的操作
五种通知的执行顺序为: 前置通知→环绕通知→后置通知→正常返回通知/异常抛出通知
编写一个接口:
package work.dao;
public interface StudentDao {
    public void read();
    public void save();
}
编写一个接口的实现类:
package work.dao.impl;
import work.dao.StudentDao;
public class StudenDaoImpl implements StudentDao {
    @Override
    public void read() {
        System.out.println("read");
    }
    @Override
    public void save() {
        System.out.println("save");
    }
}
编写一个切面类,用于调用切面类的方法对目标对象增强:
package work.utils;

import org.aspectj.lang.ProceedingJoinPoint;

public class MyAspect {
    public void before() {
        System.out.println("before。。。");
    }
    public void after() {
        System.out.println("after。。。");
    }
    public void afterReturn() {
        System.out.println("afterReturn。。。");
    }
    public void around(ProceedingJoinPoint pj) throws Throwable {
        System.out.println("around in。。。");
        pj.proceed();
        System.out.println("around out。。。");
    }
    public void afterThrow() {
        System.out.println("afterThrow。。。");
    }
}
配置applicationContext.xml文件
导入xsd,他在xsd-configuration.html的the aop schema中(如果你有其他功能,注意进行保留,在原来的基础上增加aop的xsd)
<?xml version="1.0" encoding="UTF-8"?>
<beans xmlns="http://www.springframework.org/schema/beans"
    xmlns:xsi="http://www.w3.org/2001/XMLSchema-instance"
    xmlns:aop="http://www.springframework.org/schema/aop" xsi:schemaLocation="
        http://www.springframework.org/schema/beans http://www.springframework.org/schema/beans/spring-beans.xsd
        http://www.springframework.org/schema/aop http://www.springframework.org/schema/aop/spring-aop.xsd">
</beans>
把接口实现类交给Spring去管理
<!-- 把目标实现类交给spring管理 -->
   <bean id="studentDao" class="work.dao.impl.StudenDaoImpl"></bean>
把切面交给Spring去管理
<!-- 把切面类交给spring管理 -->
  <bean id="myAspect" class="work.utils.MyAspect"></bean>
配置AOP
    <!-- 配置AOP -->
    <aop:config>
        <!-- 配置切点,配置哪些类的哪些方法需要增强 -->
        <aop:pointcut expression="execution(* work.dao.impl.StudenDaoImpl.*(..))" id="pointcut1"/>
        <!-- 配置切面 -->
        <aop:aspect ref="myAspect">
            <aop:before method="before" pointcut-ref="pointcut1"/>
            <aop:after method="after"  pointcut-ref="pointcut1" />
            <aop:after-returning method="afterReturn"  pointcut-ref="pointcut1"  />
            <aop:around method="around"  pointcut-ref="pointcut1" />
        </aop:aspect>
    </aop:config>
编写测试方法:
//测试AOP
    @Test
    public void test2() {
        ApplicationContext context=new ClassPathXmlApplicationContext("applicationContext.xml");
        StudentDao studentDao = (StudentDao) context.getBean("studentDao");
        studentDao.read();
} <!-- aop:config是配置AOP的顶层标签 -->
<aop:config>
<!-- aop:pointcut配置切点,配置哪些类的哪些方法需要增强 -->
<aop:pointcut expression="..." id="..."/>
<!-- aop:aspect配置切面 -->
<aop:aspect ref="myAspect">
<!--配置对于切点怎么增强 -->
<aop:before method="..." pointcut-ref="..."/>
<aop:after method="..." pointcut-ref="..." />
<aop:after-returning method="..." pointcut-ref="..." />
<aop:around method="..." pointcut-ref="..." />
</aop:aspect>
</aop:config>在xml中,用<aop:pointcut expression="..." id="..."/>来声明一个切点,使得增强可以针对一个切点来进行。其中id是用于标识一个切点的;expression是用来表示切点的位置的,表示增强用于哪个类的哪个方法上。
expression="execution(访问修饰符 返回类型 包名.类名.方法名(参数) "*来代表任意返回值类型的*来代表任意包任意类,但注意要符合层次比如work.demo.dao可以用*.*.*代替*来代表任意方法public void com.domain.Custom.save(..)、 * *.*.*.save(..)在xml中,用<aop:aspect ref="..."></aop:aspect>来声明一个切面,声明切面怎么对切点增强。
<aop:before method="调用的方法" pointcut-ref="切点id"/><aop:after method="调用的方法" pointcut-ref="切点id" /><aop:around method="调用的方法" pointcut-ref="切点id" /><aop:after-returning method="调用的方法" pointcut-ref="切点id" /><aop:after-throwing method="调用的方法" pointcut-ref="切点id" />切面类是用来对切点增强的,在xml中配置的通知类型的method就是切面类中的方法名。
通知类型有不同的作用,所以切面类也需要规范写法。
前置通知before可以用来获取切点信息,在方法中需要定义一个形参JoinPoint pj,这个形参会自动传入。
public void before(JoinPoint jp) {
        System.out.println("before。。。"+jp);
    }
正常通知after-returning既可以用来获取切点信息,也可以获取目标方法的返回值。如果在目标方法中进行了返回,可以在xml中使用returning属性来指明存储到哪个变量中。
<aop:after-returning method="afterReturn" pointcut-ref="pointcut1" returning="result" />【returning中的值是通知中的形参的名字。通知中通过形参来获取目标方法的返回值】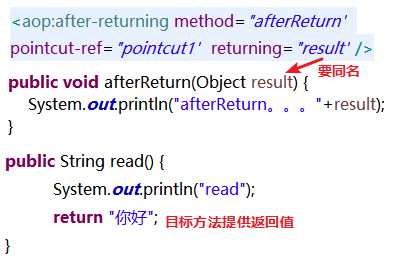
return pj.proceed();环绕通知可以用来拦截方法,所以它需要“放行”才能正常环绕,在方法中需要定义一个形参ProceedingJoinPoint pj(会自动传入值),然后pj.proceed()就可以放行了。
public void around(ProceedingJoinPoint pj) throws Throwable {
        System.out.println("around in。。。");
        Object obj=pj.proceed();
        System.out.println("around out。。。");
        return obj;
    }
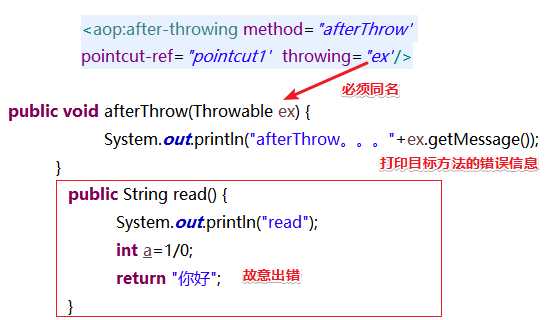
异常抛出通知可以获取目标方法的异常信息
在xml中开启AOP自动代理【其实也可以全注解配置--可以创建一个java类来进行配置,但这里不讲。】
<aop:aspectj-autoproxy></aop:aspectj-autoproxy><!-- 这个标签与bean同级,不要配错了。 -->使用@Aspect来注解一个类,Spring就会认为这个类是一个切面类。使用@Before来注解一个方法,Spring就会把这个方法当成切面类的前置通知。
package work.utils;

import org.aspectj.lang.annotation.Aspect;
import org.aspectj.lang.annotation.Before;
//注解,标明这个是一个切面类
@Aspect
public class MyAspect {
    //前置通知
    @Before(value="execution(* work.dao.impl.StudenDaoImpl.*(..))")
    public void before() {
        System.out.println("before。。。");
    }
}
这样之后,获取的对象就是被AOP前置增强了的。
当在通知中同时声明一个切点的时候,使用的是切点表达式,可以参考上面XML中的切点表达式的写法。
除了切点表达式,还可以使用注解声明切点,然后在通知是使用切点名即可。
使用@Pointcut注解来声明切点,它使用在方法上,这个方法是没有意义的,可以为空方法,方法名相当于切点的ID。Pointcut的值为切点表达式。可以在通知中使用 类名.方法名() 来指向一个切点。
package work.utils;

import org.aspectj.lang.annotation.Aspect;
import org.aspectj.lang.annotation.Before;
import org.aspectj.lang.annotation.Pointcut;
//注解,标明这个是一个切面类
@Aspect
public class MyAspect {
  @Pointcut(value="execution(* work.dao.impl.StudenDaoImpl.*(..))")
  public void pointcut1() {}
//    @Before(value="execution(* work.dao.impl.StudenDaoImpl.*(..))")
  @Before(value="MyAspect.pointcut1()")
  public void before() {
      System.out.println("before。。。");
  }
}这里以保存数据为例:
@Test
    public void test3() {
        //创建简单连接池
        SimpleDriverDataSource dataSource = new SimpleDriverDataSource();
        dataSource.setDriverClass(com.mysql.jdbc.Driver.class);
        dataSource.setUrl("jdbc:mysql://localhost:3306/spring");
        dataSource.setUsername("root");
        dataSource.setPassword("123456");
        //获取jdbc模板
        JdbcTemplate jdbcTemplate = new JdbcTemplate(dataSource);
        //操作数据库
        jdbcTemplate.update("insert into userinfo values(null,?,?) ","李雷",20);
}新增、修改、删除:jdbc模板的的增删改主要是通过update方法来与数据库交互的。
public void test4() {
        //获取jdbc模板
        ApplicationContext context = new ClassPathXmlApplicationContext("applicationContext.xml");
        JdbcTemplate jdbcTemplate = (JdbcTemplate) context.getBean("jdbcTempldate");
        //操作数据库
        jdbcTemplate.update("insert into userinfo values(null,?,?) ","韩雷",20);
        jdbcTemplate.update("delete from userinfo where id=3");
        jdbcTemplate.update("update userinfo set name='地雷' where id=?", 4);
    }
查询:
查询主要依靠query方法和queryForObject方法,他们的使用与DbUtils中的查询使用类似,都是需要传入一个结果集处理对象
下面只给出一个小例子,基本跟DbUtils的用法没什么区别,所以你也可以自己把它封装到对象中
    @Test
    public void test5() {
        //获取jdbc模板
        ApplicationContext context = new ClassPathXmlApplicationContext("applicationContext.xml");
        JdbcTemplate jdbcTemplate = (JdbcTemplate) context.getBean("jdbcTempldate");
        //操作数据库
        jdbcTemplate.query("select * from userinfo", new RowMapper() {
            @Override
            public Object mapRow(ResultSet rs, int rowNum) throws SQLException {
                String name=rs.getString("name");
                int age=rs.getInt("age");
                System.out.println(name+":"+age);
                return null;
            }
        });
    }
queryForObject可以用来获取单个数据,也可以用来像query一样用结果集处理对象来处理数据
@Test
    public void test5() {
        //获取jdbc模板
        ApplicationContext context = new ClassPathXmlApplicationContext("applicationContext.xml");
        JdbcTemplate jdbcTemplate = (JdbcTemplate) context.getBean("jdbcTempldate");

        Long num = jdbcTemplate.queryForObject("select count(*) from userinfo",Long.class);
        System.out.println(num);
    }
上面讲了jdbc模板的使用没有涉及spring管理jdbc模板,但不要忘了jdbc模板也可以交给spring去管理。
<!-- class里面写dbcp的类,使用dataSource获取的时候就是dbcp连接池对象 -->
    <bean id="dataSource" class="org.apache.commons.dbcp.BasicDataSource">
        <!-- 由于里面有很多setter,可以直接属性注入 -->
        <property name="driverClassName" value="com.mysql.jdbc.Driver" ></property>
        <property name="url" value="jdbc:mysql://localhost:3306/spring" ></property>
        <property name="username" value="root" ></property>
        <property name="password" value="123456" ></property>
    </bean>

    <bean id="jdbcTempldate" class="org.springframework.jdbc.core.JdbcTemplate">
        <!-- jdbc模板需要数据库连接池,这里注入一个dbcp的连接池对象 -->
        <property name="dataSource" ref="dataSource"></property>
</bean>如果你之前学过第三方数据库连接池的配置的话,你应该了解到他们都是DataSource接口的实现类,再想想上面的IoC,所以其实Spring中配置数据库资源就是将连接池类交给Spring去管理。(如果是在代码中创建数据库连接资源的话,像普通的编写即可,跟Spring没关系)
<!-- class里面写dbcp的类,使用dataSource获取的时候就是dbcp连接池对象 -->
    <bean id="dataSource" class="org.apache.commons.dbcp.BasicDataSource">
        <!-- 由于里面有很多setter,可以直接属性注入 -->
        <property name="driverClassName" value="com.mysql.jdbc.Driver" ></property>
        <property name="url" value="jdbc:mysql://localhost:3306/spring" ></property>
        <property name="username" value="root" ></property>
        <property name="password" value="123456" ></property>
</bean><!-- class里面写c3p0的类,使用dataSource获取的时候就是c3p0连接池对象 -->
<bean id="dataSource" class="com.mchange.v2.c3p0.ComboPooledDataSource">
<!-- 由于里面有很多setter,可以直接属性注入 -->
<property name="driverClass" value="com.mysql.jdbc.Driver" ></property>
<property name="jdbcUrl" value="jdbc:mysql://localhost:3306/spring" ></property>
<property name="user" value="root" ></property>
<property name="password" value="123456" ></property>
</bean>在上面的连接池配置过程中,你可能会发现一个问题,以往会使用配置文件来解决在代码中把参数写成固定值的问题,在上面中也是使用了固定值,那么怎么使用外部配置文件来解决这个问题呢?
引入Property配置文件:【注意一下下面标签是以context开头的,所以它需要什么xsd,你懂的】
<context:property-placeholder location="classpath:jdbc.properties" />根据配置文件中的key【要求key是点分的多单词,测试过单个单词无法获取】,引用配置文件中的参数:
<bean id="dataSource" class="com.mchange.v2.c3p0.ComboPooledDataSource">
      <property name="driverClass" value="${jdbc.driverClass}" ></property>
      <property name="jdbcUrl" value="${jdbc.url}" ></property>
      <property name="user" value="${jdbc.username}" ></property>
      <property name="password" value="${jdbc.password}" ></property>
  </bean>
给一下配置文件的写法:
jdbc.driverClass=com.mysql.jdbc.Driver
jdbc.url=jdbc:mysql://localhost:3306/spring
jdbc.username=root
jdbc.password=123456PlatformTransactionManager:一个接口,spring用于管理事务
TransactionDefinition:事务定义信息,包含了一些关于事务管理的变量(隔离级别、传播行为等等),spring会把方法\类中配置的事务相关属性装载到TransactionDefinition中。
TransactionStatus:事务的状态
平台事务管理器PlatformTransactionManager会根据事务定义信息TransactionDefinition的信息来进行事务管理。事务管理中产生的状态信息存储到TransactionStatus中。
导入事务管理的xsd:
<?xml version="1.0" encoding="UTF-8"?>
<beans xmlns="http://www.springframework.org/schema/beans"
        xmlns:xsi="http://www.w3.org/2001/XMLSchema-instance"
        xmlns:aop="http://www.springframework.org/schema/aop"
        xmlns:tx="http://www.springframework.org/schema/tx" xsi:schemaLocation="
        http://www.springframework.org/schema/beans http://www.springframework.org/schema/beans/spring-beans.xsd
        http://www.springframework.org/schema/tx http://www.springframework.org/schema/tx/spring-tx.xsd
        http://www.springframework.org/schema/aop http://www.springframework.org/schema/aop/spring-aop.xsd">

</beans>
配置事务管理器
<!--使用事务管理器,必须注入一个dataSource -->
<bean id="transactionManager" class="org.springframework.jdbc.datasource.DataSourceTransactionManager">
   <property name="dataSource" ref="dataSource" />
</bean>
配置事务的增强,相当于给方法配置一个事务管理增强。
 <!-- 把spring管理的transactionManager赋给transaction-manager属性 -->
     <tx:advice id="txAdvice" transaction-manager="transactionManager" >
       <tx:attributes>
           <!-- name写要进行事务管理的方法名 -->
           <tx:method name="transfer"  />
       </tx:attributes>
    </tx:advice>
AOP配置,把上面的事务增强配置给哪个切点,这些切点就是需要事务管理的地方:
  <aop:config>
     <!-- 这里的切点注意要写把多个数据库操作集合起来的方法 -->
     <aop:pointcut expression="execution(* work.service.impl.AccountServiceImpl.*(..))" id="pointcut1"/>
     <aop:advisor advice-ref="txAdvice" pointcut-ref="pointcut1"/>
  </aop:config>
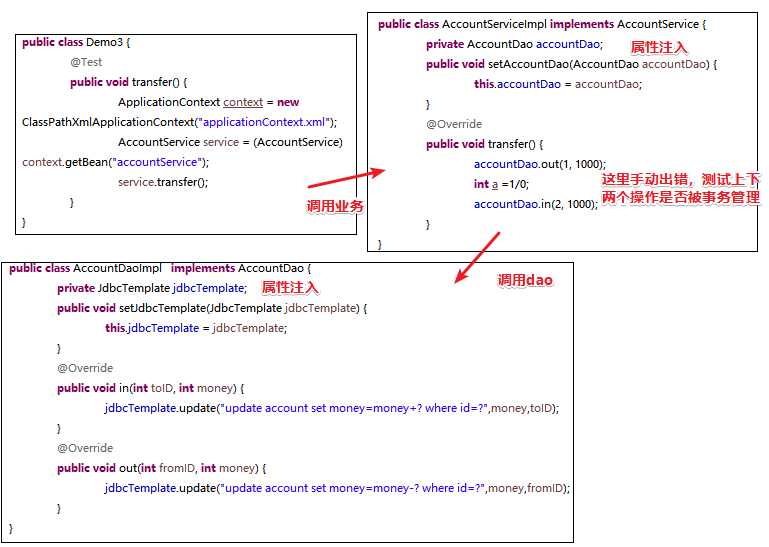
测试类的编写:
导入事务管理tx和aop的xsd
配置事务管理器
<!--使用事务管理器,必须注入一个dataSource -->
<bean id="transactionManager" class="org.springframework.jdbc.datasource.DataSourceTransactionManager">
   <property name="dataSource" ref="dataSource" />
</bean>
开启注解事务
<tx:annotation-driven transaction-manager="transactionManager"/>在业务层增加@Transactional注解:
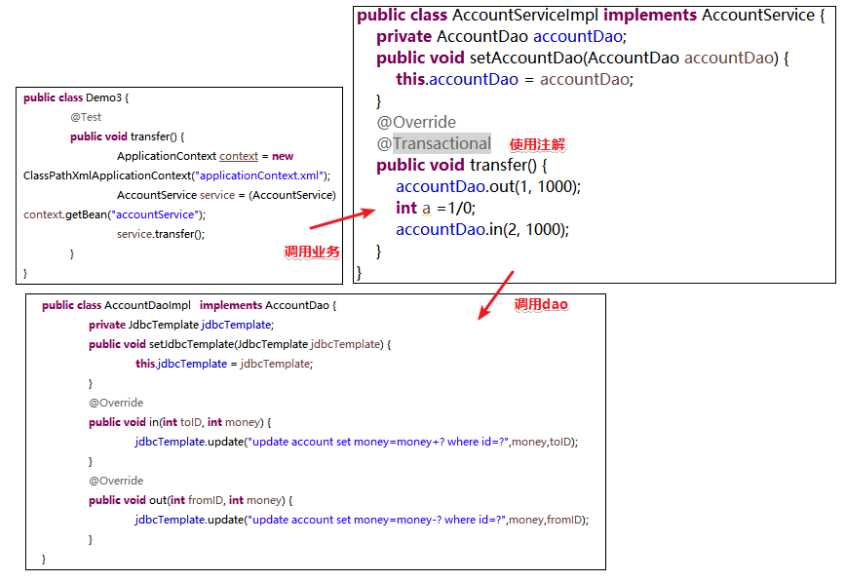
事务管理器配置
spring管理事务依靠事务管理器,所以事务管理器是必须的,无论注解式还是XML式都需要。对于MyBatis和JDBC可以使用DataSourceTransactionManager作为实现类,对于Hibernate可以使用HibernateTransactionManager作为实现类
事务管理器必须注入一个dataSource
<!--使用事务管理器,必须注入一个dataSource -->
<bean id="transactionManager" class="org.springframework.jdbc.datasource.DataSourceTransactionManager">
    <property name="dataSource" ref="dataSource" />
</bean>
XML式中事务增强的配置
method配置:
*作为后缀,代表匹配某一些特定前缀开头的方法,比如save*可以匹配saveCustomer,saveStudent;单写*的时候的,代表匹配所有方法。 <!-- 把spring管理的transactionManager赋给transaction-manager属性 -->
<tx:advice id="txAdvice" transaction-manager="transactionManager" >
<tx:attributes>
<!-- name写要进行事务管理的方法名 -->
<tx:method name="transfer" />
</tx:attributes>
</tx:advice>注解式事务管理的开启,使用注解式事务管理,除了创建事务管理器,还需要开启事务管理的注解管理,<tx:annotation-driven transaction-manager="transactionManager"/>
注解式中@Transactional的位置
隔离级别配置:【隔离级别分别解决了不同的读写问题,由于是SQL的内容,所以这里不介绍,只讲用法】
@Transactional(isolation=Isolation.DEFAULT)<tx:method name="transfer" isolation="DEFAULT" />传播行为配置:(传播行为用来处理多个事务时的叠加问题--当方法相互调用时可能会发生,某个方法有了事务,另一个方法也有事务,那么用哪个事务管理?)
<tx:method name="*" propagation="REQUIRED" />@Transactional(propagation=Propagation.REQUIRED)jdbcTemplate注入问题:你可能会发现每一个Dao你都要注入一次jdbcTemplate,那样子貌似太麻烦了。spring提供了一个JdbcDaoSupport,我们的Dao可以继承这个类,这个类中已经包含了jdbcTemplate。除此之外,如果给这个类注入一个连接池,它会自动根据连接池来生成jdbcTemplate(这样我们就不需要把jdbcTemplate交给spring管理了,直接在dao中注入一个dataSource即可)。
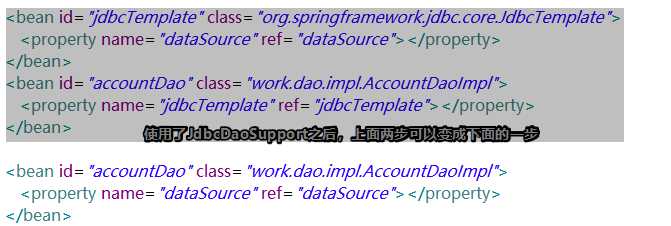
有时候你可能不想在一个applicationContext.xml中配置所有的属性,你想建立多个applicationContext.xml来配置不同的属性。
配置文件名默认名字是applicationContext.xml,其实你可以改成别名字。你可能留意到new ClassPathXmlApplicationContext()时需要给一个名字,所以其实你可以改成其他的。
在new ClassPathXmlApplicationContext()中其实可以读取多个配置文件
ApplicationContext context = new ClassPathXmlApplicationContext("applicationContext.xml","applicationContext2.xml");如果你不想在ew ClassPathXmlApplicationContext()时导入多个,也可以在一个配置文件中引入多个配置文件,例如在applicationContext.xml中使用import就可以引入别的配置文件
<import resource="applicationContext2.xml"/>解决方案其实我们都知道,重点是提前创建,然后存储起来,需要的时候再获取。
使用ServletContextListener 监听ServletContext 对象的创建和销毁。
配置spring核心监听器,让监听器提前创建工厂。监听器会帮我们把工厂存储到ServletContext 中。
引入jar包:spring-web.jar
在web.xml中配置监听器:
  <listener>
        <listener-class>org.springframework.web.context.ContextLoaderListener</listener-class>
  </listener>
  <!-- 配置参数,告诉核心过滤器读取哪个文件来创建工厂 -->
  <context-param>
        <param-name>contextConfigLocation</param-name>
        <param-value>classpath:applicationContext.xml</param-value>
  </context-param>
获取ServletContext ,然后利用WebApplicationContext context= WebApplicationContextUtils.getWebApplicationContext(sc);获取工厂 :【这里为了帮助了解,使用基础的servlet,而不是框架】
public class HelloServelet extends HttpServlet {
    @Override
    protected void doGet(HttpServletRequest req, HttpServletResponse resp) throws ServletException, IOException {
        //获取ServletContext
        ServletContext sc=req.getServletContext();
        //传入ServletContext,获取工厂
        WebApplicationContext context= WebApplicationContextUtils.getWebApplicationContext(sc);
        //通过工厂获取对象
        Person person = (Person) context.getBean("person");
        person.setName("丁典");
        //能使用就说明获取成功
        System.out.println(person);
    }
}标签:开发 保存数据 javadoc 设置 package 功能 blog xxx 不能
原文地址:https://www.cnblogs.com/progor/p/9534626.html