标签:执行 服务器 resource effort def tag message 二进制 abs
内置的maven插件提供了常见的命令, 可以在以下位置找到对应的包: .m2\repository\org\apache\maven\plugins
<plugins>
    <!--静态代码bug扫描-->
    <plugin>
        <groupId>org.codehaus.mojo</groupId>
        <artifactId>findbugs-maven-plugin</artifactId>
        <version>3.0.0</version>
        <configuration>
            <threshold>High</threshold>
            <effort>Default</effort>
            <findbugsXmlOutput>true</findbugsXmlOutput>
            <findbugsXmlOutputDirectory>target/site</findbugsXmlOutputDirectory>
        </configuration>
    </plugin>
    <!--版本号管理-->
    <plugin>
        <groupId>org.codehaus.mojo</groupId>
        <artifactId>versions-maven-plugin</artifactId>
        <version>2.3</version>
    </plugin>
    <!--打包源代码-->
    <plugin>
        <artifactId>maven-source-plugin</artifactId>
        <version>2.3</version>
        <executions>
            <execution>
                <id>attach-sources</id>
                <phase>install</phase>
                <goals>
                    <goal>jar-no-fork</goal>
                </goals>
            </execution>
        </executions>
    </plugin>
    <!--这个有点晕,生成可执行jar包什么的-->
    <plugin>
        <artifactId>maven-assembly-plugin</artifactId>
        <version>3.0.0</version>
        <configuration>
            <archieve>
                <manifest>
                    <mainClass>com.xlx.Test</mainClass>
                </manifest>
            </archieve>
            <descriptorRefs>
                <descriptorRef>jar-with-dependencies</descriptorRef>
            </descriptorRefs>
        </configuration>
    </plugin>
    <!--tomcat插件-->
    <plugin>
        <groupId>org.apache.tomcat.maven</groupId>
        <artifactId>tomcat7-maven-plugin</artifactId>
        <version>2.2</version>
        <configuration>
            <port>8080</port>
            <path>/</path>
        </configuration>
    </plugin>
</plugins>学习地址https://maven.apache.org/guides/plugin/guide-java-plugin-development.html
<packaging>maven-plugin</packaging><dependencies>
<dependency>
<groupId>org.apache.maven</groupId>
<artifactId>maven-plugin-api</artifactId>
<version>LATEST</version>
</dependency>
<dependency>
<groupId>org.apache.maven.plugin-tools</groupId>
<artifactId>maven-plugin-annotations</artifactId>
<version>LATEST</version>
<scope>provided</scope>
</dependency>
</dependencies>AbstractMojo@Mojo(name="xlxTest",defaultPhase = LifecyclePhase.PACKAGE)
public class Test extends AbstractMojo {
/**
* 接收的参数
*/
@Parameter
private String message;
/**
* 接收多个值的参数
*/
@Parameter
private List<String> options;
/**
* 命令行中接收,注意必须有property mvn:package -Dargs=this is from cmd
*/
@Parameter(property = "args")
private String args;
public void execute() throws MojoExecutionException, MojoFailureException {
System.out.println("my first maven plugin message is : " + message);
System.out.println("my first maven plugin options is : " + options);
System.out.println("my first maven plugin args from evm is : " + args);
}
}<!--项目pom修改-->
<build>
<plugins>
<plugin>
<groupId>com.xlx</groupId>
<artifactId>engineering</artifactId>
<version>1.0-SNAPSHOT</version>
<executions>
<execution>
<phase>package</phase>
<goals>
<goal>xlxTest</goal>
</goals>
</execution>
</executions>
<configuration>
<message>message</message>
<options>
<option>one</option>
<option>two</option>
</options>
</configuration>
</plugin>
</plugins>
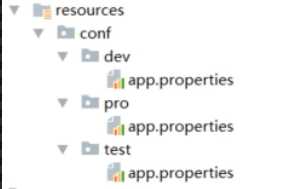
</build><profile.active>私服或者官方</profile.active>多环境配置的配置文件路径

<profiles>
    <profile>
        <id>dev</id>
        <properties>
            <profile.active>dev</profile.active>
        </properties>
        <activation>
            <activeByDefault>true</activeByDefault>
        </activation>
    </profile>
    <profile>
        <id>test</id>
        <properties>
            <profile.active>test</profile.active>
        </properties>
    </profile>
</profiles>

<build>
    <resources>
        <resource>
            <directory>${baseDir}/src/main/resources</directory>
            <excludes>
                <exclude>conf/**</exclude>
            </excludes>
        </resource>
         <resource>
            <directory>src/main/resources/conf/${profile.active}</directory>
        </resource>
    </resources>
</build>pom中增加发布节点
<distributionManagement>
    <repository>
        <id>nexus-release</id>
        <name>nexus-release</name>
        <url>http://localhost:8099/repository/maven-releases/</url>
    </repository>
    <snapshotRepository>
        <id>nexus-snapshot</id>
        <name>nexus-snapshot</name>
        <url>http://localhost:8099/repository/maven-snapshots/</url>
    </snapshotRepository>
</distributionManagement>
修改settings.xml 增加服务器账号密码信息
<server>
    <id>nexus-release</id>
    <username>admin</username>
    <password>admin123</password>
</server>
<server>
    <id>nexus-snapshot</id>
    <username>admin</username>
    <password>admin123</password>
</server>标签:执行 服务器 resource effort def tag message 二进制 abs
原文地址:https://www.cnblogs.com/walkinhalo/p/9547606.html