标签:测试方法 olly 期望 mes return 返回 目标 config arrays
目录
单元测试其实是一种廉价的技术,是由开发者创建运行测试代码,用于对程序模块(软件设计的最小单位)进行正确性检验的一种做法。
而所谓的最小单元,就是指应用的最小可测试部件。 在面向对象领域,最小单元对应于类的某个成员方法。
通常意义的单元测试会用于验证某场景、某条件下某方法的行为结果,举个例子:
我想验证
Equals 方法,在两个对象类型不一致时应该返回 false单元测试的初衷,是对各个相互独立,互不影响的基本单元基线测试,以此来保证核心代码的质量。
每一段单元测试代码,都一定会包含几个部分:
Arrange
用于初始化一些被测试方法需要的参数或依赖的对象。
Act方法
用于调用被测方法进行测试。
Assert
用于验证测试方法是否按期望执行或者结果是否符合期望值
See !并不是很复杂,可是大多数开发者并不喜欢做单元测试。
而且,有一个现象很有意思,水平越高的程序员,越不喜欢写测试代码,why?
“ 因为单元测试,主要是用来防低级程序员挖坑的啊 ”
这句话不是我说的,但却代表了相当一部分程序员的心声..
那么,单元测试到底要不要做,并不是本文要讨论的问题。
建议大家阅读下 《单元测试之道-Java版本》 (程序员修炼三部曲系列)这边书,看完后再做出自己的理解。
为了测试一座桥梁,不应该只在晴朗的天气,开一辆汽车从桥中间穿过,就认为已经完成了对桥梁的测试
接下来,要说一说 Junit框架,这个是最流行的Java 单元测试框架。
Junit 创建者是 Kent Beck和Erich Gamma,自其出现以来,Junit 生态圈已经非常庞大。
大量的应用程序、开发框架都以 Junit 作为标准的的基础测试组件,这当然也包括 Spring系列的框架。
一个典型的Junit单元测试类:
class StandardTests {

    @BeforeClass
    static void initAll() {
    }

    @Before
    void init() {
    }

    @Test
    void justTest() {
    ...
    assertTrue(...)
    }


    @After
    void tearDown() {
    }

    @AfterClass
    static void tearDownAll() {
    }

}
说明
| 要点 | 说明 |
|---|---|
| @BeforeClass | 在当前类测试之前执行 |
| @Before | 在每个测试方法之前执行 |
| @Test | 声明测试方法 |
| @After | 在每个测试方法之后执行 |
| @AfterClass | 在当前类测试之后执行 |
上面的注解还是比较容易理解的,需要注意的只是 @BeforeClass 和 @Before,前者是一个静态方法,
会在整个测试用例类开始前执行,仅一次; 而后者则是在方法测试之前触发,可能会执行多次。
当前最新的版本是Junit 5 ,有兴趣的可以看看 https://junit.org/junit5 官网的介绍
为了更清晰的理解Junit 是怎么运作,下面展示一个源码片段:
    public void runBare() throws Throwable {
        Throwable exception = null;
        setUp();
        try {
            runTest();
        } catch (Throwable running) {
            exception = running;
        } finally {
            try {
                tearDown();
            } catch (Throwable tearingDown) {
                if (exception == null) exception = tearingDown;
            }
        }
        if (exception != null) throw exception;
    }
这是早期版本的TestCase类其中的一段实现,与我们所说的思路是基本一致的。
然而,基于注解的实现是由 Junit4提供的,在有兴趣的话可以深入看看源码。
关键词
TestCase、JUnit4TestAdapter、BlockJUnit4ClassRunner
SpringBoot 提供了 spring-boot-starter-test 用于实现单元测试。
<dependency>
 <groupId>org.springframework.boot</groupId>
 <artifactId>spring-boot-starter-test</artifactId>
 <version>${spring-boot.version}</version>
</dependency>@RunWith(SpringRunner.class)
@SpringBootTest(classes = DemoBoot.class)
public class RestApiTest {
private MockMvc mockMvc;
private ObjectMapper mapper = new ObjectMapper();
@Autowired
private WebApplicationContext context;
@Autowired
private RestDataManager dataManager;
private static final String CUSTOMER = "LiLei";
private Pet polly;
private Pet badboy;
@Before
public void setupMockMvc() throws Exception {
mockMvc = MockMvcBuilders.webAppContextSetup(context).build();
initData();
}
private void initData() {
// 清除原有宠物信息
dataManager.clearPets(CUSTOMER);
// 添加新的宠物信息
polly = new Pet();
polly.setType("Bird");
polly.setName("Polly");
polly.setDescription("the rapid speaker");
dataManager.addPet(CUSTOMER, polly);
badboy = new Pet();
badboy.setType("Dog");
badboy.setName("BadBoy");
polly.setDescription("the monster");
dataManager.addPet(CUSTOMER, badboy);
}
@Test
public void testGet() throws Exception {
mockMvc.perform(MockMvcRequestBuilders.get("/rest/pets/{customer}/{petId}",
CUSTOMER, polly.getPetId()))
.andExpect(MockMvcResultMatchers.status().isOk())
.andExpect(MockMvcResultMatchers.content()
.contentType(MediaType.APPLICATION_JSON_UTF8))
.andExpect(MockMvcResultMatchers.content()
.json(mapper.writeValueAsString(polly)))
.andDo(MockMvcResultHandlers.print());
}
}
说明
SpringRunner继承于SpringJUnit4ClassRunner,这是Spring框架基于Junit实现的基础类。
如果还记得前面提到的 BlockJUnit4ClassRunner,应该不难猜到,Spring 的实现类集成了该类。
那么,SpringRunner 做了什么? 什么也没有,只是一个名称的修正而已(论命名的重要性)
@SpringBootTest的作用
其代码注释如下:
Annotation that can be specified on a test class that runs Spring Boot based tests.
Provides the following features over and above the regular Spring TestContext Framework:

1. Uses SpringBootContextLoader as the default ContextLoader when no specific @ContextConfiguration(loader=...) is defined.
2. Automatically searches for a @SpringBootConfiguration when nested @Configuration is not used, and no explicit classes are specified.
3. Allows custom Environment properties to be defined using the properties attribute.
4. Provides support for different webEnvironment modes, including the ability to start a fully running container listening on a defined or random port.
5. Registers a TestRestTemplate bean for use in web tests that are using a fully running container.
要点
默认会使用SpringBootContextLoader类用于上下文加载,
这个类将会使用所配置的SpringBootApplication实体类作为入口,加载配置并初始化Spring上下文环境;
支持不同的 web 环境模式,可以是固定端口、随机端口、无端口几种模式。
关键词
SpringRunner、SpringBootTest、SpringBootContextLoader
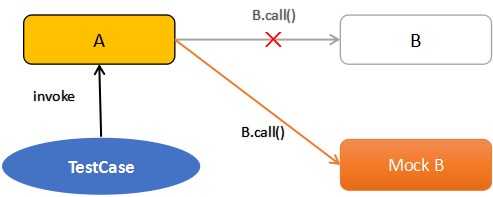
Mock 测试的使用场景在于,被测试模块(方法)依赖于外部系统(web服务、中间件或是数据库)时。
我们需要提供一种快速验证本地实现逻辑的策略,那就是 Mock,也称为打桩。

如上图,A 模块依赖于 B 模块,在 B 模块不可达的时候,我们对 依赖接口进行了 Mock。
这样在执行测试时,不需要真实的 B 模块便可完成测试。
下面我们要用到的 Mock 组件叫 Mockito
springboot-starter-test 自带了对于 mockito 的依赖,下面看一段代码:
@Before
public void setupMockMvc() throws Exception {
// 启用mock
@Before
public void setupMockMvc() throws Exception {
// 启用mock
MockitoAnnotations.initMocks(this);
polly = new Pet();
polly.setType("Bird");
polly.setName("Polly");
polly.setDescription("the rapid speaker");
lilei = new Customer();
lilei.setName(CUSTOMER);
// 设置mock接口
Mockito.when(dataManager.getPets(Mockito.isA(String.class))).thenReturn(Arrays.asList(polly));
Mockito.when(dataManager.getCustomer(Mockito.isA(String.class))).thenReturn(lilei);
// 使用standaloneSetup,指定controller
// 由于不通过webappliationContext初始化,许多配置不会自动完成,此外bean的初始化方法也不会执行
mockMvc = MockMvcBuilders.standaloneSetup(controller)
.setMessageConverters(new MappingJackson2HttpMessageConverter()).build();
}
看到了吗,利用 Mockito 可以实现你想要的 Mock效果,如下:
Mockito.when( somemethod ).thenReturn( some thing to return);然而,在进行 mock 方法时,需要使用 standaloneSetup 的模式,
否则 mockito 无法工作。
mockMvc = MockMvcBuilders.standaloneSetup(controller)..关键词
Mockito、MockMvcBuilders
细心的读者会发现,前面讲了单元测试的对象,是指软件设计的最小单位(方法),可是为什么到了 SpringBoot 的部分时
却都是对于API(Controller层)的测试呢? 到底我们的单元测试应该针对内部实现的某个单元,比如 DAO/Service方法,还是针对接口(API Interface)?
笔者认为,这点并没有绝对的好坏之分,关键在于取舍。
单元测试是软件工程领域的概念,而软件项目是分很多种类型的,比如在早期的软件工程中,
就有不少的基于C/S架构的程序,这类程序的体积相对庞大,往往需要对大量模块级的方法进行单元测试;
现如今的微服务体系架构中,对于各个子系统来说,API(作为契约)是必须进行测试的。
对于某服务的单元测试,选择 Controller 还是 Service层,取决于你的成本效益考虑,
而目前来看,结合敏捷化的 TDD实践、 通过单元测试进行 API测试 已经是一种主流做法。
欢迎继续关注"美码师的补习系列-springboot篇" ,期待更多精彩内容^-^
标签:测试方法 olly 期望 mes return 返回 目标 config arrays
原文地址:https://www.cnblogs.com/littleatp/p/9557405.html