标签:stat 技术 lis lan inter img targe sys pem
目录
所有代码示例必须配置好Spring Spring项目的快速搭建.
本系列是为了给后面学习SpringBoot打好基础,所以本系列的目的不是详细讲解Spring的知识点,而是将工作中常用的知识点罗列出来,由于SpringBoot用的是JAVA配置,所以在罗列知识点时候全部都用JAVA配置。
计划任务在Spring中的实现将会变得非常简单,直接在配置类上使用@EnableScheduling来开启对计划任务的支持,然后在要执行计划任务的方法上注解@Scheduled,声明这是一个计划任务。例如@Scheduled(cron = "0 0 6 * * ?") 表示每天早上六点启动这个任务,其中corn表达式可以百度到的。
1)配置类
package com.wisely.highlight_spring4.ch3.taskscheduler;

import org.springframework.context.annotation.ComponentScan;
import org.springframework.context.annotation.Configuration;
import org.springframework.scheduling.annotation.EnableScheduling;

@Configuration//表示这是一个配置类
//会自动扫描在这个地址下面的所有的包及其他们的子包
@ComponentScan("com.wisely.highlight_spring4.ch3.taskscheduler")
@EnableScheduling //开启计划任务支持
public class TaskSchedulerConfig {

}
2)执行类
package com.wisely.highlight_spring4.ch3.taskscheduler;

import java.text.SimpleDateFormat;
import java.util.Date;

import org.springframework.scheduling.annotation.Scheduled;
import org.springframework.stereotype.Service;

@Service
public class ScheduledTaskService {

      private static final SimpleDateFormat dateFormat = new SimpleDateFormat("HH:mm:ss");

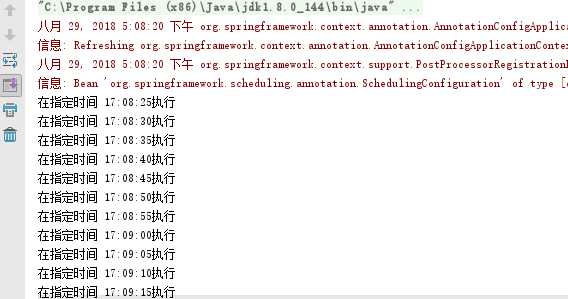
      @Scheduled(cron = "*/5 * * * * ?"  ) //每隔5秒执行一次
      public void fixTimeExecution(){
          System.out.println("在指定时间 " + dateFormat.format(new Date())+"执行");
      }

}
3)测试类
package com.wisely.highlight_spring4.ch3.taskscheduler;

import org.springframework.context.annotation.AnnotationConfigApplicationContext;

public class Main {
    public static void main(String[] args) {
         AnnotationConfigApplicationContext context =
                    new AnnotationConfigApplicationContext(TaskSchedulerConfig.class);

    }

}
4)结果

之前我们有说过可以通过profile来获得不同的Bean,Spring4提供了一个更通用的基于条件的Bean的创建---使用@Conditional注解。其实就是根据条件判断到底要装配哪一个实现类。SpringBoot会大量应用条件注解,我们先简单看一个示例。
1)创建服务接口类
package com.wisely.highlight_spring4.ch3.conditional;

public interface ListService {
    public String showListCmd();
}
2)接口实现类
package com.wisely.highlight_spring4.ch3.conditional;

public class WindowsListService implements ListService {

    @Override
    public String showListCmd() {
        return "dir";
    }

}
package com.wisely.highlight_spring4.ch3.conditional;
public class LinuxListService implements ListService{
@Override
public String showListCmd() {
return "ls";
}
}
3)条件判断类
package com.wisely.highlight_spring4.ch3.conditional;

import org.springframework.context.annotation.Condition;
import org.springframework.context.annotation.ConditionContext;
import org.springframework.core.type.AnnotatedTypeMetadata;

public class WindowsCondition implements Condition {

    public boolean matches(ConditionContext context,
            AnnotatedTypeMetadata metadata) {
        return context.getEnvironment().getProperty("os.name").contains("Windows");
    }

}
package com.wisely.highlight_spring4.ch3.conditional;
import org.springframework.context.annotation.Condition;
import org.springframework.context.annotation.ConditionContext;
import org.springframework.core.type.AnnotatedTypeMetadata;
public class LinuxCondition implements Condition {
public boolean matches(ConditionContext context,
AnnotatedTypeMetadata metadata) {
return context.getEnvironment().getProperty("os.name").contains("Linux");
}
}4)配置类
package com.wisely.highlight_spring4.ch3.conditional;

import org.springframework.context.annotation.Bean;
import org.springframework.context.annotation.Conditional;
import org.springframework.context.annotation.Configuration;

@Configuration
public class ConditionConifg {
    @Bean
    @Conditional(WindowsCondition.class) //如果WindowsCondotion类返回的是true则实例化WindowsListService
    public ListService windowsListService() {
        return new WindowsListService();
    }

    @Bean
    @Conditional(LinuxCondition.class) //如果LinuxCondition类返回的是true则实例化LinuxListService
    public ListService linuxListService() {
        return new LinuxListService();
    }

}
5)测试类
package com.wisely.highlight_spring4.ch3.conditional;

import org.springframework.context.annotation.AnnotationConfigApplicationContext;

public class Main {

    public static void main(String[] args) {
        AnnotationConfigApplicationContext context =
                new AnnotationConfigApplicationContext(ConditionConifg.class);

        ListService listService = context.getBean(ListService.class);


        System.out.println(context.getEnvironment().getProperty("os.name")
                + "系统下的列表命令是: "
                + listService.showListCmd());

        context.close();
    }
}
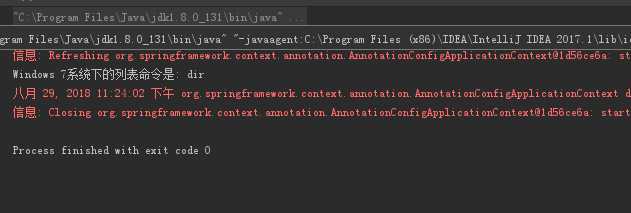
6)结果

主要演示一下组合注解
1)配置组合注解
package com.wisely.highlight_spring4.ch3.annotation;

import java.lang.annotation.Documented;
import java.lang.annotation.ElementType;
import java.lang.annotation.Retention;
import java.lang.annotation.RetentionPolicy;
import java.lang.annotation.Target;

import org.springframework.context.annotation.ComponentScan;
import org.springframework.context.annotation.Configuration;

@Target(ElementType.TYPE)
@Retention(RetentionPolicy.RUNTIME)
@Documented
@Configuration
@ComponentScan
public @interface ABC {

    String[] value() default {};
}
2)新的配置类
package com.wisely.highlight_spring4.ch3.annotation;

@ABC("com.wisely.highlight_spring4.ch3.annotation")
public class DemoConfig {

}
3)服务Bean
package com.wisely.highlight_spring4.ch3.annotation;

import org.springframework.stereotype.Service;

@Service
public class DemoService {

    public void outputResult(){
        System.out.println("新注解获取Bean");
    }

}
4)测试
package com.wisely.highlight_spring4.ch3.annotation;

import org.springframework.context.annotation.AnnotationConfigApplicationContext;

public class Main {

    public static void main(String[] args) {
        AnnotationConfigApplicationContext context =
                new AnnotationConfigApplicationContext(DemoConfig.class);

        DemoService demoService =  context.getBean(DemoService.class);

        demoService.outputResult();

        context.close();
    }

}
5)结果

标签:stat 技术 lis lan inter img targe sys pem
原文地址:https://www.cnblogs.com/bigfly277/p/9527352.html