标签:amt throws fileinput 重置 png writer struct 文件的 字节
BufferedInputStream和BufferedOutputStream是带缓冲区的字节输入输出处理流。它们本身并不具有IO流的读取与写入功能,只是在别的流(节点流或其他处理流)上加上缓冲功能提高效率,就像是把别的流包装起来一样,因此缓冲流是一种处理流。事实上,这两个处理流(BufferedInputStream和 BufferedOutputStream),加上BufferedReader和BufferedWriter,这四个流在设计时使用到的正是装饰设计模式,通过装饰设计模式,得以在其他的流的基础上增加缓冲的功能!
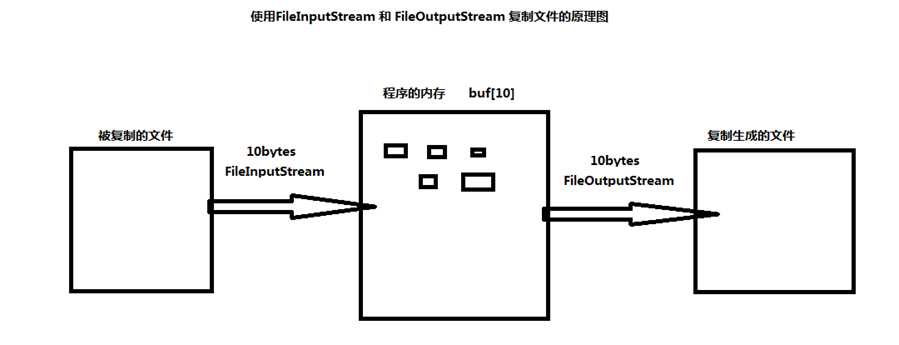
当对文件或者其他数据源进行频繁的读写操作时,效率比较低,这时如果使用缓冲流就能够更高效的读写信息。因为缓冲流是先将数据缓存起来,然后当缓存区存满后或者手动刷新时再一次性的读取到程序或写入目的地。


由源码可知,BufferedOutputStream自身并没有实现将数据写入目的地的功能,真正的写入功能其实还是由它所装饰的字节输出流os来实现的。通过缓冲区的缓冲作用,增加了内存与内存之间的交互,减少了内存与磁盘的直接交互,以此提升I/O的效率。
下面是在参考了BufferedOutputStream的源码之后,自己实现的缓冲字节输出流,其原理非常简单,即:首先在MyBos内部包装了一个真正具有将数据输出到目的地功能的字节输出流os;在MyBos中还定义了一个字节缓冲数组buf,默认大小为8K,当调用write(byte b)或write(byte[] buf, int off, int len)方法将数据写出时,并不是直接将数据写出到目的地,首选是先将数据写到MyBos中自定义的缓冲区buf中,只有当缓冲区满了或者手动刷新的时候,才会将缓冲区的数据一次性写入到目的地。
自己实现的缓冲字节输出流的代码如下所示:
import java.io.IOException;
import java.io.OutputStream;

public class MyBos {

    private byte[] buf; //缓冲字节数组
    private int count;  //记录目前缓冲数组中的有效字节数
    private OutputStream os;//被装饰的底层输出字节流


    //构造方法
    public MyBos(OutputStream os) throws Exception {
        this(os, 8192);     //若不显式指定缓冲数组的大小,则默认分配8k空间
    }

    public MyBos(OutputStream os, int size) throws Exception {
        if(size < 0) {
            throw new Exception("缓冲区空间大小分配错误:" + size);
        }
        this.os = os;
        buf = new byte[size];
    }

    /**
     * 写出单个字节数据
     * @param b 写出的字节数据
     * @throws IOException
     */
    public void write(int b) throws IOException {
        if(count == buf.length) {//若count == buf.length,说明缓冲区buf已满,则先将缓冲区数据写出
            os.write(buf);      //调用os的wirte(byte[] buf)方法讲数据写出!
            count = 0;          //重置count
        }

        buf[count++] = (byte)b;     //将字节数据写入缓冲区,写入到count所在索引位置上
    }

    /**
     * 将字节数组b[offset, offset+len)部分写出
     * @param b     字节数组
     * @param offset    开始位置
     * @param len       长度
     * @throws Exception
     */
    public void write(byte[] b, int offset, int len) throws Exception {

        if(offset < 0 || len < 0 || b.length < (offset + len)) {
            throw new Exception("数组索引越界异常!");
        }

        if(len > buf.length) {  //若写出的字节数组b数据大于缓冲数组
            flush();            //则先调用flush()方法将缓冲数组的数据写出
            os.write(b, offset, len);   //直接将数组b的数据通过os的wirte方法写出,不写入缓冲数组了
            return;
        }

        if(len > buf.length - count) {  //若缓冲数组剩余空间不足len长度
            flush();                    //则先将缓冲数组的数据写出
        }

        System.arraycopy(b, offset, buf, count, len);
        count += len;

    }

    /**
     * 刷新缓冲区
     * @throws IOException
     */
    public void flush() throws IOException {
        if(count > 0) { //若缓冲区中有数据,则调用底层输出流os将数据写出
            os.write(buf, 0, count);
            os.flush();
            count = 0;  //重置count
        }
    }

    /**
     * 关闭流
     * @throws IOException
     */
    public void close() throws IOException {
        if(null != os) {
            flush();    //先将缓冲数组的数据写出
            os.close(); //接着关闭底层数据流os
        }
    }
}
由BufferedInputStream的源码可知,该类的内部同样有一个字节缓冲区buf,每次读取数据时,它会先检查缓冲区中是否有数据,若有则直接从缓冲区中取数,若是没有,则先通过底层输入流将指定大小(默认是8192个字节)的数据从底层读取到缓冲区中,再从缓冲区拿数。
跟BufferedOutputStream一样,BufferedInputStream自身也没有实现将数据从源文件读入内存的功能,真正的读取功能其实还是由它所装饰的底层字节输入流is来实现的。通过缓冲区的缓冲作用,增加了内存与内存之间的交互,减少了内存与磁盘的直接交互,以此提升I/O的效率。
自己实现的BufferedInputStream示例代码:
import java.io.IOException;
import java.io.InputStream;

public class MyBis {
    //用于访问底层数据的底层流
    private InputStream is;
    //字节数组缓冲区
    byte[] buf;
    //默认缓存大小8k
    public static final int DEFAULT_BUF_SIZE = 8192;
    //记录缓冲区中 待读取的字节数
    private int count;
    //用于记录读取到当前 buf 中字节数据的位置
    private int pos;

    //构造方法
    public MyBis(InputStream is) throws Exception {
        this(is, DEFAULT_BUF_SIZE);
    }

    public MyBis(InputStream is, int size) throws Exception {
        if(size < 0) {
            throw new Exception("\"缓冲区空间大小分配错误:\" + size");
        }
        this.is = is;
        buf = new byte[DEFAULT_BUF_SIZE];
    }


    /**
     * 从缓冲区中读取下一个字节的数据,如果数据到到了末尾,返回 -1
     * @return 读取到的字节数据的 int 形式,如果读取到了流的末尾,返回 -1
     * @throws IOException
     */
    public int read() throws IOException {
        if(pos == count) {//若读取的下一个字节数已经到达有效数据的末尾
            count = is.read(buf);//则通过底层的输入流,一次性读取 8192 个字节数据到缓冲区中来。
            if(-1 == count) {//若is 没有读取到数据,直接返回-1
                return -1;
            }
            //若is读取到数据了,将pos设置为第一个字节
            pos = 0;
        }

        //返回读取到的字节数据的 int 形式
        return buf[pos++] & 0xff;
    }


    /**
     * 处理流的关闭问题:只关闭处理流即可,处理流的关闭会将底层的流关闭掉。
     * @throws IOException
     */
    public void close() throws IOException {
        if(null != is) {
            is.close();
        }
    }
}
测试自己写的字节缓冲输入流:
import java.io.FileInputStream;
import java.io.IOException;

public class TestMyBis {
    public static void main(String[] args) {
        MyBis mb = null;

        try {
            mb = new MyBis(new FileInputStream("./src/res/1.txt"));

            int value = 0;

            while(-1 != (value = mb.read())) {
                System.out.print((char)value);
            }

        } catch (Exception e) {
            e.printStackTrace();
        } finally {
            if(null != mb) {
                try {
                    mb.close();
                } catch (IOException e) {
                    e.printStackTrace();
                }
            }
        }
    }
}
代码运行效果:

示例代码:
import java.io.BufferedInputStream;
import java.io.BufferedOutputStream;
import java.io.FileInputStream;
import java.io.FileNotFoundException;
import java.io.FileOutputStream;
import java.io.IOException;

public class BufferedStreamTest {
    public static void main(String[] args) {
        BufferedInputStream bis = null;
        BufferedOutputStream bos = null;

        try {
            //使用缓冲流
            bis = new BufferedInputStream(new FileInputStream("e:/test_file/data_structure.avi"));
            bos = new BufferedOutputStream(new FileOutputStream("e:/test_file/data_structure_copy.avi"));
            int len = 0;
            byte[] buf = new byte[1024*1024];//因为读取的源文件较大,所以这里分配的空间大一点

            while(-1 != (len = bis.read(buf))) {
                bos.write(buf, 0, len);
            }

        } catch (FileNotFoundException e) {
            e.printStackTrace();
        } catch (IOException e) {
            e.printStackTrace();
        } finally {
            if(null != bos) {
                try {
                    bos.close();
                } catch (IOException e) {
                    e.printStackTrace();
                }
            }
            if(null != bis) {
                try {
                    bis.close();
                } catch (IOException e) {
                    e.printStackTrace();
                }
            }
        }

    }
}
最后,由BufferedInputStream和BufferedOutputStream这两个类的源码或API可以看出,它们没有新增任何新的方法,使用的都是常见的read()、read(byte[] b)、write(int b)、write(byte[] buf, int off, int len)等方法。
J05-Java IO流总结五 《 BufferedInputStream和BufferedOutputStream 》
标签:amt throws fileinput 重置 png writer struct 文件的 字节
原文地址:https://www.cnblogs.com/suhaha/p/9651568.html