标签:ddd mit roo 开发包 src long man ack 创建
http://sourceforge.net/projects/hibernate/files/hibernate-orm/5.0.7.Final/hibernate-release-5.0.7.Final.zip/download
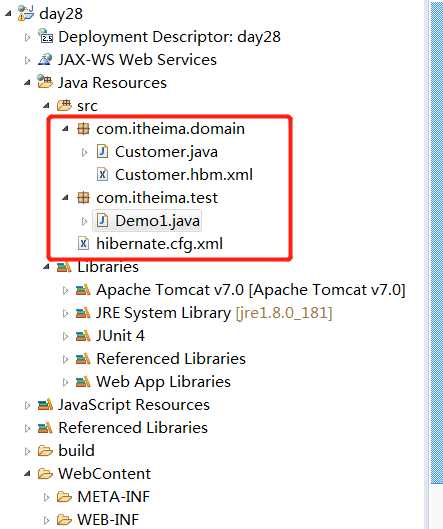
项目目录:

 1 Create database hibernate_day01;
 2 Use hibernate_day01;
 3 CREATE TABLE `cst_customer` (
 4   `cust_id` bigint(32) NOT NULL AUTO_INCREMENT COMMENT ‘客户编号(主键)‘,
 5   `cust_name` varchar(32) NOT NULL COMMENT ‘客户名称(公司名称)‘,
 6   `cust_user_id` bigint(32) DEFAULT NULL COMMENT ‘负责人id‘,
 7   `cust_create_id` bigint(32) DEFAULT NULL COMMENT ‘创建人id‘,
 8   `cust_source` varchar(32) DEFAULT NULL COMMENT ‘客户信息来源‘,
 9   `cust_industry` varchar(32) DEFAULT NULL COMMENT ‘客户所属行业‘,
10   `cust_level` varchar(32) DEFAULT NULL COMMENT ‘客户级别‘,
11   `cust_linkman` varchar(64) DEFAULT NULL COMMENT ‘联系人‘,
12   `cust_phone` varchar(64) DEFAULT NULL COMMENT ‘固定电话‘,
13   `cust_mobile` varchar(16) DEFAULT NULL COMMENT ‘移动电话‘,
14   PRIMARY KEY (`cust_id`)
15 ) ENGINE=InnoDB AUTO_INCREMENT=94 DEFAULT CHARSET=utf8;
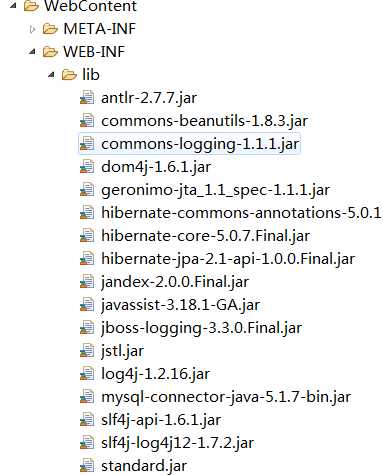
数据库驱动包:
Hibernate/lib/required/*
引入日志记录的包:
package com.itheima.domain;

/*
 * 客户的javaBean
 * @author chenyanlong
 */
public class Customer {
    private Long cust_id;
    private String cust_name;
    private Long cust_user_id;
    private Long cust_create_id;
    private String cust_source;
    private String cust_industry;
    private String cust_level;
    private String cust_linkman;
    private String cust_phone;
    private String cust_mobile;
    public Long getCust_id() {
        return cust_id;
    }
    public void setCust_id(Long cust_id) {
        this.cust_id = cust_id;
    }
    public String getCust_name() {
        return cust_name;
    }
    public void setCust_name(String cust_name) {
        this.cust_name = cust_name;
    }
    public Long getCust_user_id() {
        return cust_user_id;
    }
    public void setCust_user_id(Long cust_user_id) {
        this.cust_user_id = cust_user_id;
    }
    public Long getCust_create_id() {
        return cust_create_id;
    }
    public void setCust_create_id(Long cust_create_id) {
        this.cust_create_id = cust_create_id;
    }
    public String getCust_source() {
        return cust_source;
    }
    public void setCust_source(String cust_source) {
        this.cust_source = cust_source;
    }
    public String getCust_industry() {
        return cust_industry;
    }
    public void setCust_industry(String cust_industry) {
        this.cust_industry = cust_industry;
    }
    public String getCust_level() {
        return cust_level;
    }
    public void setCust_level(String cust_level) {
        this.cust_level = cust_level;
    }
    public String getCust_linkman() {
        return cust_linkman;
    }
    public void setCust_linkman(String cust_linkman) {
        this.cust_linkman = cust_linkman;
    }
    public String getCust_phone() {
        return cust_phone;
    }
    public void setCust_phone(String cust_phone) {
        this.cust_phone = cust_phone;
    }
    public String getCust_mobile() {
        return cust_mobile;
    }
    public void setCust_mobile(String cust_mobile) {
        this.cust_mobile = cust_mobile;
    }


}
 1 <?xml version="1.0" encoding="UTF-8"?>
 2 <!DOCTYPE hibernate-mapping PUBLIC
 3     "-//Hibernate/Hibernate Mapping DTD 3.0//EN"
 4     "http://www.hibernate.org/dtd/hibernate-mapping-3.0.dtd">
 5 <hibernate-mapping>
 6    <!-- 配置类和表结构的映射 -->
 7    <class name="com.itheima.domain.Customer" table="cst_customer">
 8            <!-- 配置id
 9                name属性,JavaBean的属性
10                column属性,是表结构的字段
11             -->
12            <id name="cust_id" column="cust_id">
13                <!-- 只要是主键 需要有一个主键的生成策略: -->
14             <generator class="native"/>
15
16            </id>
17
18          <!-- 非主键的属性都使用property标签配置映射  name是类中的属性名  column表中字段名 -->
19         <property name="cust_name" column="cust_name"></property>
20         <property name="cust_user_id" column="cust_user_id"></property>
21         <property name="cust_create_id" column="cust_create_id"></property>
22         <property name="cust_source" column="cust_source"></property>
23         <property name="cust_industry" column="cust_industry"></property>
24         <property name="cust_level" column="cust_level"></property>
25         <property name="cust_linkman" column="cust_linkman"></property>
26         <property name="cust_phone" column="cust_phone"></property>
27         <property name="cust_mobile" column="cust_mobile"></property>
28
29    </class>
30 </hibernate-mapping>
 1 <?xml version="1.0" encoding="UTF-8"?>
 2 <!DOCTYPE hibernate-configuration PUBLIC
 3     "-//Hibernate/Hibernate Configuration DTD 3.0//EN"
 4     "http://www.hibernate.org/dtd/hibernate-configuration-3.0.dtd">
 5
 6 <hibernate-configuration>
 7     <!-- 记住:先配置sessionFactoryy -->
 8
 9     <session-factory>
10         <!-- 必须的配置 -->
11         <!-- 配置连接数据库的基本的信息: -->
12         <property name="hibernate.connection.driver_class">com.mysql.jdbc.Driver</property>
13         <property name="hibernate.connection.url">jdbc:mysql:///hibernate_day01</property>
14         <property name="hibernate.connection.username">root</property>
15         <property name="hibernate.connection.password">123456</property>
16
17         <!-- 数据库的方言: -->
18         <property name="hibernate.dialect">org.hibernate.dialect.MySQLDialect</property>
19
20         <!-- Hibernate的可选项 -->
21
22         <!-- 加载映射 -->
23         <mapping resource="com/itheima/domain/Customer.hbm.xml"/>
24
25     </session-factory>
26 </hibernate-configuration>
 1 package com.itheima.test;
 2 import org.hibernate.Session;
 3 import org.hibernate.SessionFactory;
 4 import org.hibernate.Transaction;
 5 import org.hibernate.cfg.Configuration;
 6 import org.junit.Test;
 7
 8 import com.itheima.domain.Customer;
 9
10 /*
11  * 测试Hibernate框架
12  * @author chenyanlong
13  */
14 public class Demo1 {
15
16     @Test
17     public void testSave(){
18         /*
19          * 1.先加载配置文件
20          * 2.创建SessionFactory对象,生成Session对象
21          * 3.创建Sesison对象
22          * 4.开启事务
23          * 5.编写保存代码
24          * 6.提交事务
25          * 7.释放资源
26          */
27
28         //1.加载配置文件
29         Configuration config=new Configuration();
30         //默认加载src目录下hibernate.cfg.xml的配置文件
31         config.configure();
32         //2.创建SessionFactory对象
33         SessionFactory factory=config.buildSessionFactory();
34         //3.创建session对象
35         Session session=factory.openSession();
36         //4.开启事务
37         Transaction tr=  session.beginTransaction();
38
39         //5.编写保存代码
40         Customer customer = new Customer();
41         customer.setCust_name("小王");
42         customer.setCust_source("小广告");
43
44
45         session.save(customer);
46         //6.提交事务
47         tr.commit();
48
49         //7.释放资源
50         session.close();
51         factory.close();
52     }
53 }

标签:ddd mit roo 开发包 src long man ack 创建
原文地址:https://www.cnblogs.com/chenyanlong/p/9737736.html
