标签:自己 区域 wing max 关注 child OWIN row room
本文主要介绍Flutter布局中的LimitedBox、Offstage、OverflowBox、SizedBox四种控件,详细介绍了其布局行为以及使用场景,并对源码进行了分析。
A box that limits its size only when it‘s unconstrained.
LimitedBox,通过字面意思,也可以猜测出这个控件的作用,是限制类型的控件。这种类型的控件前面也介绍了不少了,这个是对最大宽高进行限制的控件。
LimitedBox是将child限制在其设定的最大宽高中的,但是这个限定是有条件的。当LimitedBox最大宽度不受限制时,child的宽度就会受到这个最大宽度的限制,同理高度。
Object > Diagnosticable > DiagnosticableTree > Widget > RenderObjectWidget > SingleChildRenderObjectWidget > LimitedBoxRow(
children: <Widget>[
Container(
color: Colors.red,
width: 100.0,
),
LimitedBox(
maxWidth: 150.0,
child: Container(
color: Colors.blue,
width: 250.0,
),
),
],
)const LimitedBox({
Key key,
this.maxWidth = double.infinity,
this.maxHeight = double.infinity,
Widget child,
})maxWidth:限定的最大宽度,默认值是double.infinity,不能为负数。
maxHeight:同上。
先不说其源码,单纯从其作用,前面介绍的SizedBox、ConstrainedBox都类似,都是通过强加到child的constraint,来达到相应的效果。
我们直接看其计算constraint的代码
minWidth: constraints.minWidth,
maxWidth: constraints.hasBoundedWidth ? constraints.maxWidth : constraints.constrainWidth(maxWidth),
minHeight: constraints.minHeight,
maxHeight: constraints.hasBoundedHeight ? constraints.maxHeight : constraints.constrainHeight(maxHeight)
LimitedBox只是改变最大宽高的限定。具体的布局代码如下:
if (child != null) {
  child.layout(_limitConstraints(constraints), parentUsesSize: true);
  size = constraints.constrain(child.size);
} else {
  size = _limitConstraints(constraints).constrain(Size.zero);
}
根据最大尺寸,限制child的布局,然后将自身调节到child的尺寸。
使用场景是不可能清楚了,光是找例子,就花了不少时间。Flutter的一些冷门控件,真的是除了官方的文档,啥材料都木有。谷歌说这个很有用,还是一脸懵逼。这种控件,也有其他的替代解决方案,LimitedBox可以达到的效果,ConstrainedBox都可以实现。
A widget that lays the child out as if it was in the tree, but without painting anything, without making the child available for hit testing, and without taking any room in the parent.
Offstage的作用很简单,通过一个参数,来控制child是否显示,日常使用中也算是比较常用的控件。
Offstage的布局行为完全取决于其offstage参数
另外,当Offstage不可见的时候,如果child有动画,应该手动停掉,Offstage并不会停掉动画。
Object > Diagnosticable > DiagnosticableTree > Widget > RenderObjectWidget > SingleChildRenderObjectWidget > OffstageColumn(
children: <Widget>[
new Offstage(
offstage: offstage,
child: Container(color: Colors.blue, height: 100.0),
),
new CupertinoButton(
child: Text("点击切换显示"),
onPressed: () {
setState(() {
offstage = !offstage;
});
},
),
],
)当点击切换按钮的时候,可以看到Offstage显示消失。
const Offstage({ Key key, this.offstage = true, Widget child })offstage:默认为true,也就是不显示,当为flase的时候,会显示该控件。
我们先来看下Offstage的computeIntrinsicSize相关的方法:
@override
double computeMinIntrinsicWidth(double height) {
    if (offstage)
      return 0.0;
    return super.computeMinIntrinsicWidth(height);
  }
可以看到,当offstage为true的时候,自身的最小以及最大宽高都会被置为0.0。
接下来我们来看下其hitTest方法:
  @override
  bool hitTest(HitTestResult result, { Offset position }) {
    return !offstage && super.hitTest(result, position: position);
  }
当offstage为true的时候,也不会去执行。
最后我们来看下其paint方法:
@override
  void paint(PaintingContext context, Offset offset) {
    if (offstage)
      return;
    super.paint(context, offset);
  }
当offstage为true的时候直接返回,不绘制了。
到此,跟上面所说的布局行为对应上了。我们一定要清楚一件事情,Offstage并不是通过插入或者删除自己在widget tree中的节点,来达到显示以及隐藏的效果,而是通过设置自身尺寸、不响应hitTest以及不绘制,来达到展示与隐藏的效果。
当我们需要控制一个区域显示或者隐藏的时候,可以使用这个场景。其实也有其他代替的方法,但是成本会高很多,例如直接在tree上插入删除,但是不建议这么做。
A widget that imposes different constraints on its child than it gets from its parent, possibly allowing the child to overflow the parent.
OverflowBox这个控件,允许child超出parent的范围显示,当然不用这个控件,也有很多种方式实现类似的效果。
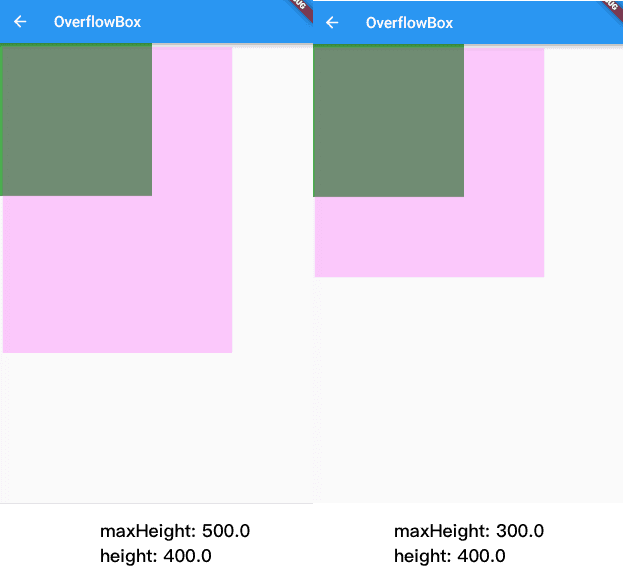
当OverflowBox的最大尺寸大于child的时候,child可以完整显示,当其小于child的时候,则以最大尺寸为基准,当然,这个尺寸都是可以突破父节点的。最后加上对齐方式,完成布局。
Object > Diagnosticable > DiagnosticableTree > Widget > RenderObjectWidget > SingleChildRenderObjectWidget > OverflowBoxContainer(
color: Colors.green,
width: 200.0,
height: 200.0,
padding: const EdgeInsets.all(5.0),
child: OverflowBox(
alignment: Alignment.topLeft,
maxWidth: 300.0,
maxHeight: 500.0,
child: Container(
color: Color(0x33FF00FF),
width: 400.0,
height: 400.0,
),
),
)
当maxHeight大于height的时候,可以完全显示下来,当maxHeight小于height的时候,则不会会被隐藏掉
构造函数如下:
const OverflowBox({
    Key key,
    this.alignment = Alignment.center,
    this.minWidth,
    this.maxWidth,
    this.minHeight,
    this.maxHeight,
    Widget child,
})alignment:对齐方式。
minWidth:允许child的最小宽度。如果child宽度小于这个值,则按照最小宽度进行显示。
maxWidth:允许child的最大宽度。如果child宽度大于这个值,则按照最大宽度进行展示。
minHeight:允许child的最小高度。如果child高度小于这个值,则按照最小高度进行显示。
maxHeight:允许child的最大高度。如果child高度大于这个值,则按照最大高度进行展示。
其中,最小以及最大宽高度,如果为null的时候,就取父节点的constraint代替。
OverflowBox的源码很简单,我们先来看一下布局代码:
if (child != null) {
  child.layout(_getInnerConstraints(constraints), parentUsesSize: true);
  alignChild();
}
如果child不为null,child则会按照计算出的constraints进行尺寸的调整,然后对齐。
至于constraints的计算,则还是上面的逻辑,如果设置的有的话,就取这个值,如果没有的话,就拿父节点的。
有时候设计图上出现的角标,会超出整个模块,可以使用OverflowBox控件。但我们应该知道,不使用这种控件,也可以完成布局,在最外面包一层,也能达到一样的效果。具体实施起来哪个比较方便,同学们自行取舍。
A box with a specified size.
比较常用的一个控件,设置具体尺寸。
SizedBox布局行为相对较简单:
Diagnosticable > DiagnosticableTree > Widget > RenderObjectWidget > SingleChildRenderObjectWidget > SizedBoxContainer(
color: Colors.green,
padding: const EdgeInsets.all(5.0),
child: SizedBox(
width: 200.0,
height: 200.0,
child: Container(
color: Colors.red,
width: 100.0,
height: 300.0,
),
),
)构造函数
const SizedBox({ Key key, this.width, this.height, Widget child })width:宽度值,如果具体设置了,则强制child宽度为此值,如果没设置,则根据child宽度调整自身宽度。
height:同上。
SizedBox内部是通过RenderConstrainedBox来实现的。具体的源码就不解析了,总体思路是,根据宽高值算好一个constraints,然后强制应用到child上。
这个控件,很多场景可以使用。但是,可以替代它的控件也有不少,例如Container、ConstrainedBox等。而且SizedBox就是ConstrainedBox的一个特例。还是那句话,精简啊,多提供一些常用的,不要提供一大堆重复的,场景很少的控件。
笔者建了一个Flutter学习相关的项目,Github地址,里面包含了笔者写的关于Flutter学习相关的一些文章,会定期更新,文章中的代码也在这个项目中,欢迎大家关注。
Flutter 布局(五)- LimitedBox、Offstage、OverflowBox、SizedBox详解
标签:自己 区域 wing max 关注 child OWIN row room
原文地址:https://www.cnblogs.com/holy-loki/p/9735059.html