标签:shape nump cto ice title metrics inpu input 深度学习
本节构建一个网络,将路透社新闻划分为46个互斥的主题,也就是46分类
from keras.datasets import reuters

(train_data, train_labels), (test_data, test_labels) = reuters.load_data(num_words=10000)
将数据限定在10000个最常见出现的单词,8982个训练样本和2264个测试样本
len(train_data)
8982
len(test_data)
2246
train_data[10]
word_index = reuters.get_word_index()
reverse_word_index = dict([(value, key) for (key, value) in word_index.items()])
# Note that our indices were offset by 3
# because 0, 1 and 2 are reserved indices for "padding", "start of sequence", and "unknown".
decoded_newswire = ‘ ‘.join([reverse_word_index.get(i - 3, ‘?‘) for i in train_data[0]])
train_labels[10]
import numpy as np

def vectorize_sequences(sequences, dimension=10000):
    results = np.zeros((len(sequences), dimension))
    for i, sequence in enumerate(sequences):
        results[i, sequence] = 1
    return results

# 将训练数据向量化
x_train = vectorize_sequences(train_data)
# 将测试数据向量化
x_test = vectorize_sequences(test_data)
# 将标签向量化,将标签转化为one-hot
def to_one_hot(labels, dimension=46):
    results = np.zeros((len(labels), dimension))
    for i, label in enumerate(labels):
        results[i, label] = 1
    return results

one_hot_train_labels = to_one_hot(train_labels)
one_hot_test_labels = to_one_hot(test_labels)

from keras.utils.np_utils import to_categorical

one_hot_train_labels = to_categorical(train_labels)
one_hot_test_labels = to_categorical(test_labels)
from keras import models
from keras import layers

model = models.Sequential()
model.add(layers.Dense(64, activation=‘relu‘, input_shape=(10000,)))
model.add(layers.Dense(64, activation=‘relu‘))
model.add(layers.Dense(46, activation=‘softmax‘))
对于这个例子,最好的损失函数是categorical_crossentropy(分类交叉熵),它用于衡量两个概率分布之间的距离
model.compile(optimizer=‘rmsprop‘, loss=‘categorical_crossentropy‘, metrics=[‘accuracy‘])
留出1000个样本作为验证集
x_val = x_train[:1000]
partial_x_train = x_train[1000:]

y_val = one_hot_train_labels[:1000]
partial_y_train = one_hot_train_labels[1000:]
history = model.fit(partial_x_train, partial_y_train, epochs=20, batch_size = 512, validation_data = (x_val, y_val))
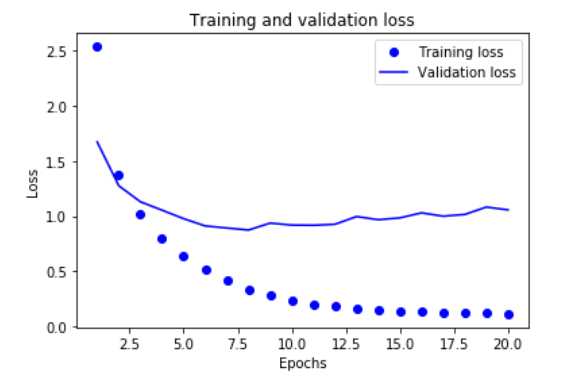
import matplotlib.pyplot as plt

loss = history.history[‘loss‘]
val_loss = history.history[‘val_loss‘]

epochs = range(1, len(loss) + 1)

plt.plot(epochs, loss, ‘bo‘, label = ‘Training loss‘)
plt.plot(epochs, val_loss, ‘b‘, label = ‘Validation loss‘)
plt.title(‘Training and validation loss‘)
plt.xlabel(‘Epochs‘)
plt.ylabel(‘Loss‘)
plt.legend()

plt.show()
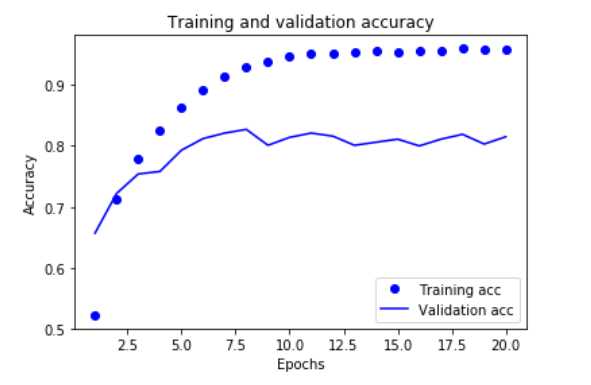
plt.clf()     # 清除图像
acc = history.history[‘acc‘]
val_acc = history.history[‘val_acc‘]

plt.plot(epochs, acc, ‘bo‘, label=‘Training acc‘)
plt.plot(epochs, val_acc, ‘b‘, label=‘Validation acc‘)
plt.title(‘Training and validation accuracy‘)
plt.xlabel(‘Epochs‘)
plt.ylabel(‘Accuracy‘)
plt.legend()

plt.show()
中间层有64个隐藏神经元
# 从头开始训练一个新的模型
model = models.Sequential()
model.add(layers.Dense(64, activation=‘relu‘, input_shape=(10000,)))
model.add(layers.Dense(64, activation=‘relu‘))
model.add(layers.Dense(46, activation=‘softmax‘))

model.compile(optimizer=‘rmsprop‘, loss=‘categorical_crossentropy‘, metrics=[‘accuracy‘])
model.fit(partial_x_train, partial_y_train, epochs=9, batch_size = 512, validation_data = (x_val, y_val))
results = model.evaluate(x_test, one_hot_test_labels)
results
[0.981157986054119, 0.790739091745149]
这种方法可以得到79%的精度
import copy

test_labels_copy = copy.copy(test_labels)
np.random.shuffle(test_labels_copy)
float(np.sum(np.array(test_labels) == np.array(test_labels_copy))) / len(test_labels)
0.19011576135351738 完全随机的精度约为19%
# 在新数据上生成预测结果
predictions = model.predict(x_test)
predictions[0].shape
np.sum(predictions[0])
np.argmax(predictions[0])
y_train = np.array(train_labels)
y_test = np.array(test_labels)
model.compile(optimizer=‘rmsprop‘, loss=‘sparse_categorical_crossentropy‘, metrics=[‘acc‘])
最终输出是46维的,本代码中间层只有4个隐藏单元,中间层的维度远远小于46
model = models.Sequential()
model.add(layers.Dense(64, activation=‘relu‘, input_shape=(10000,)))
model.add(layers.Dense(4, activation=‘relu‘))
model.add(layers.Dense(46, activation=‘softmax‘))

model.compile(optimizer=‘rmsprop‘, loss=‘categorical_crossentropy‘, metrics=[‘accuracy‘])
model.fit(partial_x_train, partial_y_train, epochs=20, batch_size = 128, validation_data = (x_val, y_val))
Epoch 20/20
7982/7982 [==============================] - 2s 274us/step - loss: 0.4369 - acc: 0.8779 - val_loss: 1.7934 - val_acc: 0.7160
验证精度最大约为71%,比前面下降了8%。导致这一下降的主要原因在于,你试图将大量信息(这些信息足够回复46个类别的分割超平面)压缩到维度很小的中间空间
model = models.Sequential()
model.add(layers.Dense(64, activation=‘relu‘, input_shape=(10000,)))
model.add(layers.Dense(32, activation=‘relu‘))
model.add(layers.Dense(46, activation=‘softmax‘))

model.compile(optimizer=‘rmsprop‘, loss=‘categorical_crossentropy‘, metrics=[‘accuracy‘])
model.fit(partial_x_train, partial_y_train, epochs=20, batch_size = 128, validation_data = (x_val, y_val))
results = model.evaluate(x_test, one_hot_test_labels)
results
标签:shape nump cto ice title metrics inpu input 深度学习
原文地址:https://www.cnblogs.com/gezhuangzhuang/p/9823325.html