标签:val 实体类 pos ati fast res lips getc dep
开发工具 eclipse
1.创建maven工程
2.编辑pom.xml 加入依赖包

<project xmlns="http://maven.apache.org/POM/4.0.0" xmlns:xsi="http://www.w3.org/2001/XMLSchema-instance"
    xsi:schemaLocation="http://maven.apache.org/POM/4.0.0 http://maven.apache.org/maven-v4_0_0.xsd">
    <modelVersion>4.0.0</modelVersion>
    <groupId>SpringBoot_001</groupId>
    <artifactId>SpringBoot_001</artifactId>
    <packaging>war</packaging>
    <version>0.0.1-SNAPSHOT</version>
    <name>SpringBoot_001 Maven Webapp</name>
    <url>http://maven.apache.org</url>
    <!-- 继承父包 -->
    <parent>
        <groupId>org.springframework.boot</groupId>
        <artifactId>spring-boot-starter-parent</artifactId>
        <version>1.4.1.RELEASE</version>
    </parent>
    <properties>
        <project.build.sourceEncoding>UTF-8</project.build.sourceEncoding>
        <java.version>1.7</java.version>
    </properties>

    <dependencies>
        <dependency>
            <groupId>org.springframework.boot</groupId>
            <artifactId>spring-boot-starter-web</artifactId>
        </dependency>
        <dependency>
            <groupId>org.hibernate</groupId>
            <artifactId>hibernate-validator</artifactId>
            <version>5.3.0.Final</version>
        </dependency>
        <!-- https://mvnrepository.com/artifact/com.alibaba/fastjson -->
        <dependency>
            <groupId>com.alibaba</groupId>
            <artifactId>fastjson</artifactId>
            <version>1.2.47</version>
        </dependency>

    </dependencies>
    <build>
        <finalName>SpringBoot_001</finalName>
    </build>
</project>
3.编辑启动类: 启动类在工程其他Java文件的父级目录或平级目录中
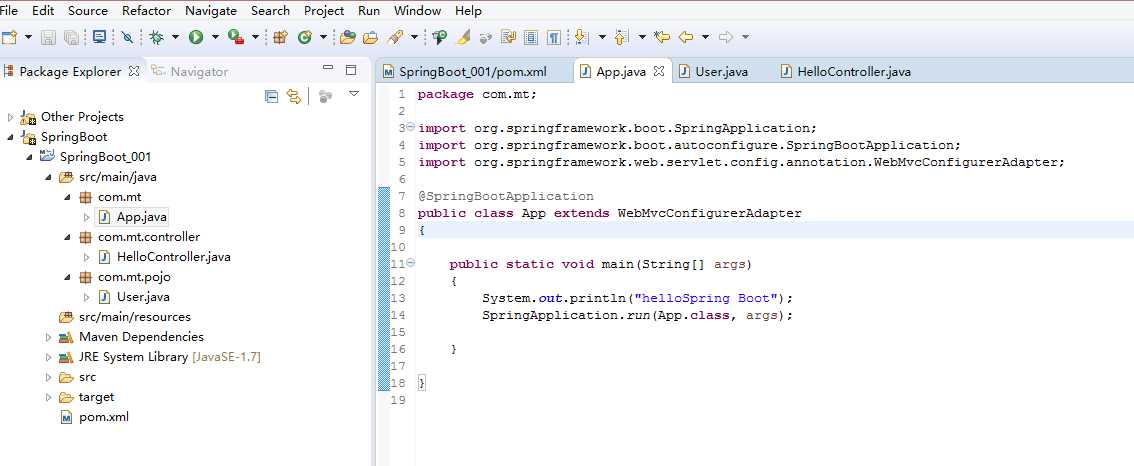
package com.mt;

import org.springframework.boot.SpringApplication;
import org.springframework.boot.autoconfigure.SpringBootApplication;
import org.springframework.web.servlet.config.annotation.WebMvcConfigurerAdapter;

@SpringBootApplication
public class App extends WebMvcConfigurerAdapter
{

    public static void main(String[] args)
    {
        System.out.println("helloSpring Boot");
        SpringApplication.run(App.class, args);

    }

}
4.编写Controller
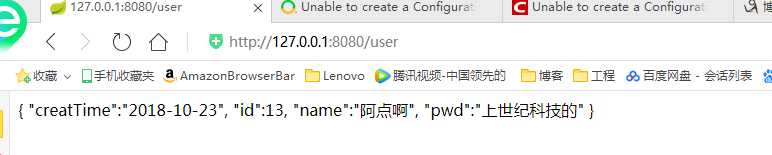
package com.mt.controller;

import java.util.Date;

import org.springframework.web.bind.annotation.RequestMapping;
import org.springframework.web.bind.annotation.RestController;

import com.mt.pojo.User;

@RestController
public class HelloController
{
    @RequestMapping("/hello")
    public String hello()
    {
        return "hello Spring Boot";
    }

    @RequestMapping("user")
    private User getUser()
    {
        User u = new User(13l, "阿点啊", "上世纪科技的", new Date());
        return u;
    }
}
实体类代码
package com.mt.pojo;

import java.util.Date;

import com.alibaba.fastjson.annotation.JSONField;

public class User
{
    private Long id;

    private String name;

    private String pwd;
    //此处使用了fastjson 格式化输出日期格式
    @JSONField(format = "yyyy-MM-dd")
    private Date creatTime;

    public User(Long id, String name, String pwd, Date creatTime)
    {
        super();
        this.id = id;
        this.name = name;
        this.pwd = pwd;
        this.creatTime = creatTime;
    }

    public Date getCreatTime()
    {
        return creatTime;
    }

    public void setCreatTime(Date creatTime)
    {
        this.creatTime = creatTime;
    }

    public Long getId()
    {
        return id;
    }

    public void setId(Long id)
    {
        this.id = id;
    }

    public String getName()
    {
        return name;
    }

    public void setName(String name)
    {
        this.name = name;
    }

    public String getPwd()
    {
        return pwd;
    }

    public void setPwd(String pwd)
    {
        this.pwd = pwd;
    }

    public User(Long id, String name, String pwd)
    {
        super();
        this.id = id;
        this.name = name;
        this.pwd = pwd;
    }

    public User()
    {
        super();
    }

}
5.测试
默认的端口号为:8080
错误截图
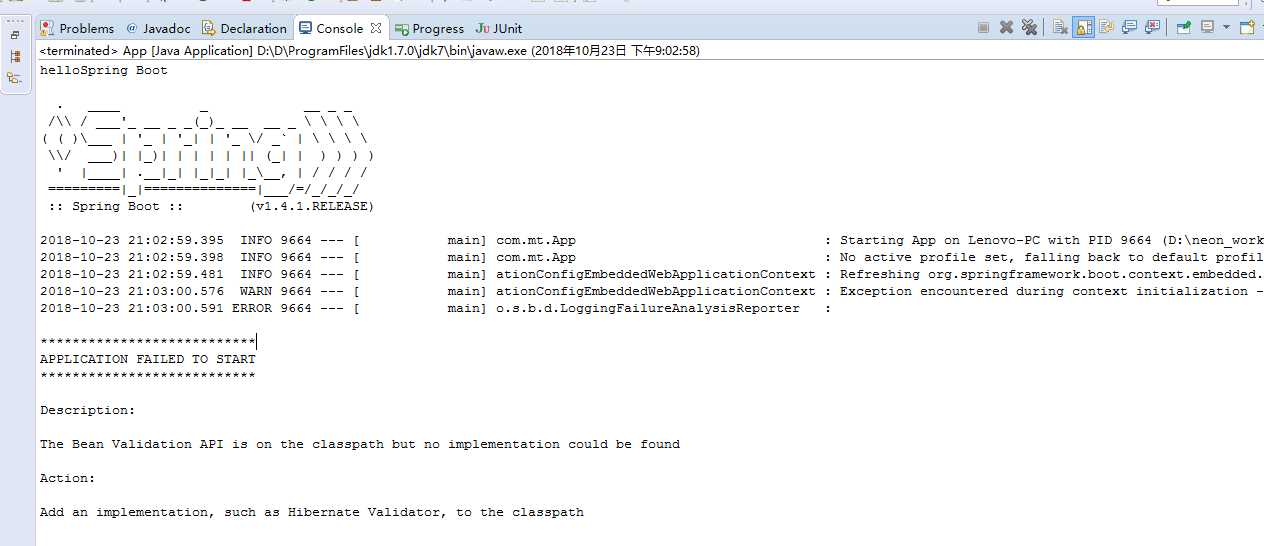

解决方法(百度):
在pom.xml中加入 hibernate-validator依赖
Spring Boot 初体验(1)——helloWorld
标签:val 实体类 pos ati fast res lips getc dep
原文地址:https://www.cnblogs.com/kuangyefeige/p/9839464.html
