标签:img 存储器 hbase scribe link 接收 领域 日志文件 .exe
一、flume特点
flume是目前大数据领域数据采集的一个利器,当然除了flume还有Fluentd和logstash,其他的目前来说并没有深入的了解,但是我觉得flume能够在大数据繁荣的今天屹立不倒,应该有以下几点:
1. Flume可以将应用产生的数据存储到任何集中存储器中,完美的介入HDFS和HBASE等,便于后期进行数据处理
2. 当收集数据的速度超过将写入数据的时候,也就是当收集信息遇到峰值时,这时候收集的信息非常大,甚至超过了系统的写入数据能力,这时候,Flume会在数据生产者和数据收容器间做出调整,保证其能够在两者之间提供一共平稳的数据,另一方面flume与kafka可以说是配合的天衣无缝,flume的采集对接kafka的缓冲层,可以让他本身在譬如双11等高并发的情况下依然能够提供完美的服务,这样的结构致使flume有非常好的容错性
4. Flume的管道是基于事务,保证了数据在传送和接收时的一致性
5. Flume是易管理的、操作简单,我们仅仅需要一个配置文件(四个步骤配置Source,配置Channel,配置slink然后将三者串接起来)就可以完成一个常用的日志采集系统
6. 支持多路径多来源和多种处理方式针对消息事件进行处理,在使用过程中完全可以根据不同的业务需求对不同数据源的不同数据进行分别处理,可以完成对数据的复用和复制(复用:根据不同的表示将消息发送到不同的通道,复制:将一个事件分发到所有的通道中)
7. 肯定还有其他没有考虑到的特点,还请小伙伴指教.....
二、flume的结构
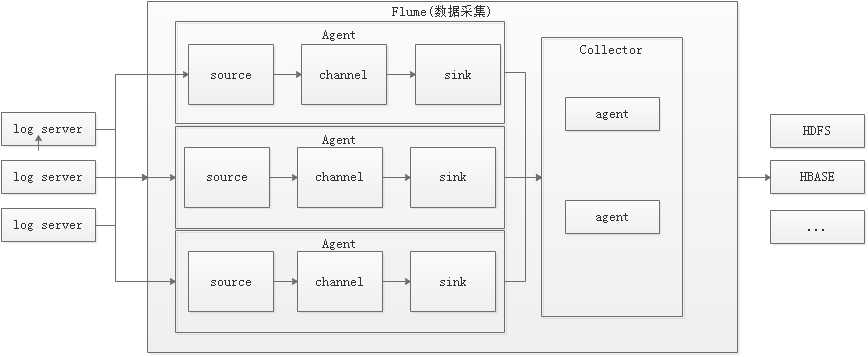
这个是小生画的一个简图,仅供参考

如上所示:
flume只要是对日志数据进行采集并通过流的形式写入到存储系统中,flume主要由agent和Collector两个部分组成,但是由于collector里面跟agent的结构相同,导致现在多数的资料上面都说的是flume里面只含有agent(这里就拿agent为例来说整个结构,以上只是本人拙见,希望大家多多指正)
Agent中包含三个组件source、channel、sink
Source负责接收输入数据,并将数据写入管道。Flume的Source支持HTTP,JMS,RPC,avro(来源于别的agent中的sink),NetCat(网络端口访问),Exec(文件访问),Spooling Directory。
Channel 从类型区分menory channel和file channel,缓存从source到Sink的中间数据。可使用不同的配置来做Channel,例如内存,文件,JDBC等。使用内存性能高但不持久,有可能丢数据。使用文件更可靠,但性能不如内存。
Sink负责从管道中读出数据并发给下一个Agent或者最终的目的地。Sink支持的不同目的地种类包括:HDFS,HBASE,Solr,ElasticSearch,File,Logger或者其它的Flume Agent。Flume在source和sink端都使用了transaction机制保证在数据传输中没有数据丢失。
三、flume安装
flume安装整体来说非常简单,直接解压压缩包即可,解压完成之后配置环境变量,配置之后在控制台输入flume-ng,如图所示,表示已经安装成功
[root@master bin]# ./flume-ng version
Flume 1.6.0
Source code repository: https://git-wip-us.apache.org/repos/asf/flume.git
Revision: 2561a23240a71ba20bf288c7c2cda88f443c2080
Compiled by hshreedharan on Mon May 11 11:15:44 PDT 2015
From source with checksum b29e416802ce9ece3269d34233baf43f
四、flume的使用讲解
flume使用可以参考apache进行配置,地址 http://flume.apache.org/FlumeUserGuide.html
1.对端口进行监控,实操的话需要在虚拟机中安装telnet,具体安装操作在此不做赘述
<1>.vi $FLUME_HOME/conf/example.conf
------------配置文件模板---------------------------
# Name the components on this agent
a1.sources = r1
a1.sinks = k1
a1.channels = c1

# Describe/configure the source
a1.sources.r1.type = netcat
a1.sources.r1.bind = master
a1.sources.r1.port = 44444

# Describe the sink
a1.sinks.k1.type = logger

# Use a channel which buffers events in memory
a1.channels.c1.type = memory
a1.channels.c1.capacity = 1000
a1.channels.c1.transactionCapacity = 100

# Bind the source and sink to the channel
a1.sources.r1.channels = c1
a1.sinks.k1.channel = c1

------------配置文件详解,--后面跟的是该行的解释---------------------------
# Name the components on this agent
a1.sources = r1      --声明一个agent,这个agent的source的名字是r1
a1.sinks = k1      --说明此agent的sink的名字是r1
a1.channels = c1  --说明此agent的sink的名字是r1

# Describe/configure the source  --配置source的信息,此处参考 http://flume.apache.org/FlumeUserGuide.html#flume-sources
a1.sources.r1.type = netcat         --netcat 表示监听一个给定的端口并将每一行文本转换为事件,
除此之外还有两个较为常用的类型avro 表示这个source的来源是其它的agent,exec 表示在标准输出上连续生成数据(stderr被简单地丢弃,除非属性logStdErr被设置为true)
a1.sources.r1.bind = master      --表示source的来源agent所在的ip地址,也可以是hostname
a1.sources.r1.port = 44444       --表示监听的端口

# Describe the sink              --配置sink的信息,此处参考 http://flume.apache.org/FlumeUserGuide.html#flume-sinks
a1.sinks.k1.type = logger         --表示直接输出在控制台,除此之外还有其他比较常用的输出类型,avro,当类型是avro的时候需要执行hostname和端口(具体的例子待头回附上)

# Use a channel which buffers events in memory  --配置channel的信息,此处参考 http://flume.apache.org/FlumeUserGuide.html#flume-channels
a1.channels.c1.type = memory                    --表明这个channel是一个memory channel
a1.channels.c1.capacity = 1000                  --表示存储在通道中的最大的时间个数,非必选,可以删除
a1.channels.c1.transactionCapacity = 100        --表示信道将从源获取的最大事件数,非必选,可以删除

# Bind the source and sink to the channel    --最后,通过这块儿的配置将source、channel、sink串接成一个agent
a1.sources.r1.channels = c1                     --source r1的数据传输给channel c1上
a1.sinks.k1.channel = c1                     --sink k1的数据来源于channel c1
<2>flume服务器远程监控项目服务器的日志文件,这种情况下需要多个配置文件。
代码解释跟上面配置文件一样,在此不再赘述
vi $FLUME_HOME/conf/distince_log/exec-memory-avro.conf

exec-memory-avro.sources = exec-source
exec-memory-avro.sinks = avro-sink
exec-memory-avro.channels = memory-channel

exec-memory-avro.sources.exec-source.type = exec
exec-memory-avro.sources.exec-source.command = tail -F /home/hadoop/data/data.log
exec-memory-avro.sources.exec-source.shell = /bin/sh -c

exec-memory-avro.sinks.avro-sink.type = avro
exec-memory-avro.sinks.avro-sink.hostname = master
exec-memory-avro.sinks.avro-sink.port = 44444

exec-memory-avro.channels.memory-channel.type = memory

exec-memory-avro.sources.exec-source.channels = memory-channel
exec-memory-avro.sinks.avro-sink.channel = memory-channel


vi $FLUME_HOME/conf/distince_log/avro-memory-logger.conf
avro-memory-logger.sources = avro-source
avro-memory-logger.sinks = logger-sink
avro-memory-logger.channels = memory-channel

avro-memory-logger.sources.avro-source.type = avro
avro-memory-logger.sources.avro-source.bind = slave1
avro-memory-logger.sources.avro-source.port = 44444

avro-memory-logger.sinks.logger-sink.type = logger

avro-memory-logger.channels.memory-channel.type = memory

avro-memory-logger.sources.avro-source.channels = memory-channel
avro-memory-logger.sinks.logger-sink.channel = memory-channel


先启动avro-memory-logger
flume-ng agent --name avro-memory-logger  --conf $FLUME_HOME/conf  --conf-file $FLUME_HOME/conf/avro-memory-logger.conf -Dflume.root.logger=INFO,console


flume-ng agent --name exec-memory-avro  --conf $FLUME_HOME/conf  --conf-file $FLUME_HOME/conf/exec-memory-avro.conf -Dflume.root.logger=INFO,console
2.运行flume,运行采用命令行,多个flume同时工作的时候需要先启动最下级的flume,然后再一次往上启动运行flume
$ bin/flume-ng agent                             --表示通过flume-ng启动一个agent
--conf $FLUME_HOME/conf                       --这里配置配置文件的父路径信息,注:只到文件夹
--conf-file $FLUME_HOME/conf/example.conf    --这里配置配置文件的全路径信息,注:必须到文件名
--name a1                                      --这个agent的名字叫a1,此处的名字必须跟配置文件中的名字保持一致
-Dflume.root.logger=INFO,console             --表示输出级别是info级别,输出到控制台
3.另起一个端口,登录到master,通过telnet来模拟数据访问(此处设计telnet的安装等...),启动之后在端口中输入内容,可以查看到控制台上以事件的形式输出了你所输入的内容
telnet master 44444

注意:此处端口必须与文件中配置的端口保持一致(telnet一般默认端口是23端口),需要查看防火墙是否开放
flume多机器之间进行日志数据采集及flume集群相关内容,谨待下次分享,以上内容,如有错误,还请指正,不胜感激......
标签:img 存储器 hbase scribe link 接收 领域 日志文件 .exe
原文地址:https://www.cnblogs.com/slymonkey/p/9946767.html