标签:isp 使用 fill void tco none imageview array osi
效果图:
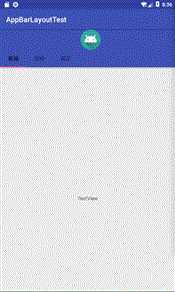
添加appbarlayout到xml文件中,然后在toolbar下面添加一个imageview并设置居中放置,我放置的是上面那个安卓的图标。
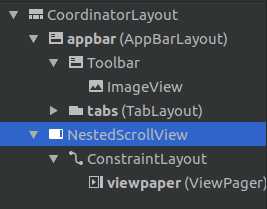
根据之前学过的toolbar那一节,结合viewpaper和toolbar设置三个页面,这时,运行程序,可能发现那三个页面并没有显示出来,NetedScollView这是个可滚动的页面,单击它,在右侧勾选fillViewport。在运行程序就可以显示页面了。
page1
page2
page3
附上代码
main.java

package com.example.aimee.appbarlayouttest;

import android.support.annotation.Nullable;
import android.support.design.widget.TabLayout;
import android.support.v4.app.Fragment;
import android.support.v4.app.FragmentManager;
import android.support.v4.app.FragmentPagerAdapter;
import android.support.v4.view.ViewPager;
import android.support.v7.app.AppCompatActivity;
import android.os.Bundle;

import java.util.ArrayList;
import java.util.List;

public class MainActivity extends AppCompatActivity {
    TabLayout tabLayout;
    ViewPager viewPager;
    List<Fragment>fragments;
    String[] title={"新闻","财经","娱乐"};

    @Override
    protected void onCreate(Bundle savedInstanceState) {
        super.onCreate(savedInstanceState);
        setContentView(R.layout.activity_main);

        tabLayout=findViewById(R.id.tabs);
        viewPager=findViewById(R.id.viewpaper);

        fragments=new ArrayList<>();
        fragments.add(new MyFragment1());
        fragments.add(new MyFragment2());
        fragments.add(new MyFragment3());
        MyAdpter myAdpter=new MyAdpter(getSupportFragmentManager(),fragments);
        viewPager.setAdapter(myAdpter);
        tabLayout.setupWithViewPager(viewPager);
    }

    private class MyAdpter extends FragmentPagerAdapter{
        private List<Fragment>fragments;

        public MyAdpter(FragmentManager fm,List<Fragment>fragments) {
            super(fm);
            this.fragments=fragments;
        }

        @Override
        public Fragment getItem(int position) {
            return fragments.get(position);
        }

        @Override
        public int getCount() {
            return fragments.size();
        }

        @Nullable
        @Override
        public CharSequence getPageTitle(int position) {
            return title[position];
        }
    }
}
MyFragment1.java
package com.example.aimee.appbarlayouttest;

import android.os.Bundle;
import android.support.annotation.NonNull;
import android.support.annotation.Nullable;
import android.support.v4.app.Fragment;
import android.view.LayoutInflater;
import android.view.View;
import android.view.ViewGroup;

public class MyFragment1 extends Fragment {
    @Nullable
    @Override
    public View onCreateView(@NonNull LayoutInflater inflater, @Nullable ViewGroup container, @Nullable Bundle savedInstanceState) {
        View view1=inflater.inflate(R.layout.layout_page1,container,false);
        return view1;
    }
}
MyFragment2.java
package com.example.aimee.appbarlayouttest;

import android.os.Bundle;
import android.support.annotation.NonNull;
import android.support.annotation.Nullable;
import android.support.v4.app.Fragment;
import android.view.LayoutInflater;
import android.view.View;
import android.view.ViewGroup;

public class MyFragment2 extends Fragment {
    @Nullable
    @Override
    public View onCreateView(@NonNull LayoutInflater inflater, @Nullable ViewGroup container, @Nullable Bundle savedInstanceState) {
        View view1=inflater.inflate(R.layout.layout_page2,container,false);
        return view1;
    }
}
MyFragment3.java
package com.example.aimee.appbarlayouttest;

import android.os.Bundle;
import android.support.annotation.NonNull;
import android.support.annotation.Nullable;
import android.support.v4.app.Fragment;
import android.view.LayoutInflater;
import android.view.View;
import android.view.ViewGroup;

public class MyFragment3 extends Fragment {
    @Nullable
    @Override
    public View onCreateView(@NonNull LayoutInflater inflater, @Nullable ViewGroup container, @Nullable Bundle savedInstanceState) {
        View view1=inflater.inflate(R.layout.layout_page3,container,false);
        return view1;
    }
}
main.xml
<?xml version="1.0" encoding="utf-8"?>
<android.support.design.widget.CoordinatorLayout xmlns:android="http://schemas.android.com/apk/res/android"
    xmlns:tools="http://schemas.android.com/tools"
    xmlns:app="http://schemas.android.com/apk/res-auto"
    android:layout_width="match_parent"
    android:layout_height="match_parent">

    <android.support.design.widget.AppBarLayout
        android:id="@+id/appbar"
        android:layout_height="wrap_content"
        android:layout_width="match_parent">

        <android.support.v7.widget.Toolbar
            android:gravity="center"
            android:layout_height="?attr/actionBarSize"
            android:layout_width="match_parent"
            app:layout_scrollFlags="scroll|enterAlways">
            <ImageView
                android:src="@mipmap/ic_launcher"
                android:layout_width="match_parent"
                android:layout_height="wrap_content" />
        </android.support.v7.widget.Toolbar>

        <android.support.design.widget.TabLayout
            android:id="@+id/tabs"
            android:layout_width="match_parent"
            android:layout_height="wrap_content"
            app:layout_scrollFlags="scroll|enterAlways"
            app:tabMode="scrollable">

            <android.support.design.widget.TabItem
                android:layout_height="wrap_content"
                android:layout_width="wrap_content"
                android:text="Tab1" />

            <android.support.design.widget.TabItem
                android:layout_height="wrap_content"
                android:layout_width="wrap_content"
                android:text="Tab2" />

            <android.support.design.widget.TabItem
                android:layout_height="wrap_content"
                android:layout_width="wrap_content"
                android:text="Tab3" />
        </android.support.design.widget.TabLayout>

    </android.support.design.widget.AppBarLayout>

    <android.support.v4.widget.NestedScrollView
        android:layout_width="match_parent"
        android:layout_height="match_parent"
        android:fillViewport="true"
        app:layout_behavior="android.support.design.widget.AppBarLayout$ScrollingViewBehavior">

        <android.support.constraint.ConstraintLayout
            android:layout_width="match_parent"
            android:layout_height="match_parent"
            tools:context=".MainActivity">

            <android.support.v4.view.ViewPager
                android:id="@+id/viewpaper"
                android:layout_width="match_parent"
                android:layout_height="0dp" />
        </android.support.constraint.ConstraintLayout>
    </android.support.v4.widget.NestedScrollView>

</android.support.design.widget.CoordinatorLayout>
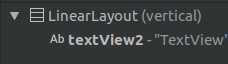
layout_page1.xml
<?xml version="1.0" encoding="utf-8"?>
<LinearLayout xmlns:android="http://schemas.android.com/apk/res/android"
    android:layout_width="match_parent"
    android:layout_height="match_parent"
    android:gravity="center"
    android:orientation="vertical">

    <TextView
        android:id="@+id/textView2"
        android:layout_width="wrap_content"
        android:layout_height="wrap_content"
        android:text="TextView" />
</LinearLayout>
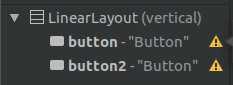
layout_page2.xml
<?xml version="1.0" encoding="utf-8"?>
<LinearLayout xmlns:android="http://schemas.android.com/apk/res/android"
    android:layout_width="match_parent"
    android:layout_height="match_parent"
    android:orientation="vertical">

    <Button
        android:id="@+id/button"
        android:layout_width="match_parent"
        android:layout_height="wrap_content"
        android:text="Button" />

    <Button
        android:id="@+id/button2"
        android:layout_width="match_parent"
        android:layout_height="wrap_content"
        android:text="Button" />
</LinearLayout>
layout_page3.xml
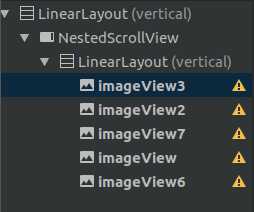
<?xml version="1.0" encoding="utf-8"?>
<LinearLayout xmlns:android="http://schemas.android.com/apk/res/android"
    xmlns:app="http://schemas.android.com/apk/res-auto"
    android:layout_width="match_parent"
    android:gravity="center"
    android:layout_height="match_parent"
    android:orientation="vertical">

    <android.support.v4.widget.NestedScrollView
        android:layout_width="match_parent"
        android:layout_height="match_parent"
        android:fillViewport="true">

        <LinearLayout
            android:layout_width="match_parent"
            android:layout_height="wrap_content"
            android:orientation="vertical" >

            <ImageView
                android:scaleType="fitXY"
                android:id="@+id/imageView3"
                android:layout_width="match_parent"
                android:layout_height="wrap_content"
                app:srcCompat="@drawable/a3" />

            <ImageView
                android:scaleType="fitXY"
                android:id="@+id/imageView2"
                android:layout_width="match_parent"
                android:layout_height="wrap_content"
                app:srcCompat="@drawable/a1" />

            <ImageView
                android:scaleType="fitXY"
                android:id="@+id/imageView7"
                android:layout_width="match_parent"
                android:layout_height="wrap_content"
                app:srcCompat="@drawable/a2" />

            <ImageView
                android:scaleType="fitXY"
                android:id="@+id/imageView"
                android:layout_width="match_parent"
                android:layout_height="wrap_content"
                app:srcCompat="@drawable/a5" />

            <ImageView
                android:scaleType="fitXY"
                android:id="@+id/imageView6"
                android:layout_width="match_parent"
                android:layout_height="wrap_content"
                app:srcCompat="@drawable/a4" />
        </LinearLayout>
    </android.support.v4.widget.NestedScrollView>

</LinearLayout>
注:图片放在drawable下面。
标签:isp 使用 fill void tco none imageview array osi
原文地址:https://www.cnblogs.com/smart-zihan/p/9961583.html
