码迷,mamicode.com
首页 > 编程语言 > 详细

Python之路(二十三):BOM、DOM

时间:2018-11-16 13:25:41      阅读:201      评论:0      收藏:0      [点我收藏+]

标签:关系   计时   添加   调用   init   over   其他   NPU   win   

BOM、DOM


上篇回顾

javascript的简单定义及了解

引入方式及存在方式

定义变量的方式及需要注意的地方

常量以及标识符

运算符之间的一些比较

控制语句有哪些

基本数据类型及其方法

函数的简单介绍及使用

BOM

1、了解

BOM(浏览器对象模型),可以对浏览器窗口进行访问和操作。使用 BOM,开发者可以移动窗口、改变状态栏中的文本以及执行其他与页面内容不直接相关的动作。

使 JavaScript 有能力与浏览器“对话”。 从而提供与浏览器交互的方法和接口

2、window对象

1
2
3
4
5
//window对象
    所有浏览器都支持 window 对象 表示浏览器窗口
    概念上讲.一个html文档对应一个window对象.
    功能上讲: 控制浏览器窗口的.
    使用上讲: window对象不需要创建对象,直接使用即可.

3、window对象方法

1
2
3
4
5
6
7
8
9
10
11
alert()            显示带有一段消息和一个确认按钮的警告框。
confirm()          显示带有一段消息以及确认按钮和取消按钮的对话框。   // 其方法有返回值,结果为布尔值 可以进行一系列的判断
prompt()           显示可提示用户输入的对话框。                    // 其方法有返回值,输入有内容,即返回内容;点取消则返回null
 
open()             打开一个新的浏览器窗口或查找一个已命名的窗口。
close()            关闭浏览器窗口。
setInterval()      按照指定的周期(以毫秒计)来调用函数或计算表达式。
clearInterval()    取消由 setInterval() 设置的 timeout。
setTimeout()       在指定的毫秒数后调用函数或计算表达式。
clearTimeout()     取消由 setTimeout() 方法设置的 timeout。
scrollTo()         把内容滚动到指定的坐标。
技术分享图片
技术分享图片
// 实例
// 在输入框,实现点击显示当前时间,并有stop按钮

<!DOCTYPE html>
<html lang="en">
<head>
    <meta charset="UTF-8">
    <title>Title</title>
    <style>
        #show{
            width: 200px;
            height: 50px;
        }
    </style>
</head>
<body>
    <input type="text" id="show" onclick="begin()">  <!--绑定点击事件并触发begin函数-->
    <button onclick="end()">Stop</button>            <!--绑定点击事件并触发end函数-->

    <script>
        function showtime() {
            var date_time = new Date().toLocaleString();    // 获取当前事件
            var content = document.getElementById("show");  // 找到id为。。的标签
            content.value = date_time;                      // 对标签的value进行赋值
        }

        var clock;   // 声明变量
        function begin() {
            // 变量未被定义则为undefined
            if (clock==undefined){
                showtime();  // 执行函数
                clock = setInterval(showtime,1000);  // 多次计时 单位毫秒
            }
        }

        function end() {
            clearInterval(clock);  // 清空多次定时器
            clock=undefined;       // 重新赋值
            }
    </script>
</body>
</html>
技术分享图片
技术分享图片
技术分享图片
<!DOCTYPE html>
<html lang="en">
<head>
    <meta charset="UTF-8">
    <title>Title</title>
</head>
<body>
    <button onclick="f1()">点我</button>
    <button onclick="f2()">停止</button>


    <script>
        var my_var;
        function f1() {
            my_var = setTimeout(function () {alert("Hello World")},3000);
            // 等待三秒  弹出框Hello World
        }

        function f2() {
            clearTimeout(my_var);
            // 清除单次计时器
            // 且必须在3000毫秒之前点击 否则无效
        }

    </script>
</body>
</html>
技术分享图片

4、History

History 对象包含用户(在浏览器窗口中)访问过的 URL。

History 对象是 window 对象的一部分,可通过 window.history 属性对其进行访问。

length  返回浏览器历史列表中的 URL 数量。

1
2
3
4
5
// history方法
 
back()         加载 history 列表中的前一个 URL。
forward()    加载 history 列表中的下一个 URL。
go()            加载 history 列表中的某个具体页面。
技术分享图片
<a href="rrr.html">click</a>
<button onclick=" history.forward()">>>></button>
<button onclick="history.back()">back</button>
<button onclick="history.go()">back</button>

// go里面的参数 1 和 -1 对应    

5、location

Location 对象包含有关当前 URL 的信息。

Location 对象是 Window 对象的一个部分,可通过 window.location 属性来访问。编写时可不使用 window 这个前缀。

Location提供的方法

  • location.hostname 返回 web 主机的域名
  • location.pathname 返回当前页面的路径和文件名
  • location.port 返回 web 主机的端口 (80 或 443)
  • location.protocol 返回所使用的 web 协议(http:// 或 https://)
  • location.assign(URL) 加载新文档
  • location.replace(newurl) 加载新文档
  • location.reload() 重新加载 类似于浏览器刷新的快捷键F5
技术分享图片
技术分享图片
<!DOCTYPE html>
<html lang="en">
<head>
    <meta charset="UTF-8">
</head>
<body>
    <button onclick="newurl()">加载assign文档</button>
    <button onclick="myurl()">加载replace文档</button>
    <button onclick="flush()">刷新文档</button>
    <script>
        console.log(location.hostname);
        console.log(location.pathname);
        console.log(location.port);
        console.log(location.protocol);
        console.log(location.href);
        // assign
        function newurl() {
            location.assign("http://www.xiaohuar.com/")
        }

        // replace
        function myurl() {
            location.replace("http://www.xiaohuar.com/")
        }
        // assign与replace的区别  assign可返回 replace不可返回上个url

        // reload
        function flush() {
            location.reload()
        }

    </script>
</body>
</html>
技术分享图片

DOM

1、定义

文档对象模型(Document Object Model,DOM)是一种用于HTML和XML文档的编程接口。

DOM 是 W3C(万维网联盟)的标准。DOM 定义了访问 HTML 和 XML 文档的标准

  • 什么是 XML DOM?  ---->XML DOM 定义了所有 XML 元素的对象和属性,以及访问它们的方法。
  • 什么是 HTML DOM?---->HTML DOM 定义了所有 HTML 元素的对象和属性,以及访问它们的方法。
技术分享图片

通过可编程的对象模型,JavaScript 获得了足够的能力来创建动态的 HTML。

  • JavaScript 能够改变页面中的所有 HTML 元素
  • JavaScript 能够改变页面中的所有 HTML 属性
  • JavaScript 能够改变页面中的所有 CSS 样式
  • JavaScript 能够对页面中的所有事件做出反应

如此可见,体会到JavaScript的强大之处。

针对HTML DOM学习

  • 如何改变 HTML 元素的内容 (innerHTML)
  • 如何改变 HTML 元素的样式 (CSS)
  • 如何对 HTML DOM 事件对出反应
  • 如何添加或删除 HTML 元素

2、节点类型 

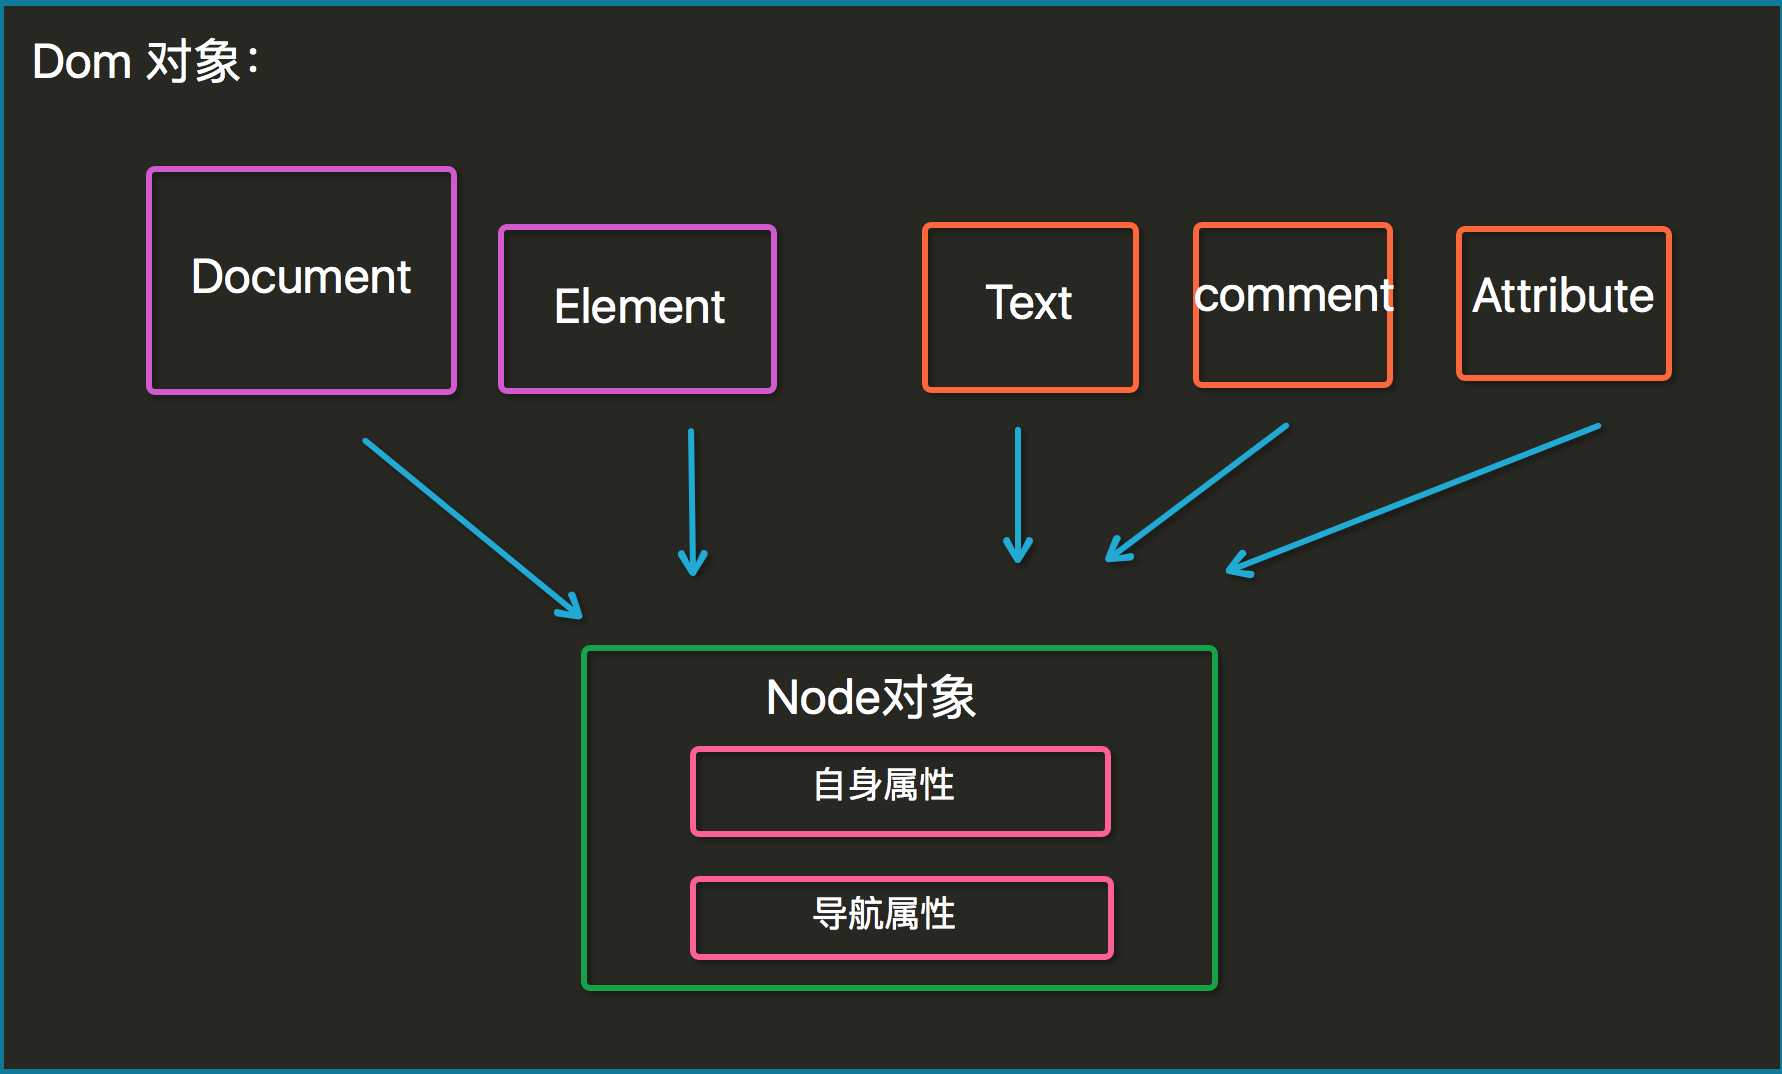
根据 W3C 的 HTML DOM 标准,HTML 文档中的所有内容都是节点:

  • 整个文档是一个文档节点
  • 每个 HTML 元素是元素节点
  • HTML 元素内的文本是文本节点
  • 每个 HTML 属性是属性节点
  • 注释是注释节点

技术分享图片

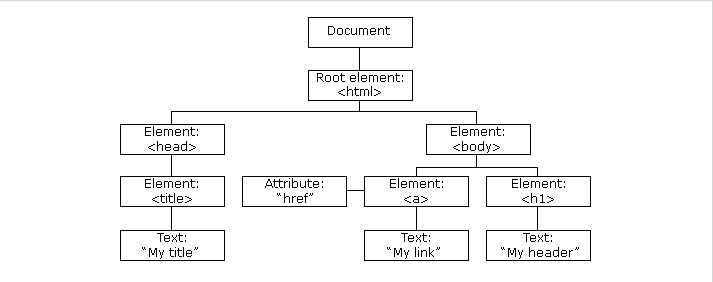
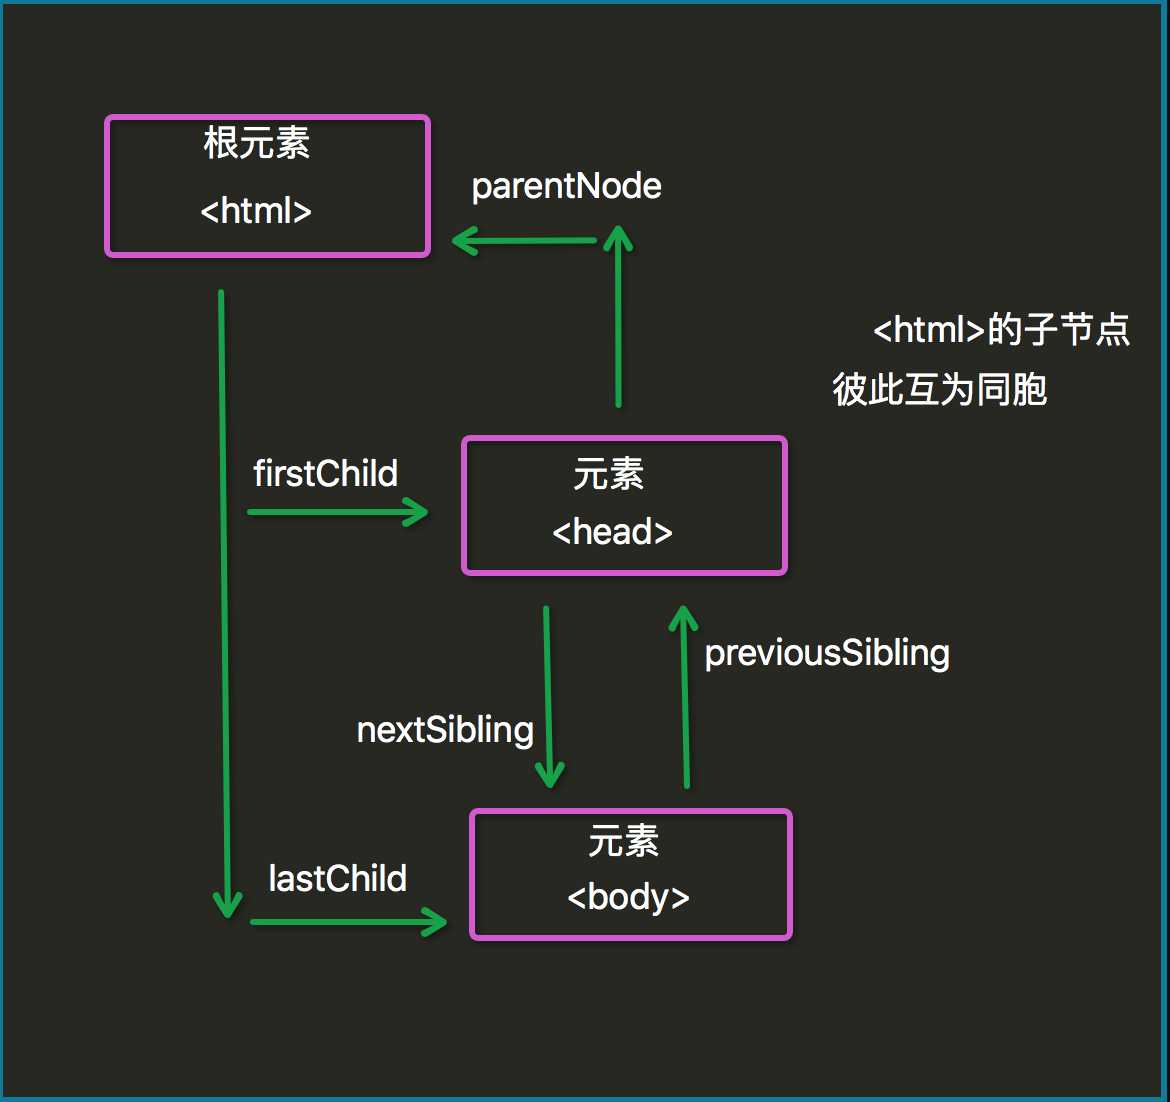
节点树中的节点彼此拥有层级关系。

父(parent)、子(child)和同胞(sibling)等术语用于描述这些关系。父节点拥有子节点。同级的子节点被称为同胞(兄弟或姐妹)。

  • 在节点树中,顶端节点被称为根(root)
  • 每个节点都有父节点、除了根(它没有父节点)
  • 一个节点可拥有任意数量的子
  • 同胞是拥有相同父节点的节点

下面的图片展示了节点树的一部分,以及节点之间的关系:
技术分享图片

3、节点属性

  直接查找

1
2
3
4
document.getElementById             根据ID获取一个标签
document.getElementsByName          根据name属性获取标签集合
document.getElementsByClassName     根据class属性获取标签集合
document.getElementsByTagName       根据标签名获取标签集合

  间接查找

1
2
3
4
5
6
7
8
9
10
11
12
13
parentNode          // 父节点
childNodes          // 所有子节点
firstChild          // 第一个子节点
lastChild           // 最后一个子节点
nextSibling         // 下一个兄弟节点
previousSibling     // 上一个兄弟节点
  
parentElement           // 父节点标签元素
children                // 所有子标签
firstElementChild       // 第一个子标签元素
lastElementChild        // 最后一个子标签元素
nextElementtSibling     // 下一个兄弟标签元素
previousElementSibling  // 上一个兄弟标签元素

4、节点操作

  内容

1
2
3
innerText  文本内容
 
innerHTML   HTML内容

  属性

1
2
3
attributes                // 获取所有标签属性
setAttribute(key,value)   // 设置标签属性
getAttribute(key)         // 获取指定标签属性

  node(节点)增、删、改、查

1
2
3
4
5
6
7
8
9
10
11
12
13
14
15
16
17
18
19
20
21
22
23
24
25
// 增
 
document.createElement(name)    // 将创建标签由document来
父级标签.appendchild(name)           // 由父级标签添加
 
// 删
 
获取删除的标签
父级标签.removeChild(name)
 
// 改
 
第一种方式:
 
      先进行删除、再进行增加   增删进行配合操作
 
第二中方式:
 
      使用setAttribute();方法修改属性         
 
      使用innerHTML属性修改元素的内容
 
// 查
 
...
技术分享图片
技术分享图片
<!DOCTYPE html>
<html lang="en">
<head>
    <meta charset="UTF-8">
    <title>Title</title>
    <style>
        .replece{
            width: 100px; height: 100px;
            background-color: gray;
        }
        div{
            width: 300px; height: 200px;
            background-color: #8aab30;
        }
        .replece{
            width: 300px; height: 100px;
            background-color: yellow;
        }
    </style>
</head>
<body>
<button onclick="rep()">替换</button>

<div class="div1" id="xx">
    Hello World
    <a href="http://www.baidu.com" class="go">百度</a>

    
    <div class="replece"></div>
</div>

<!--<img src="timg.jpg" >-->
<script>
    //

    var ele_div = document.getElementsByClassName("div1")[0];  // 通过class找标签

    add_p = document.createElement("p");  // 由文档对象创建标签

    add_p.innerHTML = "Hello girl";       // 为创建的标签进行添加内容

    ele_div.appendChild(add_p);           // 添加操作由父级标签来添加

    //

    var del_a = document.getElementsByClassName("go")[0];  // 获取删除的标签啊

    var father = del_a.parentNode;  // 删除标签的父级标签

    father.removeChild(del_a);      // 父级进行删除

    //
    
    function rep() {
        var ele_replace = document.getElementsByClassName("replece")[0];

        var ele_img = document.createElement("img");

        ele_img.setAttribute("src","go_top.png");

        var father = ele_replace.parentNode;

        father.appendChild(ele_img);

        father.replaceChild(img,ele_replace);
    }


</script>
</body>
</html>
技术分享图片
技术分享图片
技术分享图片
// 注意点: 根据class获取得到的是数组


<!DOCTYPE html>
<html lang="en">
<head>
    <meta charset="UTF-8">
    <title>Title</title>
    <style>
        .div1,.div2,.div3,.div4{
            width: 300px;
            height: 100px;
        }
        .div1{
            background-color: green;
        }
         .div2{
            background-color: yellow;
        }
         .div3{
            background-color: rebeccapurple;
        }
         .div4{
            background-color: deeppink;
        }
    </style>
</head>
<body>

<div class="div1">
    <button onclick="add()">add</button>
    hello div1
</div>
<div class="div2">
    <button onclick="del()">del</button>
    hello div2
</div>
<div class="div3">
    <button onclick="change()">change</button>
    <p>hello div3</p>
</div>
<div class="div4">hello div4</div>


<script>
    function change() {
        var img=document.createElement("img");//<img src="">
        //img.setAttribute("src","meinv.jpg");
        img.src="meinv.jpg";

        var ele=document.getElementsByTagName("p")[0];
        var father=document.getElementsByClassName("div3")[0];

        father.replaceChild(img,ele)


    }
    function add() {
        var ele=document.createElement("p");//<p></p>
        ele.innerHTML="<h1>hello p</h1>";
        //ele.innerText="<h1>hello p</h1>";
        ele.style.color="red";
        ele.style.fontSize="10px";
        var father=document.getElementsByClassName("div1")[0];
        father.appendChild(ele)

    }

    function del() {
        var father=document.getElementsByClassName("div1")[0];
        var son=father.getElementsByTagName("p")[0];
        father.removeChild(son)

    }


</script>
</body>
</html>
技术分享图片

  class操作

1
2
3
4
5
// 通过Elements去调用
 
className                // 获取所有类名
classList.remove(cls)    // 删除指定类
classList.add(cls)       // 添加类

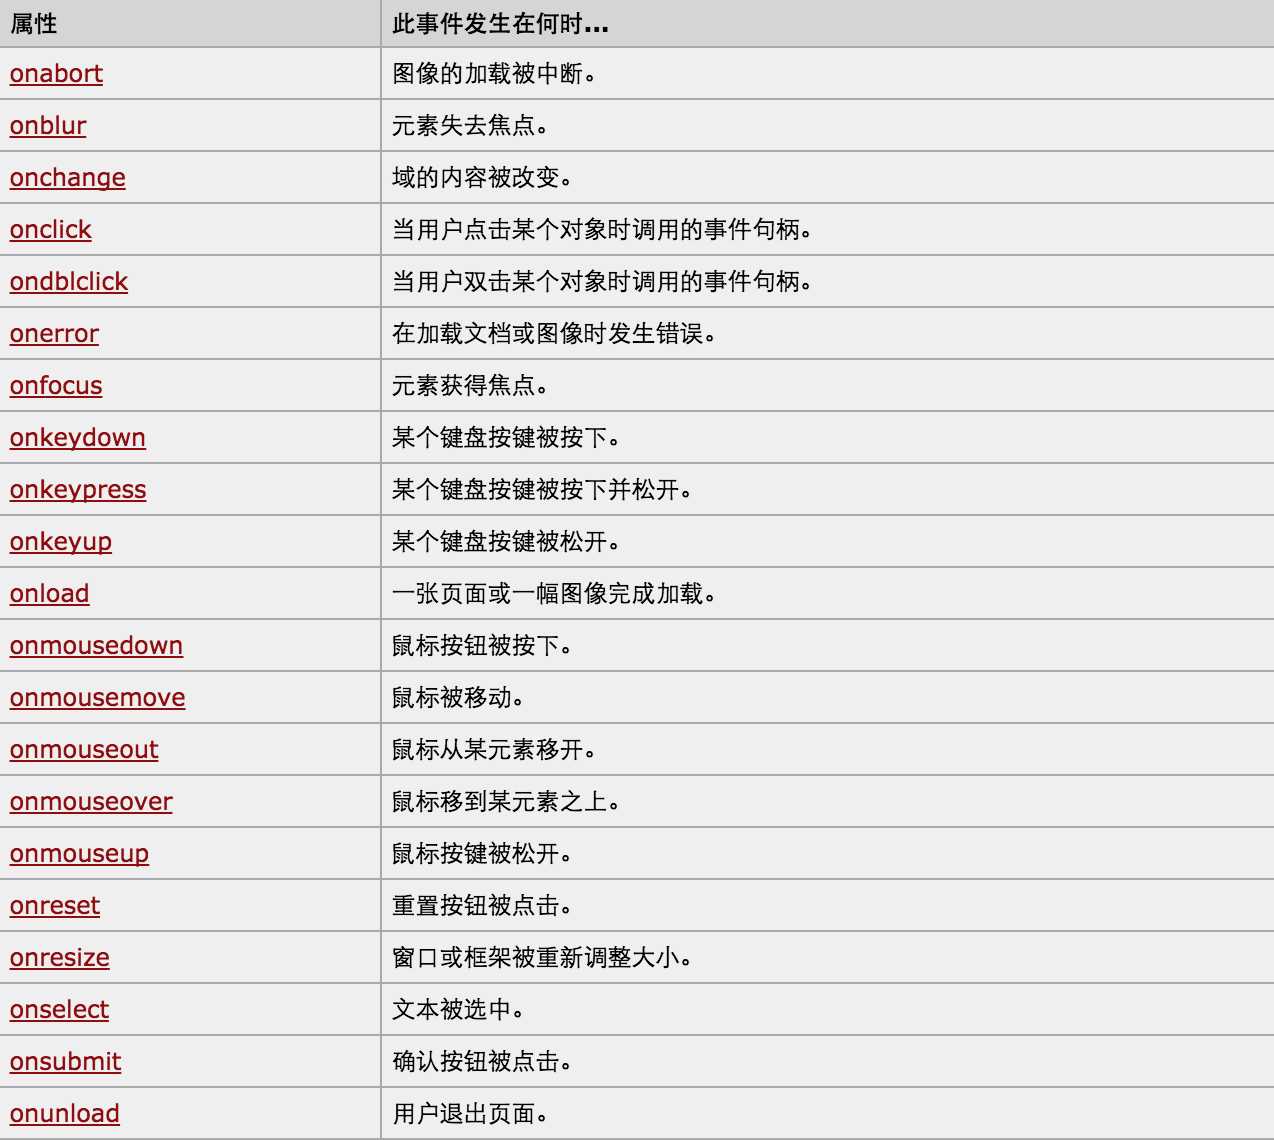
事件

技术分享图片

对于事件需要注意的要点:

  • this  
  • event
  • 事件链以及跳出

this标签当前正在操作的标签,event封装了当前事件的内容。

DOM拾遗

A,简单获取select标签选中的文本

技术分享图片
技术分享图片
<!DOCTYPE html>
<html lang="en">
<head>
    <meta charset="UTF-8">
    <title>Title</title>
</head>
<body>
    <select name="" id="xx">
        <option value="0">北京</option>
        <option value="1">上海</option>
        <option value="2">广州</option>
    </select>
    <script>
        sel = document.getElementById(xx);
        text = sel.selectedOptions[0].innerHTML;
        console.log(text)
    </script>
</body>
</html>
技术分享图片

BOM、DOM


上篇回顾

javascript的简单定义及了解

引入方式及存在方式

定义变量的方式及需要注意的地方

常量以及标识符

运算符之间的一些比较

控制语句有哪些

基本数据类型及其方法

函数的简单介绍及使用

BOM

1、了解

BOM(浏览器对象模型),可以对浏览器窗口进行访问和操作。使用 BOM,开发者可以移动窗口、改变状态栏中的文本以及执行其他与页面内容不直接相关的动作。

使 JavaScript 有能力与浏览器“对话”。 从而提供与浏览器交互的方法和接口

2、window对象

1
2
3
4
5
//window对象
    所有浏览器都支持 window 对象 表示浏览器窗口
    概念上讲.一个html文档对应一个window对象.
    功能上讲: 控制浏览器窗口的.
    使用上讲: window对象不需要创建对象,直接使用即可.

3、window对象方法

1
2
3
4
5
6
7
8
9
10
11
alert()            显示带有一段消息和一个确认按钮的警告框。
confirm()          显示带有一段消息以及确认按钮和取消按钮的对话框。   // 其方法有返回值,结果为布尔值 可以进行一系列的判断
prompt()           显示可提示用户输入的对话框。                    // 其方法有返回值,输入有内容,即返回内容;点取消则返回null
 
open()             打开一个新的浏览器窗口或查找一个已命名的窗口。
close()            关闭浏览器窗口。
setInterval()      按照指定的周期(以毫秒计)来调用函数或计算表达式。
clearInterval()    取消由 setInterval() 设置的 timeout。
setTimeout()       在指定的毫秒数后调用函数或计算表达式。
clearTimeout()     取消由 setTimeout() 方法设置的 timeout。
scrollTo()         把内容滚动到指定的坐标。
技术分享图片
技术分享图片
// 实例
// 在输入框,实现点击显示当前时间,并有stop按钮

<!DOCTYPE html>
<html lang="en">
<head>
    <meta charset="UTF-8">
    <title>Title</title>
    <style>
        #show{
            width: 200px;
            height: 50px;
        }
    </style>
</head>
<body>
    <input type="text" id="show" onclick="begin()">  <!--绑定点击事件并触发begin函数-->
    <button onclick="end()">Stop</button>            <!--绑定点击事件并触发end函数-->

    <script>
        function showtime() {
            var date_time = new Date().toLocaleString();    // 获取当前事件
            var content = document.getElementById("show");  // 找到id为。。的标签
            content.value = date_time;                      // 对标签的value进行赋值
        }

        var clock;   // 声明变量
        function begin() {
            // 变量未被定义则为undefined
            if (clock==undefined){
                showtime();  // 执行函数
                clock = setInterval(showtime,1000);  // 多次计时 单位毫秒
            }
        }

        function end() {
            clearInterval(clock);  // 清空多次定时器
            clock=undefined;       // 重新赋值
            }
    </script>
</body>
</html>
技术分享图片
技术分享图片
技术分享图片
<!DOCTYPE html>
<html lang="en">
<head>
    <meta charset="UTF-8">
    <title>Title</title>
</head>
<body>
    <button onclick="f1()">点我</button>
    <button onclick="f2()">停止</button>


    <script>
        var my_var;
        function f1() {
            my_var = setTimeout(function () {alert("Hello World")},3000);
            // 等待三秒  弹出框Hello World
        }

        function f2() {
            clearTimeout(my_var);
            // 清除单次计时器
            // 且必须在3000毫秒之前点击 否则无效
        }

    </script>
</body>
</html>
技术分享图片

4、History

History 对象包含用户(在浏览器窗口中)访问过的 URL。

History 对象是 window 对象的一部分,可通过 window.history 属性对其进行访问。

length  返回浏览器历史列表中的 URL 数量。

1
2
3
4
5
// history方法
 
back()         加载 history 列表中的前一个 URL。
forward()    加载 history 列表中的下一个 URL。
go()            加载 history 列表中的某个具体页面。
技术分享图片
<a href="rrr.html">click</a>
<button onclick=" history.forward()">>>></button>
<button onclick="history.back()">back</button>
<button onclick="history.go()">back</button>

// go里面的参数 1 和 -1 对应    

5、location

Location 对象包含有关当前 URL 的信息。

Location 对象是 Window 对象的一个部分,可通过 window.location 属性来访问。编写时可不使用 window 这个前缀。

Location提供的方法

  • location.hostname 返回 web 主机的域名
  • location.pathname 返回当前页面的路径和文件名
  • location.port 返回 web 主机的端口 (80 或 443)
  • location.protocol 返回所使用的 web 协议(http:// 或 https://)
  • location.assign(URL) 加载新文档
  • location.replace(newurl) 加载新文档
  • location.reload() 重新加载 类似于浏览器刷新的快捷键F5
技术分享图片
技术分享图片
<!DOCTYPE html>
<html lang="en">
<head>
    <meta charset="UTF-8">
</head>
<body>
    <button onclick="newurl()">加载assign文档</button>
    <button onclick="myurl()">加载replace文档</button>
    <button onclick="flush()">刷新文档</button>
    <script>
        console.log(location.hostname);
        console.log(location.pathname);
        console.log(location.port);
        console.log(location.protocol);
        console.log(location.href);
        // assign
        function newurl() {
            location.assign("http://www.xiaohuar.com/")
        }

        // replace
        function myurl() {
            location.replace("http://www.xiaohuar.com/")
        }
        // assign与replace的区别  assign可返回 replace不可返回上个url

        // reload
        function flush() {
            location.reload()
        }

    </script>
</body>
</html>
技术分享图片

DOM

1、定义

文档对象模型(Document Object Model,DOM)是一种用于HTML和XML文档的编程接口。

DOM 是 W3C(万维网联盟)的标准。DOM 定义了访问 HTML 和 XML 文档的标准

  • 什么是 XML DOM?  ---->XML DOM 定义了所有 XML 元素的对象和属性,以及访问它们的方法。
  • 什么是 HTML DOM?---->HTML DOM 定义了所有 HTML 元素的对象和属性,以及访问它们的方法。

技术分享图片

通过可编程的对象模型,JavaScript 获得了足够的能力来创建动态的 HTML。

  • JavaScript 能够改变页面中的所有 HTML 元素
  • JavaScript 能够改变页面中的所有 HTML 属性
  • JavaScript 能够改变页面中的所有 CSS 样式
  • JavaScript 能够对页面中的所有事件做出反应

如此可见,体会到JavaScript的强大之处。

针对HTML DOM学习

  • 如何改变 HTML 元素的内容 (innerHTML)
  • 如何改变 HTML 元素的样式 (CSS)
  • 如何对 HTML DOM 事件对出反应
  • 如何添加或删除 HTML 元素

2、节点类型 

根据 W3C 的 HTML DOM 标准,HTML 文档中的所有内容都是节点:

  • 整个文档是一个文档节点
  • 每个 HTML 元素是元素节点
  • HTML 元素内的文本是文本节点
  • 每个 HTML 属性是属性节点
  • 注释是注释节点

技术分享图片

节点树中的节点彼此拥有层级关系。

父(parent)、子(child)和同胞(sibling)等术语用于描述这些关系。父节点拥有子节点。同级的子节点被称为同胞(兄弟或姐妹)。

  • 在节点树中,顶端节点被称为根(root)
  • 每个节点都有父节点、除了根(它没有父节点)
  • 一个节点可拥有任意数量的子
  • 同胞是拥有相同父节点的节点

下面的图片展示了节点树的一部分,以及节点之间的关系:

技术分享图片

3、节点属性

  直接查找

1
2
3
4
document.getElementById             根据ID获取一个标签
document.getElementsByName          根据name属性获取标签集合
document.getElementsByClassName     根据class属性获取标签集合
document.getElementsByTagName       根据标签名获取标签集合

  间接查找

1
2
3
4
5
6
7
8
9
10
11
12
13
parentNode          // 父节点
childNodes          // 所有子节点
firstChild          // 第一个子节点
lastChild           // 最后一个子节点
nextSibling         // 下一个兄弟节点
previousSibling     // 上一个兄弟节点
  
parentElement           // 父节点标签元素
children                // 所有子标签
firstElementChild       // 第一个子标签元素
lastElementChild        // 最后一个子标签元素
nextElementtSibling     // 下一个兄弟标签元素
previousElementSibling  // 上一个兄弟标签元素

4、节点操作

  内容

1
2
3
innerText  文本内容
 
innerHTML   HTML内容

  属性

1
2
3
attributes                // 获取所有标签属性
setAttribute(key,value)   // 设置标签属性
getAttribute(key)         // 获取指定标签属性

  node(节点)增、删、改、查

1
2
3
4
5
6
7
8
9
10
11
12
13
14
15
16
17
18
19
20
21
22
23
24
25
// 增
 
document.createElement(name)    // 将创建标签由document来
父级标签.appendchild(name)           // 由父级标签添加
 
// 删
 
获取删除的标签
父级标签.removeChild(name)
 
// 改
 
第一种方式:
 
      先进行删除、再进行增加   增删进行配合操作
 
第二中方式:
 
      使用setAttribute();方法修改属性         
 
      使用innerHTML属性修改元素的内容
 
// 查
 
...
技术分享图片
技术分享图片
<!DOCTYPE html>
<html lang="en">
<head>
    <meta charset="UTF-8">
    <title>Title</title>
    <style>
        .replece{
            width: 100px; height: 100px;
            background-color: gray;
        }
        div{
            width: 300px; height: 200px;
            background-color: #8aab30;
        }
        .replece{
            width: 300px; height: 100px;
            background-color: yellow;
        }
    </style>
</head>
<body>
<button onclick="rep()">替换</button>

<div class="div1" id="xx">
    Hello World
    <a href="http://www.baidu.com" class="go">百度</a>

    
    <div class="replece"></div>
</div>

<!--<img src="timg.jpg" >-->
<script>
    //

    var ele_div = document.getElementsByClassName("div1")[0];  // 通过class找标签

    add_p = document.createElement("p");  // 由文档对象创建标签

    add_p.innerHTML = "Hello girl";       // 为创建的标签进行添加内容

    ele_div.appendChild(add_p);           // 添加操作由父级标签来添加

    //

    var del_a = document.getElementsByClassName("go")[0];  // 获取删除的标签啊

    var father = del_a.parentNode;  // 删除标签的父级标签

    father.removeChild(del_a);      // 父级进行删除

    //
    
    function rep() {
        var ele_replace = document.getElementsByClassName("replece")[0];

        var ele_img = document.createElement("img");

        ele_img.setAttribute("src","go_top.png");

        var father = ele_replace.parentNode;

        father.appendChild(ele_img);

        father.replaceChild(img,ele_replace);
    }


</script>
</body>
</html>
技术分享图片
技术分享图片
技术分享图片
// 注意点: 根据class获取得到的是数组


<!DOCTYPE html>
<html lang="en">
<head>
    <meta charset="UTF-8">
    <title>Title</title>
    <style>
        .div1,.div2,.div3,.div4{
            width: 300px;
            height: 100px;
        }
        .div1{
            background-color: green;
        }
         .div2{
            background-color: yellow;
        }
         .div3{
            background-color: rebeccapurple;
        }
         .div4{
            background-color: deeppink;
        }
    </style>
</head>
<body>

<div class="div1">
    <button onclick="add()">add</button>
    hello div1
</div>
<div class="div2">
    <button onclick="del()">del</button>
    hello div2
</div>
<div class="div3">
    <button onclick="change()">change</button>
    <p>hello div3</p>
</div>
<div class="div4">hello div4</div>


<script>
    function change() {
        var img=document.createElement("img");//<img src="">
        //img.setAttribute("src","meinv.jpg");
        img.src="meinv.jpg";

        var ele=document.getElementsByTagName("p")[0];
        var father=document.getElementsByClassName("div3")[0];

        father.replaceChild(img,ele)


    }
    function add() {
        var ele=document.createElement("p");//<p></p>
        ele.innerHTML="<h1>hello p</h1>";
        //ele.innerText="<h1>hello p</h1>";
        ele.style.color="red";
        ele.style.fontSize="10px";
        var father=document.getElementsByClassName("div1")[0];
        father.appendChild(ele)

    }

    function del() {
        var father=document.getElementsByClassName("div1")[0];
        var son=father.getElementsByTagName("p")[0];
        father.removeChild(son)

    }


</script>
</body>
</html>
技术分享图片

  class操作

1
2
3
4
5
// 通过Elements去调用
 
className                // 获取所有类名
classList.remove(cls)    // 删除指定类
classList.add(cls)       // 添加类

事件

技术分享图片

对于事件需要注意的要点:

  • this  
  • event
  • 事件链以及跳出

this标签当前正在操作的标签,event封装了当前事件的内容。

DOM拾遗

A,简单获取select标签选中的文本

技术分享图片
技术分享图片
<!DOCTYPE html>
<html lang="en">
<head>
    <meta charset="UTF-8">
    <title>Title</title>
</head>
<body>
    <select name="" id="xx">
        <option value="0">北京</option>
        <option value="1">上海</option>
        <option value="2">广州</option>
    </select>
    <script>
        sel = document.getElementById(xx);
        text = sel.selectedOptions[0].innerHTML;
        console.log(text)
    </script>
</body>
</html>
技术分享图片

Python之路(二十三):BOM、DOM

标签:关系   计时   添加   调用   init   over   其他   NPU   win   

原文地址:https://www.cnblogs.com/Miracle-boy/p/9968593.html

(0)
(0)
   
举报
评论 一句话评论(0
登录后才能评论!
© 2014 mamicode.com 版权所有  联系我们:gaon5@hotmail.com
迷上了代码!