标签:des error stat connect factor obj with encoder type
上一篇是关于模拟请求配置,包括域名问题的解决,本篇就说下授权登录。嗯,比较闲。以前的fx 开发web的时候好像使用的 微信提供的js插件生成二维码,然后扫码登录,,,记不清了,好久不开发微信了。
首先考虑到web端(ajax)跨域的问题,所以我们首先要解决的就是在core中配置跨域的设置(案例比较多所以不多说只贴代码):
//ConfigureServices中
services.AddCors(options =>
            {
                options.AddPolicy("AllowCORS",
                builder =>
                {
                    builder.WithOrigins("http://s86zxm.natappfree.cc", "http://127.0.0.1:65502").AllowAnyHeader().AllowAnyMethod().AllowCredentials();
                });
            });

//Configure中(一定是在 app.UserMvc())之前配置)
app.UseCors("AllowCORS");
a)这里的临时域名就是我们上篇说的基于natapp生成的动态的。
b)这里的 UseCors一定是要在app.UseMvc()之前;另外我这里是全局配置,如果您需要针对 controller或者action单独配置,可以去掉这里的app.usecors,在每个controller上或者action上加上EnableCors("跨域策略名称"),我们这里的策略名称是AllowCORS。
ajax中的请求方式,要注意以下几个点:
async: true,//Failed to execute ‘send‘ on ‘XMLHttpRequest‘
dataType: ‘jsonp‘,
crossDomain: true,
需要指定ajax的这三个属性,其中第一个 如果使用 false,也就似乎非异步方式,会出现后面红色的错误提示。大致的参考脚本如下:
$.ajax({
                    type: ‘get‘,
                    async: true,//Failed to execute ‘send‘ on ‘XMLHttpRequest‘
                    dataType: ‘jsonp‘,
                    crossDomain: true,
                    url: ‘/api/identity/OAuth2?provider=Weixin&returnUrl=/‘,
                    success: function (res) {
                        //do something
                    }, error: function (xhr, err) {
                        console.log(xhr.statusCode);
                        //do something
                    }
                });
a) 这里的配置指的是,比如微信开发域名的问题,这个问题在上一篇中,有说到,如果不知道的可以点这里 域名配置
b) 另一个就是 配置微信或者QQ的 appId和AppSecret,这个获取方式上一篇有说(微信),QQ类似;在我们的 core项目中配置,参考如下:
//configureService中配置
services.AddAuthentication().AddWeixinAuthentication(options =>
            {
                options.ClientId = Configuration["Authentication:WeChat:AppId"];
                options.ClientSecret = Configuration["Authentication:WeChat:AppKey"];
            });
//configures中使用
app.UseAuthentication();
//配置文件中:
{
    "ESoftor":{
       "Authentication": {
              "WeChat": {
                   "AppId": "你的微信AppId",
                   "AppKey": "你的微信secret"
                }
        }
     }
}
以上这些完成之后,我们就一切就绪了,重点来了,代码:
以下五个相关文件直接复制到项目(不需要做任何改动),便可直接使用,本人已全部测试通过,,谢谢配合。
WeixinAuthenticationDefaults.cs

/// <summary>
    /// Default values for Weixin authentication.
    /// </summary>
    public static class WeixinAuthenticationDefaults
    {
        /// <summary>
        /// Default value for <see cref="AuthenticationOptions.DefaultAuthenticateScheme"/>.
        /// </summary>
        public const string AuthenticationScheme = "Weixin";

        public const string DisplayName = "Weixin";

        /// <summary>
        /// Default value for <see cref="RemoteAuthenticationOptions.CallbackPath"/>.
        /// </summary>
        public const string CallbackPath = "/signin-weixin";

        /// <summary>
        /// Default value for <see cref="AuthenticationSchemeOptions.ClaimsIssuer"/>.
        /// </summary>
        public const string Issuer = "Weixin";

        /// <summary>
        /// Default value for <see cref="OAuth.OAuthOptions.AuthorizationEndpoint"/>.
        /// </summary>
        public const string AuthorizationEndpoint = "https://open.weixin.qq.com/connect/qrconnect";

        /// <summary>
        /// Default value for <see cref="OAuth.OAuthOptions.TokenEndpoint"/>.
        /// </summary>
        public const string TokenEndpoint = "https://api.weixin.qq.com/sns/oauth2/access_token";

        /// <summary>
        /// Default value for <see cref="OAuth.OAuthOptions.UserInformationEndpoint"/>.
        /// </summary>
        public const string UserInformationEndpoint = "https://api.weixin.qq.com/sns/userinfo";
    }
WeiXinAuthenticationExtensions.cs
public static class WeiXinAuthenticationExtensions
    {
        /// <summary>
        /// </summary>
        public static AuthenticationBuilder AddWeixinAuthentication(this AuthenticationBuilder builder)
        {
            return builder.AddWeixinAuthentication(WeixinAuthenticationDefaults.AuthenticationScheme, WeixinAuthenticationDefaults.DisplayName, options => { });
        }

        /// <summary>
        /// </summary>
        public static AuthenticationBuilder AddWeixinAuthentication(this AuthenticationBuilder builder, Action<WeixinAuthenticationOptions> configureOptions)
        {
            return builder.AddWeixinAuthentication(WeixinAuthenticationDefaults.AuthenticationScheme, WeixinAuthenticationDefaults.DisplayName, configureOptions);
        }

        /// <summary>
        /// </summary>
        public static AuthenticationBuilder AddWeixinAuthentication(this AuthenticationBuilder builder, string authenticationScheme, Action<WeixinAuthenticationOptions> configureOptions)
        {
            return builder.AddWeixinAuthentication(authenticationScheme, WeixinAuthenticationDefaults.DisplayName, configureOptions);
        }

        /// <summary>
        /// </summary>
        public static AuthenticationBuilder AddWeixinAuthentication(this AuthenticationBuilder builder, string authenticationScheme, string displayName, Action<WeixinAuthenticationOptions> configureOptions)
        {
            return builder.AddOAuth<WeixinAuthenticationOptions, WeixinAuthenticationHandler>(authenticationScheme, displayName, configureOptions);
        }
    }
WeixinAuthenticationHandler.cs
public class WeixinAuthenticationHandler : OAuthHandler<WeixinAuthenticationOptions>
    {
        public WeixinAuthenticationHandler(IOptionsMonitor<WeixinAuthenticationOptions> options, ILoggerFactory logger, UrlEncoder encoder, ISystemClock clock) : base(options, logger, encoder, clock)
        {
        }

        /// <summary>
        ///  Last step:
        ///  create ticket from remote server
        /// </summary>
        /// <param name="identity"></param>
        /// <param name="properties"></param>
        /// <param name="tokens"></param>
        /// <returns></returns>
        protected override async Task<AuthenticationTicket> CreateTicketAsync(ClaimsIdentity identity, AuthenticationProperties properties, OAuthTokenResponse tokens)
        {
            var address = QueryHelpers.AddQueryString(Options.UserInformationEndpoint, new Dictionary<string, string>
            {
                ["access_token"] = tokens.AccessToken,
                ["openid"] = tokens.Response.Value<string>("openid")
            });

            var response = await Backchannel.GetAsync(address);
            if (!response.IsSuccessStatusCode)
            {
                Logger.LogError("An error occurred while retrieving the user profile: the remote server " +
                                "returned a {Status} response with the following payload: {Headers} {Body}.",
                                /* Status: */ response.StatusCode,
                                /* Headers: */ response.Headers.ToString(),
                                /* Body: */ await response.Content.ReadAsStringAsync());

                throw new HttpRequestException("An error occurred while retrieving user information.");
            }

            var payload = JObject.Parse(await response.Content.ReadAsStringAsync());
            if (!string.IsNullOrEmpty(payload.Value<string>("errcode")))
            {
                Logger.LogError("An error occurred while retrieving the user profile: the remote server " +
                                "returned a {Status} response with the following payload: {Headers} {Body}.",
                                /* Status: */ response.StatusCode,
                                /* Headers: */ response.Headers.ToString(),
                                /* Body: */ await response.Content.ReadAsStringAsync());

                throw new HttpRequestException("An error occurred while retrieving user information.");
            }

            identity.AddClaim(new Claim(ClaimTypes.NameIdentifier, WeixinAuthenticationHelper.GetUnionid(payload), Options.ClaimsIssuer));
            identity.AddClaim(new Claim(ClaimTypes.Name, WeixinAuthenticationHelper.GetNickname(payload), Options.ClaimsIssuer));
            identity.AddClaim(new Claim(ClaimTypes.Gender, WeixinAuthenticationHelper.GetSex(payload), Options.ClaimsIssuer));
            identity.AddClaim(new Claim(ClaimTypes.Country, WeixinAuthenticationHelper.GetCountry(payload), Options.ClaimsIssuer));
            identity.AddClaim(new Claim("urn:weixin:openid", WeixinAuthenticationHelper.GetOpenId(payload), Options.ClaimsIssuer));
            identity.AddClaim(new Claim("urn:weixin:province", WeixinAuthenticationHelper.GetProvince(payload), Options.ClaimsIssuer));
            identity.AddClaim(new Claim("urn:weixin:city", WeixinAuthenticationHelper.GetCity(payload), Options.ClaimsIssuer));
            identity.AddClaim(new Claim("urn:weixin:headimgurl", WeixinAuthenticationHelper.GetHeadimgUrl(payload), Options.ClaimsIssuer));
            identity.AddClaim(new Claim("urn:weixin:privilege", WeixinAuthenticationHelper.GetPrivilege(payload), Options.ClaimsIssuer));

            identity.AddClaim(new Claim("urn:weixin:user_info", payload.ToString(), Options.ClaimsIssuer));

            var context = new OAuthCreatingTicketContext(new ClaimsPrincipal(identity), properties, Context, Scheme, Options, Backchannel, tokens, payload);
            context.RunClaimActions();

            await Events.CreatingTicket(context);

            return new AuthenticationTicket(context.Principal, context.Properties, Scheme.Name);
        }

        /// <summary>
        /// Step 2:通过code获取access_token
        /// </summary>
        protected override async Task<OAuthTokenResponse> ExchangeCodeAsync(string code, string redirectUri)
        {
            var address = QueryHelpers.AddQueryString(Options.TokenEndpoint, new Dictionary<string, string>()
            {
                ["appid"] = Options.ClientId,
                ["secret"] = Options.ClientSecret,
                ["code"] = code,
                ["grant_type"] = "authorization_code"
            });

            var response = await Backchannel.GetAsync(address);
            if (!response.IsSuccessStatusCode)
            {
                Logger.LogError("An error occurred while retrieving an access token: the remote server " +
                                "returned a {Status} response with the following payload: {Headers} {Body}.",
                                /* Status: */ response.StatusCode,
                                /* Headers: */ response.Headers.ToString(),
                                /* Body: */ await response.Content.ReadAsStringAsync());

                return OAuthTokenResponse.Failed(new Exception("An error occurred while retrieving an access token."));
            }

            var payload = JObject.Parse(await response.Content.ReadAsStringAsync());
            if (!string.IsNullOrEmpty(payload.Value<string>("errcode")))
            {
                Logger.LogError("An error occurred while retrieving an access token: the remote server " +
                                "returned a {Status} response with the following payload: {Headers} {Body}.",
                                /* Status: */ response.StatusCode,
                                /* Headers: */ response.Headers.ToString(),
                                /* Body: */ await response.Content.ReadAsStringAsync());

                return OAuthTokenResponse.Failed(new Exception("An error occurred while retrieving an access token."));
            }
            return OAuthTokenResponse.Success(payload);
        }

        /// <summary>
        ///  Step 1:请求CODE
        ///  构建用户授权地址
        /// </summary>
        protected override string BuildChallengeUrl(AuthenticationProperties properties, string redirectUri)
        {
            return QueryHelpers.AddQueryString(Options.AuthorizationEndpoint, new Dictionary<string, string>
            {
                ["appid"] = Options.ClientId,
                ["scope"] = FormatScope(),
                ["response_type"] = "code",
                ["redirect_uri"] = redirectUri,
                ["state"] = Options.StateDataFormat.Protect(properties)
            });
        }

        protected override string FormatScope()
        {
            return string.Join(",", Options.Scope);
        }
    }
WeixinAuthenticationHelper.cs
/// <summary>
    /// Contains static methods that allow to extract user‘s information from a <see cref="JObject"/>
    /// instance retrieved from Weixin after a successful authentication process.
    /// </summary>
    static class WeixinAuthenticationHelper
    {
        /// <summary>
        /// Gets the user identifier.
        /// </summary>
        public static string GetOpenId(JObject user) => user.Value<string>("openid");

        /// <summary>
        /// Gets the nickname associated with the user profile.
        /// </summary>
        public static string GetNickname(JObject user) => user.Value<string>("nickname");

        /// <summary>
        /// Gets the gender associated with the user profile.
        /// </summary>
        public static string GetSex(JObject user) => user.Value<string>("sex");

        /// <summary>
        /// Gets the province associated with the user profile.
        /// </summary>
        public static string GetProvince(JObject user) => user.Value<string>("province");

        /// <summary>
        /// Gets the city associated with the user profile.
        /// </summary>
        public static string GetCity(JObject user) => user.Value<string>("city");

        /// <summary>
        /// Gets the country associated with the user profile.
        /// </summary>
        public static string GetCountry(JObject user) => user.Value<string>("country");

        /// <summary>
        /// Gets the avatar image url associated with the user profile.
        /// </summary>
        public static string GetHeadimgUrl(JObject user) => user.Value<string>("headimgurl");

        /// <summary>
        /// Gets the union id associated with the application.
        /// </summary>
        public static string GetUnionid(JObject user) => user.Value<string>("unionid");

        /// <summary>
        /// Gets the privilege associated with the user profile.
        /// </summary>
        public static string GetPrivilege(JObject user)
        {
            var value = user.Value<JArray>("privilege");
            if (value == null)
            {
                return null;
            }

            return string.Join(",", value.ToObject<string[]>());
        }
    }
WeixinAuthenticationOptions.cs
public WeixinAuthenticationOptions()
        {
            ClaimsIssuer = WeixinAuthenticationDefaults.Issuer;
            CallbackPath = new PathString(WeixinAuthenticationDefaults.CallbackPath);

            AuthorizationEndpoint = WeixinAuthenticationDefaults.AuthorizationEndpoint;
            TokenEndpoint = WeixinAuthenticationDefaults.TokenEndpoint;
            UserInformationEndpoint = WeixinAuthenticationDefaults.UserInformationEndpoint;

            Scope.Add("snsapi_login");
            Scope.Add("snsapi_userinfo");

            //ClaimActions.MapJsonKey(ClaimTypes.NameIdentifier, "openid");
            //ClaimActions.MapJsonKey(ClaimTypes.Name, "nickname");
            //ClaimActions.MapJsonKey("urn:qq:figure", "figureurl_qq_1");
        }
首先定义我们的接口,接口中当然依旧是用到了 SignInManager,,如果不清楚的,依旧建议去看上一篇。
 /// <summary>
        ///     OAuth2登录
        /// </summary>
        /// <param name="provider">第三方登录提供器</param>
        /// <param name="returnUrl">回调地址</param>
        /// <returns></returns>
        [HttpGet]
        [Description("OAuth2登录")]
        [AllowAnonymous]
        //[ValidateAntiForgeryToken]
        public IActionResult OAuth2()
        {
            string provider = HttpContext.Request.Params("provider");
            string returnUrl = HttpContext.Request.Params("returnUrl");
            string redirectUrl = Url.Action(nameof(OAuth2Callback), "Identity", new { returnUrl = returnUrl ?? "/" });
            AuthenticationProperties properties = _signInManager.ConfigureExternalAuthenticationProperties(provider, redirectUrl);
            return Challenge(properties, provider);
        }
这里参数没啥好说的,一个就是 provider:这个东西其实是我们配置的(下面会说),returnUrl,就是你登陆前访问的页面,登陆后还要回过去。 这里还用到i一个回调接口哦,就是 OAuth2Callback,所以至少是需要两个。
/// <summary>
        ///     OAuth2登录回调
        /// </summary>
        /// <param name="returnUrl">回调地址</param>
        /// <param name="remoteError">第三方登录错误提示</param>
        /// <returns></returns>
        [HttpGet]
        [Description("OAuth2登录回调")]
        [AllowAnonymous]
        //[ValidateAntiForgeryToken]
        public IActionResult OAuth2Callback(string returnUrl = null, string remoteError = null)
        {
            if (remoteError != null)
            {
                _logger.LogError($"第三方登录错误:{remoteError}");
                return Unauthorized();
            }
             ExternalLoginInfo info = await _signInManager.GetExternalLoginInfoAsync();
            if (info == null)
                return Unauthorized();

             var result = await _signInManager.ExternalLoginSignInAsync(info.LoginProvider, info.ProviderKey, false, true);
            _logger.LogWarning($"SignInResult:{result.ToJsonString()}");

              if (result.Succeeded)
            {
                _logger.LogInformation($"用户“{info.Principal.Identity.Name}”通过 {info.ProviderDisplayName} OAuth2登录成功");
                return Ok();
            }
            return Unauthorized();
        }
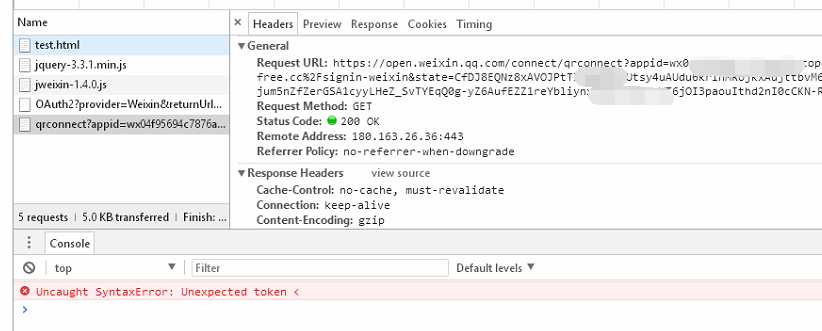
代码这就完了哦,剩下的就是调试了,使用1中说到的js(ajax),以及结合上一篇的配置,模拟请求去吧,如果你发现返回提示如下错误,那么就等同事成功了,因为可以在header中看到请求的地址,该地址就是微信的二维码的界面,复制出来在浏览器打开就可:
但是,这里来了个但是,你觉得这样就完了是吧?其实没有,这里有个细节要注意,也就是上面说的 接口的参数:provider,这个东西不是随便写的,可以在请求之前获取一次看看,有哪些provider,如果我们配置了微信那么就是 Weixin,配置了QQ就是QQ,
查看方式就是一行代码:
var loginProviders = (await _signInManager.GetExternalAuthenticationSchemesAsync()).ToList();
这里要注意,否则你的道德返回结果永远都是 未授权,当然这也是可配置的,也就是我们的 WeixinAuthenticationDefaults.cs类中的 的 Scheme,配置啥,传递参数就写啥。
1.微信、QQ配置,及开发测试的模拟配置(域名)
2.跨域问题
3.参数:provider要一致,不确定的可以通过 _signInManager.GetExternalAuthenticationSchemesAsync() 获取看一下,或者单独讲这个接口提供给前端调用查看。
标签:des error stat connect factor obj with encoder type
原文地址:https://www.cnblogs.com/Tmc-Blog/p/9986482.html
