标签:trace 工具 binding url 实现 mvcc and 不能 格式
先了解一下WebService的一些相关术语吧:
WebService:
WebService是一种跨编程语言和跨操作系统平台的远程调用技术。
WSDL(web service definition language):
WSDL是webservice定义语言, 对应.wsdl文档, 一个webservice会对应一个唯一的wsdl文档, 定义了客户端与服务端发送请求和响应的数据格式和过程
SOAP(simple object access protocal):
SOAP是"简单对象访问协议"
是一种简单的、基于HTTP和XML的协议, 用于在WEB上交换结构化的数据
soap消息:请求消息和响应消息
SEI(WebService EndPoint Interface):
SEI是web service的终端接口,就是WebService服务器端用来处理请求的接口
CXF(Celtix + XFire):
一个apache的用于开发webservice服务器端和客户端的框架。
本次采用的就是CXF框架来整合,
首先引入相关的pom包:
<!-- webservice -->
		<dependency>
			<groupId>org.apache.cxf</groupId>
			<artifactId>cxf-rt-frontend-jaxws</artifactId>
			<version>${cxf.version}</version>
		</dependency>
		<dependency>
			<groupId>org.apache.cxf</groupId>
			<artifactId>cxf-rt-transports-http</artifactId>
			<version>${cxf.version}</version>
		</dependency>
由于版本的冲突,我将spring的版本调了,并且由于cglib包中的asm包和cxf框架中的asm包有冲突,我做了以下更改:
<!-- spring版本号 -->
		<spring.version>4.1.9.RELEASE</spring.version>
<dependency>
			<groupId>cglib</groupId>
			<artifactId>cglib</artifactId>
			<version>3.2.5</version>
			<exclusions>
				<exclusion>
					<groupId>org.ow2.asm</groupId>
					<artifactId>asm</artifactId>
				</exclusion>
			</exclusions>
		</dependency>
2. 接着引入spring-context-webservice.xml和cxf-config.xml:
<?xml version="1.0" encoding="UTF-8"?>
<beans xmlns="http://www.springframework.org/schema/beans"
       xmlns:xsi="http://www.w3.org/2001/XMLSchema-instance"
       xmlns:cxf="http://cxf.apache.org/core"
       xmlns:jaxws="http://cxf.apache.org/jaxws"
       xsi:schemaLocation="http://www.springframework.org/schema/beans
       http://www.springframework.org/schema/beans/spring-beans.xsd
        http://cxf.apache.org/jaxws http://cxf.apache.org/schemas/jaxws.xsd
        http://cxf.apache.org/core http://cxf.apache.org/schemas/core.xsd">

    <import resource="cxf-config.xml"/>
</beans>
<?xml version="1.0" encoding="UTF-8"?>
<beans xmlns="http://www.springframework.org/schema/beans"
	xmlns:xsi="http://www.w3.org/2001/XMLSchema-instance" xmlns:jaxws="http://cxf.apache.org/jaxws"
	xmlns:context="http://www.springframework.org/schema/context"
	xmlns:jaxrs="http://cxf.apache.org/jaxrs"
	xsi:schemaLocation="http://cxf.apache.org/jaxws http://cxf.apache.org/schemas/jaxws.xsd
		http://www.springframework.org/schema/beans http://www.springframework.org/schema/beans/spring-beans.xsd
		http://www.springframework.org/schema/context http://www.springframework.org/schema/context/spring-context.xsd
		http://cxf.apache.org/jaxrs
        http://cxf.apache.org/schemas/jaxrs.xsd">

	<import resource="classpath*:META-INF/cxf/cxf.xml" />
	<import resource="classpath*:META-INF/cxf/cxf-extension-soap.xml" />
	<import resource="classpath*:META-INF/cxf/cxf-servlet.xml" />


<!-- id 不能重复 -->
	<jaxws:endpoint id="servicemanWebService" implementor="clack.webserviceImp.ServicemanWebServiceImp"  address="/servicemanws" />

<!-- 	<jaxrs:server id="restContainer" address="/">
		<jaxrs:serviceBeans>
			<ref bean="roomService" />
		</jaxrs:serviceBeans>
		<jaxrs:providers>
			<bean class="org.codehaus.jackson.jaxrs.JacksonJaxbJsonProvider" />
		</jaxrs:providers>
		<jaxrs:extensionMappings>
		<entry key="json" value="application/json" />
		<entry key="xml" value="application/xml" />
		</jaxrs:extensionMappings>
	</jaxrs:server> -->

</beans>
其中<jaxws:endpoint id="servicemanWebService" implementor="clack.webserviceImp.ServicemanWebServiceImp" address="/servicemanws" />
中的设置后续会用到。
3. 更改相应的web.xml加载顺序并加入cxf配置(反正是先加载spring,后加载springmvc)
<?xml version="1.0" encoding="UTF-8"?>
<web-app xmlns:xsi="http://www.w3.org/2001/XMLSchema-instance"
    xmlns="http://xmlns.jcp.org/xml/ns/javaee"
    xsi:schemaLocation="http://xmlns.jcp.org/xml/ns/javaee http://xmlns.jcp.org/xml/ns/javaee/web-app_3_1.xsd"
    id="WebApp_ID" version="3.1">
    <display-name>Archetype Created Web Application</display-name>

    <context-param>
		<param-name>contextConfigLocation</param-name>
		<param-value>classpath:spring-context*.xml</param-value>
	</context-param>
<listener>
		<listener-class>org.springframework.web.context.ContextLoaderListener</listener-class>
	</listener>
	<listener>
		<listener-class>org.springframework.web.context.request.RequestContextListener</listener-class>
	</listener>
	<!-- ================配置SpringMVC核心调度器================ -->
	<!-- 不指定具体文件的话,默认为"/WEB-INF/<servlet name>-servlet.xml" -->
	<!-- load-on-startup代表启动顺序,设置为大于等于0表示容器在应用启动时就加载并初始化这个servlet -->
	<!-- 推荐拦截/,风格优雅 -->
	<servlet>
		<servlet-name>SpringMVC</servlet-name>
		<servlet-class>org.springframework.web.servlet.DispatcherServlet</servlet-class>
		<init-param>
			<param-name>contextConfigLocation</param-name>
			<param-value>classpath*:spring-mvc.xml</param-value>
		</init-param>
		<load-on-startup>1</load-on-startup>
	</servlet>
	<servlet-mapping>
		<servlet-name>SpringMVC</servlet-name>
		<url-pattern>/</url-pattern>
	</servlet-mapping>
	<servlet>
		<servlet-name>CXFServlet</servlet-name>
		<servlet-class>org.apache.cxf.transport.servlet.CXFServlet</servlet-class>
		<load-on-startup>1</load-on-startup>
	</servlet>
	<servlet-mapping>
		<servlet-name>CXFServlet</servlet-name>
		<url-pattern>/ws/*</url-pattern>
	</servlet-mapping>
</web-app>
4. 接着添加一个工具类用于调出springmvc中加载的service注解
package clack.utils;

import java.util.Enumeration;
import javax.servlet.ServletContext;

import org.springframework.web.context.ContextLoader;
import org.springframework.web.context.WebApplicationContext;
import org.springframework.web.context.support.WebApplicationContextUtils;

public class ContextUtils {
	public static WebApplicationContext getSpringMVCContext() {
		WebApplicationContext rootWac = ContextLoader.getCurrentWebApplicationContext();
		// 获取servletContext
		System.out.println(rootWac+"ddddd");
		ServletContext servletContext = rootWac.getServletContext();
		// 获取子容器,名字最后对应servlet名字
		//1.查看spring容器中的对象名称
		String[] beannames = rootWac.getBeanDefinitionNames();
		for(String beanname:beannames){
			System.out.println(beanname);
		}

		System.out.println(servletContext);


		//2.查看servlet中容器列表
		Enumeration<String> servletnames  = servletContext.getAttributeNames();
		while(servletnames.hasMoreElements()){
			System.out.println(servletnames.nextElement());
		}

		WebApplicationContext springmvc = WebApplicationContextUtils.getWebApplicationContext(servletContext,
				"org.springframework.web.servlet.FrameworkServlet.CONTEXT.SpringMVC");
		//System.out.println(springmvc+"eee");
		return springmvc;
	}

}
5. 准备工作就绪后就建立webservice接口和webservice实现类:
package clack.webservice;

import java.util.List;

import javax.jws.WebMethod;
import javax.jws.WebService;

import clack.entity.Serviceman;

@WebService
public interface ServicemanWebService {
	//使用@WebMethod注解标注WebServiceI接口中的方法
    @WebMethod
	List<Serviceman> getAllServiceman() throws Exception;
}
其中使用的 getAllServiceman()方法是本身的service中的方法调用。
package clack.webserviceImp;

import java.util.List;

import javax.jws.WebService;

import org.springframework.beans.factory.annotation.Autowired;
import org.springframework.stereotype.Component;

import clack.entity.Serviceman;
import clack.service.ServicemanService;
import clack.utils.ContextUtils;
import clack.webservice.ServicemanWebService;
//endpointInterface 编写实现接口类名 service name 网络访问的名字 对应<wsdl:service name="studentws">
@Component("servicemanWebService")
@WebService(endpointInterface = "clack.webservice.ServicemanWebService", serviceName = "servicemanws")
public class ServicemanWebServiceImp implements ServicemanWebService{
	@Autowired
	private ServicemanService servicemanService;


	public ServicemanService getServicemanService() {
		return servicemanService;
	}


	public void setServicemanService(ServicemanService servicemanService) {
		this.servicemanService = servicemanService;
	}


	@Override
	public List<Serviceman> getAllServiceman() throws Exception {
		// TODO Auto-generated method stub
		servicemanService = (ServicemanService)ContextUtils.getSpringMVCContext().getBean("servicemanService");
		List<Serviceman> servicemans = servicemanService.getAllServiceman();
		return servicemans;
	}

}
理清其中注解的对应关系后问题不大,
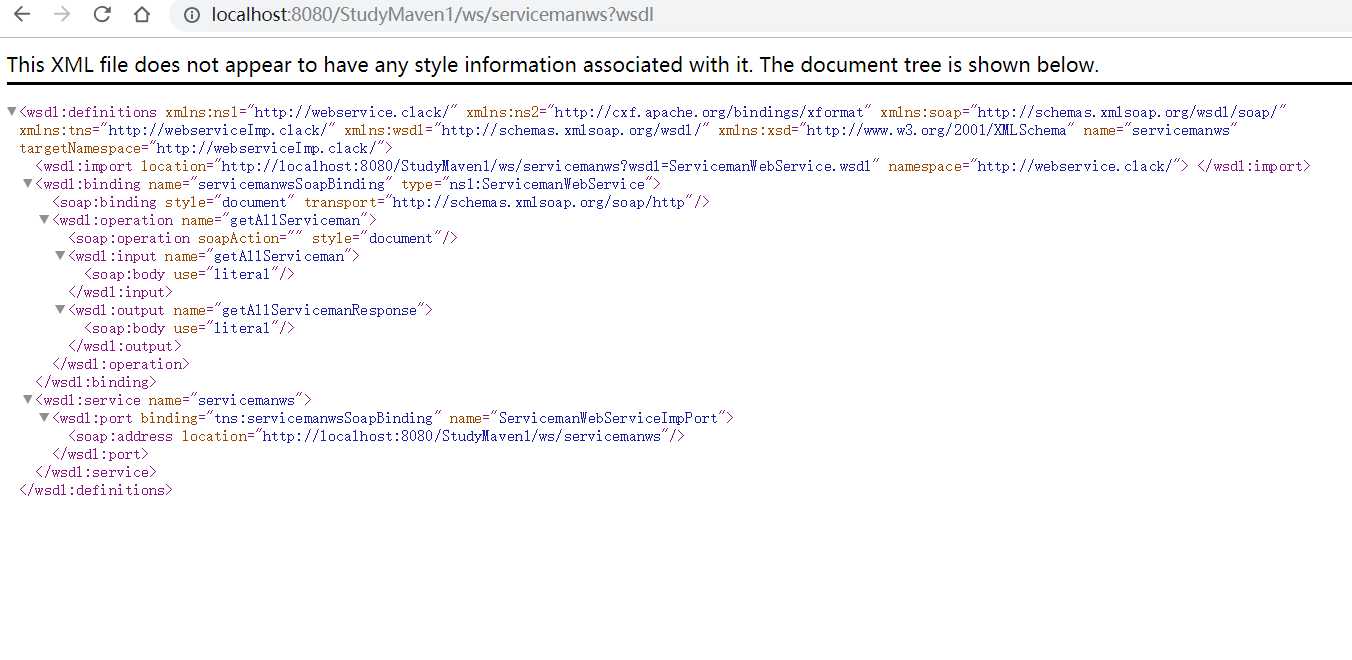
启动项目,输入地址:http://localhost:8080/StudyMaven1/ws/servicemanws?wsdl

测试:
建立一个简单的maven项目并导入相关的cxf包:
<project xmlns="http://maven.apache.org/POM/4.0.0" xmlns:xsi="http://www.w3.org/2001/XMLSchema-instance" xsi:schemaLocation="http://maven.apache.org/POM/4.0.0 http://maven.apache.org/xsd/maven-4.0.0.xsd">
  <modelVersion>4.0.0</modelVersion>
  <groupId>clack</groupId>
  <artifactId>MyWebService</artifactId>
  <version>0.0.1-SNAPSHOT</version>

  <properties>
		<cxf.version>2.2.3</cxf.version>
	</properties>

	<dependencies>
		<!-- webservice -->
		<dependency>
			<groupId>org.apache.cxf</groupId>
			<artifactId>cxf-rt-frontend-jaxws</artifactId>
			<version>${cxf.version}</version>
		</dependency>
		<dependency>
			<groupId>org.apache.cxf</groupId>
			<artifactId>cxf-rt-transports-http</artifactId>
			<version>${cxf.version}</version>
		</dependency>


	</dependencies>
	<build>
		<defaultGoal>compile</defaultGoal>
		<finalName>MyWebService</finalName>
		<plugins>
			<plugin>
				<groupId>org.apache.maven.plugins</groupId>
				<artifactId>maven-compiler-plugin</artifactId>
				<version>3.1</version>
				<configuration>
					<source>1.8</source>
					<target>1.8</target>
					<encoding>utf-8</encoding>
				</configuration>
			</plugin>
			<plugin>
				<groupId>org.apache.maven.plugins</groupId>
				<artifactId>maven-resources-plugin</artifactId>
				<version>2.6</version>
				<configuration>


					<failOnMissingWebXml>false</failOnMissingWebXml>

				</configuration>
			</plugin>
		</plugins>
		<resources>
			<!--编译之后包含xml -->
			<resource>
				<directory>src/main/java</directory>
				<includes>
					<include>**/*.xml</include>
				</includes>
			</resource>
			<resource>
				<directory>src/main/resources</directory>
				<includes>
					<include>**/*</include>
				</includes>
			</resource>

		</resources>
	</build>
</project>
2. 使用了一个插件生成相关的文件 apache-cxf-3.2.7
3. 将所得的文件拷入maven项目中,并新建一个测试类测试是否能取得数据:
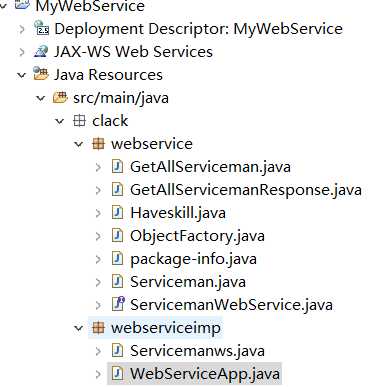
目录树如下:

其中WebServiceApp是测试类:
package clack.webserviceimp;

import java.net.URL;
import java.util.List;

import javax.xml.namespace.QName;
import javax.xml.ws.Service;

import org.apache.cxf.endpoint.Client;
import org.apache.cxf.jaxws.endpoint.dynamic.JaxWsDynamicClientFactory;

import clack.webservice.Serviceman;
import clack.webservice.ServicemanWebService;

/**
 * 通过客户端编程的方式调用Webservice服务
 *
 */
public class WebServiceApp {

	//1. 自定义方法
	public void mysoap() throws Exception {

		// CXF动态客户端工厂
		JaxWsDynamicClientFactory dcf = JaxWsDynamicClientFactory.newInstance();

		// WSDL文档url配置()
		String wsdlUrl = "http://localhost:8080/StudyMaven1/ws/servicemanws?wsdl";

		Object[] objects = null;
		try {
			// 获取CXF客户端
			Client client = dcf.createClient(wsdlUrl);
			// 调用Web Service方法
			objects = client.invoke("add", 1, 2);
		} catch (Exception e) {
			e.printStackTrace();
		}

		// 获取调用结果
		System.out.println("调用结果:" + objects[0]);

		System.out.println("=========>");
		try {
			// 获取CXF客户端
			Client client = dcf.createClient(wsdlUrl);
			// 调用Web Service方法
			objects = client.invoke("sayHello", "World!");
		} catch (Exception e) {
			e.printStackTrace();
		}

		// 获取调用结果
		System.out.println("调用结果:" + objects[0]);
	}
	//第二种 client工具生成辅助类 需使用apche cxf工具
	//步骤 cmd wsdl2java   -encoding  utf8 http://localhost:8080/StudyMavenSSM/ws/studentws?wsdl
	//
	public void clientsoap() throws Exception{
		// 创建WSDL的URL,注意不是服务地址
				URL url = new URL("http://localhost:8080/StudyMaven1/ws/servicemanws?wsdl");

				// 创建服务名称
				// 1.namespaceURI - 命名空间地址 (wsdl文档中的targetNamespace
				// targetNamespace="http://webserviceImp.gxa/")
				// 2.localPart - 服务视图名 (wsdl文档中服务名称,例如<wsdl:service name="studentws">)
				QName qname = new QName("http://webserviceImp.clack/", "servicemanws");

				// 创建服务视图
				// 参数解释:
				// 1.wsdlDocumentLocation - wsdl地址
				// 2.serviceName - 服务名称
				Service service = Service.create(url, qname);
				// 获取服务实现类
				// 参数解释:serviceEndpointInterface - 服务端口(wsdl文档中服务端口的name属性,例如<wsdl:port
				// binding="tns:studentwsSoapBinding" name="StudentWebServiceImpPort">)
				ServicemanWebService studentWebService =
				service.getPort(ServicemanWebService.class);
				 //调用查询方法
				 List<Serviceman> students = studentWebService.getAllServiceman();
				 for(Serviceman serviceman:students){
					 System.out.println(serviceman.getSname());
				 }
	}

	public static void main(String[] args) throws Exception {
		new WebServiceApp().clientsoap();
	}

}
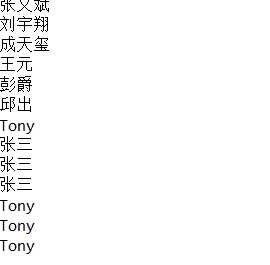
4. 最后运行如下,成功调用:

至此,一个简单的webservice就整合进去了,但是,其中还有很多细节无法言说,学而无涯。
标签:trace 工具 binding url 实现 mvcc and 不能 格式
原文地址:https://www.cnblogs.com/clack/p/10001375.html