标签:temp 类的方法 获取 blank 核心 ini 阶段 esc enabled
前言:spring主要就是对bean进行管理,因此IOC容器的初始化过程非常重要,搞清楚其原理不管在实际生产或面试过程中都十分的有用。在【spring源码分析】准备工作中已经搭建好spring的环境,并利用xml配置形式对类进行了实例化。在test代码中有一个非常关键的类ClassPathXmlApplicationContext,在这个类中实现了IOC容器的初始化,因此我们从ClassPathXmlApplicationContext入手开始研究IOC的初始化过程。
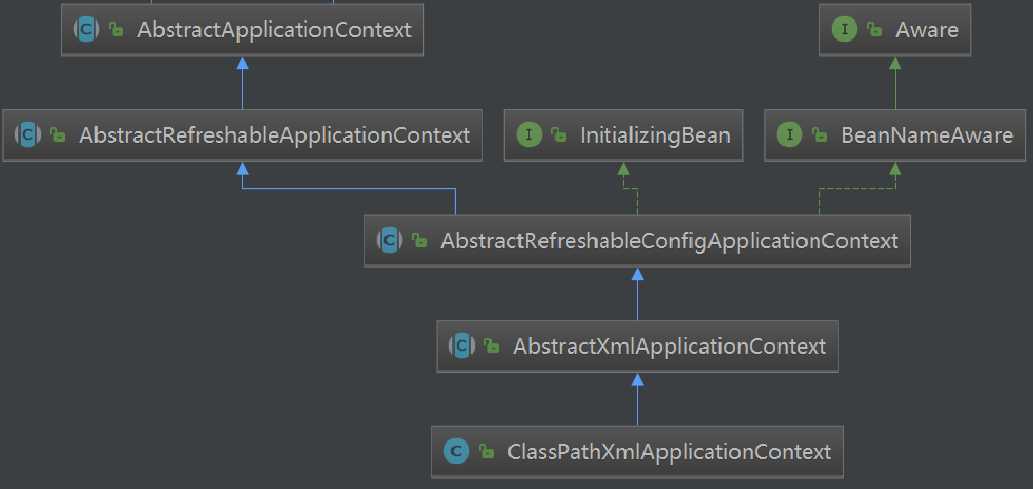
ClassPathXmlApplicationContext类的继承关系非常的庞大,在IOC容器初始化的过程中,经常调用父类的方法进行实现,因此需特别注意类之间的继承关系。通过阅读源码,可粗略的将IOC容器初始化过程分为两步:(1)解析xml文件,导入bean;(2)通过反射生成bean。因此下面将从这两大步对IOC初始化进行分析。
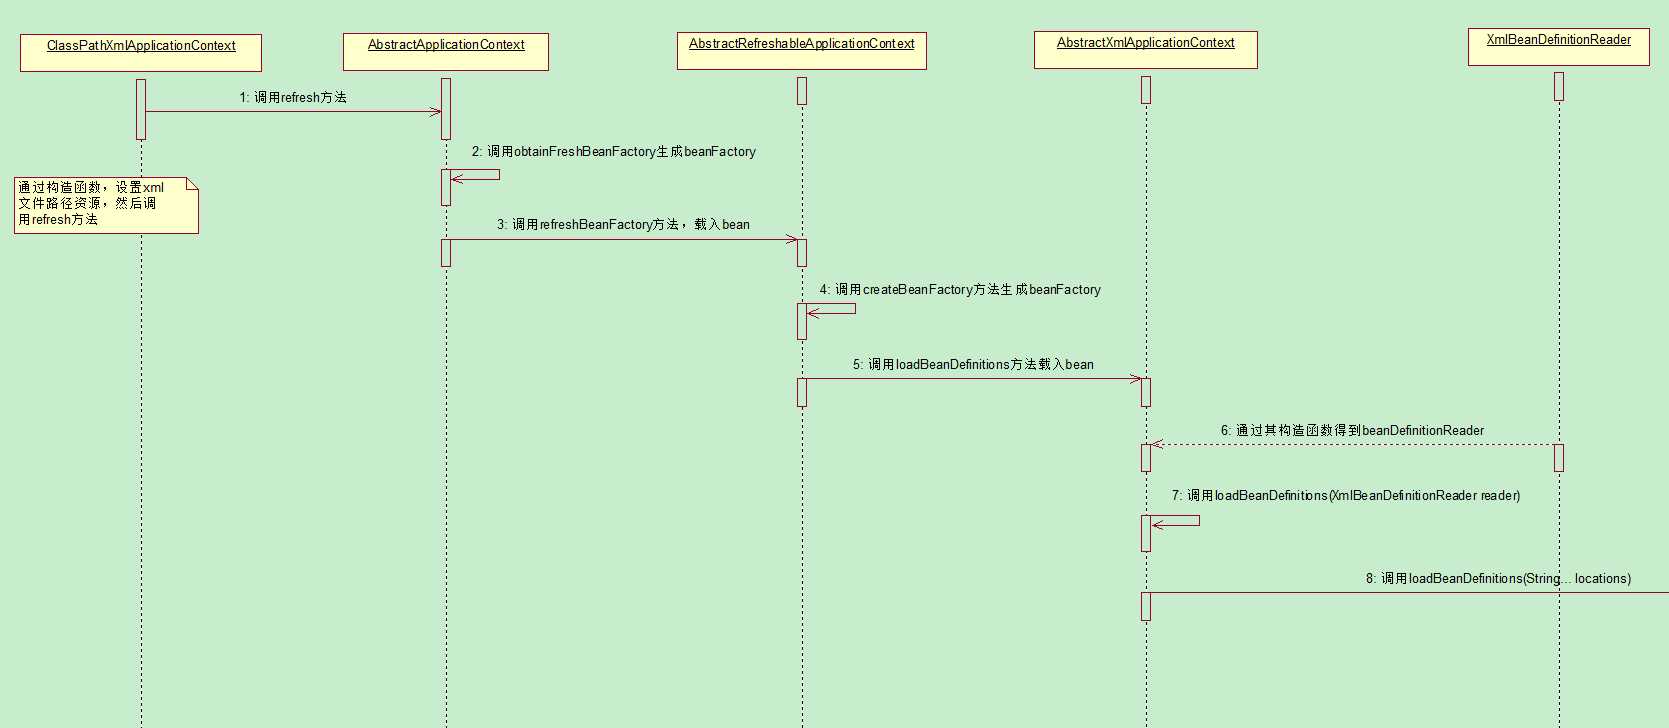
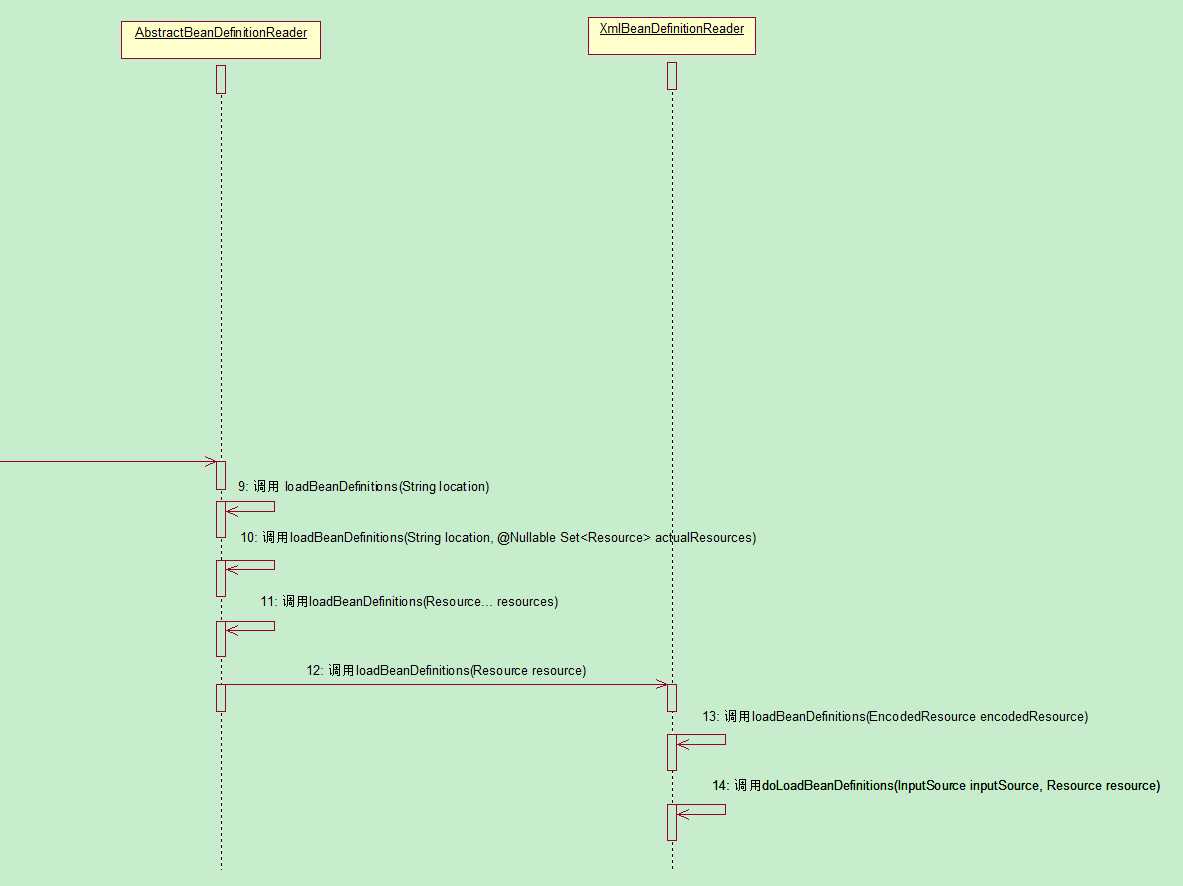
首先给出导入bean的调用链:
通过程序调用链可知:
(1)导入bean大致分为三个阶段:①导入bean(loadBeanDefinitions);②解析bean(parseBeanDefinition);③注册bean(registerBeanDefinition)。
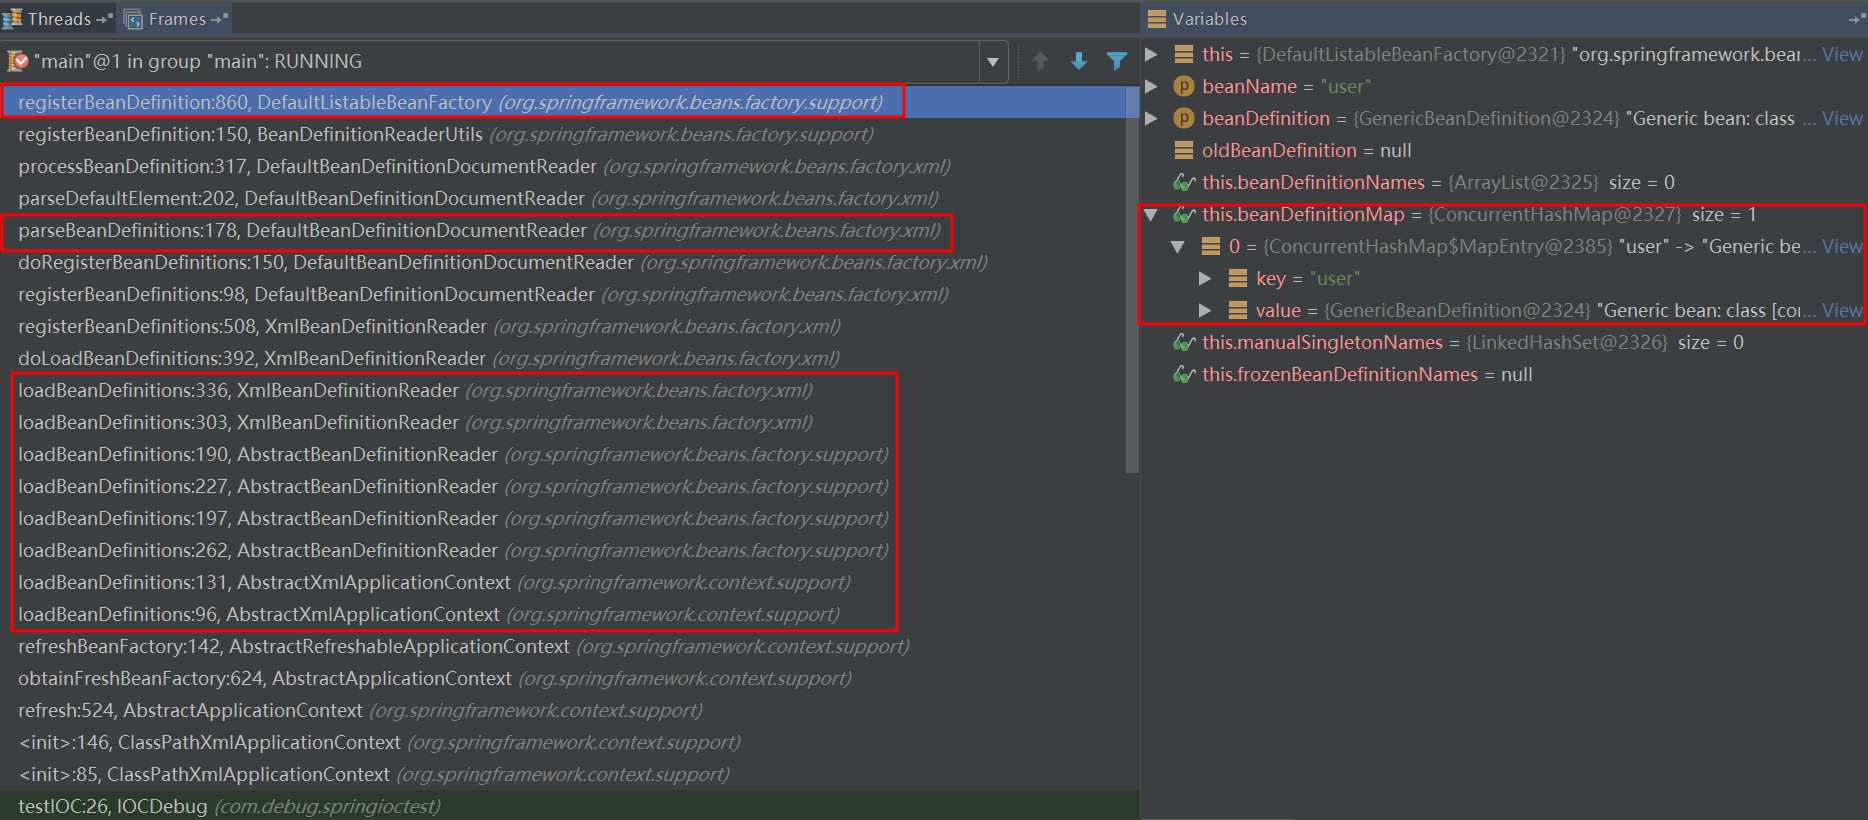
(2)最终bean是存储在beanDefinitionMap中:键为类名(beanName),值为GenericBeanDefinition(BeanDefinition)。
下面对导入bean的三个阶段进行分析。
通过上述调用链,先整理出在导入bean过程中所涉及的类和相关方法。

通过上表可以知道,在导入bean阶段主要涉及如下几个类(根据调用顺序):
①ClassPathXmlApplicationContext;②AbstractApplicationContext;
③AbstractRefreshableApplicationContext;④AbstractXmlApplicationContext;
⑤AbstractBeanDefinitionReader;⑥XmlBeanDefinitionReader。
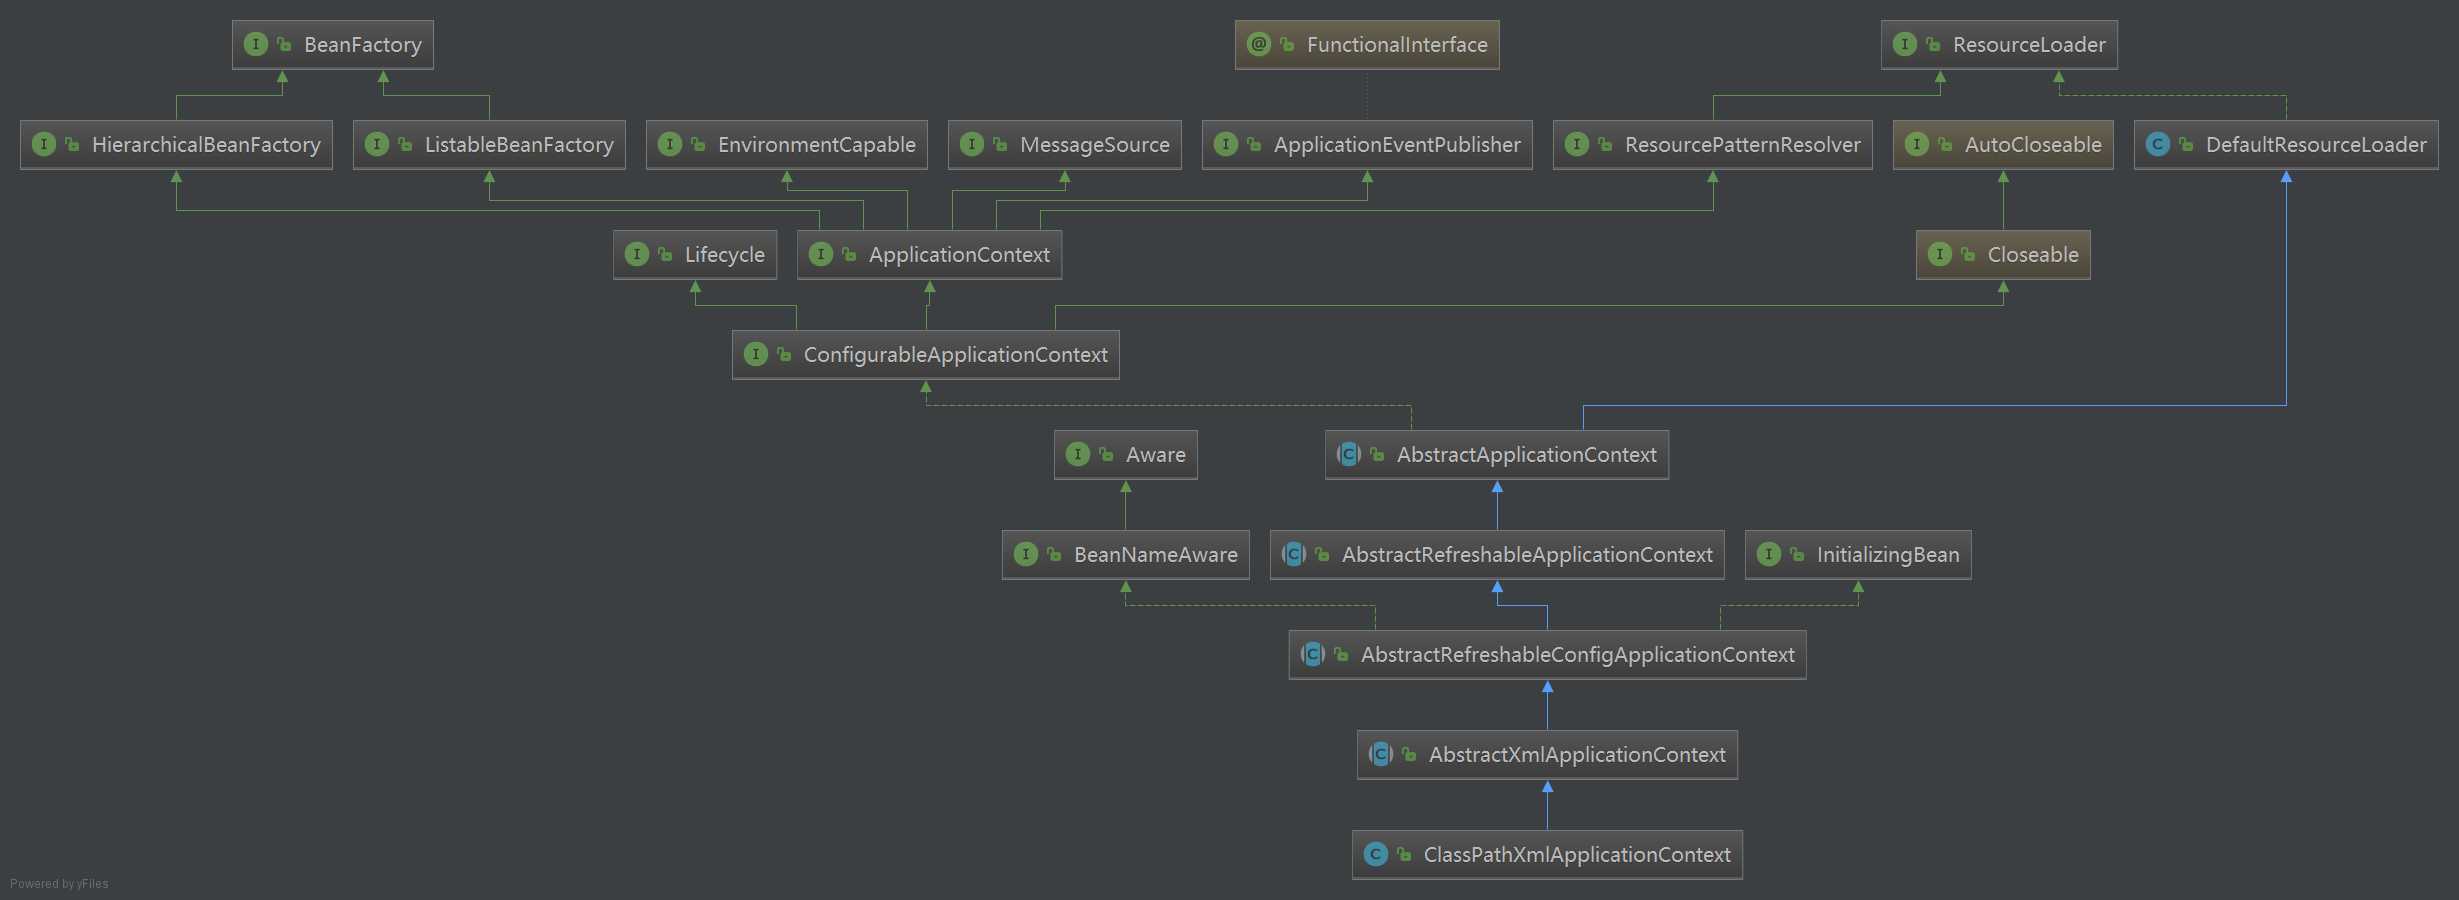
根据类名就可以猜测出①②③④为继承关系,事实的确如此。其继承关系通过ClassPathXmlApplicationContext继承关系图可知:
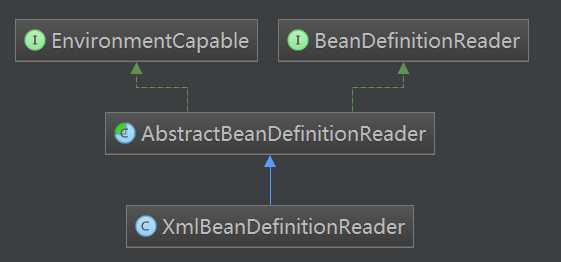
⑤⑥也为继承关系,其继承关系如下:
通过上面对bean导入阶段大致流程的梳理,应该对bean导入阶段有了大体的认识,下面对该阶段源码进行分析(按上面程序调用链顺序)。
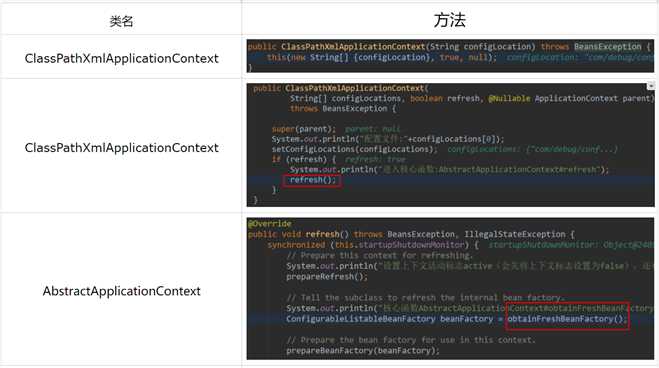
ClassPathXmlApplicationContext构造函数,具体代码如下:
 1     public ClassPathXmlApplicationContext(
 2             String[] configLocations, boolean refresh, @Nullable ApplicationContext parent)
 3             throws BeansException {
 4
 5         super(parent);
 6         System.out.println("配置文件:"+configLocations[0]);
 7         setConfigLocations(configLocations);  //配置xml文件资源
 8         if (refresh) {
 9             System.out.println("进入核心函数:AbstractApplicationContext#refresh");
10             refresh();
11         }
12     }
这段代码比较好理解主要就是设置xml文件资源,将xml文件的路径保存下来,供后面使用。
第7行代码调用的是AbstractRefreshableConfigApplicationContext的setConfigLocations函数,该函数功能简单:设置xml文件资源,具体代码如下:
 1     /**
 2      * Set the config locations for this application context.
 3      * <p>If not set, the implementation may use a default as appropriate.
 4      */
 5     public void setConfigLocations(@Nullable String... locations) {
 6         if (locations != null) {
 7             Assert.noNullElements(locations, "Config locations must not be null");
 8             this.configLocations = new String[locations.length];
 9             for (int i = 0; i < locations.length; i++) {
10                 this.configLocations[i] = resolvePath(locations[i]).trim();  //解析xml路径,并存入configLocations中
11             }
12         }
13         else {
14             this.configLocations = null;
15         }
16     }
第10行代码refresh()为整个IOC流程的入口,这里调用的是AbstractApplicationContext的refresh方法,具体代码如下:
 1 public void refresh() throws BeansException, IllegalStateException {
 2         synchronized (this.startupShutdownMonitor) {
 3             // Prepare this context for refreshing.
 4             System.out.println("设置上下文活动标志active(会先将上下文标志设置为true),还有进行一些环境配置。");
 5             prepareRefresh();
 6
 7             // Tell the subclass to refresh the internal bean factory.
 8             System.out.println("核心函数AbstractApplicationContext#obtainFreshBeanFactory,功能解析xml,创建BeanFactory");
 9             ConfigurableListableBeanFactory beanFactory = obtainFreshBeanFactory();
10
11             // Prepare the bean factory for use in this context.
12             prepareBeanFactory(beanFactory);
13
14             try {
15                 // Allows post-processing of the bean factory in context subclasses.
16                 postProcessBeanFactory(beanFactory);
17
18                 // Invoke factory processors registered as beans in the context.
19                 invokeBeanFactoryPostProcessors(beanFactory);
20
21                 // Register bean processors that intercept bean creation.
22                 registerBeanPostProcessors(beanFactory);
23
24                 // Initialize message source for this context.
25                 initMessageSource();
26
27                 // Initialize event multicaster for this context.
28                 initApplicationEventMulticaster();
29
30                 // Initialize other special beans in specific context subclasses.
31                 onRefresh();
32
33                 // Check for listener beans and register them.
34                 registerListeners();
35
36                 // Instantiate all remaining (non-lazy-init) singletons.
37                 //该函数中会对bean进行初始化,利用反射技术。
38                 finishBeanFactoryInitialization(beanFactory);
39
40                 // Last step: publish corresponding event.
41                 finishRefresh();
42             }
43
44             catch (BeansException ex) {
45                 if (logger.isWarnEnabled()) {
46                     logger.warn("Exception encountered during context initialization - " +
47                             "cancelling refresh attempt: " + ex);
48                 }
49
50                 // Destroy already created singletons to avoid dangling resources.
51                 destroyBeans();
52
53                 // Reset ‘active‘ flag.
54                 cancelRefresh(ex);
55
56                 // Propagate exception to caller.
57                 throw ex;
58             }
59
60             finally {
61                 // Reset common introspection caches in Spring‘s core, since we
62                 // might not ever need metadata for singleton beans anymore...
63                 resetCommonCaches();
64             }
65         }
66     }
注:该方法为同步方法;主要关注:①obtainFreshBeanFactory;②finishBeanFactoryInitialization。①方法会进行bean的注入;②方法会利用反射实例化bean。
第5行prepareRefresh函数功能比较简单:设置相关标志(将active设置为true),初始化一些数据。
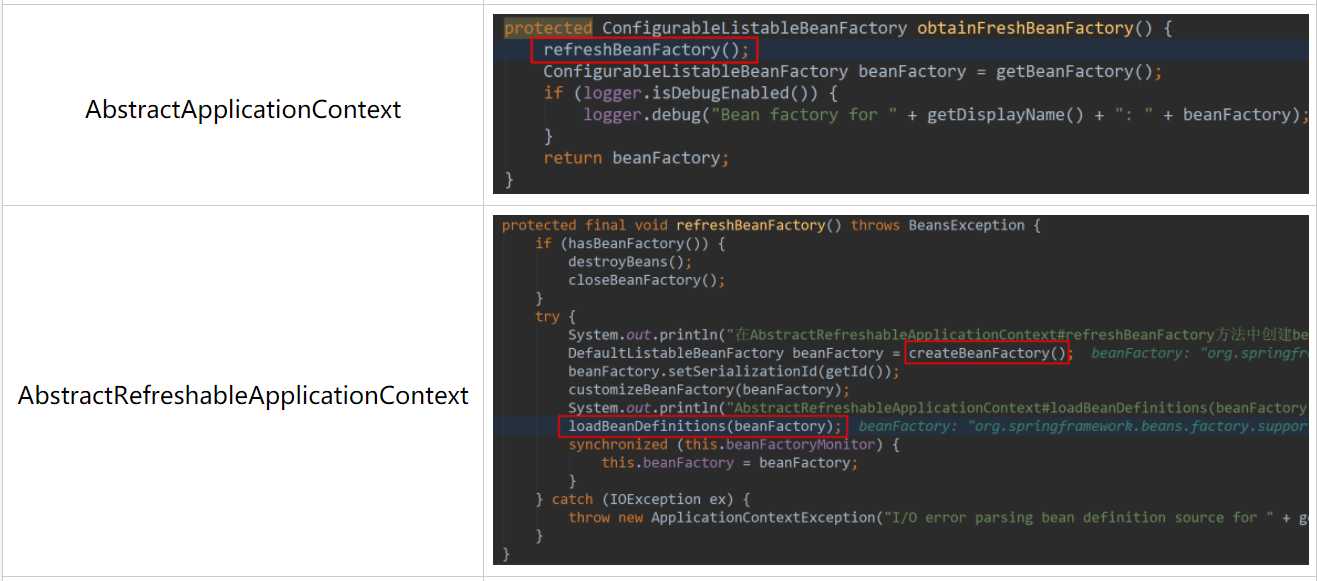
重点第9行obtainFreshBeanFactory函数生成beanFactory工厂,具体代码如下:
1 protected ConfigurableListableBeanFactory obtainFreshBeanFactory() {
2         refreshBeanFactory();
3         ConfigurableListableBeanFactory beanFactory = getBeanFactory();
4         if (logger.isDebugEnabled()) {
5             logger.debug("Bean factory for " + getDisplayName() + ": " + beanFactory);
6         }
7         return beanFactory;
8     }
注意这里执行完refreshBeanFactory后就会返回beanFactory,关键函数refreshBeanFactory刷新beanFactory,这里会调用AbstractRefreshableApplicationContext中的refreshBeanFactory方法,具体代码如下:
 1 protected final void refreshBeanFactory() throws BeansException {
 2         if (hasBeanFactory()) {
 3             destroyBeans();
 4             closeBeanFactory();
 5         }
 6         try {
 7             System.out.println("在AbstractRefreshableApplicationContext#refreshBeanFactory方法中创建beanFactory");
 8             DefaultListableBeanFactory beanFactory = createBeanFactory();
 9             beanFactory.setSerializationId(getId());
10             customizeBeanFactory(beanFactory);
11             System.out.println("AbstractRefreshableApplicationContext#loadBeanDefinitions(beanFactory)关键函数,载入bean定义");
12             loadBeanDefinitions(beanFactory);
13             synchronized (this.beanFactoryMonitor) {
14                 this.beanFactory = beanFactory;
15             }
16         } catch (IOException ex) {
17             throw new ApplicationContextException("I/O error parsing bean definition source for " + getDisplayName(), ex);
18         }
19     }
分析:
①第2行:首先判断是否存在beanFactory,如果存在则销毁bean,并关闭beanfactory。
②第8行:创建beanFactory。
③第12行:导入bean。
关注第8行创建beanFactory,该函数会调用AbstractRefreshableApplicationContext中的createBeanFactory方法,具体代码如下:
1 protected DefaultListableBeanFactory createBeanFactory() {
2         System.out.println("new一个DefaultListableBeanFactory,需先判断是否存在内部的BeanFactory实例");
3         return new DefaultListableBeanFactory(getInternalParentBeanFactory());
4     }
这里直接new一个DefaultListableBeanFactory实例,这里会先判断是否有父工厂,在DefaultListableBeanFactory的构造函数中会调用其父类AbstractAutowireCapableBeanFactory的构造函数,在其构造函数中需要进行关注下:
1 public AbstractAutowireCapableBeanFactory() {
2         super();
3         ignoreDependencyInterface(BeanNameAware.class);
4         ignoreDependencyInterface(BeanFactoryAware.class);
5         ignoreDependencyInterface(BeanClassLoaderAware.class);
6         System.out.println("AbstractAutowireCapableBeanFactory构造函数中,忽略实现接口BeanNameAware.class/BeanFactoryAware.class/BeanClassLoaderAware.class类的自动装配功能");
7     }
这里会忽略实现BeanNameAware/BeanFactoryAware/BeanClassLoaderAware接口类的自动装配功能。
在实例化DefaultListableBeanFactory后,会对beanFactory进行一些设置,在customizeBeanFactory函数中:
1 protected void customizeBeanFactory(DefaultListableBeanFactory beanFactory) {
2         if (this.allowBeanDefinitionOverriding != null) {
3             beanFactory.setAllowBeanDefinitionOverriding(this.allowBeanDefinitionOverriding);
4         }
5         if (this.allowCircularReferences != null) {
6             beanFactory.setAllowCircularReferences(this.allowCircularReferences);
7         }
8     }
注:这里设置是否可以对BeanDefinition进行覆盖,是否允许循环依赖属性。
接下来重点函数loadBeanDefinitions,这里转向AbstractXmlApplicationContext中的loadBeanDefinitions函数,具体代码如下:
 1 protected void loadBeanDefinitions(DefaultListableBeanFactory beanFactory) throws BeansException, IOException {
 2         // Create a new XmlBeanDefinitionReader for the given BeanFactory.
 3         System.out.println("通过AbstractBeanDefinitionReader父类创建XmlBeanDefinitionReader,用于解析xml文件的bean");
 4         XmlBeanDefinitionReader beanDefinitionReader = new XmlBeanDefinitionReader(beanFactory);
 5
 6         // Configure the bean definition reader with this context‘s
 7         // resource loading environment.
 8         System.out.println("设置环境与ResourceLoader");
 9         beanDefinitionReader.setEnvironment(this.getEnvironment());
10         beanDefinitionReader.setResourceLoader(this);
11         beanDefinitionReader.setEntityResolver(new ResourceEntityResolver(this));
12
13         // Allow a subclass to provide custom initialization of the reader,
14         // then proceed with actually loading the bean definitions.
15         initBeanDefinitionReader(beanDefinitionReader);
16         loadBeanDefinitions(beanDefinitionReader);
17     }
分析:
①第4行创建XmlBeanDefinitionReader,是在AbstractBeanDefinitionReader中创建的,传入beanFactory对象。
②9-11行对beanDefinitionReader设置环境、资源导入器、实体解析器。
③第15行注释已经写得很清楚了,允许子类自定义实现beanDefinitionReader方法。
④继续调用loadBeanDefinitions,传入beanDefinitionReader。
此时loadBeanDefinitions函数仍然调用的是AbstractXmlApplicationContext中的方法:
 1 protected void loadBeanDefinitions(XmlBeanDefinitionReader reader) throws BeansException, IOException {
 2         Resource[] configResources = getConfigResources();
 3         if (configResources != null) {
 4             reader.loadBeanDefinitions(configResources);
 5         }
 6         String[] configLocations = getConfigLocations();
 7         if (configLocations != null) {
 8             System.out.println("AbstractXmlApplicationContext的loadBeanDefinitions(XmlBeanDefinitionReader reader),导入xml资源");
 9             reader.loadBeanDefinitions(configLocations);
10         }
11     }
分析:
这里根据资源类型走不同分支,由于我们前面已经设置了configLocation,所以这里走到第9行处。
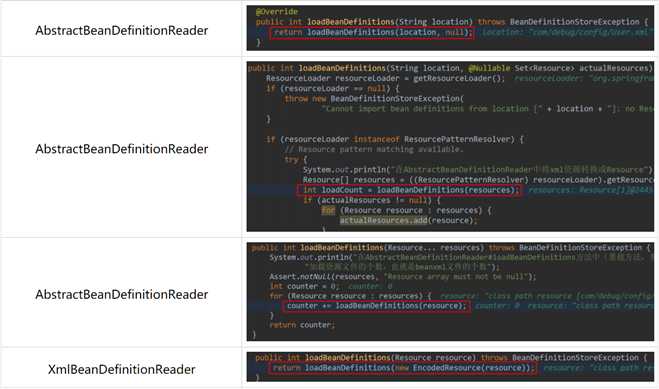
由于创建beanDefinitionReader是在AbstractBeanDefinitionReader中实现,因此转向AbstractBeanDefinitionReader的loadBeanDefinitions:
1     @Override
2     public int loadBeanDefinitions(String... locations) throws BeanDefinitionStoreException {
3         Assert.notNull(locations, "Location array must not be null");
4         int counter = 0;
5         for (String location : locations) {
6             counter += loadBeanDefinitions(location);
7         }
8         return counter;
9     }
循环资源文件进行导入(这里会多次调用loadBeanDefinitions方法,注意方法入参),继续其loadBeanDefinitions方法,注意方法入参不同,最终转向的loadBeanDefinitions方法代码如下:
 1 public int loadBeanDefinitions(String location, @Nullable Set<Resource> actualResources) throws BeanDefinitionStoreException {
 2         ResourceLoader resourceLoader = getResourceLoader();
 3         if (resourceLoader == null) {
 4             throw new BeanDefinitionStoreException(
 5                     "Cannot import bean definitions from location [" + location + "]: no ResourceLoader available");
 6         }
 7
 8         if (resourceLoader instanceof ResourcePatternResolver) {
 9             // Resource pattern matching available.
10             try {
11                 System.out.println("在AbstractBeanDefinitionReader中将xml资源转换成Resource");
12                 Resource[] resources = ((ResourcePatternResolver) resourceLoader).getResources(location);
13                 int loadCount = loadBeanDefinitions(resources);
14                 if (actualResources != null) {
15                     for (Resource resource : resources) {
16                         actualResources.add(resource);
17                     }
18                 }
19                 if (logger.isDebugEnabled()) {
20                     logger.debug("Loaded " + loadCount + " bean definitions from location pattern [" + location + "]");
21                 }
22                 return loadCount;
23             }
24             catch (IOException ex) {
25                 throw new BeanDefinitionStoreException(
26                         "Could not resolve bean definition resource pattern [" + location + "]", ex);
27             }
28         }
29         else {
30             // Can only load single resources by absolute URL.
31             Resource resource = resourceLoader.getResource(location);
32             int loadCount = loadBeanDefinitions(resource);
33             if (actualResources != null) {
34                 actualResources.add(resource);
35             }
36             if (logger.isDebugEnabled()) {
37                 logger.debug("Loaded " + loadCount + " bean definitions from location [" + location + "]");
38             }
39             return loadCount;
40         }
41     }
分析:
①第2行:取出资源导入器,为下面将xml配置文件转换成Resource数组做准备。
②第13行:由于将xml配置文件转换成了Resource数组,这里继续调用AbstractBeanDefinitionReader的loadBeanDefinitions方法(注意入参):
 1 public int loadBeanDefinitions(Resource... resources) throws BeanDefinitionStoreException {
 2         System.out.println("在AbstractBeanDefinitionReader#loadBeanDefinitions方法中(参数为Resource)得到" +
 3                 "加载资源文件的个数,也就是beanxml文件的个数");
 4         Assert.notNull(resources, "Resource array must not be null");
 5         int counter = 0;
 6         for (Resource resource : resources) {
 7             counter += loadBeanDefinitions(resource);
 8         }
 9         return counter;
10     }
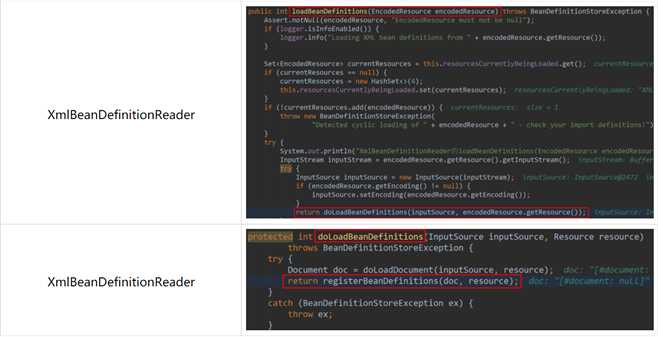
注意在第7行处,这里要调用子类的方法了,具体调用XmlBeanDefinitionReader的loadBeanDefinitions方法:
 1     /**
 2      * Load bean definitions from the specified XML file.
 3      * @param resource the resource descriptor for the XML file
 4      * @return the number of bean definitions found
 5      * @throws BeanDefinitionStoreException in case of loading or parsing errors
 6      */
 7     @Override
 8     public int loadBeanDefinitions(Resource resource) throws BeanDefinitionStoreException {
 9         return loadBeanDefinitions(new EncodedResource(resource));
10     }
11
12     /**
13      * Load bean definitions from the specified XML file.
14      * @param encodedResource the resource descriptor for the XML file,
15      * allowing to specify an encoding to use for parsing the file
16      * @return the number of bean definitions found
17      * @throws BeanDefinitionStoreException in case of loading or parsing errors
18      */
19     public int loadBeanDefinitions(EncodedResource encodedResource) throws BeanDefinitionStoreException {
20         Assert.notNull(encodedResource, "EncodedResource must not be null");
21         if (logger.isInfoEnabled()) {
22             logger.info("Loading XML bean definitions from " + encodedResource.getResource());
23         }
24
25         Set<EncodedResource> currentResources = this.resourcesCurrentlyBeingLoaded.get();
26         if (currentResources == null) {
27             currentResources = new HashSet<>(4);
28             this.resourcesCurrentlyBeingLoaded.set(currentResources);
29         }
30         if (!currentResources.add(encodedResource)) {
31             throw new BeanDefinitionStoreException(
32                     "Detected cyclic loading of " + encodedResource + " - check your import definitions!");
33         }
34         try {
35             System.out.println("XmlBeanDefinitionReader的loadBeanDefinitions(EncodedResource encodedResource)中间Resource转化成InputStream流,进行读取操作");
36             InputStream inputStream = encodedResource.getResource().getInputStream();
37             try {
38                 InputSource inputSource = new InputSource(inputStream);
39                 if (encodedResource.getEncoding() != null) {
40                     inputSource.setEncoding(encodedResource.getEncoding());
41                 }
42                 return doLoadBeanDefinitions(inputSource, encodedResource.getResource());
43             }
44             finally {
45                 inputStream.close();
46             }
47         }
48         catch (IOException ex) {
49             throw new BeanDefinitionStoreException(
50                     "IOException parsing XML document from " + encodedResource.getResource(), ex);
51         }
52         finally {
53             currentResources.remove(encodedResource);
54             if (currentResources.isEmpty()) {
55                 this.resourcesCurrentlyBeingLoaded.remove();
56             }
57         }
58     }
分析:
①这里将Resource对象包装成了EncodedResource对象,注意第25行使用了ThreadLocal来避免线程安全问题。
②第36行:获取了一个输入流,对xml文件进行操作,接下来开始导入bean,转向XmlBeanDefinitionReader的doLoadBeanDefinitions方法:
1 protected int doLoadBeanDefinitions(InputSource inputSource, Resource resource)
2             throws BeanDefinitionStoreException {
3         try {
4             Document doc = doLoadDocument(inputSource, resource);
5             return registerBeanDefinitions(doc, resource);
6         }
7         catch (...)
8     }
至此,导入bean阶段完成,通过这么长的调用链其实主要就是将xml配置文件转换成流,为下一步解析和注册bean做准备。
下面给出bean导入阶段的大致时序图:
至此导入bean阶段大致分析完成,该阶段总的来说还是比较简单,下面将对解析bean阶段进行分析。
by Shawn Chen,2018.11.24日,晚。
标签:temp 类的方法 获取 blank 核心 ini 阶段 esc enabled
原文地址:https://www.cnblogs.com/morewindows0/p/10004293.html