标签:lazy system iter 举例 限制 false ber entryset 有一个
传统应用程序设计中所说的依赖一般指的是“类之间的关系”。具体有以下几种关系:
泛化:表示类与类之间的继承关系、接口与接口之间的继承关系;
实现:表示类对接口的实现
依赖:当类与类之间有使用关系时就属于依赖关系,不同于关联关系,依赖不具有“拥有关系”,而是一种“相识关系”,只是在某个特定地方(比如某个方法体内)才有关系。
关联:表示类与类或者类与接口之间的依赖关系,表现为“拥有关系”;具体到代码可以用实例变量来表示;
聚合:属于是关联的特殊情况,体现部分--整体关系,是一种弱拥有关系;整体和部分可以有不一样的生命周期;是一种弱关联;
组合:属于是关联的特殊情况,也体现了体现部分-整体关系,是一种强“拥有关系”;整体与部分有相同的生命周 期,是一种强关联;
Spring IoC容器的依赖有两层含义:Bean依赖容器和容器注入Bean的依赖资源;
1. Bean依赖容器
也就是说Bean要依赖于容器,这里的依赖是指容器负责创建Bean并管理Bean的生命周期,正是由 于由容器来控制创建Bean并注入依赖,也就是控制权被反转了,这也正是IoC名字的由来,此处的有依赖是指Bean和 容器之间的依赖关系。
2.容器注入Bean的依赖资源
容器负责注入Bean的依赖资源,依赖资源可以是Bean、外部文件、常量数据等,在 Java中都反映为对象,并且由容器负责组装Bean之间的依赖关系,此处的依赖是指Bean之间的依赖关系,可以认为是 传统类与类之间的“关联”、“聚合”、“组合”关系。
3. 为什么要依赖注入
动态替换Bean依赖对象,程序更灵活:替换Bean依赖对象,无需修改源文件:应用依赖注入后,由于可以采用配置 文件方式实现,从而能随时动态的替换Bean的依赖对象,无需修改java源文件;
更好实践面向接口编程,代码更清晰:在Bean中只需指定依赖对象的接口,接口定义依赖对象完成的功能,通过容 器注入依赖实现;
更好实践优先使用对象组合,而不是类继承:因为IoC容器采用注入依赖,也就是组合对象,从而更好的实践对象组 合。
增加Bean可复用性:依赖于对象组合,Bean更可复用且复用更简单;
降低Bean之间耦合:由于我们完全采用面向接口编程,在代码中没有直接引用Bean依赖实现,全部引用接口,而且 不会出现显示的创建依赖对象代码,而且这些依赖是由容器来注入,很容易替换依赖实现类,从而降低Bean与依赖之间 耦合;
代码结构更清晰:要应用依赖注入,代码结构要按照规约方式进行书写,从而更好的应用一些最佳实践,因此代码 结构更清晰
note: 其实依赖注入只是一种装配对象的手段,设计的类结构才是基础,如果设计的类结构不支持依赖注入,Spring IoC容器也注入不了任何东西,从而从根本上说“如何设计好类结构才是关键,依赖注入只是一种装配对象手段”。
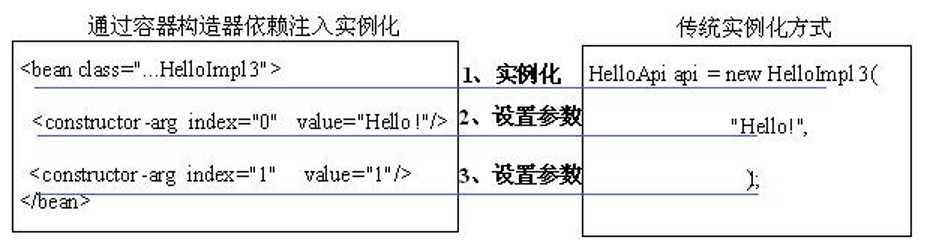
1. 构造器注入
构造器注入可以根据参数索引注入、参数类型注入或Spring3支持的参数名注入,但参数名注入是有限制的(暂时不用参数名)。静态工厂和实例工厂和它都是类似的
综合例子:
(1)bean.xml
<beans xmlns:xsi="http://www.w3.org/2001/XMLSchema-instance"
xmlns="http://www.springframework.org/schema/beans"
xsi:schemaLocation="http://www.springframework.org/schema/beans http://www.springframework.org/schema/beans/spring-beans-4.2.xsd ">
  <!-- 方法一:通过静态工厂方式注入 -->
   <bean id="byIndex" class="com.test.spring.MyStaticFactory" factory-method="newInstance">
        <constructor-arg index="0" value="Hermioner"/>
        <constructor-arg index="1" value="Nice"/>
   </bean>

   <bean id="byType" class="com.test.spring.MyStaticFactory" factory-method="newInstance">
        <constructor-arg type="java.lang.String" value="Hermioner"/>
        <constructor-arg type="java.lang.String" value="Nice"/>
   </bean>

   <!-- 方法2:通过实例化工厂方式注入 -->
   <!-- <bean id="instanceFactory" class="com.test.spring.MyInstanceFactory"/>
   <bean id="byIndex" factory-bean="instanceFactory" factory-method="newInstance">
        <constructor-arg index="0" value="Hermioner"/>
        <constructor-arg index="1" value="Nice"/>
   </bean>

   <bean id="byType" factory-bean="instanceFactory" factory-method="newInstance">
        <constructor-arg type="java.lang.String" value="Hermioner"/>
        <constructor-arg type="java.lang.String" value="Nice"/>
   </bean> -->

    <!-- 方法3:通过构造参数索引和参数类型方式依赖注入 -->
   <!-- <bean id="byIndex" class="com.test.spring.Hello">
         <constructor-arg index="0" value="Hermioner"/>
        <constructor-arg index="1" value="Nice"/>
   </bean>

   <bean id="byType" class="com.test.spring.Hello">
        <constructor-arg type="java.lang.String" value="Hermioner"/>
        <constructor-arg type="java.lang.String" value="Nice"/>
   </bean> -->
</beans>
(2)需要被注入的Bean类
package com.test.spring;

public class Hello {
    private String name;
    private String nice;
    public Hello() {
        this.name="Hermioner";
        this.nice="Nice";
    }

    public Hello(String name,String nice) {
        this.name=name;
        this.nice=nice;
    }

    public void sayHello() {
        System.out.println("hello world");
        System.out.println(name);
        System.out.println(nice);
    }
}
hello world
Hermioner
Nice
hello world
Hermioner
Nice
(3)静态工厂类
package com.test.spring;

public class MyStaticFactory {
    public static Hello newInstance(String name,String nice) {
        return new Hello(name,nice);
    }

}
(4)实例工厂类
package com.test.spring;

public class MyInstanceFactory {
    public Hello newInstance(String name,String nice) {
        return new Hello(name,nice);
    }

}
(5)测试类
package helloworld;

import org.junit.Test;
import org.springframework.beans.factory.BeanFactory;
import org.springframework.context.support.ClassPathXmlApplicationContext;

import com.test.spring.Hello;

public class HelloTest {
    @Test
    public void testHelloWorld() {
        //三种方式通用这里的代码
        BeanFactory beanFactory=new ClassPathXmlApplicationContext("bean.xml");
        //获取根据参数索引依赖注入的Bean
        Hello hello=beanFactory.getBean("byIndex",Hello.class);
        hello.sayHello();

        Hello hello2=beanFactory.getBean("byType",Hello.class);
        hello2.sayHello();
    }

}
2. setter注入
setter注入,是通过在通过构造器、静态工厂或实例工厂实例好Bean后,通过调用Bean类的setter方法进行注入依赖,如下图:
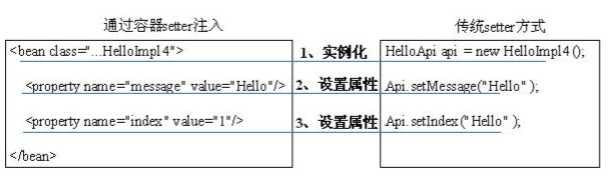
note:setter注入方式只有一种,是根据setter名字进行注入;
举例说明:
<beans xmlns:xsi="http://www.w3.org/2001/XMLSchema-instance"
xmlns="http://www.springframework.org/schema/beans"
xsi:schemaLocation="http://www.springframework.org/schema/beans http://www.springframework.org/schema/beans/spring-beans-4.2.xsd ">

 <bean id="bySetter" class="com.test.spring.Hello">
     <property name="name" value="Hermioner"/>
     <property name="nice" value="Nice"/>
 </bean>
</beans>
package com.test.spring;

public class Hello {
    private String name;
    private String nice;
    public String getName() {
        return name;
    }
    public void setName(String name) {
        this.name = name;
    }
    public String getNice() {
        return nice;
    }
    public void setNice(String nice) {
        this.nice = nice;
    }

    public void sayHello() {
        System.out.println(name);
        System.out.println(nice);
    }

}
package helloworld;

import org.junit.Test;
import org.springframework.beans.factory.BeanFactory;
import org.springframework.context.support.ClassPathXmlApplicationContext;

import com.test.spring.Hello;

public class HelloTest {
    @Test
    public void testHelloWorld() {

        BeanFactory beanFactory=new ClassPathXmlApplicationContext("bean.xml");
        Hello hello=beanFactory.getBean("bySetter",Hello.class);
        hello.sayHello();
    }

}
Hermioner
Nice
note: 其实测试代码一点都没有变,变得只是配置
那么Spring是如何知道setter方法呢?如何将值传进去得?
其实方法名是要遵守约定的,setter注 入的方法名要遵循“JavaBean getter/setter 方法命名约定”:
JavaBean:是本质就是一个POJO类,但具有一下限制:
该类必须要有公共的无参构造器,如public HelloImpl4() {};
属性为private访问级别,不建议public,如private String message;
属性必要时通过一组setter(修改器)和getter(访问器)方法来访问;
setter方法,以“set” 开头,后跟首字母大写的属性名,如“setMesssage”,简单属性一般只有一个方法参 数,方法返回值通常为“void”;
getter方法,一般属性以“get”开头,对于boolean类型一般以“is”开头,后跟首字母大写的属性名,如 “getMesssage”,“isOk”;
3. 方法注入(待更新)
1. 注入常量
注入常量是依赖注入中最简单得,配置方式如下:
<property name="message" value="Hello World!"/>
 或
 <property name="index"><value>1</value></property>
以上两种方式都可以,从配置来看第一种更简洁。注意此处“value”中指定的全是字符串,由Spring容器将此字 符串转换成属性所需要的类型,如果转换出错,将抛出相应的异常。
Spring容器目前能对各种基本类型把配置的String参数转换为需要的类型。
注:Spring类型转换系统对于boolean类型进行了容错处理,除了可以使用“true/false”标准的Java值进行注入,还 能使用“yes/no”、“on/off”、“1/0”来代表“真/假”
2. 注入Bean ID
这部分会涉及到idref和ref两个标签得区别使用,下面举例来对比说明:
(1)idref
它相当于value这个标签,我们读到得数据只是具体得id名字字符串
package com.test.spring;

public class Hello {//note;这个类中并没有引用到Student这个类
    private String name;public String getName() {
        return name;
    }
    public void setName(String name) {
        this.name = name;
    }

}
<beans xmlns:xsi="http://www.w3.org/2001/XMLSchema-instance"
    xmlns="http://www.springframework.org/schema/beans"
    xsi:schemaLocation="http://www.springframework.org/schema/beans http://www.springframework.org/schema/beans/spring-beans-4.2.xsd ">

    <bean id="helloID" class="com.test.spring.Hello">
        <property name="name">
               <idref bean="anotherID"/>
        </property>
    </bean>

    <bean id="anotherID" class="com.test.spring.Student">
        <property name="age" value="23"/>
    </bean>

</beans>
import org.junit.Test;
import org.springframework.beans.factory.BeanFactory;
import org.springframework.context.support.ClassPathXmlApplicationContext;

import com.test.spring.Hello;
import com.test.spring.User;

public class HelloTest {
    @Test
    public void testHelloWorld() {
        ClassPathXmlApplicationContext context = new ClassPathXmlApplicationContext("bean.xml");

        Hello hello=(Hello) context.getBean("helloID");
        System.out.println(hello.getName());
    }

}


anotherID
(2)ref
它是调用了另外一个bean实例
举例说明:
package com.test.spring;

public class Hello {
    private String name;
    private Student student;//Hello类中必须要用到Student类,否则ref这个标签会在运行得时候报错,因此也证明了是注入Bean id
    public String getName() {
        return name;
    }
    public void setName(String name) {
        this.name = name;
    }
    public Student getStudent() {
        return student;
    }
    public void setStudent(Student student) {
        this.student = student;
    }


}
package com.test.spring;

public class Student {
    private String age;

    public String getAge() {
        return age;
    }

    public void setAge(String age) {
        this.age = age;
    }

}
<beans xmlns:xsi="http://www.w3.org/2001/XMLSchema-instance"
    xmlns="http://www.springframework.org/schema/beans"
    xsi:schemaLocation="http://www.springframework.org/schema/beans http://www.springframework.org/schema/beans/spring-beans-4.2.xsd ">

    <bean id="helloID" class="com.test.spring.Hello">
        <property name="student">
               <ref bean="anotherID"/>
        </property>
    </bean>

    <bean id="anotherID" class="com.test.spring.Student">
        <property name="age" value="23"/>
    </bean>

</beans>
package helloworld;

import org.junit.Test;
import org.springframework.beans.factory.BeanFactory;
import org.springframework.context.support.ClassPathXmlApplicationContext;

import com.test.spring.Hello;
import com.test.spring.User;

public class HelloTest {
    @Test
    public void testHelloWorld() {
        ClassPathXmlApplicationContext context = new ClassPathXmlApplicationContext("bean.xml");

        Hello hello=(Hello) context.getBean("helloID");
        System.out.println(hello.getStudent().getAge());
    }

}


23
idref和ref得总结对比:ref调用的是bean的实例,bean里面有什么都会被调用,而idref则调用的bean的name(一段字符串),但是相较于value属性,idref又具有验证判断效果,它会使xml解析器在解析xml的时候判断idref中的bean是否真的存在于容器中,不然就会报错。
如果把idref中得anotherID改成anotherID2,就会在运行得时候报ID错误

3. 注入集合、数组和字典
Spring不仅能注入简单类型数据,还能注入集合(Collection、无序集合Set、有序集合List)类型、数组(Array)类 型、字典(Map)类型数据、Properties类型数据,接下来就让我们一个个看看如何注入这些数据类型的数据。
3.1 注入集合类型:包括Collection类型、Set类型、List类型数据
(1)List类型:需要使用<list>标签来配置注入,其具体配置如下:
<beans xmlns:xsi="http://www.w3.org/2001/XMLSchema-instance"
    xmlns="http://www.springframework.org/schema/beans"
    xsi:schemaLocation="http://www.springframework.org/schema/beans http://www.springframework.org/schema/beans/spring-beans-4.2.xsd ">

    <bean id="beanID" class="com.test.spring.Hello">
        <property name="values">
           <list>
              <value>1</value>
              <value>2</value>
              <value>3</value>
           </list>
        </property>
    </bean>
</beans>


package com.test.spring;

import java.util.List;

public class Hello {
    private List<Integer> values;

    public List<Integer> getValues() {
        return values;
    }

    public void setValues(List<Integer> values) {
        this.values = values;
    }

}


import org.junit.Test;
import org.springframework.beans.factory.BeanFactory;
import org.springframework.context.support.ClassPathXmlApplicationContext;

import com.test.spring.Hello;
import com.test.spring.User;

public class HelloTest {
    @Test
    public void testHelloWorld() {
        ClassPathXmlApplicationContext context = new ClassPathXmlApplicationContext("bean.xml");
        Hello hello=context.getBean("beanID",Hello.class);
        Integer result=hello.getValues().get(0);
        System.out.println(result);
    }

}


1
(2)Set类型:需要使用<set>标签来配置注入,其配置参数及含义和<lsit>标签完全一样,在此就不阐述了
(3)Collection类型::因为Collection类型是Set和List类型的基类型,所以使用<set>或<list>标签都可以进行注 入,配置方式完全和以上配置方式一样,只是将测试类属性改成“Collection”类型
比如: public Collection<String> getValues() { return values; }
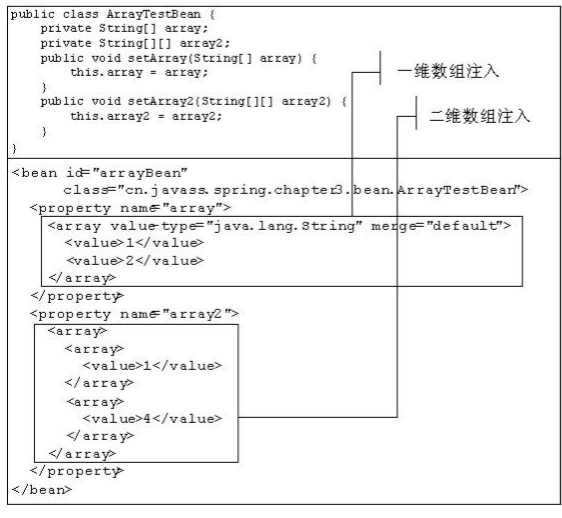
3.2 注入数组类型
需要使用<array>标签来配置注入,其中标签属性“value-type”和“merge”和<list>标签含义 完全一样,具体配置如下:
3.3 注入字典(Map)类型
:字典类型是包含键值对数据的数据结构,需要使用<map>标签来配置注入,其属性 “key-type”和“value-type”分别指定“键”和“值”的数据类型,其含义和<list>标签的“value-type”含义一 样,在此就不罗嗦了,并使用<key>子标签来指定键数据,<value>子标签来指定键对应的值数据,具体配置如下:
<beans xmlns:xsi="http://www.w3.org/2001/XMLSchema-instance"
    xmlns="http://www.springframework.org/schema/beans"
    xsi:schemaLocation="http://www.springframework.org/schema/beans http://www.springframework.org/schema/beans/spring-beans-4.2.xsd ">

    <bean id="beanID" class="com.test.spring.Hello">
        <property name="values">
           <map key-type="java.lang.String" value-type="java.lang.String">
               <entry>
                   <key>
                       <value>1</value>
                   </key>

                   <value>22</value>   //NOTE:如果22独占一行得化,最终输出会22独占一行,相当于加了回车
               </entry>
           </map>
        </property>
    </bean>
</beans>
package com.test.spring;
import java.util.Map;

public class Hello {
    public Map<String, String> getValues() {
        return values;
    }

    public void setValues(Map<String, String> values) {
        this.values = values;
    }

    private Map<String, String> values;

}
package helloworld;

import java.util.HashMap;
import java.util.Iterator;
import java.util.Map;
import org.junit.Test;
import org.springframework.context.support.ClassPathXmlApplicationContext;
import com.test.spring.Hello;

public class HelloTest {
    @Test
    public void testHelloWorld() {
        ClassPathXmlApplicationContext context = new ClassPathXmlApplicationContext("bean.xml");
        Hello hello=context.getBean("beanID",Hello.class);
        HashMap map=(HashMap) hello.getValues();
        Iterator<Map.Entry<String, String>> iterator=map.entrySet().iterator();
        while(iterator.hasNext()) {
            Map.Entry<String,String> entry=(java.util.Map.Entry<String, String>) iterator.next();
            String key=entry.getKey();
            String value=entry.getValue();
            System.out.println("the key is:"+key+","+"the value is:"+value);
        }
    }

}
the key is:1,the value is:22
3.4 Properties注入
Spring能注入java.util.Properties类型数据,需要使用<props>标签来配置注入,键和值类型必 须是String,不能变,子标签<prop key=”键”>值</prop>来指定键值对,具体配置如下:
<beans xmlns:xsi="http://www.w3.org/2001/XMLSchema-instance"
    xmlns="http://www.springframework.org/schema/beans"
    xsi:schemaLocation="http://www.springframework.org/schema/beans http://www.springframework.org/schema/beans/spring-beans-4.2.xsd ">

    <bean id="beanID" class="com.test.spring.Hello">
        <property name="properties">
           <props>
              <prop key="A">a</prop>
              <prop key="B">b</prop>
           </props>
        </property>
    </bean>
</beans>
package com.test.spring;

import java.util.Properties;

public class Hello {
    private Properties properties;

    public Properties getProperties() {
        return properties;
    }

    public void setProperties(Properties properties) {
        this.properties = properties;
    }
}
package helloworld;

import java.util.Properties;

import org.junit.Test;
import org.springframework.context.support.ClassPathXmlApplicationContext;
import com.test.spring.Hello;

public class HelloTest {
    @Test
    public void testHelloWorld() {
        ClassPathXmlApplicationContext context = new ClassPathXmlApplicationContext("bean.xml");
        Hello hello=context.getBean("beanID",Hello.class);
        Properties properties=hello.getProperties();
        System.out.println(properties.get("A"));
    }

}

a
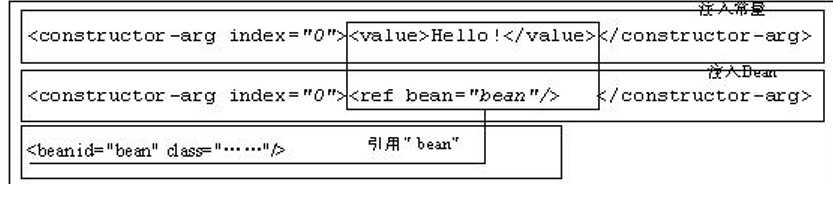
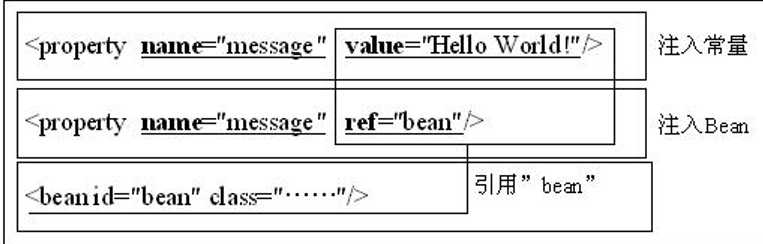
4. 引用其它Bean
引用其他Bean的步骤与注入常量的步骤一样,可以通过构造器注入及setter注入引用其他Bean,只是引用其他 Bean的注入配置稍微变化了一下:可以将“<constructor-arg index="0" value="Hello World!"/>”和“<property name="message" value="Hello World!"/>”中的value属性替换成bean属性,其中bean属性指定配置文件中的其 他Bean的id或别名。另一种是把<value>标签替换为<.ref bean=”beanName”>,
4.1 通过构造器注入方式
通过” <constructor-arg>”标签的ref属性来引用其他Bean,这是最简化的配置
4.2 setter注入方式
通过” <property>”标签的ref属性来引用其他Bean,这是最简化的配置
综合例子:
<beans xmlns:xsi="http://www.w3.org/2001/XMLSchema-instance"
    xmlns="http://www.springframework.org/schema/beans"
    xsi:schemaLocation="http://www.springframework.org/schema/beans http://www.springframework.org/schema/beans/spring-beans-4.2.xsd ">

    <bean id="beanID1" class="com.test.spring.Hello">
        <constructor-arg index="0" ref="studentID"/>
    </bean>

    <bean id="beanID2" class="com.test.spring.Hello">
         <property name="student"><ref bean="studentID"/></property>
    </bean>

    <bean id="studentID" class="com.test.spring.Student">
    </bean>
</beans>


package com.test.spring;

public class Hello {
    private Student student;
    public Hello() {

    }
    public Hello(Student student) {
        this.student=student;
    }

    public Student getStudent() {
        return student;
    }

    public void setStudent(Student student) {
        this.student = student;
    }

    public void sayHello() {
        System.out.println("hello world");
    }

}

package com.test.spring;

public class Student {
    private String age;

    public String getAge() {
        return age;
    }

    public void setAge(String age) {
        this.age = age;
    }

}

package helloworld;

import org.junit.Test;
import org.springframework.context.support.ClassPathXmlApplicationContext;
import com.test.spring.Hello;

public class HelloTest {
    @Test
    public void testHelloWorld() {
        ClassPathXmlApplicationContext context = new ClassPathXmlApplicationContext("bean.xml");
        Hello hello=context.getBean("beanID2",Hello.class);
        hello.sayHello();
    }

}


hello world
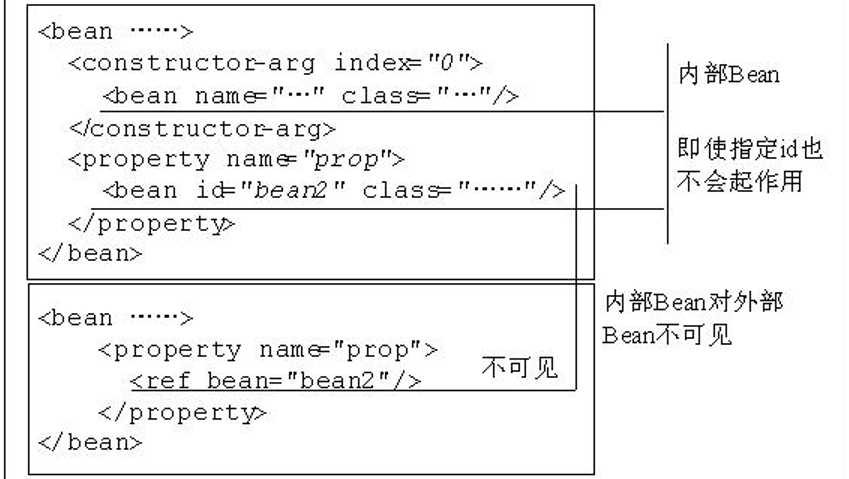
5. 内部Bean定义
内部Bean就是在<property>或<constructor-arg>内通过<bean>标签定义的Bean,该Bean不管是否指定id或 name,该Bean都会有唯一的匿名标识符,而且不能指定别名,该内部Bean对其他外部Bean不可见,具体配置如下:
举例:
<beans xmlns:xsi="http://www.w3.org/2001/XMLSchema-instance"
    xmlns="http://www.springframework.org/schema/beans"
    xsi:schemaLocation="http://www.springframework.org/schema/beans http://www.springframework.org/schema/beans/spring-beans-4.2.xsd ">

    <bean id="bean1" class="com.test.spring.Hello">
        <property name="hello2">  //必须在Hello中引入Hello2,否则Bean无法实例化成功
             <bean id="innerbean" class="com.test.spring.Hello2"/>
        </property>
    </bean>

</beans>
package com.test.spring;

public class Hello {
    private Hello2 hello2;//必须注入Hello2
    public Hello2 getHello2() {
        return hello2;
    }

    public void setHello2(Hello2 hello2) {
        this.hello2 = hello2;
    }

    public void sayHello() {
        System.out.println("hello world");
    }

}
package com.test.spring;

public class Hello2 {
     private String name;

        public String getName() {
            return name;
        }

        public void setName(String name) {
            this.name = name;
        }

        public void sayHello() {
            System.out.println("hello world2");
        }

}
package helloworld;

import org.junit.Test;
import org.springframework.context.support.ClassPathXmlApplicationContext;
import com.test.spring.Hello;

public class HelloTest {
    @Test
    public void testHelloWorld() {
        ClassPathXmlApplicationContext context = new ClassPathXmlApplicationContext("bean.xml");
        Hello hello=context.getBean("bean1",Hello.class);
        hello.sayHello();
    }

}

hello world
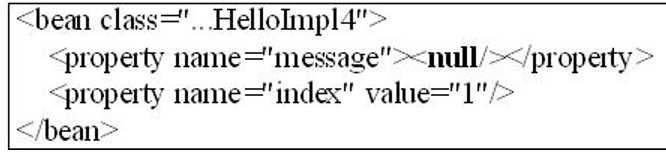
6. 处理null值
通过<null>标签来处理Null
1. 什么是循环依赖
循环依赖就是循环引用,就是两个或多个Bean相互之间的持有对方,比如CircleA引用CircleB,CircleB引用 CircleC,CircleC引用CircleA,则它们最终反映为一个环。此处不是循环调用,循环调用是方法之间的环调用。
循环调用是无法解决的,除非有终结条件,否则就是死循环,最终导致内存溢出错误。
Spring容器循环依赖包括构造器循环依赖和setter循环依赖,那Spring容器如何解决循环依赖呢?首先让我们来定 义循环引用类:
public class TestA {
    private TestB testB;

    public TestA(TestB testB) {
        this.testB = testB;
    }
    public TestA() {

    }

    public TestB getTestB() {
        return testB;
    }

    public void setTestB(TestB testB) {
        this.testB = testB;
    }
}


public class TestB {
    private TestC testC;

    public TestB(TestC testC) {
        this.testC = testC;
    }

    public TestB() {

    }

    public TestC getTestC() {
        return testC;
    }

    public void setTestC(TestC testC) {
        this.testC = testC;
    }
}


public class TestC {
    private TestA testA;

    public TestC(TestA testA) {
        this.testA = testA;
    }
    public TestC() {

    }
    public TestA getTestA() {
        return testA;
    }

    public void setTestA(TestA testA) {
        this.testA = testA;
    }
}
2. Spring如何解决循环依赖
有两种方式:
(1)构造器循环依赖
表示通过构造器注入构成的循环依赖,这种依赖是无法解决的,只能抛出BeanCreationException异常表示循环依赖。
程序在创建TestA时,构造器需要TestB,去创建TestB,TestB中的构造器又需要TestC,又去创建TestC,TestC的构造器又需要TestA,形成一个环,没有办法创建
<bean id="a" class="com.bean.test.TestA">
        <constructor-arg index="0" ref="b"></constructor-arg>
    </bean>
    <bean id="b" class="com.bean.test.TestB">
        <constructor-arg index="0" ref="c"></constructor-arg>
    </bean>
    <bean id="c" class="com.bean.test.TestC">
        <constructor-arg index="0" ref="a"></constructor-arg>
    </bean>
public class Test {
    public static void main(String[] args) {
        ApplicationContext context = new ClassPathXmlApplicationContext("com/bean/test/applicationContext.xml");
        System.out.println(context.getBean("a", TestA.class));
    }
}
程序抛出异常:
Exception in thread "main" org.springframework.beans.factory.BeanCreationException:
分析构造器循环依赖:(创建TestA时,发现需要TestB,TestB又需要TestC,TestC又需要TestA,需要注意的是,这时候TestC需要的TestA并没有创建完成,TestA还在等着后面需要的bean的成功创建他才可以成功创建)Spring容器将每一个正在创建的Bean 标识符放在一个“当前创建Bean池”中,Bean标识符在创建过程中将一直保持 在这个池中,因此如果在创建Bean过程中发现自己已经在“当前创建Bean池”里时将抛出 BeanCurrentlyInCreationException异常表示循环依赖;而对于创建完毕的Bean将从“当前创建Bean池”中清除掉。(note:因为A早已经在池子中了,当在C中时,发现依赖了
A,因此想创建A,可以发现A已经再池中了,它早已经再等待被创建,好清除掉,所以造成了死循环)
(2)setter循环依赖
表示通过setter注入方式构成的循环依赖。
<bean id="a" class="com.bean.test.TestA" scope="singleton">
        <property name="testB" ref="b"></property>
    </bean>
    <bean id="b" class="com.bean.test.TestB" scope="singleton">
        <property name="testC" ref="c"></property>
    </bean>
    <bean id="c" class="com.bean.test.TestC" scope="singleton">
        <property name="testA" ref="a"></property>
    </bean>
执行测试类,没有抛出异常,正常输出
com.bean.test.TestA@37760a63setter方法也是Spring中的默认解决方法,可以解决循环依赖的问题。具体实现原理是:setter注入造成的依赖是通过Spring容器提前暴露刚完成构造器注入但并未完成其他步骤的bean完成。Spring是先将Bean对象实例化之后再设置对象属性的。
Spring先是用构造实例化Bean对象,此时Spring会将这个实例化结束的对象放到一个Map中,并且Spring提供了获取这个未设置属性的实例化对象引用的方法。 结合我们的实例来看,当Spring实例化了TestA、TestB、TestC后,紧接着会去设置对象的属性,此时TestA依赖TestB,就会去Map中取出存在里面的单例TestB对象,以此类推(这是Spring中得相关源码已经实现了得)
5.1 延迟初始化Bean
延迟初始化也叫做惰性初始化,指不提前初始化Bean,而是只有在真正使用时才创建及初始化Bean。
配置方式很简单只需在<bean>标签上指定 “lazy-init” 属性值为“true”即可延迟初始化Bean。
Spring容器会在创建容器时提前初始化“singleton”作用域的Bean,“singleton”就是单例的意思即整个容器 每个Bean只有一个实例,后边会详细介绍。Spring容器预先初始化Bean通常能帮助我们提前发现配置错误,所以如果 没有什么情况建议开启,除非有某个Bean可能需要加载很大资源,而且很可能在整个应用程序生命周期中很可能使用不 到,可以设置为延迟初始化。
具体配置如下:
<bean id="helloApi"
class="cn.javass.spring.chapter2.helloworld.HelloImpl"
lazy-init="true"/>
5.2 使用depends-on
depends-on是指指定Bean初始化及销毁时的顺序,使用depends-on属性指定的Bean要先初始化完毕后才初始 化当前Bean,由于只有“singleton”Bean能被Spring管理销毁,反着初始化的顺序来销毁。
举例说明:
<bean id="helloApi" class="cn.javass.spring.chapter2.helloworld.HelloImpl"/>
<bean id="decorator"
 class="cn.javass.spring.chapter3.bean.HelloApiDecorator"
depends-on="helloApi">
<property name="helloApi"><ref bean="helloApi"/></property>
</bean>
说明:
“decorator”指定了“depends-on”属性为“helloApi”,所以在“decorator”Bean初始化之前要先初始化 “helloApi”,而在销毁“helloApi”之前先要销毁“decorator”
“depends-on”属性可以指定多个Bean,若指定多个Bean可以用“;”、“,”、空格分割。
那“depends-on”有什么好处呢?主要是给出明确的初始化及销毁顺序,比如要初始化“decorator”时要确保 “helloApi”Bean的资源准备好了,否则使用“decorator”时会看不到准备的资源;而在销毁时要先在 “decorator”Bean的把对“helloApi”资源的引用释放掉才能销毁“helloApi”,否则可能销毁 “helloApi”时而 “decorator”还保持着资源访问,造成资源不能释放或释放错误。
需要注意的特点:
1、Spring管理的bean都是单例模式(singleton)
2、实例化对象应该顺序化的,比如A依赖B,B依赖C,C依赖D...
3、一个bean可以依赖多个bean,可以通过逗号(",")或者分号(";")来定义多个依赖对象:
<bean id=a Class="com.twovv.A" depends-on="b,c,d" />
<bean id=b Class="com.twovv.B" />
<bean id=c Class="com.twovv.C" />
<bean id=d Class="com.twovv.D" />
4、初始化依赖关系不允许形成环闭依赖,下面的依赖关系定义是错误的,Spring将无法确定该如何实例化:
<bean id=a Class="com.twovv.A" depends-on="b" />
<bean id=b Class="com.twovv.B" depends-on="a" />
5.3 自动装配(待更新)
5.4 依赖检查(待更新)
六、 Bean的作用域
什么是作用域呢?即“scope”,在面向对象程序设计中一般指对象或变量之间的可见范围。而在Spring容器 中是指其创建的Bean对象相对于其他Bean对象的请求可见范围。
Spring提供“singleton”和“prototype”两种基本作用域,另外提供“request”、“session”、“global session”三种web作用域;Spring还允许用户定制自己的作用域
基本的作用域
(1)singleton:指“singleton”作用域的Bean只会在每个Spring IoC容器中存在一个实例,而且其完整生命 周期完全由Spring容器管理。对于所有获取该Bean的操作Spring容器将只返回同一个Bean。
(2)prototype:即原型,指每次向Spring容器请求获取Bean都返回一个全新的Bean,相对于“singleton"来说就是不缓存Bean,每次都是一个根据Bean定义创建的全新Bean.
标签:lazy system iter 举例 限制 false ber entryset 有一个
原文地址:https://www.cnblogs.com/Hermioner/p/10000841.html