标签:.repo 相关 aging window 项目 download ati end als
本篇博文,主要介绍借助Appium做移动端自动化测试的开发环境搭建,包括Java和Python
Java环境:Appium+Maven+Idea+TestNG+Ngreport
Python环境:Appium+Pycharm+Unittest
用MAVEN建立项目的好处:
优点一:项目非常大时,可借助Maven将一个项目拆分成多个工程,最好是一个模块对应一个工程,利于分工协作。而且模块之间还是可以发送消息的。
优点二:借助Maven,可将jar包仅仅保存在“仓库”中,有需要该文件时,就引用该文件接口,不需要复制文件过来占用空间。
优点三:借助Maven可以以规范的方式下载jar包,因为所有的知名框架或第三方工具的jar包已经按照统一的规范存放到了Maven的中央仓库中。
优点四:Maven会自动将你要加入到项目中的jar包导入,不仅导入,而且还会将该jar包所依赖的jar包都自动导入进来。
官方地址:http://maven.apache.org/download.cgi
下载安装后配置MVN环境变量,如下图所示

变量名可用M2_HOME或者MAVEN_HOME
变量值就是安装目录,如果JDK配的很遛,这个同理

PATH:%M2_HOME%\bin;
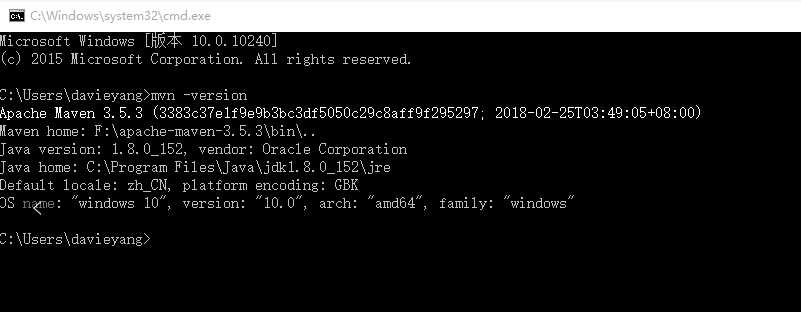
检查Maven环境
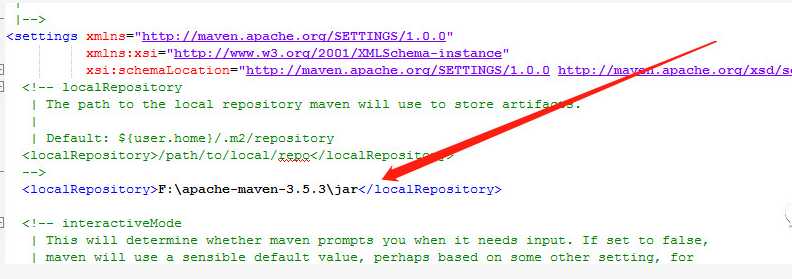
配置MVN本地仓库物理地址,也就是maven会从中央仓库下载需要的jar包到本地

再次路径下打开setting.xml,配置项如下,注意XML节点,地址随意
配置MVN中央仓库
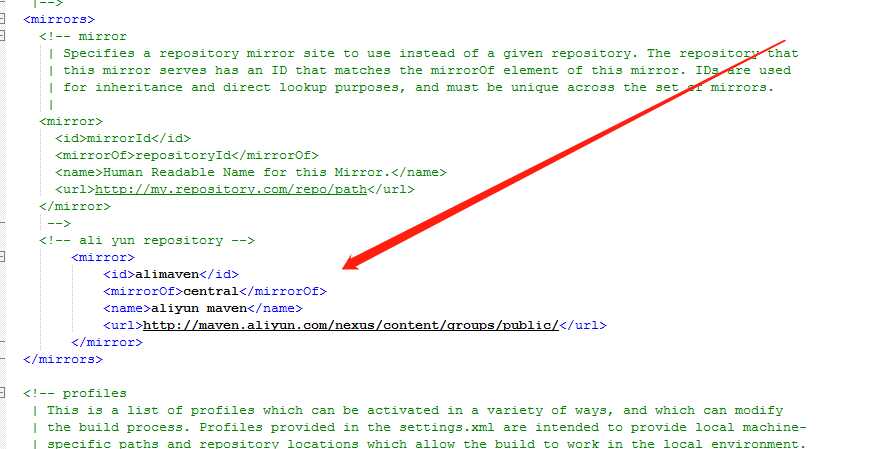
保存配置后,将该文件复制如下路径下

此处单配置了一个镜像地址,是阿里云的地址,官方地址下载太慢可以通过这个位置的配置代替
配置IDEA,IDEA官方下载地址:https://www.jetbrains.com/idea/download/,默认安装即可
打开IDEA,新建一个maven项目,检查Maven的配置如图所示,箭头所指两个配置已经更新到了前边步骤中的位置
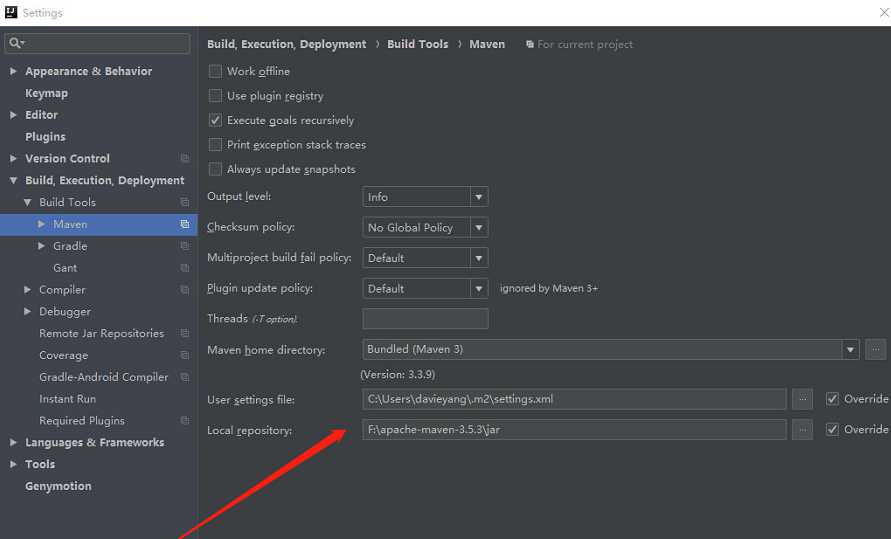
IDEA会在右下角(注意右下角)提示你是否需要自动安装pom配置的jar包,一旦出现,就要enable它
找到pom.xml文件,打开它,配置项目所需的依赖包,如下图配置
 1     <dependencies>
 2         <!--- 导入webdriver相关   -->
 3         <!-- https://mvnrepository.com/artifact/org.seleniumhq.selenium/selenium-server -->
 4         <dependency>
 5             <groupId>org.seleniumhq.selenium</groupId>
 6             <artifactId>selenium-server</artifactId>
 7             <version>3.12.0</version>
 8         </dependency>
 9
10         <!-- https://mvnrepository.com/artifact/org.seleniumhq.selenium/selenium-java -->
11         <dependency>
12             <groupId>org.seleniumhq.selenium</groupId>
13             <artifactId>selenium-java</artifactId>
14             <version>3.12.0</version>
15         </dependency>
16
17         <!-- https://mvnrepository.com/artifact/org.testng/testng -->
18         <dependency>
19             <groupId>org.testng</groupId>
20             <artifactId>testng</artifactId>
21             <version>6.14.3</version>
22             <scope>test</scope>
23         </dependency>
24         <!-- https://mvnrepository.com/artifact/io.appium/java-client -->
25         <dependency>
26             <groupId>io.appium</groupId>
27             <artifactId>java-client</artifactId>
28             <version>4.0.0</version>
29         </dependency>
30             <!-- https://mvnrepository.com/artifact/org.apache.logging.log4j/log4j-api -->
31         <dependency>
32             <groupId>org.apache.logging.log4j</groupId>
33             <artifactId>log4j-api</artifactId>
34             <version>2.11.1</version>
35         </dependency>
36         <!-- https://mvnrepository.com/artifact/org.apache.logging.log4j/log4j-core -->
37         <dependency>
38             <groupId>org.apache.logging.log4j</groupId>
39             <artifactId>log4j-core</artifactId>
40             <version>2.11.1</version>
41         </dependency>
42         <dependency>
43             <groupId>log4j</groupId>
44             <artifactId>log4j</artifactId>
45             <version>1.2.17</version>
46             <scope>test</scope>
47         </dependency>
48     </dependencies>
配置监听
 1     <build>
 2         <pluginManagement><!-- lock down plugins versions to avoid using Maven defaults (may be moved to parent pom) -->
 3             <plugins>
 4                 <plugin>
 5                     <groupId>org.apache.maven.plugins</groupId>
 6                     <artifactId>maven-surefire-plugin</artifactId>
 7                     <version>2.20.1</version>
 8                     <configuration>
 9                         <properties>
10                             <property>
11                                 <name>usedefaultlisteners</name>
12                                 <value>false</value>
13                             </property>
14                             <property>
15                                 <!--使用reportng的 listener 生成测试报告-->
16                                 <name>listener</name>
17                                 <value>org.uncommons.reportng.HTMLReporter, org.uncommons.reportng.JUnitXMLReporter</value>
18                             </property>
19                         </properties>
20                         <testFailureIgnore>true</testFailureIgnore>
21                         <!--指定testng.xml的位置-->
22                         <suiteXmlFiles>
23                             <file>testng.xml</file>
24                         </suiteXmlFiles>
25                         <workingDirectory>target/</workingDirectory>
26                         <forkMode>always</forkMode>
27                     </configuration>
28                 </plugin>
29                 <plugin>
30                     <artifactId>maven-clean-plugin</artifactId>
31                     <version>3.0.0</version>
32                 </plugin>
33                 <!-- see http://maven.apache.org/ref/current/maven-core/default-bindings.html#Plugin_bindings_for_jar_packaging -->
34                 <plugin>
35                     <artifactId>maven-resources-plugin</artifactId>
36                     <version>3.0.2</version>
37                 </plugin>
38                 <plugin>
39                     <artifactId>maven-compiler-plugin</artifactId>
40                     <version>3.7.0</version>
41                 </plugin>
42                 <plugin>
43                     <artifactId>maven-jar-plugin</artifactId>
44                     <version>3.0.2</version>
45                 </plugin>
46                 <plugin>
47                     <artifactId>maven-install-plugin</artifactId>
48                     <version>2.5.2</version>
49                 </plugin>
50                 <plugin>
51                     <artifactId>maven-deploy-plugin</artifactId>
52                     <version>2.8.2</version>
53                 </plugin>
54             </plugins>
55         </pluginManagement>
56     </build>
到此Java环境完成
Pom中配置的依赖可以在MVN的中央库http://mvnrepository.com/, 检索到你想要的包,配置进去即可
Python的环境相对简单很多,因为已经有了unittest,我们再安装Appium相关模块即可
在CMD中运行 pip install Appium-Python-Client
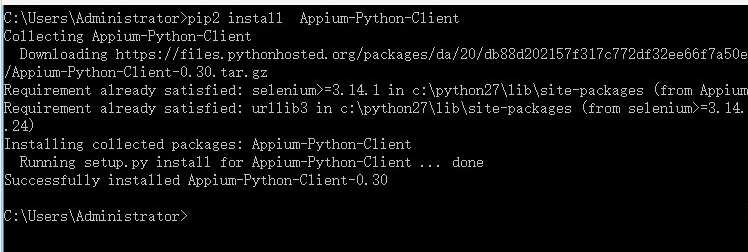
Pycharm官方下载地址:https://www.jetbrains.com/pycharm/download/
Windows&Appium&Java&Python自动化测试-开发环境
标签:.repo 相关 aging window 项目 download ati end als
原文地址:https://www.cnblogs.com/davieyang/p/10060946.html