标签:源码分析 shm 来源 而不是 point scene future 分段 timeout
Hashmap 不适合并发,应该使用ConcurrentHashMap .
这是很多人都知道的,但是为什么呢? 可以先看一下这两篇文章. JDK7与JDK8中HashMap的实现 和 谈谈HashMap线程不安全的体现.
由这两篇文章我们可以知道 :
明白了Hashmap之后,我们来看一下 ConcurrentHashMap 的实现是怎么样的? 漫画:什么是ConcurrentHashMap的? 我们可以总结一下 ConcurrentHashMap的几个要点 : (ccHp缩写 ConcurrentHashMap)
1.遍历所有的Segment。
2.把Segment的元素数量累加起来。
3.把Segment的修改次数累加起来。
4.判断所有Segment的总修改次数是否大于上一次的总修改次数。如果大于,说明统计过程中有修改,重新统计,尝试次数+1;如果不是。说明没有修改,统计结束。
5.如果尝试次数超过阈值,则对每一个Segment加锁,再重新统计。
6.再次判断所有Segment的总修改次数是否大于上一次的总修改次数。由于已经加锁,次数一定和上次相等。
7.释放锁,统计结束。
可以看到ccHp 统计size 时判断是否有没被修改和 CAS 相似.
ccHp的运用可以适合并发,在web上例如session的管理,下面是shiro session 管理类.(shiro开源可以好好学习)
public class MemorySessionDAO extends AbstractSessionDAO {

    private static final Logger log = LoggerFactory.getLogger(MemorySessionDAO.class);

    private ConcurrentMap<Serializable, Session> sessions;

    public MemorySessionDAO() {
        this.sessions = new ConcurrentHashMap<Serializable, Session>();
    }

    protected Serializable doCreate(Session session) {
        Serializable sessionId = generateSessionId(session);
        assignSessionId(session, sessionId);
        storeSession(sessionId, session);
        return sessionId;
    }

    protected Session storeSession(Serializable id, Session session) {
        if (id == null) {
            throw new NullPointerException("id argument cannot be null.");
        }
        return sessions.putIfAbsent(id, session);
    }

    protected Session doReadSession(Serializable sessionId) {
        return sessions.get(sessionId);
    }

    public void update(Session session) throws UnknownSessionException {
        storeSession(session.getId(), session);
    }

    public void delete(Session session) {
        if (session == null) {
            throw new NullPointerException("session argument cannot be null.");
        }
        Serializable id = session.getId();
        if (id != null) {
            sessions.remove(id);
        }
    }

    public Collection<Session> getActiveSessions() {
        Collection<Session> values = sessions.values();
        if (CollectionUtils.isEmpty(values)) {
            return Collections.emptySet();
        } else {
            return Collections.unmodifiableCollection(values);
        }
    }

}
下文缩写CopyOnWriteArrayList 为 cowaList. cowaList 是为了替代同步 List, cowaSet 同理为了替代同步Set的. 阅读下面进行了解原理先. CopyOnWriteArrayList实现原理及源码分析 .
原理一图得已了解.(图片来源见参考资料)
图一
由此我们可以总结一下 ccowaList 的几个重要点 :
运用场景和缺点分析, 详细的看这里 Java并发编程:并发容器之CopyOnWriteArrayList(转载)
CopyOnWrite并发容器用于读多写少的并发场景。比如白名单,黑名单,商品类目的访问和更新场景,假如我们有一个搜索网站,用户在这个网站的搜索框中,输入关键字搜索内容,但是某些关键字不允许被搜索。这些不能被搜索的关键字会被放在一个黑名单当中,黑名单每天晚上更新一次。当用户搜索时,会检查当前关键字在不在黑名单当中.
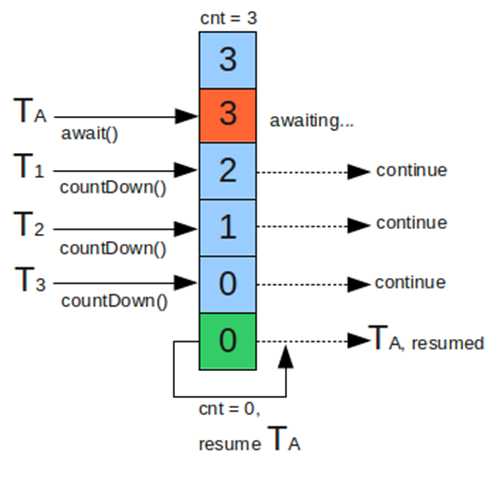
下文简称cdl. 首先cdl定义一个count, 这个count表示一个有多少个执行任务,需要等待几个执行,然后cdl开启await()并且阻塞 ,然后每个线程执行完任务,调用countDown()方法,个count-1 ,直到全部任务完成,cdl继续执行. 详见 什么时候使用CountDownLatch
使用例子如下 :
public static void main(String[] args) throws InterruptedException {
        CountDownLatch latch = new CountDownLatch(2);
        Thread thread1 = new Thread(() -> {
            try {
                System.out.println("线程1  开始执行" + new Date());
                Thread.sleep(1000 * 3);
                System.out.println("线程1  执行完毕"+ new Date());
                latch.countDown();
            } catch (InterruptedException e) {
                e.printStackTrace();
            }

        });


        Thread thread2 = new Thread(() -> {
            try {
                System.out.println("线程2 开始执行 " + new Date());
                Thread.sleep(2 * 1000);
                System.out.println("线程2 执行结束 " + new Date());
                latch.countDown();
            } catch (InterruptedException e) {
                e.printStackTrace();
            } catch (Exception e) {
                e.printStackTrace();
            }
        });


        thread1.start();
        thread2.start();
        latch.await();
        System.out.println("任务全部完成");

    }
下文简称ft. 那么ft的作用到底是干什么的呢?具体来说就是可以返回线程执行的结果,可以获取线程执行的状态,可以中断线执行的类. 具体使用见 : Java并发编程:Callable、Future和FutureTask
public class FutureTask<V> implements RunnableFuture<V>
public interface RunnableFuture<V> extends Runnable, Future<V> {
    void run();
}
public interface Future<V> {
    boolean cancel(boolean mayInterruptIfRunning);
    boolean isCancelled();
    boolean isDone();
    V get() throws InterruptedException, ExecutionException;
    V get(long timeout, TimeUnit unit)
        throws InterruptedException, ExecutionException, TimeoutException;
}
public class Test {
    public static void main(String[] args) {
        ExecutorService executor = Executors.newCachedThreadPool();
        Task task = new Task();
        Future<Integer> result = executor.submit(task);
        executor.shutdown();

        try {
            Thread.sleep(1000);
        } catch (InterruptedException e1) {
            e1.printStackTrace();
        }

        System.out.println("主线程在执行任务");

        try {
            System.out.println("task运行结果"+result.get());
        } catch (InterruptedException e) {
            e.printStackTrace();
        } catch (ExecutionException e) {
            e.printStackTrace();
        }

        System.out.println("所有任务执行完毕");
    }
}
class Task implements Callable<Integer>{
    @Override
    public Integer call() throws Exception {
        System.out.println("子线程在进行计算");
        Thread.sleep(3000);
        int sum = 0;
        for(int i=0;i<100;i++)
            sum += i;
        return sum;
    }
}
Semaphore 这个类就像一个停车场的保安,停车场的车位是固定的,获取信号量就是进入停车场停车,而释放信号量就是离开停车场.
Semaphore 分为两种模式,假如假如车位满了,当有车出来时,那么公平的方式就是在场外的车先到先进,不公平的方式就是无论先来晚来
的一起竞争. 详见这两篇文章 : Semaphore的工作原理及实例 和 深入理解Semaphore
Semaphore有两种模式,公平模式和非公平模式。
公平模式就是调用acquire的顺序就是获取许可证的顺序,遵循FIFO;
而非公平模式是抢占式的,也就是有可能一个新的获取线程恰好在一个许可证释放时得到了这个许可证,而前面还有等待的线程。
示例代码来自 Semaphore的工作原理及实例
public class SemaphoreDemo {
    private static final Semaphore semaphore=new Semaphore(3);
    private static final ThreadPoolExecutor threadPool=new ThreadPoolExecutor(5,10,60,TimeUnit.SECONDS,new LinkedBlockingQueue<Runnable>());

    private static class InformationThread extends Thread{
        private final String name;
        private final int age;
        public InformationThread(String name,int age)
        {
            this.name=name;
            this.age=age;
        }

        public void run()
        {
            try
            {
                semaphore.acquire();
                System.out.println(Thread.currentThread().getName()+":大家好,我是"+name+"我今年"+age+"岁当前时间为:"+System.currentTimeMillis());
                Thread.sleep(1000);
                System.out.println(name+"要准备释放许可证了,当前时间为:"+System.currentTimeMillis());
                System.out.println("当前可使用的许可数为:"+semaphore.availablePermits());
                semaphore.release();

            }
            catch(InterruptedException e)
            {
                e.printStackTrace();
            }
        }
    }
    public static void main(String[] args)
    {
        String[] name= {"李明","王五","张杰","王强","赵二","李四","张三"};
        int[] age= {26,27,33,45,19,23,41};
        for(int i=0;i<7;i++)
        {
            Thread t1=new InformationThread(name[i],age[i]);
            threadPool.execute(t1);
        }
    }


}
可以看到要是没有许可的话,调用acquire 方法就会一直阻塞.
栅栏能阻塞一组线程直到某个事件发生,栅栏与闭锁的区别的关键区别在于,所有线程必须同时到达栅栏位置,才能继续执行.而闭锁是等待一组线程完成后,某个操作才可以进行.可以这样比喻吧,例如有场赛马表演,当所有的马到达终点后会放飞和平鸽.那么当所有马都准备好,即是条件满足了,所有的马奔腾而出,就是CyclicBarrier ,而当所有的马都到达终点了,这么条件满足了,和平鸽被放飞了,这个相当于是CountDownLatch.
static CyclicBarrier c = new CyclicBarrier(2);

    public static void main(String[] args) {
        new Thread(() -> {
            try {
                System.out.println("线程1 进入cyclicBarrier.await() " + new Date());
                c.await();
            } catch (Exception e) {

            }
            System.out.println("线程1 栅栏打开 " + new Date());
            System.out.println(1);
        }).start();

        try {
            System.out.println("主线程 进入cyclicBarrier.await() " + new Date());
            c.await();
        } catch (Exception e) {

        }
        System.out.println("主线程 栅栏打开 " + new Date());
        System.out.println(2);
    }
  1 public class Test {
  2     public static void main(String[] args) {
  3         int N = 4;
  4         CyclicBarrier barrier  = new CyclicBarrier(N);
  5
  6         for(int i=0;i<N;i++) {
  7             new Writer(barrier).start();
  8         }
  9
 10         try {
 11             Thread.sleep(25000);
 12         } catch (InterruptedException e) {
 13             e.printStackTrace();
 14         }
 15
 16         System.out.println("CyclicBarrier重用");
 17
 18         for(int i=0;i<N;i++) {
 19             new Writer(barrier).start();
 20         }
 21     }
 22     static class Writer extends Thread{
 23         private CyclicBarrier cyclicBarrier;
 24         public Writer(CyclicBarrier cyclicBarrier) {
 25             this.cyclicBarrier = cyclicBarrier;
 26         }
 27
 28         @Override
 29         public void run() {
 30             System.out.println("线程"+Thread.currentThread().getName()+"正在写入数据...");
 31             try {
 32                 Thread.sleep(5000);      //以睡眠来模拟写入数据操作
 33                 System.out.println("线程"+Thread.currentThread().getName()+"写入数据完毕,等待其他线程写入完毕");
 34
 35                 cyclicBarrier.await();
 36             } catch (InterruptedException e) {
 37                 e.printStackTrace();
 38             }catch(BrokenBarrierException e){
 39                 e.printStackTrace();
 40             }
 41             System.out.println(Thread.currentThread().getName()+"所有线程写入完毕,继续处理其他任务...");
 42         }
 43     }
 44 }
第二个代码展示了CyclicBarrier 执行的东西可以复用.
下面总结一下 CyclicBarrier 和 CountDownLatch 的区别
Exchanger 像是交换东西的一个平台.
  1    public static void main(String[] args) {
  2
  3         ExecutorService executor = Executors.newCachedThreadPool();
  4         final Exchanger exchanger = new Exchanger();
  5
  6         executor.execute(new Runnable() {
  7             String data1 = "Ling";
  8             @Override
  9             public void run() {
 10                 doExchangeWork(data1, exchanger);
 11             }
 12         });
 13
 14         executor.execute(new Runnable() {
 15             String data1 = "huhx";
 16             @Override
 17             public void run() {
 18                 doExchangeWork(data1, exchanger);
 19             }
 20         });
 21
 22         executor.shutdown();
 23     }
 24
 25
 26     private static void doExchangeWork(String data1, Exchanger exchanger) {
 27         try {
 28             System.out.println(Thread.currentThread().getName() + "正在把数据 " + data1 + " 交换出去");
 29             Thread.sleep((long) (Math.random() * 1000));
 30             //放进交换的位置.
 31             String data2 = (String) exchanger.exchange(data1);
 32             System.out.println(Thread.currentThread().getName() + "交换数据 到  " + data2);
 33         } catch (InterruptedException e) {
 34             e.printStackTrace();
 35         }
 36     }
标签:源码分析 shm 来源 而不是 point scene future 分段 timeout
原文地址:https://www.cnblogs.com/Benjious/p/10101201.html