标签:资料 bin 环境变量配置 files grep jave for proc bsp
最近做一个项目需要将微信的语音文件放在页面进行播放,查了好多资料发现,web页面直接播放并没有一个好的解决方案,于是就想到了先将amr文件转换成易于在页面播放的mp3文件,然后在进行播放,现在将amr文件转化为mp3文件的几种方式以及踩过的坑分享一下:
查了好多资料,总结一下,amr转换mp3的方式有如下几种:
1.通过jave.jar包实现(不可以转微信及qq语音文件);
我用的是:jave-1.0.2.zip
2.通过ffmpeg.exe实现(不可以转微信及qq语音文件);
需要配置环境变量
3.通过SILK v3编码解码方式实现(可以转微信及qq语音文件);
需要配置环境变量
下面对以上三种方式进行分解:
一、通过jave.jar包实现(不可以转微信及qq语音文件):
将jave.jar包导入项目:
package com.nnbrightstar.lbtm.common.utils;

import it.sauronsoftware.jave.AudioAttributes;
import it.sauronsoftware.jave.Encoder;
import it.sauronsoftware.jave.EncoderException;
import it.sauronsoftware.jave.EncodingAttributes;
import it.sauronsoftware.jave.InputFormatException;
import java.io.File;

public class ChangeAudioFormat {
    public static void main(String[] args) throws Exception {
        File source = new File("D:/1.amr");
        String targetPath = "D:/2.mp3";
        transcodingToMP3(source,targetPath);
    }

    /**
     * jave包实现将amr格式转为mp3格式
     * @param source
     * @param targetPath
     * @return
     */
    public static boolean transcodingToMP3(File source,String targetPath){
        //File source = new File("C:/Users/Administrator/Downloads/厨房里的爆炸案.mpg");
        boolean flag = false;
        File target = new File(targetPath);
        AudioAttributes audio = new AudioAttributes();// 音频属性
        audio.setCodec("libmp3lame");// libmp3lame 音频编码
        audio.setBitRate(new Integer(128000));// 音频比特率
        audio.setChannels(new Integer(1));// 声道
        audio.setSamplingRate(new Integer(44100));// 采样率
        EncodingAttributes attrs = new EncodingAttributes();// 视频属性
        attrs.setFormat("mp3");// 转码格式
        attrs.setAudioAttributes(audio);// 音频属性
        Encoder encoder = new Encoder();// 创建解码器
        long beginTime = System.currentTimeMillis();
        try {
            // 获取时长
            MultimediaInfo m = encoder.getInfo(source);
            System.out.println(m.getDuration()/1000 + "秒");
            System.out.println("获取时长花费时间是:" + ((System.currentTimeMillis() - beginTime))/1000 + "秒");
            beginTime = System.currentTimeMillis();
            encoder.encode(source, target, attrs);
            System.out.println("音频转码花费时间是:" + ((System.currentTimeMillis() - beginTime)/1000) + "秒");
            flag = true;
        } catch (IllegalArgumentException e) {
            flag = false;
            e.printStackTrace();
        } catch (InputFormatException e) {
            flag = false;
            e.printStackTrace();
        } catch (EncoderException e) {
            flag = false;
            e.printStackTrace();
        }
        return flag;
    }
}
二、通过ffmpeg.exe实现(不可以转微信及qq语音文件):
ffmpeg是一个非常强大的音视频处理工具,直接将下载好的Windows版本的ffmpeg解压,然后将其中bin目录下ffmpeg.exe文件导入到项目中(或者直接使用代码读取本地的ffmpeg.exe执行文件)。
1.使用本地的ffmpeg.exe执行文件,直接通过File获取:

2、将ffmpeg.exe执行文件导入到项目中,通过 URL url = Thread.currentThread().getContextClassLoader().getResource("ffmpeg/windows/"); 来获取

不管用那种形式实现,效果是一样的,示例代码如下:
package com.nnbrightstar.lbtm.common.utils;

import it.sauronsoftware.jave.AudioAttributes;
import it.sauronsoftware.jave.Encoder;
import it.sauronsoftware.jave.EncoderException;
import it.sauronsoftware.jave.EncodingAttributes;
import it.sauronsoftware.jave.InputFormatException;
import java.io.File;

public class ChangeAudioFormat {
    public static void main(String[] args) throws Exception {
        String sourcePath = "D:/1.amr";
        String targetPath = "D:/1.mp3";
        ToMp3(sourcePath,targetPath);
    }

   /**
     * ffmpeg.exe软件实现将amr格式转为mp3格式
     * @param webroot 项目的根目录
     * @param sourcePath 文件的相对地址
     */
    public static void ToMp3(String sourcePath, String targetPath){
        Runtime run = null;
        try {
            run = Runtime.getRuntime();
            long start=System.currentTimeMillis();
            //Process p=run.exec(webroot+"files/ffmpeg -i "+webroot+sourcePath+" -acodec libmp3lame "+webroot+targetPath);//执行ffmpeg.exe,前面是ffmpeg.exe的地址,中间是需要转换的文件地址,后面是转换后的文件地址。-i是转换方式,意思是可编码解码,mp3编码方式采用的是libmp3lame
            String cmd = "D:/ffmpeg/bin/ffmpeg -i "+sourcePath+" -acodec libmp3lame "+targetPath;
            Process p=run.exec(cmd);//执行ffmpeg.exe,前面是ffmpeg.exe的地址,中间是需要转换的文件地址,后面是转换后的文件地址。-i是转换方式,意思是可编码解码,mp3编码方式采用的是libmp3lame
            System.out.println(cmd);
            //释放进程
            p.getOutputStream().close();
            p.getInputStream().close();
            p.getErrorStream().close();
            p.waitFor();
            long end=System.currentTimeMillis();
            System.out.println(sourcePath+" convert success, costs:"+(end-start)+"ms");
        } catch (Exception e) {
            e.printStackTrace();
        }finally{
            //run调用lame解码器最后释放内存
            run.freeMemory();
        }
    }
}
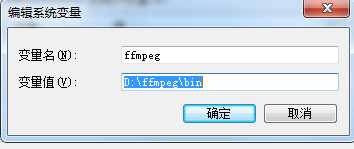
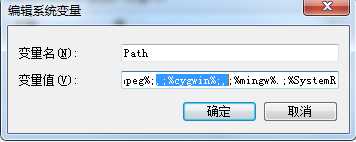
环境变量配置:
(1)ffmpeg
D:\ffmpeg\bin
(2)Path
.;%ffmpeg%;,;%cygwin%;
三、通过SILK v3编码解码方式实现(可以转微信及qq语音文件):
SILK v3编码是Skype向第三方开发人员和硬件制造商提供免版税认证(RF)的Silk宽带音频编码器,Skype后来将其开源。具体可见Wikipedia。
转换QQ的语音信息(去年又是微信的语言信息),做成Shell脚本,具体可见Github项目地址:https://github.com/kn007/silk-v3-decoder。
需要gcc和ffmpeg。gcc是拿来编译silk v3 decoder源码,ffmpeg是拿来转换格式的。
1.Linux下可执行,调用很简单,只需一句shell命令:
sh convert.sh 1.amr mp3
其中:“1.amr”是你要转换的源文件(QQ常见为slk,微信常见为amr);后面的“mp3”是你要输出的格式。
首次使用会编译silk v3 decoder,第二次以后就不用了。
2.windows下使用下载好的项目包中的windows文件夹下的silk2mp3.exe可以实现文件类型转换。
3.那么问题来了,我需要在windows下使用java代码直接调用可以再Linux下面执行的shell命令:
首先我们需要在windows系统下可以执行shell命令,然后让cmd.exe中也可以执行相应的shell命令就可以了。
Linux的shell脚本提供了大量方便的工具,如:awk、grep、more、tail、wc等等,方便用户对文件、数据的分析,但是windows相对来说就没那么方便,要分析一个数据可能需要自己编程、编译然后才能对一些数据进行分析,对于一些轻量级的数据,不如shell脚本好用。
下载cygwin对应于自己windows操作系统的版本:32位或64位
(cygwin是一个在windows平台上运行的unix模拟环境,是cygnus solutions公司开发的自由软件)
打开cygwin,就可以看到熟悉的命令行提示了,shell环境对应的根目录是软件的安装目录.
开始使用linux命令:grep、awk、less、vi等等,如果发现有缺少什么命令,重新运行setup.exe安装程序,搜索需求的命令,叉选上即可安装。
cygwin安装:
(1)双击setup.exe
(2)按照安装提示“下一步”
(3) 选择从“互联网”安装:
(4)选择安装的路径,一般是C:\Cygwin,选择本地临时目录,用于存放下载的软件;选择您连接互联网的方式,一般选“直接连接”就可以了。
(5)选择下载源.
(6)根据安装提示,选择需要安装的软件包,完成安装。
cygwin使用:
(1)双击桌面的Cygwin图标,即可启动Cygwin里的Bash。
(2)或者,你可将C:/Cygwin/bin加到%PATH%当中,您就可以直接在cmd.exe里面使用Linux命令了,比如less, cat, wc , wget
(3)如果您有一个Bash脚本,您可以直接用C:/Cygwin/bin/bash.exe X:/scripts/Monitor.sh的形式调用。
实现代码:
package com.nnbrightstar.lbtm.common.utils;

import it.sauronsoftware.jave.AudioAttributes;
import it.sauronsoftware.jave.Encoder;
import it.sauronsoftware.jave.EncoderException;
import it.sauronsoftware.jave.EncodingAttributes;
import it.sauronsoftware.jave.InputFormatException;
import java.io.File;

public class ChangeAudioFormat {
    public static void main(String[] args) throws Exception {
        ToMp3();
    }

    /**
     * cygwin软件实现将amr格式转为mp3格式
     */
    public static void ToMp3(){
        Runtime run = null;
        try {
            run = Runtime.getRuntime();
            long start=System.currentTimeMillis();
            //F:/Cygwin/bin/bash.exe调用cygwin执行linux命令,C:/Users/Administrator/Desktop/silk-v3-decoder-master/converter.sh是要执行的文件,1.amr是要转换的文件,mp3要输出的格式
            String cmd = "F:/Cygwin/bin/bash.exe C:/Users/Administrator/Desktop/silk-v3-decoder-master/converter.sh 1.amr mp3";
            Process p=run.exec(cmd);//执行cygwin,前面是cygwin的地址,中间是需要转换的文件地址,后面是转换后的文件的格式。
            System.out.println(cmd);
            //释放进程
            p.getOutputStream().close();
            p.getInputStream().close();
            p.getErrorStream().close();
            p.waitFor();
            long end=System.currentTimeMillis();
            System.out.println(sourcePath+" convert success, costs:"+(end-start)+"ms");
        } catch (Exception e) {
            e.printStackTrace();
        }finally{
            //run调用lame解码器最后释放内存
            run.freeMemory();
        }
    }
}
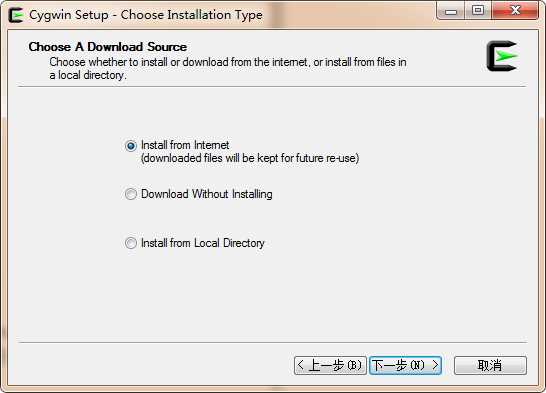
如何完整安装cygwin:
(1)选择Install from internet
(2)选择安装目录,这个目录相当于是安装好之后的Linux根目录
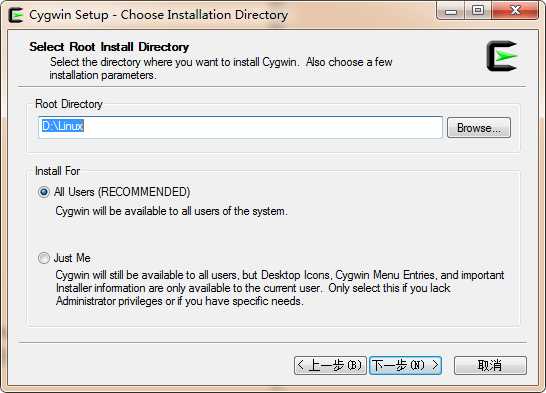
(3)这个目录之Cygwin的安装文件目录和下载的文件目录
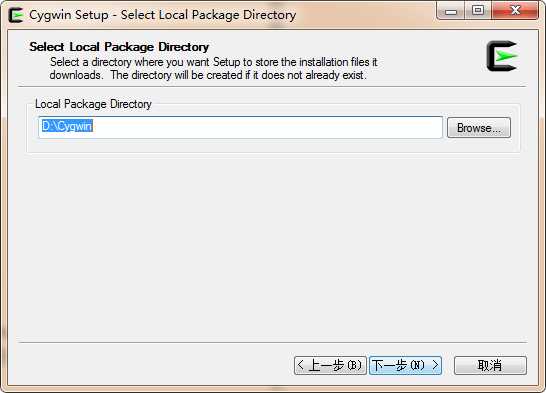
(4)点下一步到
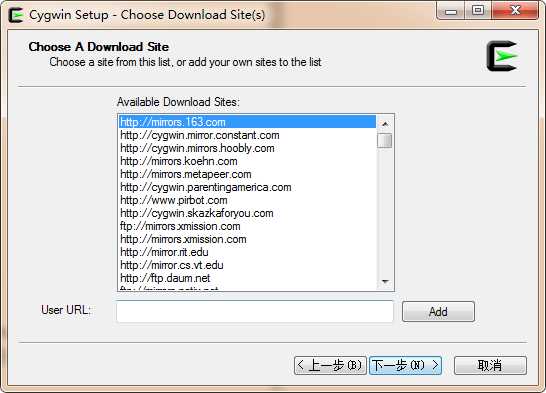
敲黑板,这不很关键,直接关系到能不能安装成功,我之前的N次失败原因都在这里。国内没有合适的下载源,这里得手动添加下:http://mirrors.163.com/cygwin/ 。添加163的镜像下载源,Next step:
(5)接在来选择安装的软件,Search处分别搜索 gcc-core、gcc-g++、make、gdb、binutils,选择devel目录下的相关版本,注意有bin和src,只应用的话选择二进制文件即可。然后一路无脑点,下载文件就看各位的网速了;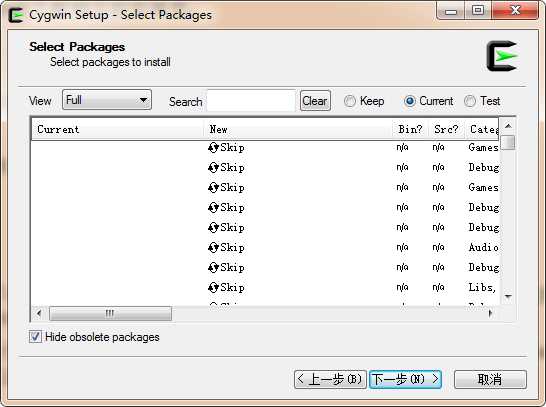
环境变量配置:
(1)cygwin
F:\Cygwin\bin

(2)Path
.;%ffmpeg%;,;%cygwin%;

参考链接:
https://zhidao.baidu.com/question/329657466310314125.html
https://blog.csdn.net/u012778714/article/details/74012013
https://kn007.net/topics/decoding-qq-wechat-silk-v3-encoded-audio-to-mp3-or-other-formats/
java实现windows下amr转换为mp3(可实现微信语音和qq语音转换)
标签:资料 bin 环境变量配置 files grep jave for proc bsp
原文地址:https://www.cnblogs.com/shuilangyizu/p/10112567.html