标签:www. point lib code port 图片 命名空间 model public
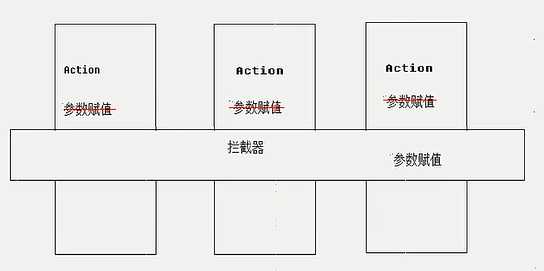
AOP称为面向切面编程,在程序开发中主要用来解决一些系统层面上的问题,比如日志,事务,权限等待
它利用一种称为"横切"的技术,剖解开封装的对象内部,并将那些影响了多个类的公共行为封装到一个可重用模块,并将其命名为"Aspect",即切面。所谓"切面",简单说就是那些与业务无关,却为业务模块所共同调用的逻辑或责任封装起来,便于减少系统的重复代码,降低模块之间的耦合度,并有利于未来的可操作性和可维护性。
举个例子:

Spring对AOP的支持
Spring中AOP代理由Spring的IOC容器负责生成、管理,其依赖关系也由IOC容器负责管理。因此,AOP代理可以直接使用容器中的其它bean实例作为目标,这种关系可由IOC容器的依赖注入提供。Spring创建代理的规则为:
1、默认使用Java动态代理来创建AOP代理,这样就可以为任何接口实例创建代理了
2、当需要代理的类不是代理接口的时候,Spring会切换为使用CGLIB代理,也可强制使用CGLIB
AOP编程其实是很简单的事情,纵观AOP编程,程序员只需要参与三个部分:
1、定义普通业务组件
2、定义切入点,一个切入点可能横切多个业务组件
3、定义增强处理,增强处理就是在AOP框架为普通业务组件织入的处理动作
所以进行AOP编程的关键就是定义切入点和定义增强处理,一旦定义了合适的切入点和增强处理,AOP框架将自动生成AOP代理,即:代理对象的方法=增强处理+被代理对象的方法。
简单说,就是spring能帮我们创建代理对象!!!
需要了解的几个概念:
几个概念
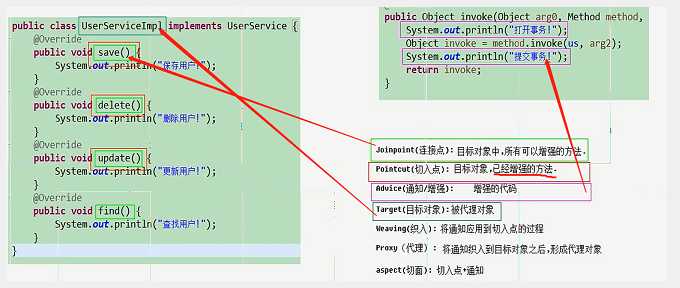
(1)Aspect(切面):通常是一个类,里面可以定义切入点和通知
(2)JointPoint(连接点):程序执行过程中明确的点,一般是方法的调用
(3)Advice(通知):AOP在特定的切入点上执行的增强处理,有before,after,afterReturning,afterThrowing,around
(4)Pointcut(切入点):就是带有通知的连接点,在程序中主要体现为书写切入点表达式
(5)AOP代理:AOP框架创建的对象,代理就是目标对象的加强。Spring中的AOP代理可以使JDK动态代理,也可以是CGLIB代理,前者基于接口,后者基于子类
如下图:

一、导包(用的是IDEA的maven工程,pom.xml导入依赖,注意jar包的版本,会导致出错)
<?xml version="1.0" encoding="UTF-8"?>
<project xmlns="http://maven.apache.org/POM/4.0.0"
         xmlns:xsi="http://www.w3.org/2001/XMLSchema-instance"
         xsi:schemaLocation="http://maven.apache.org/POM/4.0.0 http://maven.apache.org/xsd/maven-4.0.0.xsd">
    <modelVersion>4.0.0</modelVersion>

    <groupId>day2</groupId>
    <artifactId>day2</artifactId>
    <version>1.0-SNAPSHOT</version>

    <dependencies>
        <dependency>
            <groupId>org.springframework</groupId>
            <artifactId>spring-core</artifactId>
            <version>4.1.4.RELEASE</version>
        </dependency>

        <dependency>
            <groupId>org.springframework</groupId>
            <artifactId>spring-context</artifactId>
            <version>4.1.4.RELEASE</version>
        </dependency>
        <dependency>
            <groupId>junit</groupId>
            <artifactId>junit</artifactId>
            <version>4.12</version>
        </dependency>
        <dependency>
            <groupId>org.aspectj</groupId>
            <artifactId>aspectjweaver</artifactId>
            <version>1.8.13</version>
        </dependency>
<!--测试jar包-->
        <dependency>
            <groupId>org.springframework</groupId>
            <artifactId>spring-test</artifactId>
            <version>4.1.6.RELEASE</version>
        </dependency>
    </dependencies>

</project>
二、书写通知类
import org.aspectj.lang.ProceedingJoinPoint;

public class MyAdivce {
    //前置通知
//        |-目标方法运行之前调用
    //后置通知(如果出现异常不会调用)
//        |-在目标方法运行之后调用
    //环绕通知
//        |-在目标方法之前和之后都调用
    //异常拦截通知
//        |-如果出现异常,就会调用
    //后置通知(无论是否出现 异常都会调用)
//        |-在目标方法运行之后调用
//----------------------------------------------------------------
    //前置通知
    public void before(){
        System.out.println("这是前置通知!!");
    }
    //后置通知
    public void afterReturning(){
        System.out.println("这是后置通知(如果出现异常不会调用)!!");
    }
    //环绕通知
    public Object around(ProceedingJoinPoint pjp) throws Throwable {
        System.out.println("这是环绕通知之前的部分!!");
        Object proceed = pjp.proceed();//调用目标方法
        System.out.println("这是环绕通知之后的部分!!");
        return proceed;
    }
    //异常通知
    public void afterException(){
        System.out.println("出事啦!出现异常了!!");
    }
    //后置通知
    public void after(){
        System.out.println("这是后置通知(出现异常也会调用)!!");
    }
}
三、书写要增强的接口和它的实现类
public interface UserService {
    void save();
    void delete();
    void update();
    void find();
}
public class UserServiceImpl implements UserService {
    public void save() {

    }

    public void delete() {

    }

    public void update() {

    }

    public void find() {

    }
}
四、书写配置文件
<?xml version="1.0" encoding="UTF-8"?>
<beans xmlns:xsi="http://www.w3.org/2001/XMLSchema-instance" xmlns="http://www.springframework.org/schema/beans" xmlns:context="http://www.springframework.org/schema/context" xmlns:aop="http://www.springframework.org/schema/aop" xsi:schemaLocation="http://www.springframework.org/schema/beans http://www.springframework.org/schema/beans/spring-beans-4.2.xsd http://www.springframework.org/schema/context http://www.springframework.org/schema/context/spring-context-4.2.xsd http://www.springframework.org/schema/aop http://www.springframework.org/schema/aop/spring-aop-4.2.xsd ">

    <!-- 准备工作: 导入aop(约束)命名空间 -->
    <!-- 1.配置目标对象 -->
    <bean name="userService" class="dyh.service.UserServiceImpl" ></bean>
    <!-- 2.配置通知对象 -->
    <bean name="myAdvice" class="dyh.aopdemo.MyAdivce" ></bean>
    <!-- 3.配置将通知织入目标对象 -->
    <aop:config>
        <!-- 配置切入点
            public void cn.itcast.service.UserServiceImpl.save()
            void cn.itcast.service.UserServiceImpl.save()
            * cn.itcast.service.UserServiceImpl.save()
            * cn.itcast.service.UserServiceImpl.*()

            * cn.itcast.service.*ServiceImpl.*(..)
            * cn.itcast.service..*ServiceImpl.*(..)
        -->
        <aop:pointcut expression="execution(* dyh.service.*ServiceImpl.*(..))" id="pc"/>
        <aop:aspect ref="myAdvice" >
            <!-- 指定名为before方法作为前置通知 -->
            <aop:before method="before" pointcut-ref="pc" />
            <!-- 后置 -->
            <aop:after-returning method="afterReturning" pointcut-ref="pc" />
            <!-- 环绕通知 -->
            <aop:around method="around" pointcut-ref="pc" />
            <!-- 异常拦截通知 -->
            <aop:after-throwing method="afterException" pointcut-ref="pc"/>
            <!-- 后置 -->
            <aop:after method="after" pointcut-ref="pc"/>
        </aop:aspect>
    </aop:config>
</beans>
五、测试
import dyh.service.UserService;
import org.junit.Test;
import org.junit.runner.RunWith;
import org.springframework.beans.factory.annotation.Autowired;
import org.springframework.test.context.ContextConfiguration;
import org.springframework.test.context.junit4.SpringJUnit4ClassRunner;

import javax.annotation.Resource;

@RunWith(SpringJUnit4ClassRunner.class)
@ContextConfiguration("classpath:dyh/aopdemo/applicationContext.xml")
public class Demo {
//@Autowired
    @Resource(name = "userService")
    private UserService us;
    @Test
    public void fun(){
        us.save();
    }
}
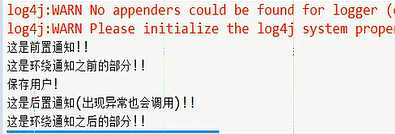
测试结果:

标签:www. point lib code port 图片 命名空间 model public
原文地址:https://www.cnblogs.com/soft2018/p/10124069.html