标签:unit setting pre engine 端口 lte cut tab 手动
1.windows下安装mysql,mysql-installer-community-8.0.13.0
2.安装完成后通过mysql自带的command line client窗口进入,需要输入密码,登录后use mysql;alter user ‘root‘@‘localhost‘ identified with mysql_nativa_password by ‘oldboy‘
3.安装navicat工具
4.通过navicat工具连接mysql数据库
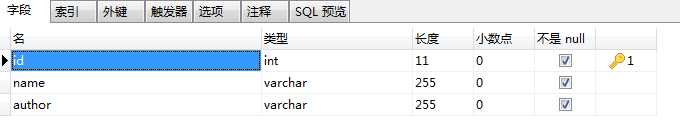
5.创建一个django_db1的数据库,在这个库中创建一个book表,表结构如下
6.项目解释器手动导入PyMySql模块,在项目的settings.py文件中添加两行import pymysql和pymysql.install_as_MySQLdb(),并修改DATABASES部分如下
DATABASES = {
    ‘default‘: {
        ‘ENGINE‘: ‘django.db.backends.mysql‘,  #数据库引擎
        ‘NAME‘: ‘django_db1‘,   #数据库名称
        ‘USER‘:‘root‘,   #登录上述数据库的用户名
        ‘PASSWORD‘:‘oldboy‘,   #登录上述数据库的密码
        ‘HOST‘:‘localhost‘,   #登录上述数据库所在主机
        ‘PORT‘:‘3306‘    #登录上述数据库的端口
    }
}
views.py
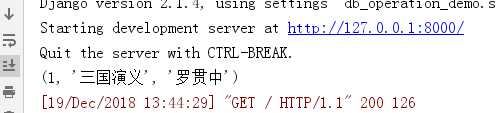
def index(request):
    cursor = connection.cursor()
    cursor.execute("insert into book(id,name,author) values(null,‘三国演义‘,‘罗贯中‘)") #通过execute执行sql语句
    rows = cursor.fetchall() #通过fetchall将所有结果取出来
    for row in rows:
        print(rows)
    return render(request,‘index.html‘)
运行项目,在浏览器输入127.0.0.1:8000,可看到数据库中增加了一条数据,并能在项目的终端看到输出结果
标签:unit setting pre engine 端口 lte cut tab 手动
原文地址:https://www.cnblogs.com/Forever77/p/10142421.html