标签:ble 添加 obj except object 基础软件 中间 static private
一 、RabbitMQ的介绍
RabbitMQ是消息中间件的一种,消息中间件即分布式系统中完成消息的发送和接收的基础软件,消息中间件的工作过程可以用生产者消费者模型来表示.即,生产者不断的向消息队列发送信息,而消费者从消息队列中消费信息.具体过程如下:

从上图可看出,对于消息队列来说,生产者、消息队列、消费者是最重要的三个概念,生产者发消息到消息队列中去,消费者监听指定的消息队列,并且当消息队列收到消息之后,接收消息队列传来的消息,并且给予相应的处理。消息队列常用于分布式系统之间互相信息的传递。
对于RabbitMQ来说,除了这三个基本模块以外,还添加了一个模块,即交换机(Exchange)。它使得生产者和消息队列之间产生了隔离,生产者将消息发送给交换机,而交换机则根据调度策略把相应的消息转发给对应的消息队列。
交换机的主要作用是接收相应的消息并且绑定到指定的队列。交换机有四种类型,分别为Direct、topic、headers、Fanout。
Direct是RabbitMQ默认的交换机模式,也是最简单的模式。即创建消息队列的时候,指定一个BindingKey。当发送者发送消息的时候,指定对应的Key。当Key和消息队列的BindingKey一致的时候,消息将会被发送到该消息队列中。
topic转发信息主要是依据通配符,队列和交换机的绑定主要是依据一种模式(通配符+字符串),而当发送消息的时候,只有指定的Key和该模式相匹配的时候,消息才会被发送到该消息队列中。
headers也是根据一个规则进行匹配,在消息队列和交换机绑定的时候会指定一组键值对规则,而发送消息的时候也会指定一组键值对规则,当两组键值对规则相匹配的时候,消息会被发送到匹配的消息队列中。
Fanout是路由广播的形式,将会把消息发给绑定它的全部队列,即便设置了key,也会被忽略。
二 、SpringBoot整合RabbitMQ(Direct模式)
SpringBoot整合RabbitMQ非常简单,首先还是pom.xml引入依赖。
    <dependency>
            <groupId>org.springframework.boot</groupId>
            <artifactId>spring-boot-starter-amqp</artifactId>
    </dependency>
在application.properties中配置RabbitMQ相关的信息,并首先启动了RabbitMQ实例,并创建两个queue。

spring.application.name=spirng-boot-rabbitmq
spring.rabbitmq.host=127.0.0.1
spring.rabbitmq.port=5672
spring.rabbitmq.username=admin
spring.rabbitmq.password=admin
配置Queue(消息队列),由于采用的是Direct模式,需要在配置Queue的时候指定一个键,使其和交换机绑定。
@Configuration
public class RabbitConfig {

    @Bean
    public org.springframework.amqp.core.Queue Queue() {

        return new org.springframework.amqp.core.Queue("hello");

    }
}
接着就可以发送消息啦。在SpringBoot中,我们使用AmqpTemplate去发送消息。代码如下:
@Component
public class HelloSender {

    @Autowired
    private AmqpTemplate rabbitTemplate;

    public void send(int index) {

        String context = "hello Queue "+index + new Date();
        System.out.println("Sender : " + context);
        this.rabbitTemplate.convertAndSend("hello", context);
    }
}
生产者发送消息之后就需要消费者接收消息。这里定义了两个消息消费者,用来模拟生产者与消费者一对多的关系。
@Component
@RabbitListener(queues = "hello")
public class HelloReceiver {

    @RabbitHandler
    public void process(String hello) {
        System.out.println("Receiver1  : " + hello);
    }
}
@Component
@RabbitListener(queues = "hello")
public class HelloReceiver2 {

    @RabbitHandler
    public void process(String hello) {
        System.out.println("Receiver2  : " + hello);
    }
}
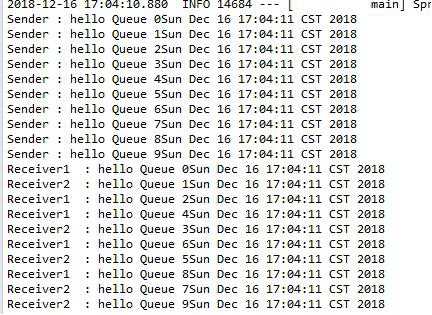
在单元测试中模拟发送消息,批量发送10条消息,两个接收者分别接收了5条消息。
    @Autowired
    private HelloSender helloSender;
    @Test
    public void hello() throws Exception {
        for(int i=0;i<10;i++)
        {
            helloSender.send(i);
        }
    }

实际上RabbitMQ还可以支持发送对象,当然由于涉及到序列化和反序列化,该对象要实现Serilizable接口。这里定义了User对象,用来做发送消息内容。
import java.io.Serializable;
public class User implements Serializable{

    private String name;
    private String pwd;

    public String getPwd() {
        return pwd;
    }
    public void setPwd(String pwd) {
        this.pwd = pwd;
    }
    public String getName() {
        return name;
    }
    public void setName(String name) {
        this.name = name;
    }
    public User(String name, String pwd) {
        this.name = name;
        this.pwd = pwd;
    }
    @Override
public String toString() {
        return "User{" +"name=‘" + name + ‘\‘‘ +", pwd=‘" + pwd + ‘\‘‘ +‘}‘;
    }
}
在生产者中发送User对象。
@Component
public class ModelSender {

    @Autowired
    private AmqpTemplate rabbitTemplate;

    public void sendModel(User user) {

        System.out.println("Sender object: " + user.toString());
        this.rabbitTemplate.convertAndSend("object", user);

    }
}
在消费者中接收User对象。
@Component
@RabbitListener(queues = "object")
public class ModelRecevicer {

    @RabbitHandler
    public void process(User user) {

        System.out.println("Receiver object : " + user);

    }
}
在单元测试中注入ModelSender 对象,实例化User对象,然后发送。
    @Autowired
    private ModelSender modelSender;
    @Test
    public void model() throws Exception {

        User user=new User("abc","123");
        modelSender.sendModel(user);
    }

三 、SpringBoot整合RabbitMQ(Topic转发模式)
首先需要在RabbitMQ服务端创建交换机topicExchange,并绑定两个queue:topic.message、topic.messages。

新建TopicRabbitConfig,设置对应的queue与binding。
@Configuration
public class TopicRabbitConfig {

    final static String message = "topic.message";
    final static String messages = "topic.messages";

    @Bean
    public Queue queueMessage() {
        return new Queue(TopicRabbitConfig.message);
    }

    @Bean
    public Queue queueMessages() {
        return new Queue(TopicRabbitConfig.messages);
    }

    @Bean
    TopicExchange exchange() {
        return new TopicExchange("topicExchange");
    }

    @Bean
    Binding bindingExchangeMessage(Queue queueMessage, TopicExchange exchange) {
        return BindingBuilder.bind(queueMessage).to(exchange).with("topic.message");
    }

    @Bean
    Binding bindingExchangeMessages(Queue queueMessages, TopicExchange exchange) {
        return BindingBuilder.bind(queueMessages).to(exchange).with("topic.#");
    }
}
创建消息生产者,在TopicSender中发送3个消息。
@Component
public class TopicSender {

    @Autowired
    private AmqpTemplate rabbitTemplate;

    public void send() {
        String context = "hi, i am message all";
        System.out.println("Sender : " + context);
        this.rabbitTemplate.convertAndSend("topicExchange", "topic.1", context);
    }

    public void send1() {
        String context = "hi, i am message 1";
        System.out.println("Sender : " + context);
        this.rabbitTemplate.convertAndSend("topicExchange", "topic.message", context);
    }

    public void send2() {
        String context = "hi, i am messages 2";
        System.out.println("Sender : " + context);
        this.rabbitTemplate.convertAndSend("topicExchange", "topic.messages", context);
    }
}
生产者发送消息,这里创建了两个接收消息的消费者。
@Component
@RabbitListener(queues = "topic.message")
public class TopicReceiver {

    @RabbitHandler
    public void process(String message) {
        System.out.println("Topic Receiver1  : " + message);
    }
}

@Component
@RabbitListener(queues = "topic.messages")
public class TopicReceiver2 {

    @RabbitHandler
    public void process(String message) {

        System.out.println("Topic Receiver2  : " + message);

    }
}
在单元测试中注入TopicSender,利用topicSender 发送消息。
    @Autowired
    private TopicSender topicSender;
    @Test
    public void topicSender() throws Exception {
        topicSender.send();
        topicSender.send1();
        topicSender.send2();
    }

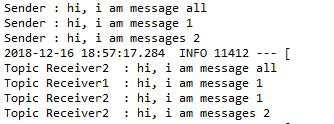
从上面的输出结果可以看到,Topic Receiver2 匹配到了所有消息,Topic Receiver1只匹配到了1个消息。
四 、SpringBoot整合RabbitMQ(Fanout Exchange形式)
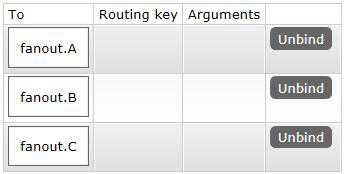
Fanout Exchange形式又叫广播形式,因此我们发送到路由器的消息会使得绑定到该路由器的每一个Queue接收到消息。首先需要在RabbitMQ服务端创建交换机fanoutExchange,并绑定三个queue:fanout.A、fanout.B、fanout.C。

与Topic类似,新建FanoutRabbitConfig,绑定交换机和队列。
@Configuration
public class FanoutRabbitConfig {

    @Bean
    public Queue AMessage() {
        return new Queue("fanout.A");
    }

    @Bean
    public Queue BMessage() {
        return new Queue("fanout.B");
    }

    @Bean
    public Queue CMessage() {
        return new Queue("fanout.C");
    }

    @Bean
    FanoutExchange fanoutExchange() {
        return new FanoutExchange("fanoutExchange");
    }

    @Bean
    Binding bindingExchangeA(Queue AMessage,FanoutExchange fanoutExchange) {
        return BindingBuilder.bind(AMessage).to(fanoutExchange);
    }

    @Bean
    Binding bindingExchangeB(Queue BMessage, FanoutExchange fanoutExchange) {
        return BindingBuilder.bind(BMessage).to(fanoutExchange);
    }

    @Bean
    Binding bindingExchangeC(Queue CMessage, FanoutExchange fanoutExchange) {
        return BindingBuilder.bind(CMessage).to(fanoutExchange);
    }
}
创建消息生产者,在FanoutSender中发送消息。
@Component
public class FanoutSender {

    @Autowired
    private AmqpTemplate rabbitTemplate;

    public void send() {

        String context = "hi, fanout msg ";
        System.out.println("FanoutSender : " + context);
        this.rabbitTemplate.convertAndSend("fanoutExchange","", context);

    }
}
然后创建了3个接收者FanoutReceiverA、FanoutReceiverB、FanoutReceiverC。
@Component
@RabbitListener(queues = "fanout.A")
public class FanoutReceiverA {

    @RabbitHandler
    public void process(String message) {
        System.out.println("fanout Receiver A  : " + message);
    }
}
@Component
@RabbitListener(queues = "fanout.B")
public class FanoutReceiverB {

    @RabbitHandler
    public void process(String message) {
        System.out.println("fanout Receiver B: " + message);
    }
}
@Component
@RabbitListener(queues = "fanout.C")
public class FanoutReceiverC {

    @RabbitHandler
    public void process(String message) {
        System.out.println("fanout Receiver C: " + message);
    }
}
在单元测试中注入消息发送者,发送消息。
    @Autowired
    private FanoutSender fanoutSender;
    @Test
    public void fanoutSender() throws Exception {
        fanoutSender.send();
    }
从下图可以看到3个队列都接收到了消息。

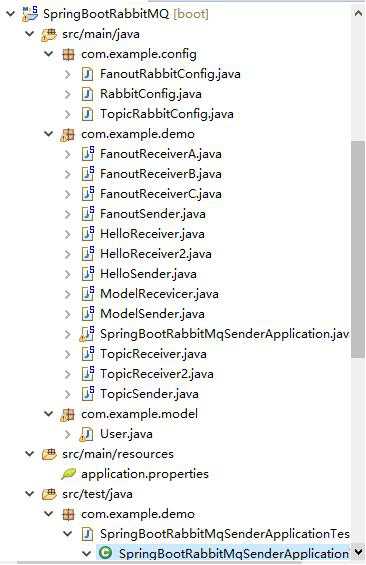
本章节创建的类比较多,下图为本章节的结构,也可以直接查看demo源码了解。

标签:ble 添加 obj except object 基础软件 中间 static private
原文地址:https://www.cnblogs.com/5ishare/p/10163318.html