标签:ret bst patch nta filter href apach 方法 mod
Spring 系列目录(https://www.cnblogs.com/binarylei/p/10198698.html)
在 Servlet 3.0 时支持注解启动,不再需要 web.xml 配制文件。
Servlet 3.0 常用注解: @WebServlet @WebFilter @WebInitParam @WebListener
@WebServlet("/hello")
public class HelloServert extends HttpServlet {
    @Override
    protected void doGet(HttpServletRequest req, HttpServletResponse resp)
            throws ServletException, IOException {
        resp.getWriter().write("hello");
    }
}Servlet 容器启动会扫描当前应用的每一个 jar 包 ServletContainerInitializer 的实现。
通过每个 jar 包下的 META-INFO/services/javax.servlet.ServletContainerInitializer 文件:
com.github.binarylei.MyServletContainerInitializer
@HandlesTypes(HelloServert.class)
public class MyServletContainerInitializer implements ServletContainerInitializer {

    /**
     * @param c                 @HandlesTypes 指定,HelloServert 子类
     * @param ServletContext    注册三大组件(Servlet Filter Listener)
     */
    @Override
    public void onStartup(Set<Class<?>> set, ServletContext ctx)
            throws ServletException {
        // 1. 处理感兴趣的类
        System.out.println(set);

        // 2.1. 注册 Servert
        ServletRegistration.Dynamic servlet = ctx.addServlet("myServlet", HelloServert.class);
        servlet.addMapping("/*");

        // 2.2. 注册 Listener
        ctx.addListener(MyServletContextListener.class);

        // 2.3. 注册 Filter
        FilterRegistration.Dynamic filter = ctx.addFilter("myFileter", MyFilter.class);
        filter.addMappingForUrlPatterns(EnumSet.of(DispatcherType.REQUEST),
                true, "/*");
    }
}
在 Servlet 3.0 时支持注解启动,其中 ServletContainerInitializer 和 HandlesTypes 都是 Servlet 3.0 的规范。
ServletContainerInitializer 只有一个方法 onStartupHandlesTypes 感兴趣的类,启动时会通过 onStartup 传递给 clazzs 参数。HandlesTypes 会找到 HelloServert 所有的子类(不包括 HelloServert 自己)@HandlesTypes(WebApplicationInitializer.class)
public class SpringServletContainerInitializer implements ServletContainerInitializer {
@Override
public void onStartup(@Nullable Set<Class<?>> webAppInitializerClasses, ServletContext servletContext)
throws ServletException {
List<WebApplicationInitializer> initializers = new LinkedList<>();
if (webAppInitializerClasses != null) {
for (Class<?> waiClass : webAppInitializerClasses) {
// WebApplicationInitializer 的实现类
if (!waiClass.isInterface() && !Modifier.isAbstract(waiClass.getModifiers()) &&
WebApplicationInitializer.class.isAssignableFrom(waiClass)) {
try {
initializers.add((WebApplicationInitializer)
ReflectionUtils.accessibleConstructor(waiClass).newInstance());
} catch (Throwable ex) {
throw new ServletException("Failed to instantiate WebApplicationInitializer class", ex);
}
}
}
}
if (initializers.isEmpty()) {
servletContext.log("No Spring WebApplicationInitializer types detected on classpath");
return;
}
// 执行 onStartup
AnnotationAwareOrderComparator.sort(initializers);
for (WebApplicationInitializer initializer : initializers) {
initializer.onStartup(servletContext);
}
}
}Spring MVC 启动时会调用 WebApplicationInitializer 实现类的 onStartup 方法启动 WEB 容器。WebApplicationInitializer 的继承关系如下:
WebApplicationInitializer
    |- AbstractContextLoaderInitializer
        |- AbstractDispatcherServletInitializer
            |- AbstractAnnotationConfigDispatcherServletInitializer
AbstractContextLoaderInitializer 创建 Root 根容器并注册 ContextLoaderListener,创建根容器由子类实现。核心方法:registerContextLoaderListener
AbstractDispatcherServletInitializer 创建 Servlet 容器,并注册 DispatcherServlet 和 Filete,创建根容器由子类实现。核心方法:registerDispatcherServlet
AbstractAnnotationConfigDispatcherServletInitializer 创建 Root 和 Servlet 容器。核心方法:createRootApplicationContext、createServletApplicationContext
断点调试,webAppInitializerClasses 有以下类,显然只有一个实现类 MyAbstractAnnotationConfigDispatcherServletInitializer 执行了 onStartup 方法。
0 = {Class@4467} "class org.springframework.web.servlet.support.AbstractAnnotationConfigDispatcherServletInitializer"
1 = {Class@4468} "class org.springframework.web.servlet.support.AbstractDispatcherServletInitializer"
2 = {Class@4469} "class org.springframework.web.server.adapter.AbstractReactiveWebInitializer"
3 = {Class@4470} "class org.springframework.web.context.AbstractContextLoaderInitializer"
4 = {Class@4471} "class com.github.binarylei.MyAbstractAnnotationConfigDispatcherServletInitializer"使用 tomcat7-maven-plugin 插件模拟 Spring Boot。Tomcat 对 Servlet 的支持如下:
Tomcat 6.x 实现 Servert 2.5
Tomcat 7.x 实现 Servert 3.0
Tomcat 8.x 实现 Servert 3.1
Tomcat 9.x 实现 Servert 4.0
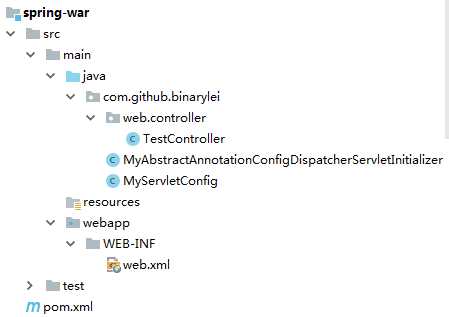
(1) WebApplicationInitializer 实现类
public class MyAbstractAnnotationConfigDispatcherServletInitializer extends
        AbstractAnnotationConfigDispatcherServletInitializer {
    protected Class<?>[] getRootConfigClasses() {
        return new Class[]{MyRootConfig.class};
    }

    protected Class<?>[] getServletConfigClasses() {
        return new Class[]{MyServletConfig.class};
    }

    protected String[] getServletMappings() {
        return new String[]{"/*"};
    }
}

@Configuration
@ComponentScan(basePackages = "com.github.binarylei",
        includeFilters = {@ComponentScan.Filter(type = FilterType.ANNOTATION, classes = Controller.class)})
public class MyServletConfig {
}

@Configuration
@ComponentScan(basePackages = "com.github.binarylei",
        excludeFilters = {@ComponentScan.Filter(type = FilterType.ANNOTATION, classes = Controller.class)})
public class MyRootConfig {
}
(2) tomcat7-maven-plugin 配制
tomcat7-maven-plugin 官网:http://tomcat.apache.org/maven-plugin-2.1/executable-war-jar.html
<packaging>war</packaging>
<properties>
    <spring.version>5.1.0.RELEASE</spring.version>

    <project.build.sourceEncoding>utf-8</project.build.sourceEncoding>
    <maven.compiler.source>1.8</maven.compiler.source>
    <maven.compiler.target>1.8</maven.compiler.target>
</properties>

<dependencies>
    <dependency>
        <groupId>org.springframework</groupId>
        <artifactId>spring-webmvc</artifactId>
        <version>${spring.version}</version>
    </dependency>
    <dependency>
        <groupId>javax.servlet</groupId>
        <artifactId>javax.servlet-api</artifactId>
        <version>3.1.0</version>
        <scope>provided</scope>
    </dependency>
</dependencies>

<build>
    <plugins>
        <plugin>
            <groupId>org.apache.tomcat.maven</groupId>
            <artifactId>tomcat7-maven-plugin</artifactId>
            <version>2.1</version>
            <executions>
                <execution>
                    <id>tomcat-run</id>
                    <goals>
                        <goal>exec-war-only</goal>
                    </goals>
                    <phase>package</phase>
                    <configuration>
                        <path>/</path>
                    </configuration>
                </execution>
            </executions>
        </plugin>
    </plugins>
</build>
(3) 运行
执行 mvn package 后生成了两个文件:spring-war-1.0.0.war 和 spring-war-1.0.0-war-exec.jar
# localhost:8080/
java -jar spring-war-1.0.0-war-exec.jar
# IDEA remote 调试时(suspend=y)
java -jar -agentlib:jdwp=transport=dt_socket,server=y,suspend=y,address=*:5005 spring-war-1.0.0-war-exec.jar
tomcat 启动远程时报错:https://www.aliyun.com/jiaocheng/1443062.html
每天用心记录一点点。内容也许不重要,但习惯很重要!
标签:ret bst patch nta filter href apach 方法 mod
原文地址:https://www.cnblogs.com/binarylei/p/10203391.html