标签:... sch kubectl clu join namespace original setting emc
Step1: Download centos 7 minimal iso image and install it via vmware workstation 15
tbd
Step2: Configure static network interface
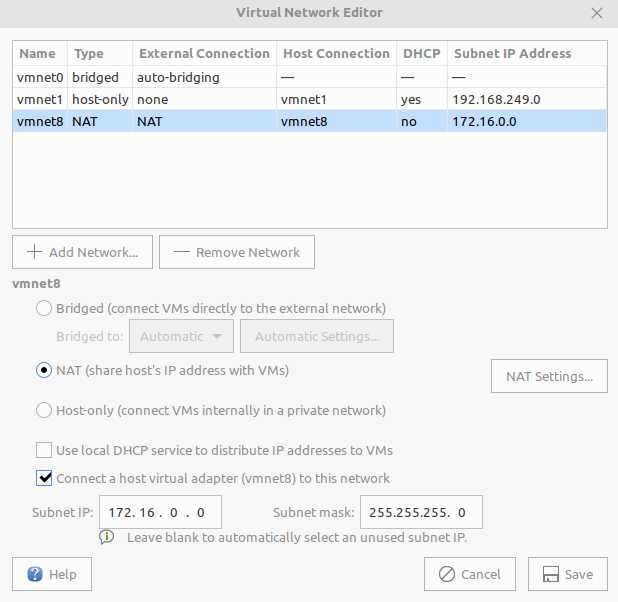
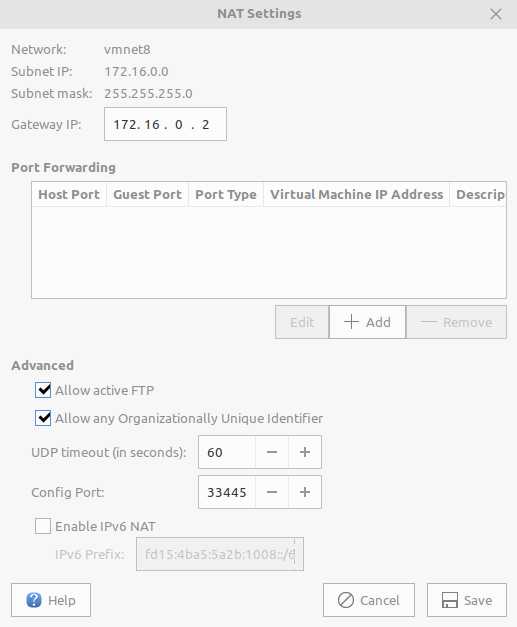
Edit -> Virtual Network Editor -> configure as following and -> NAT Settings... -> Start vm
Get Mac Adress of your instance by using:
cat /sys/class/net/{your network insterface}/address
-> 00:0c:29:71:91:df
start with editing “/etc/sysconfig/network-scripts/ifcfg-ens33″
vi /etc/sysconfig/network-scripts/ifcfg-ens33
add following configuration:
HWADDR=00:0C:29:71:91:DF
TYPE=Ethernet
BOOTPROTO=static
DEFROUTE=yes
PEERDNS=yes
PEERROUTES=yes
IPV4_FAILURE_FATAL=no
IPADDR=172:16.0.11
NETMASK=255.255.255.0
GATEWAY=172.16.0.2
IPV6INIT=yes
IPV6_AUTOCONF=yes
IPV6_DEFROUTE=yes
IPV6_PEERDNS=yes
IPV6_PEERROUTES=yes
IPV6_FAILURE_FATAL=no
NAME=ens33
DEVICE=ens33
UUID=ea68db6e-461e-427d-b9a8-bfcf6e1a4fc6
ONBOOT=yes
Configure default gateway
vi /etc/sysconfig/network
Add following line:
NETWORKING=yes
HOSTNAME=k8smaster
GATEWAY=172.16.0.2
Configure DNS Server
vi /etc/resolv.conf
Add following line:
nameserver 8.8.8.8
nameserver 8.8.4.4
Restart network service:
systemctl restart network
ping www.sohu.com
If it works, turn down vm -> shutdown now
Clone a second machine
set the right IPADDR, HWADDR and UUID for network interface then hostname for default gateway
how get UUID of this machine:
uuidgen ifcfg-ens33
# or
# echo UUID=$(uuidgen ifcfg-ens33) >> ifcfg-ens33
# then delete the original one
Now you have 3 virtual machines with different ips
For installation of common software like docker and some setting for preinstallation, I wrote a ansible script see my github (tbd)
The rest see:
https://www.digitalocean.com/community/tutorials/how-to-create-a-kubernetes-1-10-cluster-using-kubeadm-on-centos-7
Start master node with kubeadm init
kubeadm init --ignore-preflight-errors all --kubernetes-version=v1.11.1 --pod-network-cidr=10.244.0.0/16 --service-cidr=10.96.0.0/12
then wait.... your os will pull docker image from docker hub
Your Kubernetes master has initialized successfully!

To start using your cluster, you need to run the following as a regular user:

  mkdir -p $HOME/.kube
  sudo cp -i /etc/kubernetes/admin.conf $HOME/.kube/config
  sudo chown $(id -u):$(id -g) $HOME/.kube/config

You should now deploy a pod network to the cluster.
Run "kubectl apply -f [podnetwork].yaml" with one of the options listed at:
  https://kubernetes.io/docs/concepts/cluster-administration/addons/

You can now join any number of machines by running the following on each node
as root:

  kubeadm join 172.16.0.11:6443 --token s97rc5.oio179xrb0fbxrg2 --discovery-token-ca-cert-hash sha256:ade669b38cf81989baf62fae57cdc50cf8aba5db429841e33e6c090aded2730e
run
docker images
[root@k8smaster ~]# docker images
REPOSITORY                                 TAG                 IMAGE ID            CREATED             SIZE
k8s.gcr.io/kube-proxy-amd64                v1.11.1             d5c25579d0ff        5 months ago        97.8MB
k8s.gcr.io/kube-scheduler-amd64            v1.11.1             272b3a60cd68        5 months ago        56.8MB
k8s.gcr.io/kube-apiserver-amd64            v1.11.1             816332bd9d11        5 months ago        187MB
k8s.gcr.io/kube-controller-manager-amd64   v1.11.1             52096ee87d0e        5 months ago        155MB
k8s.gcr.io/coredns                         1.1.3               b3b94275d97c        7 months ago        45.6MB
k8s.gcr.io/etcd-amd64                      3.2.18              b8df3b177be2        8 months ago        219MB
k8s.gcr.io/pause                           3.1                 da86e6ba6ca1        12 months ago       742kB
[root@k8smaster ~]#
validate your installation:
[root@k8smaster ~]# kubectl get nodes
NAME        STATUS     ROLES    AGE   VERSION
k8smaster   NotReady   master   18m   v1.11.1
[root@k8smaster ~]#
status -> NotReady because you need a network addon like flannel
Install flannel
kubectl apply -f https://raw.githubusercontent.com/coreos/flannel/master/Documentation/kube-flannel.yml
then you will see:
root@k8smaster ~]# kubectl apply -f https://raw.githubusercontent.com/coreos/flannel/master/Documentation/kube-flannel.yml
clusterrole.rbac.authorization.k8s.io/flannel created
clusterrolebinding.rbac.authorization.k8s.io/flannel created
serviceaccount/flannel created
configmap/kube-flannel-cfg created
daemonset.extensions/kube-flannel-ds-amd64 created
daemonset.extensions/kube-flannel-ds-arm64 created
daemonset.extensions/kube-flannel-ds-arm created
daemonset.extensions/kube-flannel-ds-ppc64le created
daemonset.extensions/kube-flannel-ds-s390x created
Validate pods: kubectl get pods -n kube-system
-n -> namespace
[root@k8smaster ~]# kubectl get pods -n kube-system
NAME                                READY   STATUS    RESTARTS   AGE
coredns-78fcdf6894-5v9g9            1/1     Running   0          27m
coredns-78fcdf6894-lpwfw            1/1     Running   0          27m
etcd-k8smaster                      1/1     Running   0          1m
kube-apiserver-k8smaster            1/1     Running   0          1m
kube-controller-manager-k8smaster   1/1     Running   0          1m
kube-flannel-ds-amd64-n5j7l         1/1     Running   0          1m
kube-proxy-rjssr                    1/1     Running   0          27m
kube-scheduler-k8smaster            1/1     Running   0          1m
Now adding two worker nodes to cluster
on k8snode1
kubeadm join --ignore-preflight-errors all 172.16.0.11:6443 --token s97rc5.oio179xrb0fbxrg2 --discovery-token-ca-cert-hash sha256:ade669b38cf81989baf62fae57cdc50cf8aba5db429841e33e6c090aded2730e
Validating on master node with:
[root@k8smaster ~]# kubectl get pods -n kube-system -o wide
NAME                                READY   STATUS    RESTARTS   AGE   IP            NODE
coredns-78fcdf6894-5v9g9            1/1     Running   0          40m   10.244.0.2    k8smaster
coredns-78fcdf6894-lpwfw            1/1     Running   0          40m   10.244.0.3    k8smaster
etcd-k8smaster                      1/1     Running   0          14m   172.16.0.11   k8smaster
kube-apiserver-k8smaster            1/1     Running   0          14m   172.16.0.11   k8smaster
kube-controller-manager-k8smaster   1/1     Running   0          14m   172.16.0.11   k8smaster
kube-flannel-ds-amd64-hs6b9         1/1     Running   0          3m    172.16.0.12   k8snode1
kube-flannel-ds-amd64-n5j7l         1/1     Running   0          14m   172.16.0.11   k8smaster
kube-proxy-8x5p6                    1/1     Running   0          3m    172.16.0.12   k8snode1
kube-proxy-rjssr                    1/1     Running   0          40m   172.16.0.11   k8smaster
kube-scheduler-k8smaster            1/1     Running   0          14m   172.16.0.11   k8smaster
The same on k8snode2...
[root@k8smaster ~]# kubectl get nodes
NAME        STATUS   ROLES    AGE   VERSION
k8smaster   Ready    master   43m   v1.11.1
k8snode1    Ready    <none>   6m    v1.11.1
k8snode2    Ready    <none>   40s   v1.11.1
[root@k8smaster ~]# kubectl get pods -n kube-system -o wide
NAME                                READY   STATUS    RESTARTS   AGE   IP            NODE
coredns-78fcdf6894-5v9g9            1/1     Running   0          44m   10.244.0.2    k8smaster
coredns-78fcdf6894-lpwfw            1/1     Running   0          44m   10.244.0.3    k8smaster
etcd-k8smaster                      1/1     Running   0          17m   172.16.0.11   k8smaster
kube-apiserver-k8smaster            1/1     Running   0          17m   172.16.0.11   k8smaster
kube-controller-manager-k8smaster   1/1     Running   0          17m   172.16.0.11   k8smaster
kube-flannel-ds-amd64-8gpzz         1/1     Running   0          1m    172.16.0.13   k8snode2
kube-flannel-ds-amd64-hs6b9         1/1     Running   0          7m    172.16.0.12   k8snode1
kube-flannel-ds-amd64-n5j7l         1/1     Running   0          17m   172.16.0.11   k8smaster
kube-proxy-8x5p6                    1/1     Running   0          7m    172.16.0.12   k8snode1
kube-proxy-jkpgf                    1/1     Running   0          1m    172.16.0.13   k8snode2
kube-proxy-rjssr                    1/1     Running   0          44m   172.16.0.11   k8smaster
kube-scheduler-k8smaster            1/1     Running   0          17m   172.16.0.11   k8smaster
Done :-)
Kubernetes Cetos 7 minimal Preinstallation (VMWare Workstation 15)
标签:... sch kubectl clu join namespace original setting emc
原文地址:https://www.cnblogs.com/crazy-chinese/p/10166571.html