标签:print jieba分词 stat xpath font fct img 管理 select
新人一枚,初来乍到,请多关照
来到博客园,不知道写点啥,那就去瞄一瞄大家都在干什么好了。
使用python 爬取博客园首页文章链接和标题。
首先当然是环境了,爬虫在window10系统下,python3.6.5环境中运行。使用python中的requests模块和BeautifulSoup模块。
通过包管理工具pip3安装requests和BeautifulSoup:
pip3 install requests
pip3 install bs4
贴代码:
import requests
from bs4 import BeautifulSoup
import time


def getlinktitle():
    counts=0
    index=0
    f=open(‘down.txt‘,‘w‘,encoding=‘utf-8‘)
    postData={
        "CategoryType":"SiteHome",
        "ParentCategoryId":0,
        "CategoryId":808,
        "PageIndex":1,#pageIndex确定是第几页,博客园首页共有200页
        "TotalPostCount":4000,
        "ItemListActionName":"PostList"
        }#博客园请求页面使用post请求的请求数据
    try:
        for i in range(0,200):                                                      #博客园首页内容只有200页
            time.sleep(0.2)
            r=requests.post(‘https://www.cnblogs.com/mvc/AggSite/PostList.aspx‘,data=postData)
            index+=1
            postData[‘PageIndex‘]=index#通过改变PageIndex的值改变请求页
            if r.status_code==200:
                html=‘<html><head><meta charest="utf-8"><title>自定义标题</title></head><body>‘+r.content.decode()+‘</body></html>‘#将页面补充完整
                soup=BeautifulSoup(html,‘lxml‘)
                links=soup.select(‘.post_item_body  h3 a‘)                      #xpath 路径是 //*[@id="post_list"]/div[1]/div[2]/h3
                for i in range(0,len(links)):
                    f.write(links[i].get_text())
            else:
                print(r.status_code)
            r.close()
    except Exception as e:
        print(e)
    finally:
        f.close()
我们将结果保存在文本中了,打开文本可以看到内容都被保存了下来.
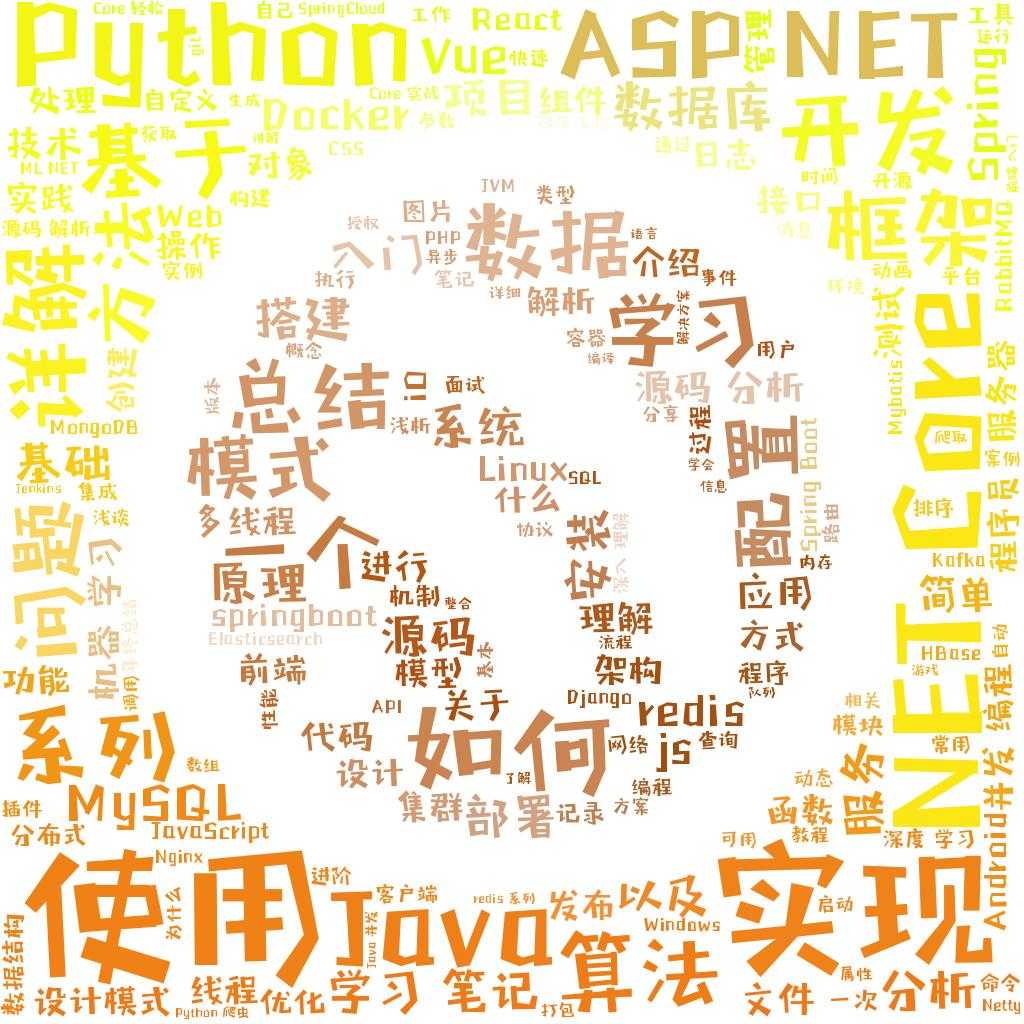
能不能让结果更直观一点呢?当然可以,我们可以用词云工具制作一个词云图片。
本次使用wordcloud词云制作工具和jieba分词
首先当然是安装了工具了:
pip3 install wordcloud
pip3 install jieba
pip3 install opencv-python(也可以使用matplotlib的pyplot )
最后贴代码:
import jieba
from  wordcloud import WordCloud,ImageColorGenerator,STOPWORDS
import cv2
def feci():
    img=cv2.imread(‘bky.jpg‘)
    with open(‘down.txt‘,‘r‘,encoding=‘utf-8‘) as f:
        fctxt=‘ ‘.join(jieba.cut(f.read()))
    wd=WordCloud(background_color=‘white‘,width=480,height=480,mask=img,stopwords=STOPWORDS,font_path="C:/windows/字体管家方萌.ttf")
    wd.generate(fctxt)
    imgcolor=ImageColorGenerator(img)
    wd.recolor(color_func=imgcolor)
    wd.to_file(‘final.jpg‘)
掩模使用一张博客园的logo(图片来自百度,侵删)

最终效果

我们可以看到近两个月python,ASP.NET,.NET Core这几个词出现的频率最高(别问我为什么是两个月,因为博客园首页只有200页),感觉自己也是其中的一员呢,感觉以后自己可以放心写了,需要说明一点就是博客园的每一页是psot请求,请求拿到的数据是被<div>标签包围的,并不是完整的html页面,使用beautifulSoup的同学要注意,给得到的数据加上html页面的头部。这样BeautifulSoup才能正常解析。博客园没有反爬虫机制是真的好啊。
最后贴完整代码:
#coding:utf-8
#date:2018-12-27
#author:零度热冰
#content:爬取博客圆首页文章标题

import requests
import time
from bs4 import BeautifulSoup
import jieba
from  wordcloud import WordCloud,ImageColorGenerator,STOPWORDS
import cv2


def getlinktitle():
    counts=0
    index=0
    f=open(‘down.txt‘,‘w‘,encoding=‘utf-8‘)
    postData={
        "CategoryType":"SiteHome",
        "ParentCategoryId":0,
        "CategoryId":808,
        "PageIndex":1,
        "TotalPostCount":4000,
        "ItemListActionName":"PostList"
        }#博客园请求页面使用post请求的请求数据
    try:
        for i in range(0,200):                                                      #博客园首页内容只有200页
            time.sleep(0.2)
            r=requests.post(‘https://www.cnblogs.com/mvc/AggSite/PostList.aspx‘,data=postData)
            index+=1
            postData[‘PageIndex‘]=index#通过改变PageIndex的值改变请求页
            if r.status_code==200:
                html=‘<html><head><meta charest="utf-8"><title>自定义标题</title></head><body>‘+r.content.decode()+‘</body></html>‘
                soup=BeautifulSoup(html,‘lxml‘)
                links=soup.select(‘.post_item_body  h3 a‘)                      #xpath is //*[@id="post_list"]/div[1]/div[2]/h3
                for i in range(0,len(links)):
                    f.write(links[i].get_text())
            else:
                print(r.status_code)
            r.close()
    except Exception as e:
        print(e)
    finally:
        f.close()

def feci():
    img=cv2.imread(‘bky.jpg‘)#使用opencv读取图片
    with open(‘down.txt‘,‘r‘,encoding=‘utf-8‘) as f:
        fctxt=‘ ‘.join(jieba.cut(f.read()))
    wd=WordCloud(background_color=‘white‘,width=480,height=480,mask=img,stopwords=STOPWORDS,font_path="C:/windows/fonts/字体管家方萌.ttf")
    wd.generate(fctxt)
    imgcolor=ImageColorGenerator(img)
    wd.recolor(color_func=imgcolor)
    wd.to_file(‘final.jpg‘)
if __name__=="__main__":
    getlinktitle()
    feci()
标签:print jieba分词 stat xpath font fct img 管理 select
原文地址:https://www.cnblogs.com/lingdurebing/p/10271056.html