标签:ext conf str long ddt number key prope create
一、在进行java操作elasticsearch之前,请确认好集群的名称及对应的ES节点ip和端口
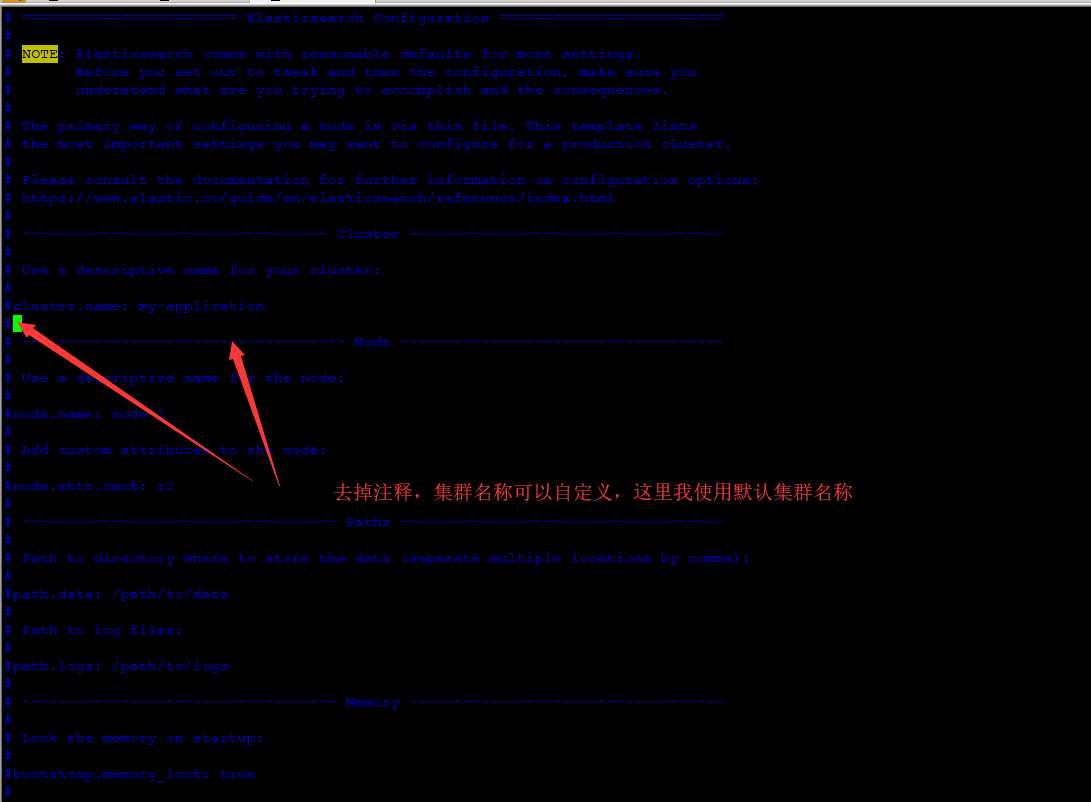
1、查看ES的集群名称
#进入elasticsearch.yml配置文件
/opt/elasticsearch-6.4.3/config
vim elasticsearch.yml

2、查询ip

二、根据文档id查询数据
/**
 *
 */
package com.cyb.test;

import java.net.InetAddress;
import java.net.UnknownHostException;

import org.elasticsearch.action.get.GetResponse;
import org.elasticsearch.client.transport.TransportClient;
import org.elasticsearch.common.settings.Settings;
import org.elasticsearch.common.transport.TransportAddress;
import org.elasticsearch.transport.client.PreBuiltTransportClient;
import org.junit.Test;


/**
* @Title: EsDemo.java
* @Package:com.cyb.test
* @Description:
* @author:陈远波
* @date:2019年1月20日
* @version:V1.0
*/
public class EsDemo {

    //从es中查询数据
    @Test
    public void test1() throws UnknownHostException {
        //1、指定es集群  cluster.name 是固定的key值,my-application是ES集群的名称
        Settings settings = Settings.builder().put("cluster.name", "my-application").build();
        //2.创建访问ES服务器的客户端
        TransportClient client = new PreBuiltTransportClient(settings)
                //获取es主机中节点的ip地址及端口号(以下是单个节点案例)
                                .addTransportAddress(new TransportAddress(InetAddress.getByName("192.168.1.94"), 9300));
        //实现数据查询(指定_id查询) 参数分别是 索引名,类型名  id
        GetResponse response = client.prepareGet("lib3","user","1").execute().actionGet();
        //得到查询出的数据
        System.out.println(response.getSourceAsString());//打印出json数据
        client.close();//关闭客户端

    }

}
在kibana中查询id为1的结果为:

java控制台输出的结果为:

三、插入数据
1、在插入数据之前,需要使用kibana在es中建立索引和定义好字段等信息
PUT /index1
{
  "settings": {
    "number_of_shards": 5,
    "number_of_replicas": 0
  },
  "mappings": {
    "blog":{
      "properties":{
        "id":{
          "type":"long"
        },
        "title":{
          "type":"text",
          "analyzer":"ik_max_word"
        },
        "content":{
          "type":"text",
          "analyzer":"ik_max_word"
        },
        "postdate":{
          "type":"date"
        },
        "url":{
          "type":"text"
        }
      }
    }
  }

}
2、java实现添加
//插入数据
    @Test
    public void test2() throws IOException {
        //1、指定es集群  cluster.name 是固定的key值,my-application是ES集群的名称
                Settings settings = Settings.builder().put("cluster.name", "my-application").build();
                //2.创建访问ES服务器的客户端
                TransportClient client = new PreBuiltTransportClient(settings)
                        //获取es主机中节点的ip地址及端口号(以下是单个节点案例)
                                        .addTransportAddress(new TransportAddress(InetAddress.getByName("192.168.1.94"), 9300));
                //将数据转换成文档的格式(后期可以使用java对象,将数据转换成json对象就可以了)
                XContentBuilder  doContentBuilder=XContentFactory.jsonBuilder()
                                                .startObject()
                                                .field("id", "1") //字段名 : 值
                                                .field("title", "java设计模式之装饰模式")
                                                .field("content", "在不必改变原类文件和使用继承的情况下,动态地扩展一个对象的功能")
                                                .field("postdate", "2018-05-20")
                                                .field("url", "https://www.cnblogs.com/chenyuanbo/")
                                                .endObject();
                //添加文档  index1:索引名 blog:类型 10:id
                IndexResponse response = client.prepareIndex("index1","blog","10")
                                        .setSource(doContentBuilder).get();
                System.out.println(response.status());
                //打印出CREATED 表示添加成功
    }
三、java实现删除
//删除文档
    @Test
    public void test3() throws UnknownHostException {
        Settings settings = Settings.builder().put("cluster.name", "my-application").build();
        //2.创建访问ES服务器的客户端
        TransportClient client = new PreBuiltTransportClient(settings)
                //获取es主机中节点的ip地址及端口号(以下是单个节点案例)
                                .addTransportAddress(new TransportAddress(InetAddress.getByName("192.168.1.94"), 9300));
        DeleteResponse response = client.prepareDelete("index1","blog","10").get();
        System.out.println(response.status());
        //控制台打印出OK代表删除成功
    }
四、java实现修改数据
1、对指定字段进行修改
    //修改数据(指定字段进行修改)
    @Test
    public void test4() throws IOException, InterruptedException, ExecutionException {
        Settings settings = Settings.builder().put("cluster.name", "my-application").build();
        //2.创建访问ES服务器的客户端
        TransportClient client = new PreBuiltTransportClient(settings)
                //获取es主机中节点的ip地址及端口号(以下是单个节点案例)
                                .addTransportAddress(new TransportAddress(InetAddress.getByName("192.168.1.94"), 9300));
       UpdateRequest request = new UpdateRequest();
       request.index("index1") //索引名
                .type("blog") //类型
                .id("10")//id
                .doc(
                        XContentFactory.jsonBuilder()
                        .startObject()
                        .field("title", "单例设计模式")//要修改的字段 及字段值
                        .endObject()
                        );
      UpdateResponse response= client.update(request).get();
       System.out.println(response.status());
       //控制台出现OK 代表更新成功
    }
2、使用upsert修改
upsert修改用法:修改文章存在,执行修改,不存在则执行插入
//upsert 修改用法:修改文章存在,执行修改,不存在则执行插入
    @Test
    public void test5() throws IOException, InterruptedException, ExecutionException {
        Settings settings = Settings.builder().put("cluster.name", "my-application").build();
        //2.创建访问ES服务器的客户端
        TransportClient client = new PreBuiltTransportClient(settings)
                //获取es主机中节点的ip地址及端口号(以下是单个节点案例)
                                .addTransportAddress(new TransportAddress(InetAddress.getByName("192.168.1.94"), 9300));
       IndexRequest request1 = new IndexRequest("index1","blog","8").source(
                              XContentFactory.jsonBuilder()
                              .startObject()
                              .field("id", "2") //字段名 : 值
                              .field("title", "工厂模式")
                              .field("content", "静态工厂,实例工厂")
                              .field("postdate", "2018-05-20")
                              .field("url", "https://www.cnblogs.com/chenyuanbo/")
                              .endObject()
                              );
       UpdateRequest request2 = new UpdateRequest("index1","blog","8").doc(
                               XContentFactory.jsonBuilder().startObject()
                               .field("title", "设计模式")
                               .endObject()
                                 ).upsert(request1);
       UpdateResponse response = client.update(request2).get();
       System.out.println(response.status());
    }
以上是java对elasticsearch的基本操作,下一篇博客本人将书写bulk的批量操作。对ES感兴趣的朋友可以加个关注,另转发请说明出处,本人的博客地址为:https://www.cnblogs.com/chenyuanbo/
技术在于交流!
java操作elasticsearch实现基本的增删改查操作
标签:ext conf str long ddt number key prope create
原文地址:https://www.cnblogs.com/chenyuanbo/p/10296809.html