标签:lock unit 运行 存在 nginx doc 2.2.3 步骤 info
在上一篇文章中我们介绍了Java基本IO,也就是阻塞式IO(BIO),在JDK1.4版本后推出了新的IO系统(NIO),也可以理解为非阻塞IO(Non-Blocking IO)。引用《Java NIO》中的一段话来解释一下NIO出现的原因:
操作系统与 Java 基于流的 I/O模型有些不匹配。操作系统要移动的是大块数据(缓冲区),这往往是在硬件直接存储器存取( DMA)的协助下完成的。而 JVM 的 I/O 类喜欢操作小块数据——单个字节、几行文本。结果,操作系统送来整缓冲区的数据, java.io 的流数据类再花大量时间把它们拆成小块,往往拷贝一个小块就要往返于几层对象。操作系统喜欢整卡车地运来数据, java.io 类则喜欢一铲子一铲子地加工数据。有了 NIO,就可以轻松地把一卡车数据备份到您能直接使用的地方( ByteBuffer 对象)。但是Java里的RandomAccessFile类是比较接近操作系统的方式。
可以看出Java原生的IO模型之所以慢,是因为与操作系统的操作方式不匹配造成的,那么NIO之所以比BIO快主要就是用到了缓冲区相关的技术,接下来慢慢介绍这些技术点。
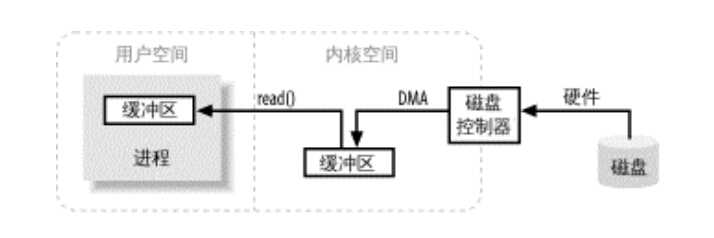
下图描述了操作系统中数据是如何从外部存储向运行中的进程内存区域移动的过程:进程使用read()系统调用要求缓冲区被填充满。内核随即向磁盘控制器发出指令,要求其从磁盘读取数据。磁盘控制器通过DMA直接把磁盘上的数据写入缓冲区,这一步不需要CPU的参与。当缓冲区填满时,内核将数据从临时缓冲区拷贝到进程执行read()调用时指定的缓冲区。

这里需要主要为什么要执行系统调用这样一个中间步骤而不是直接DMA到进程的缓冲区,是因为用户空间是无法直接操作硬件的,另外磁盘这种块存储设备操作的是固定大小的数据块,而用户请求的则是非规则大小的数据,内核空间在这里的作用就是分解、重组的作用。
Java NIO主要依赖的组件有三个:缓冲区Buffer、通道Channel和选择器Selector。
Buffer家族主要有这么些个成员,根据类名也大概能猜到它们的用处,用的最多的是ByteBuffer,在下面的例子中也会主要用到它。
在这里就不仔细讲Buffer类的API了,因为需要用的时候可以去查Java Doc,而以几个常用的操作来讲述一下怎么使用Buffer。
容量(capacity):缓冲区的最大大小
上界(limit):缓冲区当前的大小
位置(position):下一个要读写的位置,由get()和put()更新
标记(mark):备忘位置,由mark()来指定mark = position,由reset()来指定position=mark
它们之间的大小关系:
0 <= mark <= position <= limit <= capacity
一种最常用的方式是:
ByteBuffer buffer = ByteBuffer.allocate(1024);这种方法是创建一个1024字节大小的缓冲区。也可以用下面这种方式来包装自己创建的字节数组。
byte[] bytes = new byte[1024];
ByteBuffer buffer = ByteBuffer.wrap(bytes);
Buffer在填充完毕后需要传递到一个通道中,这时如果直接读取Buffer,其实是什么都读不到的。因为Buffer的设计中是有一个指针概念的,指向当前的位置,当一个Buffer填充完毕时指针是指向末尾的,因此在读取时应该将指针指向Buffer的头部,简单的方法就是使用下面这个方法:
Buffer.flip();flip的实现如下:
public final Buffer flip() {
    limit = position;
    position = 0;
    mark = -1;
    return this;
}
可以看出flip其实是把当前的limit从capacity变成了position,又把position放到了缓冲区的起点,并取消了mark。
Buffer.clear();clear的实现如下:
public final Buffer clear() {
    position = 0;
    limit = capacity;
    mark = -1;
    return this;
}
clear函数就是将position放到起点,并重置limiti为capacity,以及取消mark。
Buffer.rewind();rewind的实现如下:
public final Buffer rewind() {
    position = 0;
    mark = -1;
    return this;
}
rewind和flip的区别在于没有改变limit的值。
Buffer.compact()开始我不是很理解Channel这个东西为什么要存在,看了书才慢慢明白,缓冲区为我们装载了数据,但是数据的写入和读取并不能直接进行read()和write()这样的系统调用,而是JVM为我们提供了一层对系统调用的封装。而Channel可以用最小的开销来访问操作系统本身的IO服务,这就是为什么要有Channel的原因。
下面来讲讲常用的几个Channel类及其常用的方法。
I/O从广义上可以分为File I/O和Stream I/O,对应到通道来说就有文件通道和socket通道,具体的说是FileChannle类和SocketChannel、ServerSocketChannel和DatagramChannel类。
它们之间的区别还是很大的,从继承关系上来看:
public abstract class FileChannel
    extends AbstractInterruptibleChannel
    implements SeekableByteChannel, GatheringByteChannel, ScatteringByteChannel
FileChannel主要是继承了可中断接口,而对于socket相关的Channel类都继承AbstractSelectableChannel,这是选择器(Selector)相关的通道,在下一节中具体讲解。
public abstract class SocketChannel
    extends AbstractSelectableChannel
implements ByteChannel, ScatteringByteChannel, GatheringByteChannel, NetworkChannelFileChannel只能通过工厂方法来实例化,那就是调用RandomAccessFile、FileInputStream和FileOutputStream的getChannel()方法。如:
RandomAccessFile file = new RandomAccessFile("a.txt", "r");
FileChannel fc = file.getChannel();先看看FileChannel提供的方法句柄:
public abstract int read(ByteBuffer dst) throws IOException;//把通道中数据传到目的缓冲区中,dst是destination的缩写
public abstract int write(ByteBuffer src) throws IOException;//把源缓冲区中的内容写到指定的通道中去
从句柄可以看出FileChannel是既可以读又可以写的,是全双工的。下面这个例子用来展示FileChannel是如何进行读和写的。
public class FileChannelTest {

    public static void readFile(String path) throws IOException {
        FileChannel fc = new FileInputStream(path).getChannel();
        ByteBuffer buffer = ByteBuffer.allocate(128);
        StringBuilder sb = new StringBuilder();
        while ((fc.read(buffer)) >= 0) {
            //翻转指针
            buffer.flip();
            //remaining = limit - position
            byte[] bytes = new byte[buffer.remaining()];
            buffer.get(bytes);
            String string = new String(bytes, "UTF-8");
            sb.append(string);

            //清空buffer
            buffer.clear();
        }
        System.out.println(sb.toString());
    }

    public static void writeFile(String path, String string) throws IOException {
        FileChannel fc = new FileOutputStream(path).getChannel();
        ByteBuffer buffer = ByteBuffer.allocate(10);
        int current = 0;
        int len = string.getBytes().length;
        while (current < len) {
            for (int i=0;i<10;i++) {
                if (current+i>=len) break;
                buffer.put(string.getBytes()[current+i]);
            }
            current += buffer.position();

            buffer.flip();
            fc.write(buffer);
            buffer.clear();
        }
    }


    public static void main(String[] args) throws IOException {
        String in = "D:/in.txt";
        String out = "D:/out.txt";
        readFile(in);
        writeFile(out, "hello world");
        readFile(out);
    }
}
分析一下上面这段代码,在readFile()函数中,通过FileInputStream.getChannel()得到FileChannel对象,并创建ByteBuffer对象,接着利用FileChannel的read方法填充buffer,得到填充完的buffer之后我们将buffer的当前指针翻转一下接着利用buffer的get方法把数据放到byte数组中,接着就可以读取数据了。
读取文件的整个过程相比原生的I/O方法还是略显麻烦,但是我们如果把数据看成一堆煤矿,把ByteBuffer看成装煤的矿车,而FileChannel看成是运煤的矿道,那么上面的过程就演变成了:先打通一条矿道,然后把煤矿装在小车里运出来。形象的记忆更利于理解这个过程。
而writeFile()函数也是类似,为了更好的理解Buffer的属性,我特意将buffer的大小设置为10,为要写入的字符串长度为11个字节。首先还是通过FileOutputStream.getChannel()方法得到FileChannel对象,并创建一个10字节大小的缓冲区,接着定义一个整型变量current指向要写入的字符串的当前下标,每次向buffer中put10个字节,并更新current,通过buffer.position()方法可以得到buffer被填充之后指针的位置,也就是缓冲区里的字节个数,然后翻转指针,最后通过FileChannel.write(buffer)方法将buffer写入到文件中。
同样考虑一下形象化的过程:我们首先把煤矿装入小车(buffer.put()),并打开一条通往矿山的矿道(FileOutputStream.getChannel()),接着把煤矿运输进去(FileChannel.write(buffer))。还是很容易理解的吧!
在另一篇博客中介绍了阻塞式TCP的使用,接下来会介绍一下非阻塞式的TCP使用。
Socket通道与文件通道有着不同的特征,最显著的就是可以运行非阻塞模式并且是可以选择的。在2.2.1节中我们讲到Socket通道都继承自AbstractSelectableChannel类,而文件通道没有,而这个类就是Socket通道拥有非阻塞和可选择特点的关键。下面是SelectableChannel的几个方法句柄:
public abstract boolean isBlocking();
public abstract SelectableChannel configureBlocking(boolean block)
    throws IOException;
从这两个方法句柄可以看到,设置一个socket通道的非阻塞模式只需要:
socketChannel.configureBlocking(false)即可。而有条件的选择(readiness selection)是一种可以用来查询通道的机制,该查询可以判断通道是否准备好执行一个目标操作,比如read、write或accept。这个特性是在SelectableChannel类和SelectionKey类中进行了定义。
public static final int OP_READ = 1 << 0;
public static final int OP_WRITE = 1 << 2;
public static final int OP_CONNECT = 1 << 3;
public static final int OP_ACCEPT = 1 << 4;
SelectionKey中的四个常量定义了socket通道的四种状态,而SelectableChannel的register方法正好返回了SelectionKey对象。
public abstract SelectionKey register(Selector sel, int ops, Object att)
throws ClosedChannelException;socket通道与文件通道不同,并不是通过socket.getChannel()来创建对象(尽管socket对象有这个方法),而是通过SocketChannel.open()这样的静态工厂方法去创建对象。每一个socket通道有与之关联的一个socket对象,却并不是所有的socket对象都有一个关联的通道,如果用传统的方法创建了一个socket对象,则它不会有一个关联的通道并且getChannel()方法总是返回null。
SocketChannel sc = SocketChannel.open();
sc.configureBlocking(false);
这样就创建了一个非阻塞的socket通道。
public abstract class ServerSocketChannel
    extends AbstractSelectableChannel
{
    public static ServerSocketChannel open( ) throws IOException;
    public abstract ServerSocket socket( );
    public abstract ServerSocket accept( ) throws IOException;
    public final int validOps( );
}
ServerSocketChannel与SocketChannel和DatagramChannel不同,它本身是不传输数据的,提供的接口非常简单,如果要进行数据读写,需要通过ServerSocketChannel.socket()方法返回一个与之关联的ServerSocket对象来进行。
ServerSocketChannel ssc = ServerSocketChannel.open();
ServerSocket ss = ssc.socket();
ss.bind(new InetSocketAddress(port));
ServerSocketChannel同ServerSocket一样也有accept()方法,当调用ServerSocket的accept()函数时只能是阻塞式的,而调用ServerSocketChannel的accept()函数却可以是非阻塞式。
下面这个例子展示了ServerSocketChannel的用法:
public class Server {
    static int port = 20001;

    public static void main(String[] args) throws IOException, InterruptedException {
        ServerSocketChannel ssc = ServerSocketChannel.open();
        ssc.socket().bind(new InetSocketAddress(port));
        ssc.configureBlocking(false);
        String string = "hello client";
        ByteBuffer buffer = ByteBuffer.wrap(string.getBytes());
        ByteBuffer in = ByteBuffer.allocate(1024);
        System.out.println("Server wait for connection...");
        while (true) {
            SocketChannel sc = ssc.accept();
            if (sc == null) {
                TimeUnit.SECONDS.sleep(1);
            }else {
                //rewind只是将position调到0,不会改变Limit的值,而flip是将limit调整成position,再把position改成0
                System.out.println("Server get a connection...");

                sc.read(in);
                in.flip();

                buffer.rewind();
                sc.write(buffer);
                System.out.println("From client:" + new String(in.array(), "UTF-8"));
            }
        }
    }
}选择器其实是一种多路复用机制在Java语言中的应用,在学习Selector之前有必要学习一下I/O多路复用的概念。
在之前的文章中我们已经看到对于每个客户端请求都分配一个线程的设计,或者是利用线程池来处理客户端请求,但是这样的设计对于处理客户端有大量请求的情况都束手无策。原因在于首先线程非常消耗系统资源,其次阻塞式的设计在某一个请求发送的数据很大时会使其他请求等待很久。那么究竟有没有其他方法来解决这个问题呢?早在上世纪80年代在Unix系统中就已经提出select模型来解决这个问题,在之后对select进行优化又提出了poll模型和epoll模型(Linux专有)。
select/poll/epoll其实都是一种多路复用模型,什么是多路复用,开始听见这个名词我也是一脸懵逼,觉得好像很高大上很难理解的样子。后面通过看书和看知乎上的形象化描述,慢慢理解了其实多路复用也没有想象着那么难。我们如果把每个客户端请求看成一个电路,如下图,那么是否有必要为每条电路都分配一条专有的线路呢?还是当电流来了进行开关切换?很明显,后者只需要一个开关就可以节省大量的不必要开销。select模型其实就是这样做的,监控所有的socket请求,当某个socket准备好(read/write/accept)时就进行处。但是如何做到监控所有socket的状态呢,select做的很简单,也许你也想到了,就是去轮询所有socket的状态,这样很明显当socket数量比较大时效率非常低。并且select对于监控的socket数量有限制,默认是1024个。poll模型进行了一些改进,但是并没有本质的改变。到了epoll模型,就有了非常大的改观。假象另一个场景,如果你是一个监考老师,考试结束时要去收卷子,你按照常理一个一个的收着,一旦有一个学生还没写完,于是你就会卡(阻塞)在那,并且整个轮询一遍下来非常慢。所以你想到了吗?让那些已经做完的学生举手告知你他已经做完了,你再过去收一下卷子即可。这样很明显阻塞会大幅度减少。这就是epoll,让那些已经准备好的socket发出通知,然后来处理它。

如果还是不理解,可以看看知乎上的一些回答。
好了,废话这么多,已经是可以理解多路复用是什么了。Java语言直到JDK1.4版本才有多路复用这个概念,很大原因也是因为没人用Java去写服务器,例如著名的Apache和Nginx都是用C/C++写的。接下来对NIO中多路复用的实现进行介绍。
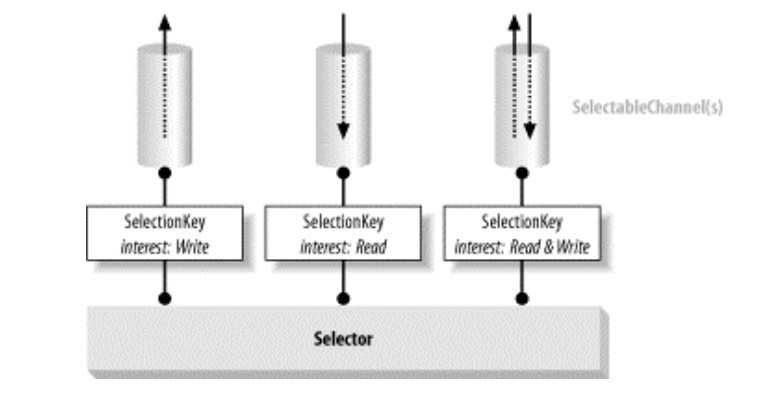
NIO处理多路复用请求只需要三个组件:可选择的通道(SelectableChannels)、选择器(Selector)和选择键(SelectionKey),他们之间的关系如下图所示:

可选择的通道可以主动注册到一个选择器上,并指定对哪些动作是感兴趣的。这个注册行为会返回一个选择键,选择键封装了该通道和选择器之间的注册关系,包含两个比特集:指示该注册关系所关心的通道操作;通道已经准备好的操作。选择器是核心组件,它管理着注册在其上的通道集合的信息和它们的就绪状态。值得注意的是,通道在注册到一个选择器之前,必须设置为非阻塞模式。原因在这里。
通过静态工厂方法创建一个选择器。
Selector selector = Selector.open();这是通道拥有的方法,先看看方法句柄:
public abstract SelectionKey register(Selector sel, int ops, Object att)
    throws ClosedChannelException;

public final SelectionKey register(Selector sel, int ops)
    throws ClosedChannelException
{
    return register(sel, ops, null);
}值得注意的是第二个参数ops,这个参数表示了该通道感兴趣的操作,所有的操作包括读(read)、写(write)、连接(connect)和接受(accept)。并不是所有通道都支持这些操作,比如SocketChannel就没有accept这个操作,因为这是专属于ServerSocketChannel的操作。可以通过调用Channel.validOps()来查询支持的操作。
第三个参数是用来传递一个对象的引用,在调用新生成的选择键的attach()方法时会返回该对象的引用。
选择器的核心功能是选择过程,选择器实际上是对select()、poll()等本地系统调用的一个封装。每一个选择器会维护三个键集合:已注册的键集合、已选择的键集合和已取消的键集合。通过执行Selector.select()、Selector.select(int timeout)或Selector.selectNow(),选择过程被调用,这时会执行以下步骤:
好不容易才写完上面这段,因为我在看原书的时候看了2-3遍才看懂,过程还是比较复杂的,我觉得是时候去看看Unix中的select()是怎么做的,也许这样更利于理解这个选择过程。
说了这么多原理,不知道你晕没晕,反正我是快晕了。这时候来一段实战代码,告诉你了解了这么多,到底该怎么用!
通常的做法如下:在选择器上调用一次select操作(这会更新已选择键的集合),然后遍历selectedKeys返回的键的集合。接着键将从已选择的键的集合中被移除(通过Iterator.remove()方法),然后检测下一个键。完成后,继续下一次select操作。
服务端程序演示:
public class SelectorTest {
    public static void main(String[] args) throws IOException {
        new SelectorTest().select();
    }

    public void select() throws IOException {
        //创建选择器
        Selector selector = Selector.open();
        //创建serverChannel
        ServerSocketChannel ssc = ServerSocketChannel.open();
        //设置为非阻塞模式
        ssc.configureBlocking(false);
        //绑定监听的地址
        ssc.socket().bind(new InetSocketAddress(20000), 1024);
        //将serverChannel注册到选择器上,监听accept事件,返回选择键
        ssc.register(selector, SelectionKey.OP_ACCEPT);

        while (true) {
            //此次选择过程准备就绪的通道数量
            int num = selector.select();
            if (num == 0) {
                //若没有准备好的就继续循环
                continue;
            }
            //返回已就绪的键集合
            Iterator<SelectionKey> it = selector.selectedKeys().iterator();
            while (it.hasNext()) {
                SelectionKey key = it.next();
                handle(selector, key);
                //因为已经处理了该键,所以把当前的key从已选择的集合中去除
                it.remove();
            }
        }
    }

    public void handle(Selector selector, SelectionKey key) throws IOException {
        if (key.isValid()) {
            //当一个ServerChannel为accept状态时,注册这个ServerChannel的SocketChannel为可读取状态
            if (key.isAcceptable()) {
                ServerSocketChannel serverChannel = (ServerSocketChannel) key.channel();
                SocketChannel channel = serverChannel.accept();
                //把通道注册到选择器之前要设置为非阻塞,否则会报异常
                channel.configureBlocking(false);
                channel.register(selector, SelectionKey.OP_READ);
            }
            //如果channel是可读取状态,则读取其中的数据
            if (key.isReadable()) {
                //只有SocketChannel才能读写数据,所以如果是可读取状态,只能是SocketChannel
                SocketChannel sc = (SocketChannel) key.channel();
                ByteBuffer in = ByteBuffer.allocate(1024);
                //将socketChannel中的数据读入到buffer中,返回当前字节的位置
                int readBytes = sc.read(in);
                if (readBytes > 0) {
                    //把buffer的position指针指向buffer的开头
                    in.flip();
                    byte[] bytes = new byte[in.remaining()];
                    in.get(bytes);
                    String body = new String(bytes, "UTF-8");
                    System.out.println("The server receive : " + body);
                    //把response输出到socket中
                    doWrite(sc, "Hello client");
                } else if (readBytes < 0) {
                    key.cancel();
                    sc.close();
                }
            }
        }
    }

    private void doWrite(SocketChannel sc, String response) throws IOException {
        //把服务器端返回的数据写到socketChannel中
        if (response == null && response.trim().length() > 0) {
            byte[] bytes = response.getBytes();
            ByteBuffer writeBuffer = ByteBuffer.allocate(bytes.length);
            writeBuffer.put(bytes);
            writeBuffer.flip();
            sc.write(writeBuffer);
        }
    }
}代码相较于阻塞式TCP服务端程序复杂了太多倍,但是基本思路跟我上面那段话写的是一样的,而且基本每一段代码都写了注释,耐心看下去肯定看的懂。我就不再解释这段代码啦。
客户端演示:
public class Client {
    public static final int PORT = 20000;
    public static final String HOST = "127.0.0.1";
    private volatile boolean stop = false;

    public static void main(String[] args) throws IOException {
        new Client().select();
    }

    public void select() throws IOException {
        // 创建选择器
        Selector selector = Selector.open();
        // 创建SocketChannel
        SocketChannel sc = SocketChannel.open();
        // 设置为非阻塞模式
        sc.configureBlocking(false);
        try {
            doConnect(selector, sc);
        } catch (Exception e) {
            e.printStackTrace();
            System.exit(1);
        }

        while (!stop) {
            int num = selector.select();
            if (num == 0) {
                continue;
            }
            Iterator<SelectionKey> it = selector.selectedKeys().iterator();
            while (it.hasNext()) {
                SelectionKey key = it.next();
                try {
                    handleKeys(selector, key);
                } catch (Exception e) {
                    e.printStackTrace();
                    if (key != null) {
                        key.cancel();
                        if (key.channel() != null) {
                            key.channel().close();
                        }
                    }
                }
                // 因为已经处理了该键,所以把当前的key从已选择的集合中去除
                it.remove();
            }
        }

        if (selector != null) {
            selector.close();
        }
    }

    private void doWrite(SocketChannel sc, String response) throws IOException {
        if (response != null && response.trim().length() > 0) {
            byte[] bytes = response.getBytes();
            ByteBuffer writeBuffer = ByteBuffer.allocate(bytes.length);
            writeBuffer.put(bytes);
            writeBuffer.flip();
            sc.write(writeBuffer);
            if (!writeBuffer.hasRemaining()) {
                System.out.println("Send msg successfully");
            }
        }
    }

    private void handleKeys(Selector selector, SelectionKey key) throws IOException {
        if (key.isValid()) {
            SocketChannel sc = (SocketChannel) key.channel();
            // 判断是否连接成功
            if (key.isConnectable()) {
                if (sc.finishConnect()) {
                    sc.register(selector, SelectionKey.OP_READ);
                    doWrite(sc, "Hello Server");
                } else {
                    System.exit(1);
                }
            }
            if (key.isReadable()) {
                ByteBuffer in = ByteBuffer.allocate(1024);
                // 将socketChannel中的数据读入到buffer中,返回当前字节的位置
                int readBytes = sc.read(in);
                if (readBytes > 0) {
                    // 把buffer的position指针指向buffer的开头
                    in.flip();
                    byte[] bytes = new byte[in.remaining()];
                    in.get(bytes);
                    String body = new String(bytes, "UTF-8");
                    System.out.println("The Client receive : " + body);
                    this.stop = true;
                } else if (readBytes < 0) {
                    // 对端链路关闭
                    key.cancel();
                    sc.close();
                } else {
                    // 读到0字节,忽略
                }
            }
        }
    }

    private void doConnect(Selector selector, SocketChannel sc) throws IOException {
        if (sc.connect(new InetSocketAddress(HOST, PORT))) {
            System.out.println("Client connect successfully...");
            // 如果直接连接成功,则注册读操作
            sc.register(selector, SelectionKey.OP_READ);
            doWrite(sc, "Hello server!");
        } else {
            // 如果没有连接成功,则注册连接操作
            sc.register(selector, SelectionKey.OP_CONNECT);
        }
    }
}
客户端跟服务端很相似,唯一不同的是服务端需要监测的socket行为是OP_ACCEPT和OP_READ,而客户端需要监控的是OP_CONNECT和OP_READ,其他的区别不是很大。
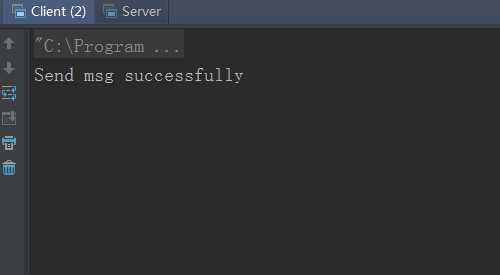
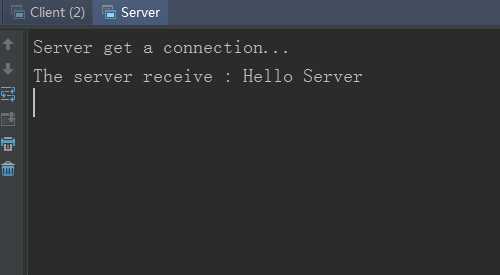
依次运行服务器端和客户端,结果如下:


代码在我的github repo上也可以找到。
标签:lock unit 运行 存在 nginx doc 2.2.3 步骤 info
原文地址:https://www.cnblogs.com/kakaisgood/p/10383641.html