标签:resource c3p0 简单 closed let 调用 管理 web efault
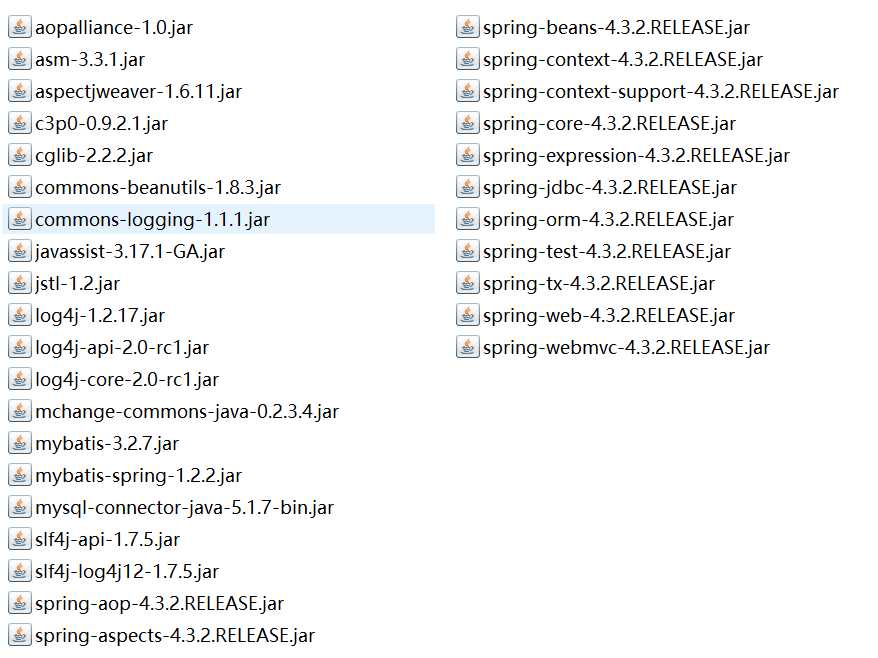
1、Mybatis所需要的的jar包(包含数据库驱动包和相关的日志包)、SpringMVC和Spring的jar包

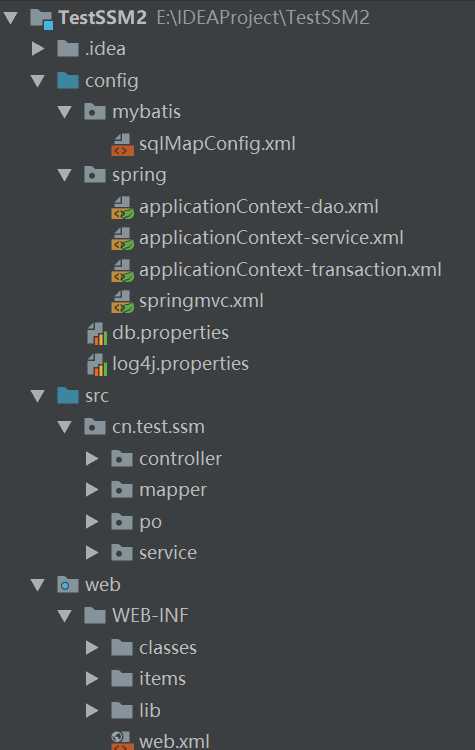
2、然后构建一个基本的工程,这里我们使用mapper代理的方式进行Mybatis的编写,关于mapper代理请参考Mybatis简单入门中的Mybatis开发dao方法简介中讲到的mapper代理方式,所以在项目中我们不建立dao包,需要建立mapper包用来存放mapper接口和相应的mapper配置文件。

1、配置Mybatis的核心配置文件,因为是和Spring整合,所以数据库的配置交给Spring管理由Spring进行数据源的配置。
 1 <?xml version="1.0" encoding="UTF-8" ?>
 2 <!DOCTYPE configuration
 3         PUBLIC "-//mybatis.org//DTD Config 3.0//EN"
 4         "http://mybatis.org/dtd/mybatis-3-config.dtd">
 5 <configuration>
 6
 7     <typeAliases>
 8         <!--批量别名定义:Mybatis在定义别名的时候会自动扫描包中的po类,自动的将别名定义为类名(首字母大写或者小写都可以)-->
 9         <package name="cn.test.ssm.mapper"></package>
10     </typeAliases>
11
12 </configuration>
2、下来是Spring和Mybatis的整合,可以参考前面的Mybatis和Spring整合篇中的mapper代理方式。到这里我们就需要配置Spring整合Mybatis的配置文件了,在Spring和Mybatis的整合文件applicationContext-dao.xml配置文件中我们需要配置数据源(dataSource)、会话工厂(sqlSessionFactory)和Mapper扫描器
 1 <?xml version="1.0" encoding="UTF-8"?>
 2 <beans xmlns="http://www.springframework.org/schema/beans"
 3        xmlns:xsi="http://www.w3.org/2001/XMLSchema-instance"
 4        xmlns:context="http://www.springframework.org/schema/context"
 5        xmlns:aop="http://www.springframework.org/schema/aop"
 6        xmlns:tx="http://www.springframework.org/schema/tx"
 7        xsi:schemaLocation="
 8         http://www.springframework.org/schema/beans
 9         http://www.springframework.org/schema/beans/spring-beans.xsd
10         http://www.springframework.org/schema/aop
11         http://www.springframework.org/schema/aop/spring-aop.xsd
12         http://www.springframework.org/schema/context
13         http://www.springframework.org/schema/context/spring-context.xsd
14         http://www.springframework.org/schema/tx
15         http://www.springframework.org/schema/tx/spring-tx.xsd">
16
17
18     <!--加载数据库信息的配置文件-->
19     <context:property-placeholder location="classpath:db.properties"></context:property-placeholder>
20
21     <!--配置数据源-->
22     <bean id="dataSource" class="com.mchange.v2.c3p0.ComboPooledDataSource">
23         <property name="driverClass" value="${jdbc.driver}" />
24         <property name="jdbcUrl" value="${jdbc.url}" />
25         <property name="user" value="${jdbc.username}" />
26         <property name="password" value="${jdbc.password}" />
27     </bean>
28
29     <!--配置SqlSessionFactory-->
30     <bean id="sqlSessionFactory" class="org.mybatis.spring.SqlSessionFactoryBean">
31         <!--加载Mybatis的配置文件-->
32         <property name="configLocation" value="classpath:mybatis/sqlMapConfig.xml"></property>
33         <!--配置数据源-->
34         <property name="dataSource" ref="dataSource"></property>
35     </bean>
36
37     <!--配置mapper扫描器-->
38     <bean class="org.mybatis.spring.mapper.MapperScannerConfigurer">
39         <property name="basePackage" value="cn.test.ssm.mapper"></property>
40         <property name="sqlSessionTemplateBeanName" value="sqlSessionFactory"></property>
41     </bean>
42 </beans>
3、接下来我们就开始编写一个简单测mapper测试配置文件,只完成一个小功能(查询一个列表集合) ,在里面使用一些简单的动态sql进行判断避免异常
 1 <?xml version="1.0" encoding="UTF-8" ?>
 2 <!DOCTYPE mapper
 3         PUBLIC "-//mybatis.org//DTD Mapper 3.0//EN"
 4         "http://mybatis.org/dtd/mybatis-3-mapper.dtd">
 5 <!--mapper为根元素,namespace指定了命名空间-->
 6 <mapper namespace="cn.test.ssm.mapper.ProductDemo">
 7
 8     <!--实现一个简单的列表查询的功能(使用动态sql和sql片段便于扩展,虽然这只是个小的demo并没有做其他的扩展,但是可以养成一种习惯)-->
 9
10     <!--sql片段+动态sql-->
11     <sql id="queryListCondition">
12         <where>
13             <if test="productExtend != null">
14                 <if test="productExtend.name != null and productExtend.name != ‘‘">
15                     product.pname LIKE ‘%${productExtend.name}%‘
16                 </if>
17             </if>
18         </where>
19     </sql>
20
21     <!--为了便于扩展,使用ProductExtent类作为输出映射,这样除了可以查询Product之外还可以扩展其他的字段-->
22     <select id="findProductListByName" parameterType="cn.test.ssm.po.ProductQueryVo" resultType="cn.test.ssm.po.ProductExtend">
23         SELECT product.* FROM product
24         <where>
25             <include refid="queryListCondition"></include>
26         </where>
27     </select>
28 </mapper>
4、写完mapper配置文件之后就写一个接单的接口程序,其中只包含一个方法就是查询列表信息。
 1 package cn.test.ssm.mapper;
 2
 3 import cn.test.ssm.po.ProductExtend;
 4 import cn.test.ssm.po.ProductQueryVo;
 5
 6 import java.util.List;
 7
 8 public interface ProductDemo {
 9
10     public List<ProductExtend> findProductListByName(ProductQueryVo productQueryVo) throws Exception;
11 }
1、一般情况下都是定义service接口和对应的实现类,这里我们也定义一个简单的ProductService接口和其实现类作为service层的主要类
①Product Service接口:主要就是要调用mapper接口中定义的那一个查询列表的方法
 1 package cn.test.ssm.service;
 2
 3 import cn.test.ssm.po.ProductExtend;
 4 import cn.test.ssm.po.ProductQueryVo;
 5
 6 import java.util.List;
 7
 8 public interface ProductService {
 9     public List<ProductExtend> findProductListByName(ProductQueryVo productQueryVo) throws Exception;
10 }
②ProductServiceImpl实现类,实现上面接口中的方法,由于要和Mybatis和Spring已经整合(采用mapper代理的方式),并且在applicationContext-dao配置文件中配置了mapper扫描器,所以我们可以使用注解的方式注入Mapper接口然后在service中调用接口中的方法
 1 package cn.test.ssm.service.impl;
 2
 3 import cn.test.ssm.mapper.ProductDemo;
 4 import cn.test.ssm.po.ProductExtend;
 5 import cn.test.ssm.po.ProductQueryVo;
 6 import cn.test.ssm.service.ProductService;
 7 import org.springframework.beans.factory.annotation.Autowired;
 8
 9 import java.util.List;
10
11 public class ProductServiceImpl implements ProductService {
12
13     @Autowired
14     private ProductDemo productDemo;  //自动注入mapper接口,然后在实现service的方法中调用mapper接口中的方法
15
16     @Override
17     public List<ProductExtend> findProductListByName(ProductQueryVo productQueryVo) throws Exception {
18         return productDemo.findProductListByName(productQueryVo);
19     }
20 }
2、上面写好了接口和实现类,然后就是将service交给Spring进行管理,配置applicationContext-service.xml对service进行整合。对service整合主要包括:service本身接口实现类的bean配置、事务控制等
①管理service本身的接口实现类的bean
 1 <?xml version="1.0" encoding="UTF-8"?>
 2 <beans xmlns="http://www.springframework.org/schema/beans"
 3        xmlns:xsi="http://www.w3.org/2001/XMLSchema-instance"
 4        xmlns:context="http://www.springframework.org/schema/context"
 5        xmlns:aop="http://www.springframework.org/schema/aop"
 6        xmlns:tx="http://www.springframework.org/schema/tx"
 7        xsi:schemaLocation="
 8         http://www.springframework.org/schema/beans
 9         http://www.springframework.org/schema/beans/spring-beans.xsd
10         http://www.springframework.org/schema/aop
11         http://www.springframework.org/schema/aop/spring-aop.xsd
12         http://www.springframework.org/schema/context
13         http://www.springframework.org/schema/context/spring-context.xsd
14         http://www.springframework.org/schema/tx
15         http://www.springframework.org/schema/tx/spring-tx.xsd">
16
17     <!--对service本身的接口实现类的bean配置-->
18     <bean id="productService" class="cn.test.ssm.service.impl.ProductServiceImpl">
19
20     </bean>
21
22 </beans>
②进行事务控制的配置
 1 <?xml version="1.0" encoding="UTF-8"?>
 2 <beans xmlns="http://www.springframework.org/schema/beans"
 3        xmlns:xsi="http://www.w3.org/2001/XMLSchema-instance"
 4        xmlns:context="http://www.springframework.org/schema/context"
 5        xmlns:aop="http://www.springframework.org/schema/aop"
 6        xmlns:tx="http://www.springframework.org/schema/tx"
 7        xsi:schemaLocation="
 8         http://www.springframework.org/schema/beans
 9         http://www.springframework.org/schema/beans/spring-beans.xsd
10         http://www.springframework.org/schema/aop
11         http://www.springframework.org/schema/aop/spring-aop.xsd
12         http://www.springframework.org/schema/context
13         http://www.springframework.org/schema/context/spring-context.xsd
14         http://www.springframework.org/schema/tx
15         http://www.springframework.org/schema/tx/spring-tx.xsd">
16
17     <!--
18         事务控制的配置
19         对数据库操作Mybatis的事务控制使用spring的jdbc事务管理控制类
20     -->
21
22     <!--事务管理器-->
23     <bean id="transactionManager" class="org.springframework.jdbc.datasource.DataSourceTransactionManager">
24         <!--添加对数据源的控制-->
25         <property name="dataSource" ref="dataSource"></property>
26     </bean>
27
28     <!--通知-->
29     <tx:advice id="txAdvice">
30         <tx:attributes>
31             <!--配置传播行为-->
32             <!--配置必须进行事务控制的方法-->
33             <tx:method name="save*" propagation="REQUIRED"/>
34             <tx:method name="delete*" propagation="REQUIRED"></tx:method>
35             <tx:method name="insert*" propagation="REQUIRED"></tx:method>
36             <tx:method name="update*" propagation="REQUIRED"></tx:method>
37             <!--配置支持事务的方法-->
38             <tx:method name="find*" propagation="SUPPORTS" read-only="true"></tx:method>
39         </tx:attributes>
40     </tx:advice>
41
42     <!--配置aop去调用通知-->
43     <aop:config>
44         <aop:advisor advice-ref="txAdvice" pointcut="execution(* cn.test.ssm.service.impl.*.*(..))"></aop:advisor>
45     </aop:config>
46 </beans>
1、首先配置springmvc的配置文件,其中包括处理器映射器、处理器适配器、视图解析器的配置和对controller层包自动扫描的配置
 1 <?xml version="1.0" encoding="UTF-8"?>
 2 <beans xmlns="http://www.springframework.org/schema/beans"
 3        xmlns:xsi="http://www.w3.org/2001/XMLSchema-instance" xmlns:mvc="http://www.springframework.org/schema/mvc"
 4        xmlns:context="http://www.springframework.org/schema/context"
 5        xmlns:aop="http://www.springframework.org/schema/aop" xmlns:tx="http://www.springframework.org/schema/tx"
 6        xsi:schemaLocation="http://www.springframework.org/schema/beans
 7         http://www.springframework.org/schema/beans/spring-beans-3.2.xsd
 8         http://www.springframework.org/schema/mvc
 9         http://www.springframework.org/schema/mvc/spring-mvc-3.2.xsd
10         http://www.springframework.org/schema/context
11         http://www.springframework.org/schema/context/spring-context-3.2.xsd
12         http://www.springframework.org/schema/aop
13         http://www.springframework.org/schema/aop/spring-aop-3.2.xsd
14         http://www.springframework.org/schema/tx
15         http://www.springframework.org/schema/tx/spring-tx-3.2.xsd ">
16
17
18     <!--配置controller的扫描-->
19     <context:component-scan base-package="cn.test.ssm.controller"></context:component-scan>
20
21     <!--配置mvc:annotation代替基于注解方式的处理器映射器和适配器的配置-->
22     <mvc:annotation-driven></mvc:annotation-driven>
23
24     <bean class="org.springframework.web.servlet.view.InternalResourceViewResolver"></bean>
25 </beans>
2、下来在web.xml中配置springmvc的前端控制器,里面主要包括DispatcherServlet的配置以及springmvc配置文件的路径配置。
 1 <?xml version="1.0" encoding="UTF-8"?>
 2 <web-app xmlns="http://xmlns.jcp.org/xml/ns/javaee"
 3          xmlns:xsi="http://www.w3.org/2001/XMLSchema-instance"
 4          xsi:schemaLocation="http://xmlns.jcp.org/xml/ns/javaee http://xmlns.jcp.org/xml/ns/javaee/web-app_4_0.xsd"
 5          version="4.0">
 6     <!--配置前端控制器-->
 7     <servlet>
 8         <servlet-name>SpringMvc</servlet-name>
 9         <servlet-class>
10             org.springframework.web.servlet.DispatcherServlet
11         </servlet-class>
12         <!--
13             配饰SpringMVC的配置文件(处理器映射器、适配器等)
14             注明需要这样配置的原因:自己配置contextConfigLocation,就不会自己默认加载/WEB-INF/下面的dispatch-servlet.xml
15         -->
16         <init-param>
17             <param-name>contextConfigLocation</param-name>
18             <param-value>classpath:spring/applicationContext-springmvc.xml</param-value>
19         </init-param>
20     </servlet>
21     <servlet-mapping>
22         <servlet-name>SpringMvc</servlet-name>
23         <url-pattern>*.do</url-pattern>
24     </servlet-mapping>
25 </web-app>
这里实现的功能也比较简单,由于只是为了测试整个整合流程的正确,所以依旧是按照查询列表进行编写,然后从service调用方法,返回模型视图、
 1 package cn.test.ssm.controller;
 2
 3 import cn.test.ssm.po.ProductExtend;
 4 import cn.test.ssm.service.ProductService;
 5 import org.springframework.beans.factory.annotation.Autowired;
 6 import org.springframework.stereotype.Controller;
 7 import org.springframework.web.bind.annotation.RequestMapping;
 8 import org.springframework.web.servlet.ModelAndView;
 9
10 import java.util.List;
11
12 @Controller
13 public class ProductController {
14
15     @Autowired
16     private ProductService productService;
17
18     @RequestMapping("/queryList.do")
19     public ModelAndView queryList() throws Exception{
20
21         //从service层调用方法
22         List<ProductExtend> productExtendList = productService.findProductListByName(null);
23
24         //返回ModelandView
25         ModelAndView modelAndView = new ModelAndView();
26         modelAndView.addObject(productExtendList);
27         modelAndView.setViewName("/WEB-INF/items/itemsList.jsp");
28
29         return modelAndView;
30     }
31 }
到这里,我们还需要配置spring容器的监听和相应配置文件(applicationContext-dao.xml......)的加载。在配置文件中我们需要在IDEA中修改class文件的输出路径(本来默认是自动建立out文件,然后将class文件输出进去),参考这篇博客。至此,所有的配置都已经完成,下面就开始测试
1     <!--配置spring容器的监听器-->
2     <context-param>
3         <param-name>contextConfigLocation</param-name>
4         <param-value>/WEB-INF/classes/spring/applicationContext-*.xml</param-value>
5     </context-param>
6     <listener>
7         <listener-class>org.springframework.web.context.ContextLoaderListener</listener-class>
8     </listener>
1、数据库中的Product表信息:

1 CREATE TABLE `product` (
2   `pid` INT(11) NOT NULL AUTO_INCREMENT,
3   `pname` VARCHAR(255) DEFAULT NULL,
4   `shop_price` DOUBLE DEFAULT NULL,
5   PRIMARY KEY (`pid`)
6 ) ENGINE=INNODB AUTO_INCREMENT=5 DEFAULT CHARSET=utf8

2、然后在浏览器中输入http://localhost:8080/TestSSM2/queryList.do测试得到下面的结果信息

标签:resource c3p0 简单 closed let 调用 管理 web efault
原文地址:https://www.cnblogs.com/fsmly/p/10393507.html