标签:share long cti sof isp files 批量写入 timestamp hive
Flume是Cloudera提供的一个高可用的,高可靠的,分布式的海量日志采集、聚合和传输的系统。Flume基于流式架构,灵活简单。
主要作用:实时读取服务器本地磁盘数据,将数据写入HDFS;
优点:
Flume使用两个独立的事务分别负责从soucrce到channel,以及从channel到sink的事件传递。一旦事务中所有的数据全部成功提交到channel,那么source才认为该数据读取完成。同理,只有成功被sink写出去的数据,才会从channel中移除;失败后就重新提交;
组成:Agent 由 source+channel+sink构成;
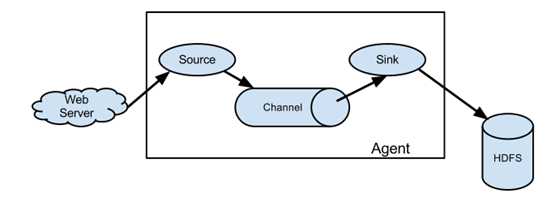
source是数据来源的抽象,sink是数据去向的抽象;
Source
Source是负责接收数据到Flume Agent的组件。Source组件可以处理各种类型、各种格式的日志数据
数据输入端输入类型:spooling directory文件夹里边的数据不停的滚动、exec 命令的执行结果被采集
syslog系统日志、avro上一层的flume、netcat网络端传输的数据
Channel
Channel是位于Source和Sink之间的缓冲区。因此,Channel允许Source和Sink运作在不同的速率上。Channel是线程安全的,可以同时处理几个Source的写入操作和几个Sink的读取操作。
Flume自带两种Channel:Memory Channel和File Channel。
Memory Channel是内存中的队列。Memory Channel在不需要关心数据丢失的情景下适用。如果需要关心数据丢失,那么Memory Channel就不应该使用,因为程序死亡、机器宕机或者重启都会导致数据丢失。
File Channel将所有事件写到磁盘。因此在程序关闭或机器宕机的情况下不会丢失数据。
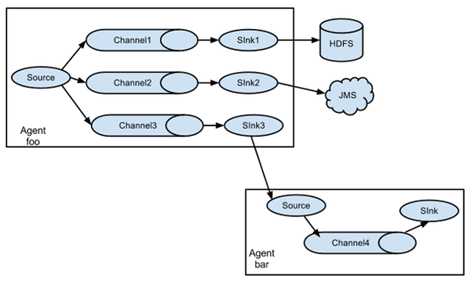
Channel Selector有两种类型:Replicating Channel Selector(default,会把所有的数据发给所有的Channel)和Multiplexing Chanell Selector(选择把哪个数据发到哪个channel)
Sink
数据去向常见的目的地有:HDFS、Kafka、logger、avro(下一层的Flume)、File、Hbase、solr、ipc、thrift自定义等
Sink不断地轮询Channel中的事件且批量地移除它们,并将这些事件批量写入到存储或索引系统、或者被发送到另一个Flume Agent。
Sink是完全事务性的。在从Channel批量删除数据之前,每个Sink用Channel启动一个事务。批量事件一旦成功写出到存储系统或下一个Flume Agent,Sink就利用Channel提交事务。事务一旦被提交,该Channel从自己的内部缓冲区删除事件。
事务
Put事务流程:
doPut将批数据先写入临时缓冲区putList; doCommit:检查channel内存队列是否足够合并; doRollback:channel内存队列空间不足,回滚数据;
尝试put先把数据put到putList里边,然后commit提交,查看channel中事务是否提交成功,如果都提交成功了就把这个事件从putList中拿出来;如果失败就重写提交,rollTback到putList;
Take事务:
doTake先将数据取到临时缓冲区takeList; doCommit如果数据全部发送成功,则清除临时缓冲区takeList; doRollback数据发送过程中如果出现异常,rollback将临时缓存takeList中的数据归还给channel内存队列;
拉取事件到takeList中,尝试提交,如果提交成功就把takeList中数据清除掉;如果提交失败就重写提交,返回到channel后重写提交;
这种事务:flume有可能有重复的数据;
Flume拓扑结构
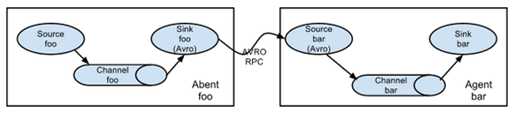
串联:channel多,但flume层数不宜过多,
常见
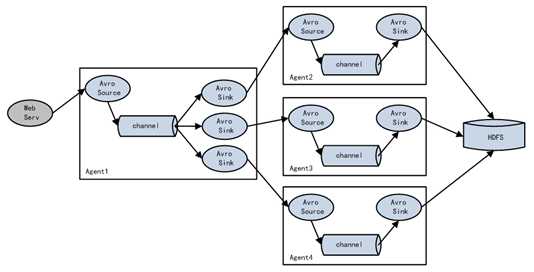
负载均衡 :并排的三个channel都是轮询,好处是增大流量并且保证数据的安全;(一个挂了,三个不会都挂;缓冲区比较长,如果hdfs出现问题,两层的channel,多个flune的并联可以保证数据的安全且增大缓冲区)
将apache-flume-1.7.0-bin.tar.gz上传到linux的/opt/software目录下
解压apache-flume-1.7.0-bin.tar.gz到/opt/module/目录下
[kris@hadoop101 software]$ tar -zxf apache-flume-1.7.0-bin.tar.gz -C /opt/module/
[kris@hadoop101 module]$ mv apache-flume-1.7.0-bin/ flume
[kris@hadoop101 conf]$ mv flume-env.sh.template flume-env.sh
[kris@hadoop101 conf]$ vim flume-env.sh
export JAVA_HOME=/opt/module/jdk1.8.0_144
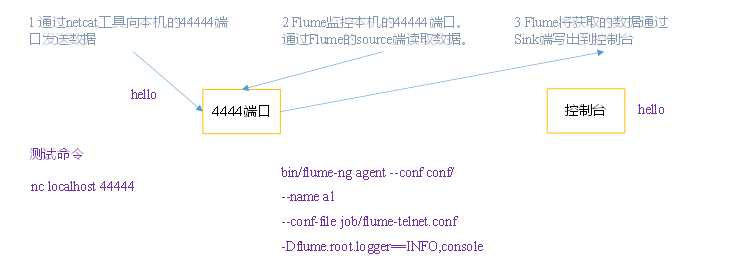
[kris@hadoop101 flume]$ mkdir job
[kris@hadoop101 flume]$ cd job/
[kris@hadoop101 job]$ touch flume-netcat-logger.conf
[kris@hadoop101 job]$ vim flume-netcat-logger.conf

# Name the components on this agent
a1.sources = r1
a1.sinks = k1
a1.channels = c1

# Describe/configure the source
a1.sources.r1.type = netcat
a1.sources.r1.bind = localhost
a1.sources.r1.port = 44444

# Describe the sink
a1.sinks.k1.type = logger

# Use a channel which buffers events in memory
a1.channels.c1.type = memory
a1.channels.c1.capacity = 1000
a1.channels.c1.transactionCapacity = 100

# Bind the source and sink to the channel
a1.sources.r1.channels = c1
a1.sinks.k1.channel = c1
安装nc工具
[kris@hadoop101 software]$ sudo yum install -y nc
判断44444端口是否被占用
[kris@hadoop101 flume]$ sudo netstat -tunlp | grep 44444
先开启flume监听端口
[kris@hadoop101 flume]$ bin/flume-ng agent --conf conf/ --name a1 --conf-file job/flume-netcat-logger.conf -Dflume.root.logger=INFO,console

[kris@hadoop101 ~]$ cd /opt/module/flume/
向本机的44444端口发送内容
[kris@hadoop101 flume]$ nc localhost 44444
hello
OK
kris
OK
在Flume监听页面观察接收数据情况
2019-02-20 10:01:41,151 (SinkRunner-PollingRunner-DefaultSinkProcessor) [INFO - org.apache.flume.sink.LoggerSink.process(LoggerSink.java:95)] Event: { headers:{} body: 68 65 6C 6C 6F                                  hello }
2019-02-20 10:01:45,153 (SinkRunner-PollingRunner-DefaultSinkProcessor) [INFO - org.apache.flume.sink.LoggerSink.process(LoggerSink.java:95)] Event: { headers:{} body: 6B 72 69 73                                     kris }

netstat -nltp
[kris@hadoop101 ~]$ netstat -nltp
tcp        0      0 ::ffff:127.0.0.1:44444      :::*                        LISTEN      4841/java
1.Flume要想将数据输出到HDFS,必须持有Hadoop相关jar包
将commons-configuration-1.6.jar、
hadoop-auth-2.7.2.jar、
hadoop-common-2.7.2.jar、
hadoop-hdfs-2.7.2.jar、
commons-io-2.4.jar、
htrace-core-3.1.0-incubating.jar
拷贝到/opt/module/flume/lib文件夹下
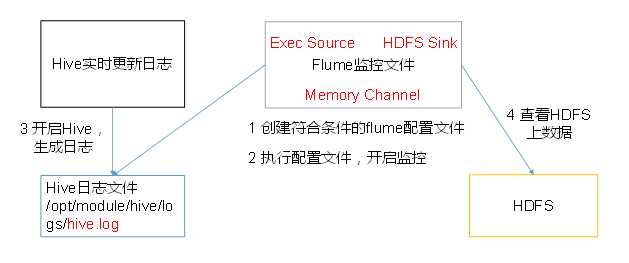
2.创建flume-file-hdfs.conf文件
[kris@hadoop101 job]$ vim flume-file-hdfs.conf
# Name the components on this agent
a2.sources = r2
a2.sinks = k2
a2.channels = c2

# Describe/configure the source
a2.sources.r2.type = exec
a2.sources.r2.command = tail -F /opt/module/hive/logs/hive.log
a2.sources.r2.shell = /bin/bash -c

# Describe the sink
a2.sinks.k2.type = hdfs
a2.sinks.k2.hdfs.path = hdfs://hadoop102:9000/flume/%Y%m%d/%H
#上传文件的前缀
a2.sinks.k2.hdfs.filePrefix = logs-
#是否按照时间滚动文件夹
a2.sinks.k2.hdfs.round = true
#多少时间单位创建一个新的文件夹
a2.sinks.k2.hdfs.roundValue = 1
#重新定义时间单位
# Name the components on this agent
a2.sources = r2
a2.sinks = k2
a2.channels = c2

# Describe/configure the source
a2.sources.r2.type = exec
a2.sources.r2.command = tail -F /opt/module/hive/logs/hive.log
a2.sources.r2.shell = /bin/bash -c

# Describe the sink
a2.sinks.k2.type = hdfs
a2.sinks.k2.hdfs.path = hdfs://hadoop101:9000/flume/%Y%m%d/%H
#上传文件的前缀
a2.sinks.k2.hdfs.filePrefix = logs-
#是否按照时间滚动文件夹
a2.sinks.k2.hdfs.round = true
#多少时间单位创建一个新的文件夹
a2.sinks.k2.hdfs.roundValue = 1
#重新定义时间单位
a2.sinks.k2.hdfs.roundUnit = hour
#是否使用本地时间戳
a2.sinks.k2.hdfs.useLocalTimeStamp = true
#积攒多少个Event才flush到HDFS一次
a2.sinks.k2.hdfs.batchSize = 1000
#设置文件类型,可支持压缩
a2.sinks.k2.hdfs.fileType = DataStream
#多久生成一个新的文件
a2.sinks.k2.hdfs.rollInterval = 60
#设置每个文件的滚动大小
a2.sinks.k2.hdfs.rollSize = 134217700
#文件的滚动与Event数量无关
a2.sinks.k2.hdfs.rollCount = 0

# Use a channel which buffers events in memory
a2.channels.c2.type = memory
a2.channels.c2.capacity = 1000
a2.channels.c2.transactionCapacity = 100

# Bind the source and sink to the channel
a2.sources.r2.channels = c2
a2.sinks.k2.channel = c2
tail -F /opt/module/hive/logs/hive.log -F实时监控
[kris@hadoop101 flume]$ bin/flume-ng agent -c conf/ -n a2 -f job/flume-file-hdfs.conf


开启Hadoop和Hive并操作Hive产生日志
sbin/start-dfs.sh
sbin/start-yarn.sh
bin/hive
在HDFS上查看文件。

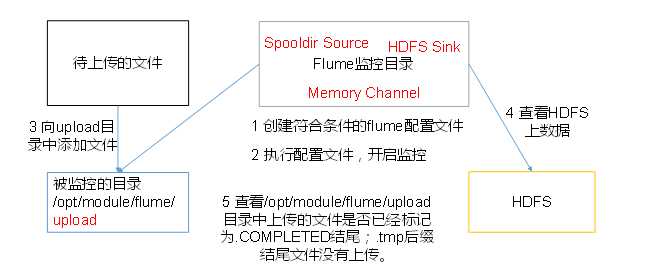
[kris@hadoop101 job]$ vim flume-dir-hdfs.conf
a3.sources = r3
a3.sinks = k3
a3.channels = c3

# Describe/configure the source
a3.sources.r3.type = spooldir
a3.sources.r3.spoolDir = /opt/module/flume/upload
a3.sources.r3.fileSuffix = .COMPLETED
a3.sources.r3.fileHeader = true
#忽略所有以.tmp结尾的文件,不上传
a3.sources.r3.ignorePattern = ([^ ]*\.tmp)

# Describe the sink
a3.sinks.k3.type = hdfs
a3.sinks.k3.hdfs.path = hdfs://hadoop102:9000/flume/upload/%Y%m%d/%H
#上传文件的前缀
a3.sinks.k3.hdfs.filePrefix = upload-
#是否按照时间滚动文件夹
a3.sinks.k3.hdfs.round = true
#多少时间单位创建一个新的文件夹
a3.sinks.k3.hdfs.roundValue = 1
#重新定义时间单位
a3.sources = r3
a3.sinks = k3
a3.channels = c3

# Describe/configure the source
a3.sources.r3.type = spooldir
a3.sources.r3.spoolDir = /opt/module/flume/upload
a3.sources.r3.fileSuffix = .COMPLETED
a3.sources.r3.fileHeader = true
#忽略所有以.tmp结尾的文件,不上传
a3.sources.r3.ignorePattern = ([^ ]*\.tmp)

# Describe the sink
a3.sinks.k3.type = hdfs
a3.sinks.k3.hdfs.path = hdfs://hadoop101:9000/flume/upload/%Y%m%d/%H
#上传文件的前缀
a3.sinks.k3.hdfs.filePrefix = upload-
#是否按照时间滚动文件夹
a3.sinks.k3.hdfs.round = true
#多少时间单位创建一个新的文件夹
a3.sinks.k3.hdfs.roundValue = 1
#重新定义时间单位
a3.sinks.k3.hdfs.roundUnit = hour
#是否使用本地时间戳
a3.sinks.k3.hdfs.useLocalTimeStamp = true
#积攒多少个Event才flush到HDFS一次
a3.sinks.k3.hdfs.batchSize = 100
#设置文件类型,可支持压缩
a3.sinks.k3.hdfs.fileType = DataStream
#多久生成一个新的文件
a3.sinks.k3.hdfs.rollInterval = 60
#设置每个文件的滚动大小大概是128M
a3.sinks.k3.hdfs.rollSize = 134217700
#文件的滚动与Event数量无关
a3.sinks.k3.hdfs.rollCount = 0

# Use a channel which buffers events in memory
a3.channels.c3.type = memory
a3.channels.c3.capacity = 1000
a3.channels.c3.transactionCapacity = 100

# Bind the source and sink to the channel
a3.sources.r3.channels = c3
a3.sinks.k3.channel = c3
[kris@hadoop101 flume]$ bin/flume-ng agent -c conf/ -n a3 -f job/flume-dir-hdfs.conf
[kris@hadoop101 flume]$ mkdir upload
[kris@hadoop101 flume]$ cd upload/
[kris@hadoop101 upload]$ touch kris.txt
[kris@hadoop101 upload]$ touch kris.tmp
[kris@hadoop101 upload]$ touch kris.log
[kris@hadoop101 upload]$ ll
总用量 0
-rw-rw-r--. 1 kris kris 0 2月  20 11:09 kris.log.COMPLETED
-rw-rw-r--. 1 kris kris 0 2月  20 11:08 kris.tmp
-rw-rw-r--. 1 kris kris 0 2月  20 11:08 kris.txt.COMPLETED
[kris@hadoop101 flume]$ cp README.md upload/
[kris@hadoop101 flume]$ cp LICENSE upload/
[kris@hadoop101 upload]$ ll
总用量 32
-rw-rw-r--. 1 kris kris     0 2月  20 11:09 kris.log.COMPLETED
-rw-rw-r--. 1 kris kris     0 2月  20 11:08 kris.tmp
-rw-rw-r--. 1 kris kris     0 2月  20 11:08 kris.txt.COMPLETED
-rw-r--r--. 1 kris kris 27625 2月  20 11:14 LICENSE.COMPLETED
-rw-r--r--. 1 kris kris  2520 2月  20 11:13 README.md.COMPLETED
数据直接在文件后边追加

单Source多Channel、Sink
准备工作
       在/opt/module/flume/job目录下创建group1文件夹

[kris@hadoop101 job]$ cd group1/

在/opt/module/datas/目录下创建flume3文件夹

[kris@hadoop101 datas]$ mkdir flume3
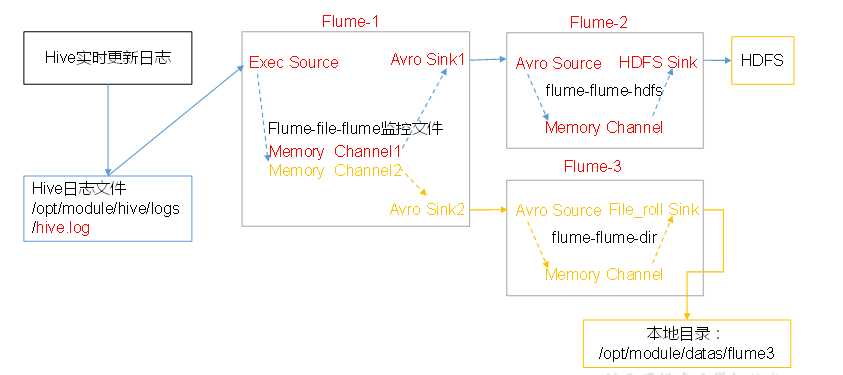
1.创建flume-file-flume.conf
配置1个接收日志文件的source和两个channel、两个sink,分别输送给flume-flume-hdfs和flume-flume-dir。
[kris@hadoop101 group1]$ vim flume-file-flume.conf
# Name the components on this agent
a1.sources = r1
a1.sinks = k1 k2
a1.channels = c1 c2
# 将数据流复制给所有channel
a1.sources.r1.selector.type = replicating

# Describe/configure the source
a1.sources.r1.type = exec
a1.sources.r1.command = tail -F /opt/module/hive/logs/hive.log
a1.sources.r1.shell = /bin/bash -c

# Describe the sink
# sink端的avro是一个数据发送者
a1.sinks.k1.type = avro
a1.sinks.k1.hostname = hadoop101
  .sinks.k1.port = 4141

a1.sinks.k2.type = avro
a1.sinks.k2.hostname = hadoop101
a1.sinks.k2.port = 4142

# Describe the channel
a1.channels.c1.type = memory
a1.channels.c1.capacity = 1000
a1.channels.c1.transactionCapacity = 100

a1.channels.c2.type = memory
a1.channels.c2.capacity = 1000
a1.channels.c2.transactionCapacity = 100

# Bind the source and sink to the channel
a1.sources.r1.channels = c1 c2
a1.sinks.k1.channel = c1
a1.sinks.k2.channel = c2
[kris@hadoop101 group1]$ vim flume-flume-hdfs.conf
# Name the components on this agent
a2.sources = r1
a2.sinks = k1
a2.channels = c1

# Describe/configure the source
# source端的avro是一个数据接收服务
a2.sources.r1.type = avro
a2.sources.r1.bind = hadoop102
a2.sources.r1.port = 4141

# Describe the sink
a2.sinks.k1.type = hdfs
a2.sinks.k1.hdfs.path = hdfs://hadoop102:9000/flume2/%Y%m%d/%H
#上传文件的前缀
a2.sinks.k1.hdfs.filePrefix = flume2-
#是否按照时间滚动文件夹
a2.sinks.k1.hdfs.round = true
#多少时间单位创建一个新的文件夹
a2.sinks.k1.hdfs.roundValue = 1
#重新定义时间单位
# Name the components on this agent
a2.sources = r1
a2.sinks = k1
a2.channels = c1

# Describe/configure the source
# source端的avro是一个数据接收服务
a2.sources.r1.type = avro
a2.sources.r1.bind = hadoop101
a2.sources.r1.port = 4141

# Describe the sink
a2.sinks.k1.type = hdfs
a2.sinks.k1.hdfs.path = hdfs://hadoop101:9000/flume2/%Y%m%d/%H
#上传文件的前缀
a2.sinks.k1.hdfs.filePrefix = flume2-
#是否按照时间滚动文件夹
a2.sinks.k1.hdfs.round = true
#多少时间单位创建一个新的文件夹
a2.sinks.k1.hdfs.roundValue = 1
#重新定义时间单位
a2.sinks.k1.hdfs.roundUnit = hour
#是否使用本地时间戳
a2.sinks.k1.hdfs.useLocalTimeStamp = true
   攒多少个Event才flush到HDFS一次
a2.sinks.k1.hdfs.batchSize = 100
#设置文件类型,可支持压缩
a2.sinks.k1.hdfs.fileType = DataStream
#多久生成一个新的文件
a2.sinks.k1.hdfs.rollInterval = 600
#设置每个文件的滚动大小大概是128M
a2.sinks.k1.hdfs.rollSize = 134217700
#文件的滚动与Event数量无关
a2.sinks.k1.hdfs.rollCount = 0

# Describe the channel
a2.channels.c1.type = memory
a2.channels.c1.capacity = 1000
a2.channels.c1.transactionCapacity = 100

# Bind the source and sink to the channel
a2.sources.r1.channels = c1
a2.sinks.k1.channel = c1
[kris@hadoop101 group1]$ vim flume-flume-dir.conf
# Name the components on this agent
a3.sources = r1
a3.sinks = k1
a3.channels = c2

# Describe/configure the source
a3.sources.r1.type = avro
a3.sources.r1.bind = hadoop101
a3.sources.r1.port = 4142

# Describe the sink
a3.sinks.k1.type = file_roll
a3.sinks.k1.sink.directory = /opt/module/datas/flume3

# Describe the channel
a3.channels.c2.type = memory
a3.channels.c2.capacity = 1000
a3.channels.c2.transactionCapacity = 100

# Bind the source and sink to the channel
a3.sources.r1.channels = c2
a3.sinks.k1.channel = c2
执行配置文件
分别开启对应配置文件:flume-flume-dir,flume-flume-hdfs,flume-file-flume。

[kris@hadoop101 flume]$ bin/flume-ng agent -c conf/ -n a3 -f job/group1/flume-flume-dir.conf
[kris@hadoop101 flume]$ bin/flume-ng agent -c conf/ -n a2 -f job/group1/flume-flume-hdfs.conf
[kris@hadoop101 flume]$ bin/flume-ng agent -c conf/ -n a1 -f job/group1/flume-file-flume.conf

启动Hadoop和Hive
start-dfs.sh
start-yarn.sh
bin/hive
检查HDFS上数据

检查/opt/module/datas/flume3目录中数据
[kris@hadoop101 ~]$ cd /opt/module/datas/flume3/
[kris@hadoop101 flume3]$ ll
总用量 4
-rw-rw-r--. 1 kris kris    0 2月  20 11:49 1550634573721-1
-rw-rw-r--. 1 kris kris    0 2月  20 11:54 1550634573721-10
-rw-rw-r--. 1 kris kris    0 2月  20 11:54 1550634573721-11
-rw-rw-r--. 1 kris kris    0 2月  20 11:50 1550634573721-2
-rw-rw-r--. 1 kris kris    0 2月  20 11:50 1550634573721-3
-rw-rw-r--. 1 kris kris    0 2月  20 11:51 1550634573721-4
-rw-rw-r--. 1 kris kris    0 2月  20 11:51 1550634573721-5
-rw-rw-r--. 1 kris kris    0 2月  20 11:52 1550634573721-6
-rw-rw-r--. 1 kris kris    0 2月  20 11:52 1550634573721-7
-rw-rw-r--. 1 kris kris    0 2月  20 11:53 1550634573721-8
-rw-rw-r--. 1 kris kris 1738 2月  20 11:53 1550634573721-9
[kris@hadoop101 flume3]$ cat 1550634573721-9
2019-02-20 11:00:42,459 INFO  [main]: metastore.hivemetastoressimpl (HiveMetaStoreFsImpl.java:deleteDir(53)) - Deleted the diretory hdfs://hadoop101:9000/user/hive/warehouse/student22
2019-02-20 11:00:42,460 INFO  [main]: log.PerfLogger (PerfLogger.java:PerfLogEnd(148)) - </PERFLOG method=runTasks start=1550631641861 end=1550631642460 duration=599 from=org.apache.hadoop.hive.ql.Driver>
2019-02-20 11:00:42,461 INFO  [main]: log.PerfLogger (PerfLogger.java:PerfLogEnd(148)) - </PERFLOG method=Driver.execute start=1550631641860 end=1550631642461 duration=601 from=org.apache.hadoop.hive.ql.Driver>
2019-02-20 11:00:42,461 INFO  [main]: ql.Driver (SessionState.java:printInfo(951)) - OK
2019-02-20 11:00:42,461 INFO  [main]: log.PerfLogger (PerfLogger.java:PerfLogBegin(121)) - <PERFLOG method=releaseLocks from=org.apache.hadoop.hive.ql.Driver>
2019-02-20 11:00:42,461 INFO  [main]: log.PerfLogger (PerfLogger.java:PerfLogEnd(148)) - </PERFLOG method=releaseLocks start=1550631642461 end=1550631642461 duration=0 from=org.apache.hadoop.hive.ql.Driver>
2019-02-20 11:00:42,461 INFO  [main]: log.PerfLogger (PerfLogger.java:PerfLogEnd(148)) - </PERFLOG method=Driver.run start=1550631641638 end=1550631642461 duration=823 from=org.apache.hadoop.hive.ql.Driver>
2019-02-20 11:00:42,461 INFO  [main]: CliDriver (SessionState.java:printInfo(951)) - Time taken: 0.824 seconds
2019-02-20 11:00:42,461 INFO  [main]: log.PerfLogger (PerfLogger.java:PerfLogBegin(121)) - <PERFLOG method=releaseLocks from=org.apache.hadoop.hive.ql.Driver>
2019-02-20 11:00:42,462 INFO  [main]: log.PerfLogger (PerfLogger.java:PerfLogEnd(148)) - </PERFLOG method=releaseLocks start=1550631642461 end=1550631642462 duration=1 from=org.apache.hadoop.hive.ql.Driver>
单Source、Channel多Sink(负载均衡)
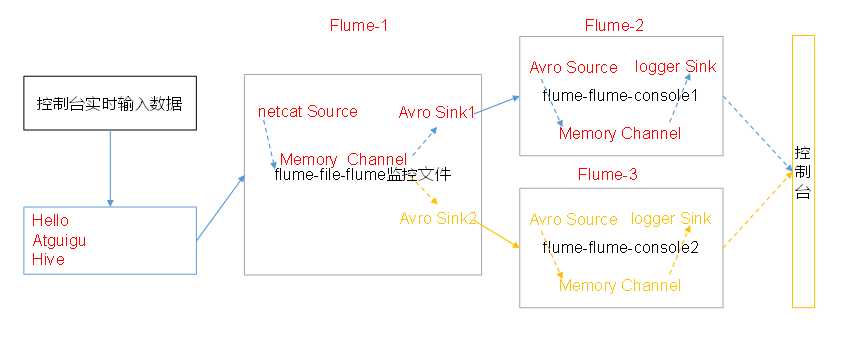
[kris@hadoop101 group2]$ cat flume-netcat-flume.conf
# Name the components on this agent
a1.sources = r1
a1.channels = c1
a1.sinkgroups = g1
a1.sinks = k1 k2

# Describe/configure the source
a1.sources.r1.type = netcat
a1.sources.r1.bind = localhost
a1.sources.r1.port = 44444

a1.sinkgroups.g1.processor.type = load_balance
a1.sinkgroups.g1.processor.backoff = true
a1.sinkgroups.g1.processor.selector = round_robin
a1.sinkgroups.g1.processor.selector.maxTimeOut=10000

# Describe the sink
a1.sinks.k1.type = avro
a1.sinks.k1.hostname = hadoop101
a1.sinks.k1.port = 4141

a1.sinks.k2.type = avro
a1.sinks.k2.hostname = hadoop101
a1.sinks.k2.port = 4142

# Describe the channel
a1.channels.c1.type = memory
a1.channels.c1.capacity = 1000
a1.channels.c1.transactionCapacity = 100

# Bind the source and sink to the channel
a1.sources.r1.channels = c1
a1.sinkgroups.g1.sinks = k1 k2
a1.sinks.k1.channel = c1
a1.sinks.k2.channel = c1
[kris@hadoop101 group2]$ cat flume-flume-console1.conf
# Name the components on this agent
a2.sources = r1
a2.sinks = k1
a2.channels = c1

# Describe/configure the source
a2.sources.r1.type = avro
a2.sources.r1.bind = hadoop101
a2.sources.r1.port = 4141

# Describe the sink
a2.sinks.k1.type = logger

# Describe the channel
a2.channels.c1.type = memory
a2.channels.c1.capacity = 1000
a2.channels.c1.transactionCapacity = 100

# Bind the source and sink to the channel
a2.sources.r1.channels = c1
a2.sinks.k1.channel = c1
[kris@hadoop101 group2]$ cat flume-flume-console2.conf
# Name the components on this agent
a3.sources = r1
a3.sinks = k1
a3.channels = c2

# Describe/configure the source
a3.sources.r1.type = avro
a3.sources.r1.bind = hadoop101
a3.sources.r1.port = 4142

# Describe the sink
a3.sinks.k1.type = logger

# Describe the channel
a3.channels.c2.type = memory
a3.channels.c2.capacity = 1000
a3.channels.c2.transactionCapacity = 100

# Bind the source and sink to the channel
a3.sources.r1.channels = c2
a3.sinks.k1.channel = c2
[kris@hadoop101 flume]$ bin/flume-ng agent -c conf/ -n a3 -f  job/group2/flume-flume-console2.conf  -Dflume.root.logger=INFO,console
[kris@hadoop101 flume]$ bin/flume-ng agent -c conf/ -n a2 -f job/group2/flume-flume-console1.conf -Dflume.root.logger.INFO,console
[kris@hadoop101 flume]$ bin/flume-ng agent -c conf/ -n a1 -f job/group2/flume-netcat-flume.conf
[kris@hadoop101 group2]$ nc localhost 44444
1
OK
1
OK
2
OK
3
OK
4

oggerSink.java:95)] Event: { headers:{} body: 31                                              1 }
2019-02-20 15:26:37,828 (SinkRunner-PollingRunner-DefaultSinkProcessor) [INFO - org.apache.flume.sink.LoggerSink.process(LoggerSink.java:95)] Event: { headers:{} body: 31                                              1 }
2019-02-20 15:26:37,828 (SinkRunner-PollingRunner-DefaultSinkProcessor) [INFO - org.apache.flume.sink.LoggerSink.process(LoggerSink.java:95)] Event: { headers:{} body: 32                                              2 }
2019-02-20 15:26:37,829 (SinkRunner-PollingRunner-DefaultSinkProcessor) [INFO - org.apache.flume.sink.LoggerSink.process(LoggerSink.java:95)] Event: { headers:{} body: 33                                              3 }
2019-02-20 15:26:37,829 (SinkRunner-PollingRunner-DefaultSinkProcessor) [INFO - org.apache.flume.sink.LoggerSink.process(LoggerSink.java:95)] Event: { headers:{} body: 34                                              4 }
2019-02-20 15:26:37,830 (SinkRunne

2019-02-20 15:27:06,706 (SinkRunner-PollingRunner-DefaultSinkProcessor) [INFO - org.apache.flume.sink.LoggerSink.process(LoggerSink.java:95)] Event: { headers:{} body: 61                                              a }
2019-02-20 15:27:06,706 (SinkRunner-PollingRunner-DefaultSinkProcessor) [INFO - org.apache.flume.sink.LoggerSink.process(LoggerSink.java:95)] Event: { headers:{} body: 62                                              b }
2019-02-20 15:27:06,707
多Source汇总数据到单Flume

分发Flume
[kris@hadoop101 module]$ xsync flume
在hadoop101、hadoop102以及hadoop103的/opt/module/flume/job目录下创建一个group3文件夹。
[kris@hadoop101 job]$ mkdir group3
[kris@hadoop102 job]$ mkdir group3
[kris@hadoop103 job]$ mkdir group3
1.创建flume1-logger-flume.conf
配置Source用于监控hive.log文件,配置Sink输出数据到下一级Flume。
在hadoop102上创建配置文件并打开
[kris@hadoop102 group3]$ vim flume1-logger-flume.conf
# Name the components on this agent
# Name the components on this agent
a1.sources = r1
a1.sinks = k1
a1.channels = c1

# Describe/configure the source
a1.sources.r1.type = exec
a1.sources.r1.command = tail -F /opt/module/group.log
a1.sources.r1.shell = /bin/bash -c

# Describe the sink
a1.sinks.k1.type = avro
a1.sinks.k1.hostname = hadoop103
a1.sinks.k1.port = 4141

# Describe the channel
a1.channels.c1.type = memory
a1.channels.c1.capacity = 1000
a1.channels.c1.transactionCapacity = 100

# Bind the source and sink to the channel
a1.sources.r1.channels = c1
a1.sinks.k1.channel = c1
2.创建flume2-netcat-flume.conf
配置Source监控端口44444数据流,配置Sink数据到下一级Flume:
在hadoop101上创建配置文件并打开
[kris@hadoop101 group3]$ vim flume2-netcat-flume.conf
# Name the components on this agent
# Name the components on this agent
a2.sources = r1
a2.sinks = k1
a2.channels = c1

# Describe/configure the source
a2.sources.r1.type = netcat
a2.sources.r1.bind = hadoop101
a2.sources.r1.port = 44444

# Describe the sink
a2.sinks.k1.type = avro
a2.sinks.k1.hostname = hadoop103
a2.sinks.k1.port = 4141

# Use a channel which buffers events in memory
a2.channels.c1.type = memory
a2.channels.c1.capacity = 1000
a2.channels.c1.transactionCapacity = 100

# Bind the source and sink to the channel
a2.sources.r1.channels = c1
a2.sinks.k1.channel = c1
3.创建flume3-flume-logger.conf
配置source用于接收flume1与flume2发送过来的数据流,最终合并后sink到控制台。
在hadoop103上创建配置文件并打开
[kris@hadoop103 group3]$ vim flume3-flume-logger.conf
# Name the components on this agent
a3.sources = r1
a3.sinks = k1
a3.channels = c1

# Describe/configure the source
a3.sources.r1.type = avro
a3.sources.r1.bind = hadoop103
a3.sources.r1.port = 4141

# Describe the sink
# Describe the sink
a3.sinks.k1.type = logger

# Describe the channel
a3.channels.c1.type = memory
a3.channels.c1.capacity = 1000
a3.channels.c1.transactionCapacity = 100

# Bind the source and sink to the channel
a3.sources.r1.channels = c1
a3.sinks.k1.channel = c1
4.执行配置文件
分别开启对应配置文件:flume3-flume-logger.conf,flume2-netcat-flume.conf,flume1-logger-flume.conf。
[kris@hadoop103 flume]$ bin/flume-ng agent -c conf/ -n a3 -f job/group3/flume3-flume-logger.conf -Dflume.root.logger=INFO,console
[kris@hadoop101 flume]$ bin/flume-ng agent -c conf/ -n a2 -f job/group3/flume2-netcat-flume.conf
[kris@hadoop102 flume]$ bin/flume-ng agent -c conf/ -n a1 -f job/group3/flume1-logger-flume.conf
在hadoop102上向/opt/module目录下的group.log追加内容
[kris@hadoop102 module]$ echo "Hello World" > group.log
[kris@hadoop102 module]$ ll
总用量 24
drwxrwxr-x. 10 kris kris 4096 2月  20 11:07 flume
-rw-rw-r--.  1 kris kris   12 2月  20 16:13 group.log
在hadoop101上向44444端口发送数据
[kris@hadoop101 flume]$ nc hadoop101 44444
1
OK
2
OK
3
OK
4

检查hadoop103上数据
2019-02-20 16:13:20,748 (SinkRunner-PollingRunner-DefaultSinkProcessor) [INFO - org.apache.flume.sink.LoggerSink.process(LoggerSink.java:95)] Event: { headers:{} body: 48 65 6C 6C 6F 20 57 6F 72 6C 64                Hello World }
2019-02-20 16:14:46,774 (SinkRunner-PollingRunner-DefaultSinkProcessor) [INFO - org.apache.flume.sink.LoggerSink.process(LoggerSink.java:95)] Event: { headers:{} body: 31                                              1 }
2019-02-20 16:14:46,775 (SinkRunner-PollingRunner-DefaultSinkProcessor) [INFO - org.apache.flume.sink.LoggerSink.process(LoggerSink.java:95)] Event: { headers:{} body: 32                                              2 }
安装ganglia 、httpd服务与php、其他依赖
sudo rpm -Uvh http://dl.fedoraproject.org/pub/epel/6/x86_64/epel-release-6-8.noarch.rpm
sudo yum -y install httpd php rrdtool perl-rrdtool rrdtool-devel apr-devel ganglia-gmetad ganglia-web ganglia-gmond
Ganglia由gmond、gmetad和gweb三部分组成。
gmond(Ganglia Monitoring Daemon)是一种轻量级服务,安装在每台需要收集指标数据的节点主机上。使用gmond,你可以很容易收集很多系统指标数据,如CPU、内存、磁盘、网络和活跃进程的数据等。
gmetad(Ganglia Meta Daemon)整合所有信息,并将其以RRD格式存储至磁盘的服务。
gweb(Ganglia Web)Ganglia可视化工具,gweb是一种利用浏览器显示gmetad所存储数据的PHP前端。在Web界面中以图表方式展现集群的运行状态下收集的多种不同指标数据。
配置
修改配置文件/etc/httpd/conf.d/ganglia.conf
[kris@hadoop101 flume]$ sudo vim /etc/httpd/conf.d/ganglia.conf
修改为红颜色的配置:
# Ganglia monitoring system php web frontend
Alias /ganglia /usr/share/ganglia
<Location /ganglia>
  Order deny,allow
  #Deny from all
  Allow from all
  # Allow from 127.0.0.1
  # Allow from ::1
  # Allow from .example.com
</Location>
5) 修改配置文件/etc/ganglia/gmetad.conf
[kris@hadoop101 flume]$ sudo vim /etc/ganglia/gmetad.conf
修改为:
data_source "hadoop102" 192.168.1.102
6) 修改配置文件/etc/ganglia/gmond.conf
[kris@hadoop101 flume]$ sudo vim /etc/ganglia/gmond.conf
修改为:
cluster {
  name = "hadoop101"
  owner = "unspecified"
  latlong = "unspecified"
  url = "unspecified"
}
udp_send_channel {
  #bind_hostname = yes # Highly recommended, soon to be default.
                       # This option tells gmond to use a source address
                       # that resolves to the machine‘s hostname.  Without
                       # this, the metrics may appear to come from any
                       # interface and the DNS names associated with
                       # those IPs will be used to create the RRDs.
  # mcast_join = 239.2.11.71
  host = 192.168.1.101
  port = 8649
  ttl = 1
}
udp_recv_channel {
  # mcast_join = 239.2.11.71
  port = 8649
  bind = 192.168.1.101
  retry_bind = true
  # Size of the UDP buffer. If you are handling lots of metrics you really
  # should bump it up to e.g. 10MB or even higher.
  # buffer = 10485760
}
7) 修改配置文件/etc/selinux/config
[kris@hadoop101 flume]$ sudo vim /etc/selinux/config
修改为:
# This file controls the state of SELinux on the system.
# SELINUX= can take one of these three values:
#     enforcing - SELinux security policy is enforced.
#     permissive - SELinux prints warnings instead of enforcing.
#     disabled - No SELinux policy is loaded.
SELINUX=disabled
# SELINUXTYPE= can take one of these two values:
#     targeted - Targeted processes are protected,
#     mls - Multi Level Security protection.
SELINUXTYPE=targeted
尖叫提示:selinux本次生效关闭必须重启,如果此时不想重启,可以临时生效之:
[kris@hadoop101 flume]$ sudo setenforce 0
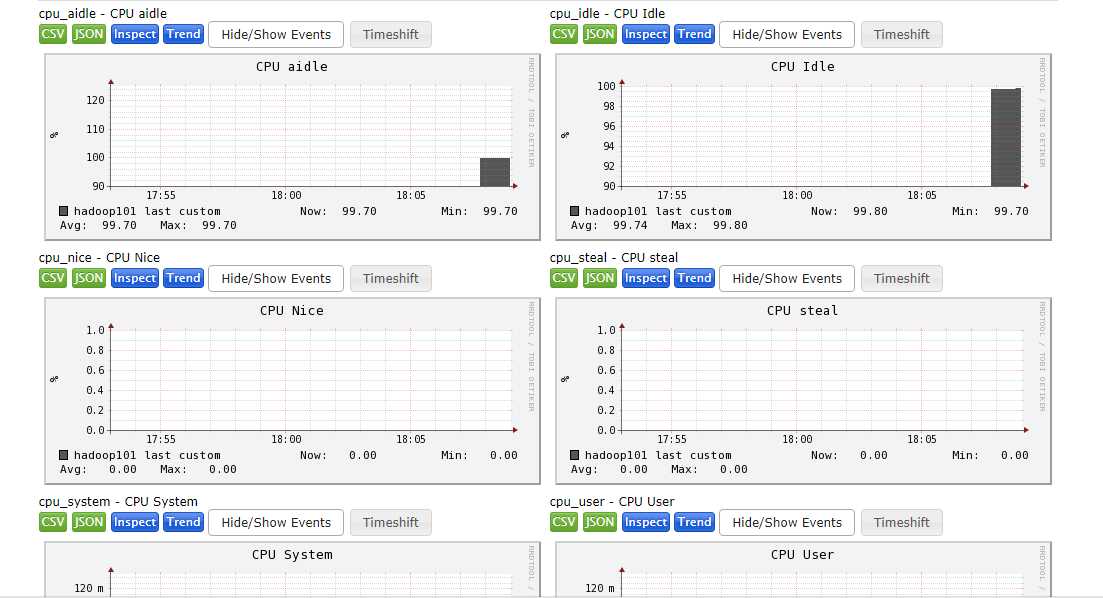
5) 启动ganglia
[kris@hadoop101 flume]$ sudo service httpd start
[kris@hadoop101 flume]$ sudo service gmetad start
[kris@hadoop101 flume]$ sudo service gmond start
6) 打开网页浏览ganglia页面
http://192.168.1.101/ganglia
尖叫提示:如果完成以上操作依然出现权限不足错误,请修改/var/lib/ganglia目录的权限:
[kris@hadoop101 flume]$ sudo chmod -R 777 /var/lib/ganglia
4.2 操作Flume测试监控
1) 修改/opt/module/flume/conf目录下的flume-env.sh配置:
JAVA_OPTS="-Dflume.monitoring.type=ganglia
-Dflume.monitoring.hosts=192.168.1.101:8649
-Xms100m
-Xmx200m"
2) 启动Flume任务
[kris@hadoop101 flume]$ bin/flume-ng agent --conf conf/ --name a1 --conf-file job/flume-netcat-logger.conf -Dflume.root.logger==INFO,console -Dflume.monitoring.type=ganglia -Dflume.monitoring.hosts=192.168.1.101:8649
3) 发送数据观察ganglia监测图
[kris@hadoop101 flume]$ nc localhost 44444
标签:share long cti sof isp files 批量写入 timestamp hive
原文地址:https://www.cnblogs.com/shengyang17/p/10405979.html
