标签:nstat dev 循环 stop func primary over nec 成功
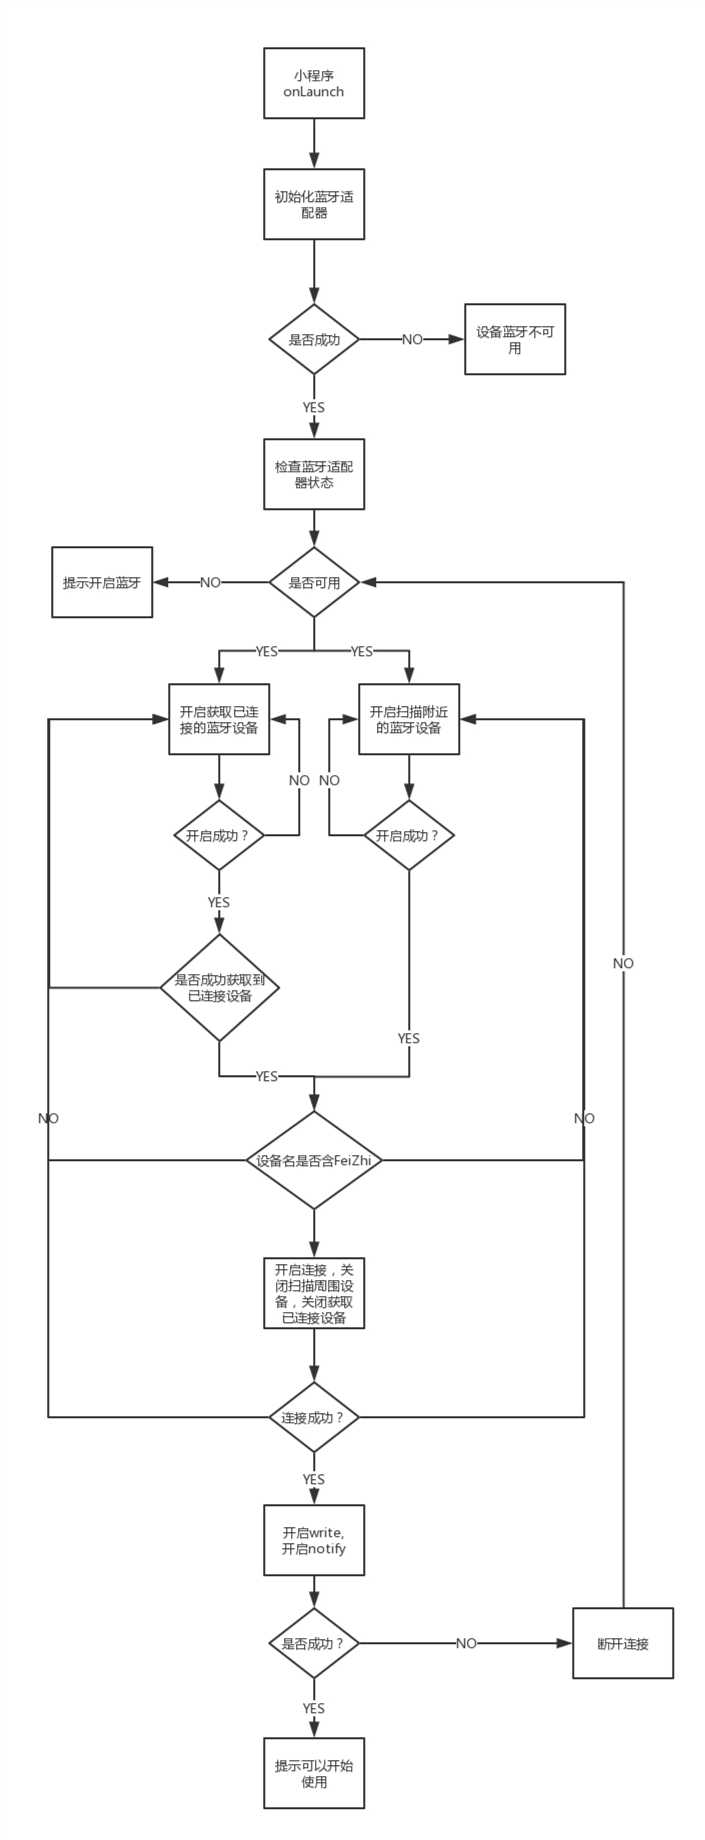
大致流程:
* 1、 开启蓝牙适配
* 2、 获取蓝牙适配器状态,判断设备蓝牙是否可用。
* 3、 判断蓝牙适配器可用时开启扫描蓝牙设备和开启获取已连接的蓝牙设备
* 4、 如果开启扫描蓝牙设备失败5s后自动再次开启扫描
* 5、 开启扫描蓝牙设备成功后开启监听已扫描的设备
* 6、 如果已扫描到的新设备含FeiZhi名(个人产品需要)的设备则开始连接该设备
* 7、 开启获取已连接蓝牙设备开启获取设备成功后判断以获取的设备名包含FeiZhi(个人产品需要)字符串的设备则开始连接该设备
* 8、 开始获取已连接蓝牙设备没有成功获取到已连接的蓝牙设备5s后自动重新开启获取。
* 9、 开始连接某设备时停止扫描设备,停止循环获取已连接设备。
* 10、连接成功后停止扫描设备,停止循环获取已连接设备
暗示
1、app.js的onLaunch() 方法里中调用开启连接 this.startConnect();弹出提示框,开启适配,如果失败提示设备蓝牙不可用,同时开启蓝牙适配器状态监听。
startConnect: function () {
var that = this;
wx.showLoading({
title: ‘开启蓝牙适配‘
});
wx.openBluetoothAdapter({
success: function (res) {
console.log("初始化蓝牙适配器");
console.log(res);
that.getBluetoothAdapterState();
},
fail: function (err) {
console.log(err);
wx.showToast({
title: ‘蓝牙初始化失败‘,
icon: ‘success‘,
duration: 2000
})
setTimeout(function () {
wx.hideToast()
}, 2000)
}
});
wx.onBluetoothAdapterStateChange(function (res) {
var available = res.available;
if (available) {
that.getBluetoothAdapterState();
}
})
}
2、初始化蓝牙适配器成功,调用this.getBluetoothAdapterState() 获取本机蓝牙适配器状态,判断是否可用,available为false则因为用户没有开启系统蓝牙。同时判断程序还没有开始搜索蓝牙设备,调用this.startBluetoothDevicesDiscovery();开始扫描附近的蓝牙设备,同时调用this.getConnectedBluetoothDevices() 开启获取本机已配对的蓝牙设备。
getBluetoothAdapterState: function () {
var that = this;
wx.getBluetoothAdapterState({
success: function (res) {
var available = res.available,
discovering = res.discovering;
if (!available) {
wx.showToast({
title: ‘设备无法开启蓝牙连接‘,
icon: ‘success‘,
duration: 2000
})
setTimeout(function () {
wx.hideToast()
}, 2000)
} else {
if (!discovering) {
that.startBluetoothDevicesDiscovery();
that.getConnectedBluetoothDevices();
}
}
}
})
}
3、开始搜索蓝牙设备startBluetoothDevicesDiscovery() , 提示蓝牙搜索。
startBluetoothDevicesDiscovery: function () {
var that = this;
wx.showLoading({
title: ‘蓝牙搜索‘
});
wx.startBluetoothDevicesDiscovery({
services: [],
allowDuplicatesKey: false,
success: function (res) {
if (!res.isDiscovering) {
that.getBluetoothAdapterState();
} else {
that.onBluetoothDeviceFound();
}
},
fail: function (err) {
console.log(err);
}
});
}
4、获取已配对的蓝牙设备。此方法特别说明参数services(Array)是必填的,但是官方示例中以及各种坑爹demo里从没见过有谁填写,但是不填写这个属性此方法无法获取到任何已配对设备。如果要调用此方法则是需要连接特定设备,并且知道该设备的一个主服务serviceId。如果未知可以先手动连接一次想要连接的设备,然后获取service列表,记录属性primary为true的值至少一个。
getConnectedBluetoothDevices: function () {
var that = this;
wx.getConnectedBluetoothDevices({
services: [that.serviceId],
success: function (res) {
console.log("获取处于连接状态的设备", res);
var devices = res[‘devices‘], flag = false, index = 0, conDevList = [];
devices.forEach(function (value, index, array) {
if (value[‘name‘].indexOf(‘FeiZhi‘) != -1) {
// 如果存在包含FeiZhi字段的设备
flag = true;
index += 1;
conDevList.push(value[‘deviceId‘]);
that.deviceId = value[‘deviceId‘];
return;
}
});
if (flag) {
this.connectDeviceIndex = 0;
that.loopConnect(conDevList);
} else {
if (!this.getConnectedTimer) {
that.getConnectedTimer = setTimeout(function () {
that.getConnectedBluetoothDevices();
}, 5000);
}
}
},
fail: function (err) {
if (!this.getConnectedTimer) {
that.getConnectedTimer = setTimeout(function () {
that.getConnectedBluetoothDevices();
}, 5000);
}
}
});
}
5、开启蓝牙搜索功能失败,则回到第2步重新检查蓝牙是适配器是否可用,开启蓝牙搜索功能成功后开启发现附近蓝牙设备事件监听。this.onBluetoothDeviceFound()
onBluetoothDeviceFound: function () {
var that = this;
console.log(‘onBluetoothDeviceFound‘);
wx.onBluetoothDeviceFound(function (res) {
console.log(‘new device list has founded‘)
console.log(res);
if (res.devices[0]) {
var name = res.devices[0][‘name‘];
if (name != ‘‘) {
if (name.indexOf(‘FeiZhi‘) != -1) {
var deviceId = res.devices[0][‘deviceId‘];
that.deviceId = deviceId;
console.log(that.deviceId);
that.startConnectDevices();
}
}
}
})
}
此方法可自定义过滤一些无效的蓝牙设备比如name为空的,个人产品开发中需要过滤devices name 不含有FeiZhi字符串的设备。
6、在第5步中发现了某个想配对的设备,则获取到该设备的deviceId,然后开始配对该设备 this.startConnectDevices()。
startConnectDevices: function (ltype, array) {
var that = this;
clearTimeout(that.getConnectedTimer);
that.getConnectedTimer = null;
clearTimeout(that.discoveryDevicesTimer);
that.stopBluetoothDevicesDiscovery();
this.isConnectting = true;
wx.createBLEConnection({
deviceId: that.deviceId,
success: function (res) {
if (res.errCode == 0) {
setTimeout(function () {
that.getService(that.deviceId);
}, 5000)
}
},
fail: function (err) {
console.log(‘连接失败:‘, err);
if (ltype == ‘loop‘) {
that.connectDeviceIndex += 1;
that.loopConnect(array);
} else {
that.startBluetoothDevicesDiscovery();
that.getConnectedBluetoothDevices();
}
},
complete: function () {
console.log(‘complete connect devices‘);
this.isConnectting = false;
}
});
}
开启连接后为了避免出现冲突,一旦开启连接则终止扫描附近蓝牙设备,终止读取本机已配对设备。
#####7、连接成功后根据deiviceId获取设备的所有服务。this.getService(deviceId);
getService: function (deviceId) {
var that = this;
// 监听蓝牙连接
wx.onBLEConnectionStateChange(function (res) {
console.log(res);
});
// 获取蓝牙设备service值
wx.getBLEDeviceServices({
deviceId: deviceId,
success: function (res) {
that.getCharacter(deviceId, res.services);
}
})
}
8、读取服务的特征值。
getCharacter: function (deviceId, services) {
var that = this;
services.forEach(function (value, index, array) {
if (value == that.serviceId) {
that.serviceId = array[index];
}
});
wx.getBLEDeviceCharacteristics({
deviceId: deviceId,
serviceId: that.serviceId,
success: function (res) {
that.writeBLECharacteristicValue(deviceId, that.serviceId, that.characterId_write);
that.openNotifyService(deviceId, that.serviceId, that.characterId_read);
},
fail: function (err) {
console.log(err);
},
complete: function () {
console.log(‘complete‘);
}
})
}
9、如果扫描到的设备中没有想要连接的设备,可以尝试使用系统蓝牙手动配对,然后再小程序中调用getConnectedBluetoothDevices() 获取本机已配对的蓝牙设备,然后过滤设备(可能获取多个已配对的蓝牙设备)。将以获取的蓝牙设备deviceId放入到一个数组中调用自定义方法this.loopConnect(); 思路:通过递归调用获取已配对蓝牙设备的deviceId,如果获取到了就去连接,devicesId[x] 为空说明上传调用getConnectedBluetoothDevices()时获取到的已配对设备全部连接失败了。则开启重新获取已配对蓝牙设备,并开启扫描附近蓝牙设备。
loopConnect: function (devicesId) {
var that = this;
var listLen = devicesId.length;
if (devicesId[this.connectDeviceIndex]) {
this.deviceId = devicesId[this.connectDeviceIndex];
this.startConnectDevices(‘loop‘, devicesId);
} else {
console.log(‘已配对的设备小程序蓝牙连接失败‘);
that.startBluetoothDevicesDiscovery();
that.getConnectedBluetoothDevices();
}
}
10、**startConnectDevices(‘loop‘, array)方法,是当获取已配对蓝牙设备进行连接时这样调用。其中的处理逻辑上文已经贴出,意思就是在连接失败后fail方法里累加一个全局变量,然后回调loopConnect(array)方法。
**11、手动连接,上文介绍的方法是为了直接自动连接,如果不需要自动连接,可在使用方法getBluetoothDevices() 将会获取到已扫描到的蓝牙设备的列表,可以做个页面显示出设备名,点击该设备开始连接。
注意:
1、that.serviceId 是在初始化时设置的,由于对需要连接设备的主服务serivceId和各种特征值都是已知的因此可以这样做。如果不可知可以做一个扫描方法自己检查特征值的用途。
2、 连接成功后的writeBLECharacteristicValue和openNotifyService操作需要注意,如果同时开启这两项操作要先调用wirte再开启notify(原因未知,个人心得)。
3、经人提醒还可以再完善一下在onBlueToothAdapterStateChange()**可以监听蓝牙适配器状态,以此判断连接过程中或连接后用户开关了设备蓝牙,如果判断到关了蓝牙提示请开启,如果监听到开启了,就重新回到第1步。
标签:nstat dev 循环 stop func primary over nec 成功
原文地址:https://www.cnblogs.com/tangyuanby2/p/10495919.html