标签:作者 private 编程开发 cat method encode like inter lock
本篇demo实现的功能是基于netty的心跳机制和长连接以及重连机制,最关键的就是通过netty中的 IdleStateHandler 的超时机制来实现心跳和重连 ,然后通过org.msgpack编码器来实现跨平台数据传输,
实现的功能就是通过Scanner来输入消息得到服务端的回应,超过设定的超时时间就触发超时事件来进行心跳传输,如果服务端宕机客户端就会一直发起重连。
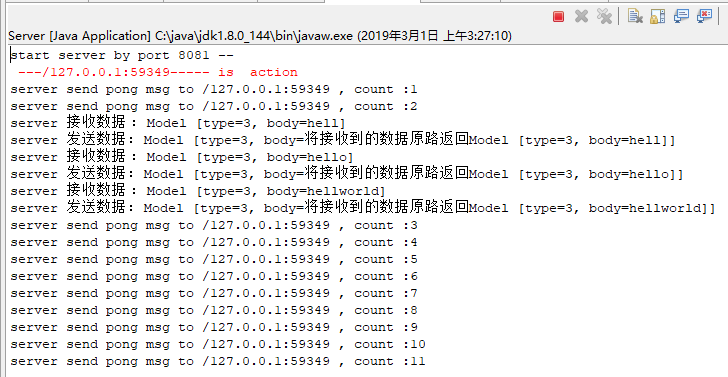
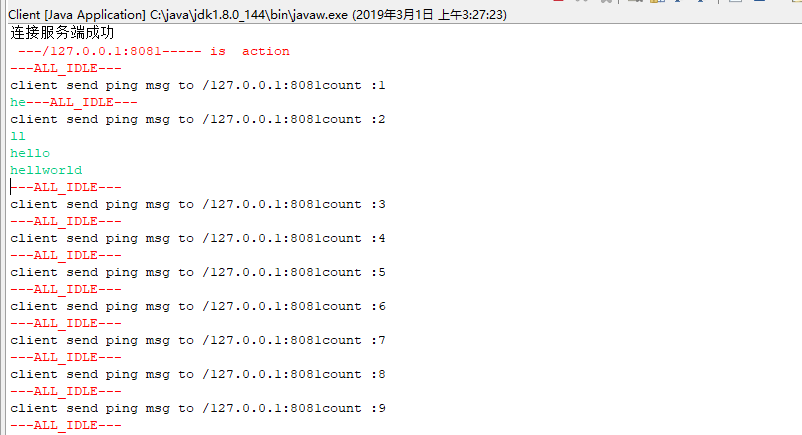
一、运行效果
服务端:

客户端:

在maven pom文件添加依赖:
       <!-- 解码and编码器 -->
        <!-- https://mvnrepository.com/artifact/org.msgpack/msgpack -->
        <dependency>
            <groupId>org.msgpack</groupId>
            <artifactId>msgpack</artifactId>
            <version>0.6.12</version>
        </dependency>
        <!-- netty 核心依赖 -->
        <!-- https://mvnrepository.com/artifact/io.netty/netty-all -->
      <dependency>
	    <groupId>io.netty</groupId>
	    <artifactId>netty-all</artifactId>
	    <version>4.1.33.Final</version>
	  </dependency>
导入以上依赖
↓
创建配置模型model(模型类) , TypeData(参数配置类)
↓
创建解码and编码器MsgPckDecode(解码器) ,MsgPckEncode(编码器)
↓
创建各自的控制器 AbstractClientChannelInboundHandleAdapter,AbstractServerChannelInboundHandleAdapter
↓
创建客户端及客户端控制器Client(客户端启动类) , ClientHandler(客户端控制器)
↓
创建服务端以及控制器Server(客户端启动类) , ServerHandler(客户端控制器)

ps:本demo使用了msgpack , It’s like JSON. but fast and small.
package com.zxh.demo.model;

import java.io.Serializable;
import org.msgpack.annotation.Message;
/**
 * 消息类型分离器
 * @author Administrator
 *
 */
@Message
public class Model implements Serializable{

    private static final long serialVersionUID = 1L;

    //类型
    private int type;

    //内容
    private String body;

    public String getBody() {
        return body;
    }

    public void setBody(String body) {
        this.body = body;
    }

    public int getType() {
        return type;
    }

    public void setType(int type) {
        this.type = type;
    }

    @Override
    public String toString() {
        return "Model [type=" + type + ", body=" + body + "]";
    }
}
编写一个配置类接口,用于控制心跳包和应用消息的处理
package com.zxh.demo.model;

/**
 * 配置项
 * @author Administrator
 *
 */
public interface TypeData {

    byte PING = 1;

    byte PONG = 2;
    //顾客
    byte CUSTOMER = 3;
}
创建MsgPckDecode(解码器)
package com.zxh.demo.model;

import java.util.List;
import org.msgpack.MessagePack;
import io.netty.buffer.ByteBuf;
import io.netty.channel.ChannelHandlerContext;
import io.netty.handler.codec.MessageToMessageDecoder;

/**
 * 解码器
 * @author Administrator
 *
 */
public class MsgPckDecode extends MessageToMessageDecoder<ByteBuf>{

    @Override
    protected void decode(ChannelHandlerContext ctx, ByteBuf msg,
            List<Object> out) throws Exception {

        final  byte[] array;

        final int length = msg.readableBytes();

        array = new byte[length];

        msg.getBytes(msg.readerIndex(), array, 0, length);

        MessagePack pack = new MessagePack();

        out.add(pack.read(array, Model.class));

    }
}
创建MsgPckEncode(编码器)
package com.zxh.demo.model;

import org.msgpack.MessagePack;
import io.netty.buffer.ByteBuf;
import io.netty.channel.ChannelHandlerContext;
import io.netty.handler.codec.MessageToByteEncoder;

/**
 * 编码器
 * @author Administrator
 *
 */
public class MsgPckEncode extends MessageToByteEncoder<Object>{

    @Override
    protected void encode(ChannelHandlerContext ctx, Object msg, ByteBuf buf)
            throws Exception {
        // TODO Auto-generated method stub
        MessagePack pack = new MessagePack();

        byte[] write = pack.write(msg);

        buf.writeBytes(write);

    }
}
创建client客户端:
package com.zxh.demo.client;

import java.util.Scanner;
import java.util.concurrent.TimeUnit;

import com.zxh.demo.model.Model;
import com.zxh.demo.model.MsgPckDecode;
import com.zxh.demo.model.MsgPckEncode;
import com.zxh.demo.model.TypeData;

import io.netty.bootstrap.Bootstrap;
import io.netty.channel.Channel;
import io.netty.channel.ChannelFuture;
import io.netty.channel.ChannelFutureListener;
import io.netty.channel.ChannelInitializer;
import io.netty.channel.ChannelOption;
import io.netty.channel.ChannelPipeline;
import io.netty.channel.nio.NioEventLoopGroup;
import io.netty.channel.socket.nio.NioSocketChannel;
import io.netty.handler.timeout.IdleStateHandler;

public class Client {

    private NioEventLoopGroup worker = new NioEventLoopGroup();

    private Channel channel;

    private Bootstrap bootstrap;

    public static void main(String[] args) {
        Client  client = new Client();

        client.start();

        client.sendData();
    }

    private void start() {
        bootstrap = new Bootstrap();
        bootstrap.group(worker)
        .channel(NioSocketChannel.class)
        .option(ChannelOption.TCP_NODELAY, true)
        .handler(new ChannelInitializer<Channel>() {
            @Override
            protected void initChannel(Channel ch) throws Exception {
                // TODO Auto-generated method stub
                ChannelPipeline pipeline = ch.pipeline();

                pipeline.addLast(new IdleStateHandler(0,0,5));

                pipeline.addLast(new MsgPckDecode());

                pipeline.addLast(new MsgPckEncode());

                pipeline.addLast(new ClientHandler(Client.this));
            }
        });
        doConnect();
    }

    /**
     * 连接服务端 and 重连
     */
    protected void doConnect() {

        if (channel != null && channel.isActive()){
            return;
        }
        ChannelFuture connect = bootstrap.connect("127.0.0.1", 8081);
        //实现监听通道连接的方法
        connect.addListener(new ChannelFutureListener() {

            @Override
            public void operationComplete(ChannelFuture channelFuture) throws Exception {

                if(channelFuture.isSuccess()){
                    channel = channelFuture.channel();
                    System.out.println("连接服务端成功");
                }else{
                    System.out.println("每隔2s重连....");
                    channelFuture.channel().eventLoop().schedule(new Runnable() {

                        @Override
                        public void run() {
                            doConnect();
                        }
                    },2,TimeUnit.SECONDS);
                }
            }
        });
    }
    /**
     * 向服务端发送消息
     */
    private void sendData() {
        Scanner sc= new Scanner(System.in);
        for (int i = 0; i < 1000; i++) {

            if(channel != null && channel.isActive()){
                //获取一个键盘扫描器
                String nextLine = sc.nextLine();
                Model model = new Model();

                model.setType(TypeData.CUSTOMER);

                model.setBody(nextLine);

                channel.writeAndFlush(model);
            }
        }
    }
}
创建Server服务端:
package com.zxh.demo.server;
import com.zxh.demo.model.MsgPckDecode;
import com.zxh.demo.model.MsgPckEncode;

import io.netty.bootstrap.ServerBootstrap;
import io.netty.channel.Channel;
import io.netty.channel.ChannelFuture;
import io.netty.channel.ChannelInitializer;
import io.netty.channel.ChannelPipeline;
import io.netty.channel.EventLoopGroup;
import io.netty.channel.nio.NioEventLoopGroup;
import io.netty.channel.socket.nio.NioServerSocketChannel;
import io.netty.handler.timeout.IdleStateHandler;

public class Server {
    public static void main(String[] args) {
        EventLoopGroup bossGroup = new NioEventLoopGroup(1);

        EventLoopGroup workerGroup = new NioEventLoopGroup(4);
        try {
            ServerBootstrap serverBootstrap = new ServerBootstrap();

            serverBootstrap.group(bossGroup, workerGroup)
            .channel(NioServerSocketChannel.class)
            .localAddress(8081)
            .childHandler(new ChannelInitializer<Channel>() {

                @Override
                protected void initChannel(Channel ch) throws Exception {
                    // TODO Auto-generated method stub
                    ChannelPipeline pipeline = ch.pipeline();
                    pipeline.addLast(new IdleStateHandler(10,0,0));
                    pipeline.addLast(new MsgPckDecode());
                    pipeline.addLast(new MsgPckEncode());
                    pipeline.addLast(new ServerHandler());
                }
            });
            System.out.println("start server by port 8081 --");
            ChannelFuture sync = serverBootstrap.bind().sync();
            sync.channel().closeFuture().sync();
        } catch (InterruptedException e) {
            // TODO Auto-generated catch block
            e.printStackTrace();
        }finally{
            //优雅的关闭资源
            bossGroup.shutdownGracefully();
            workerGroup.shutdownGracefully();
        }
    }
}
先运行服务端,然后再启动客户端 会根据设置的端口连接服务端,在客户端输入消息就会得到服务端的回应,如果超过5秒没有进行读写就会触发IdleStateHandler类超时事件 来进行心跳包的传输 ,服务端未检测到客户端的读写或者心跳就会主动关闭channel通道
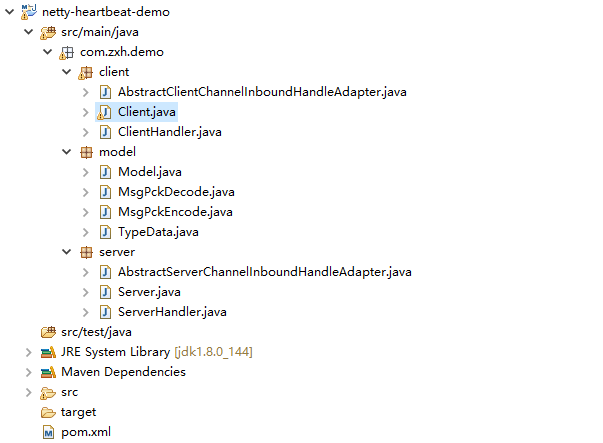
三、项目结构图

所谓的心跳, 即在 TCP 长连接中, 客户端和服务器之间定期发送的一种特殊的数据包, 通知对方自己还在线, 以确保 TCP 连接的有效性.因为网络的不可靠性, 有可能在 TCP 保持长连接的过程中, 由于某些突发情况, 例如网线被拔出, 突然掉电等, 会造成服务器和客户端的连接中断. 在这些突发情况下, 如果恰好服务器和客户端之间没有交互的话, 那么它们是不能在短时间内发现对方已经掉线的. 为了解决这个问题, 我们就需要引入 心跳 机制. 心跳机制的工作原理是: 在服务器和客户端之间一定时间内没有数据交互时, 即处于 idle 状态时, 客户端或服务器会发送一个特殊的数据包给对方, 当接收方收到这个数据报文后, 也立即发送一个特殊的数据报文, 回应发送方, 此即一个 PING-PONG 交互. 自然地, 当某一端收到心跳消息后, 就知道了对方仍然在线, 这就确保 TCP 连接的有效性
标签:作者 private 编程开发 cat method encode like inter lock
原文地址:https://www.cnblogs.com/demodashi/p/10503459.html