标签:ipa hub exit int obj jee rtu content .net
This blog is to explain how to install Tensorflow object detection API in Anaconda in Windows 10 as well as how to train train a convolution neural network to do object detection on your own data set.
Steps:
1. Installation and Configuration
Install Anaconda
First we need to install Anaconda on Windows 10. For specific introduction see this link
https://medium.com/@GalarnykMichael/install-python-on-windows-anaconda-c63c7c3d1444
After we have installed Anaconda in windows, lets start to install tensorflow
Install Tensorflow
open an Anaconda Prompt and run the following code
C:\>conda create --name tf_obj_detect python=3.6
This command will create an environment first named with ‘tf_obj_detect’ and will install all the packages required by python3.5. (I tried to install tensorflow-gpu at frist but failed, so I switch to install regular tensorflow)
Then, activate the environment by issuing
C:\>conda activate tf_onj_detect
Install tensorflow-gpu in this environment by issuing
(tf_obj_detect)C:\>pip install tensorflow
Install the other necessary packages by issuing the following commands
(tf_obj_detect) C:\> pip install pillow
(tf_obj_detect) C:\> pip install lxml
(tf_obj_detect) C:\> pip install Cython
(tf_obj_detect) C:\> pip install jupyter
(tf_obj_detect) C:\> pip install matplotlib
(tf_obj_detect) C:\> pip install pandas
(tf_obj_detect) C:\> pip install opencv-python
Download TensorFlow Object Detection API repository from GitHub
Create a folder named tensorflow1 in C, this working directory will contain all Tensorflow object detection frameworks, and also the test/train images, configuration files etc. Download the full Tensorflow object detection repository by clicking Clone or download. Open the downloaded file and extract the model-master file to the C:\tensorflow1 and rename the models-master folder to models
Download Faster-RCNN-Inception-V2 model
This post will use the Faster-RCNN-Inception-V2 model, you could download the model here . Open the downloaded file and faster_rcnn_inception_v2_coco_2018_01_28 folder to the C:\tensorflow1\models\research\object_detection folder. (Note: The model date and version will likely change in the future, but it should still work with this post.)
Download useful python script
Download the repository here. It contains useful python scripts for generating the training data. extract all the contents directly into the C:\tensorflow1\models\research\object_detection directory
To train our own dataset we need to delete the following files
Configure PYTHONPATH environment variable
(test) C:\> set PYTHONPATH=C:\tensorflow1\models;C:\tensorflow1\models\research;C:\tensorflow1\models\research\slim
(Note: Every time the "tensorflow1" virtual environment is exited, the PYTHONPATH variable is reset and needs to be set up again.)
Compile Protobufs and run setup.py‘
The compilation command posted on TensorFlow’s Object Detection API ,https://github.com/tensorflow/models/blob/master/research/object_detection/g3doc/installation.md, does not work on Windows. In the Anaconda Command Prompt, change directories to the \models\research directory and copy and paste the following command into the command line and press Enter:
protoc --python_out=. .\object_detection\protos\anchor_generator.proto .\object_detection\protos\argmax_matcher.proto .\object_detection\protos\bipartite_matcher.proto .\object_detection\protos\box_coder.proto .\object_detection\protos\box_predictor.proto .\object_detection\protos\eval.proto .\object_detection\protos\faster_rcnn.proto .\object_detection\protos\faster_rcnn_box_coder.proto .\object_detection\protos\grid_anchor_generator.proto .\object_detection\protos\hyperparams.proto .\object_detection\protos\image_resizer.proto .\object_detection\protos\input_reader.proto .\object_detection\protos\losses.proto .\object_detection\protos\matcher.proto .\object_detection\protos\mean_stddev_box_coder.proto .\object_detection\protos\model.proto .\object_detection\protos\optimizer.proto .\object_detection\protos\pipeline.proto .\object_detection\protos\post_processing.proto .\object_detection\protos\preprocessor.proto .\object_detection\protos\region_similarity_calculator.proto .\object_detection\protos\square_box_coder.proto .\object_detection\protos\ssd.proto .\object_detection\protos\ssd_anchor_generator.proto .\object_detection\protos\string_int_label_map.proto .\object_detection\protos\train.proto .\object_detection\protos\keypoint_box_coder.proto .\object_detection\protos\multiscale_anchor_generator.proto .\object_detection\protos\graph_rewriter.proto
(Note: TensorFlow occassionally adds new .proto files to the \protos folder. If you get an error saying ImportError: cannot import name ‘something_something_pb2‘ , you may need to update the protoc command to include the new .proto files.)
Finally, run the following commands from the C:\tensorflow1\models\research directory:
(test) C:\tensorflow1\models\research> python setup.py build
(test) C:\tensorflow1\models\research> python setup.py install
Test Tensorflow object API works properly
once you finish the installation, you can verify installation is working by launching the object_detection_tutorial.ipynb script with Jupyter. From the \object_detection directory, issue this command:
(test) C:\tensorflow1\models\research\object_detection> jupyter notebook object_detection_tutorial.ipynb
Go to the Cell menu option, and then "Run All." you should see two labeled images at the bottom section the page. If you see this, then everything is working properly! If not, the bottom section will report any errors encountered.
2. Build your own dataset
Gather pictures
I use the To obtain a robust detector, the training data should have different background and illumination condition.There should be some images where the desired object is partially obscured, overlapped with something else, or only halfway in the picture.
For my bolt detector I only have one object, bolt, to detect. The original dataset is quite small, only have 30 images. To enlarge my dataset I first crop the images and then do the data agumentation on the cropped images. I use the code in this page for data augmentation, and now there are more than 300 pictures in my datasets
Label pictures
Next download and install LabelImg, point it to your \images\train directory, and then draw a box around each object in each image. Repeat the process for all the images in the \images\test directory. This will take a while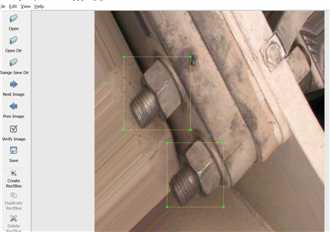 LabelImg could generate XML file containing label data for each image. We need to convert these XML files to singular CSV files that can be then converted to the TFRecord files which are one of the inputs to the TensorFlow trainer. These XML files should be placed in the same folder and same name with images, but with
 .xml-extension,
Generating training data
To do this I make use of python scripts from datitrans github. ,with some slight modifications to work with our directory structure. To begin, we‘re going to use xml_to_csv.py. From the \object_detection folder, issue the following command in the Anaconda command prompt:
(test) C:\tensorflow1\models\research\object_detection> python xml_to_csv.py
Now, grab generate_tfrecord.py. The only modification that you will need to make here is in the class_text_to_int function. You need to change this to your specific class. In our case, we just have ONE class, we will replace the following code in generate_tfrecord.py:
# TO-DO replace this with label map
def class_text_to_int(row_label):
    if row_label == ‘nine‘:
        return 1
    elif row_label == ‘ten‘:
        return 2
    elif row_label == ‘jack‘:
        return 3
    elif row_label == ‘queen‘:
        return 4
    elif row_label == ‘king‘:
        return 5
    elif row_label == ‘ace‘:
        return 6
    else:
        return None
with this
# TO-DO replace this with label map
def class_text_to_int(row_label):
    if row_label == ‘bolt‘:
        return 1
    else:
        None
Then, generate the TFRecord files by issuing these commands from the \object_detection folder:
python generate_tfrecord.py --csv_input=images\train_labels.csv --image_dir=images\train --output_path=train.record
python generate_tfrecord.py --csv_input=images\test_labels.csv --image_dir=images\test --output_path=test.record
3. Create Labelmap and Configure Training
Label Map
The label map tell the classifier what each object is by definig a map from the class names to class IDs. Create a labelmap.pbtxt in\object_detection\training folder. The type in the label map in the format below
item {
  id: 1
  name: ‘bolt‘
}
Configure training
Navigate to C:\tensorflow1\models\research\object_detection\samples\configs and copy the faster_rcnn_inception_v2_pets.config file into the \object_detection\training directory. Then make the following changes to the faster_rcnn_inception_v2_pets.config file
Line 9. Change num_classes to the number of different objects you want the classifier to detect. For the above basketball, shirt, and shoe detector, it would be num_classes : 3 .
Line 110. Change fine_tune_checkpoint to:
Lines 126 and 128. In the train_input_reader section, change input_path and label_map_path to:
Line 132. Change num_examples to the number of images you have in the \images\test directory.
Lines 140 and 142. In the eval_input_reader section, change input_path and label_map_path to:
Save the file after the changes have been made. That’s it! The training job is all configured and ready to go!
4. Run Training
Move train.py from /object_detection/legacy into the /object_detection folder and issue the following command to begin training:
python train.py --logtostderr --train_dir=training/ --pipeline_config_path=training/faster_rcnn_inception_v2_pets.config
If everything has been set up correctly, TensorFlow will initialize the training. The initialization can take up to 30 seconds before the actual training begins. When training begins, it will look like this:
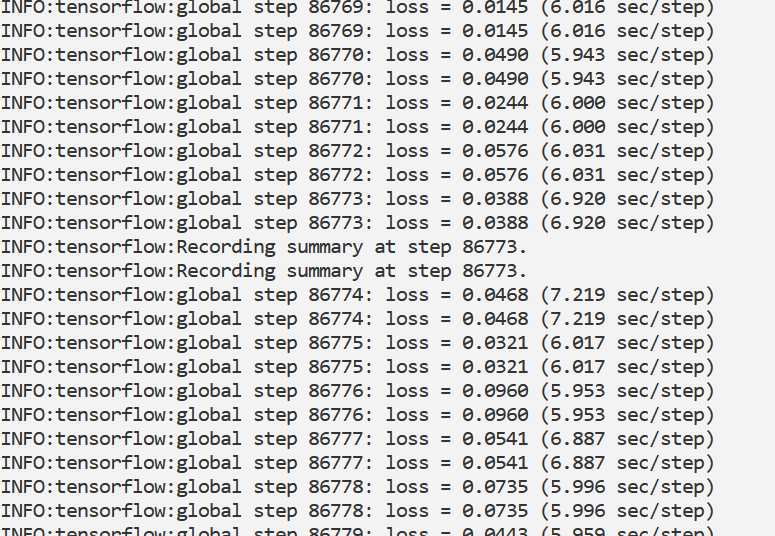
You‘d better train your model to train until the loss consistently drops below 0.05, which will take about 50,000 steps for me.
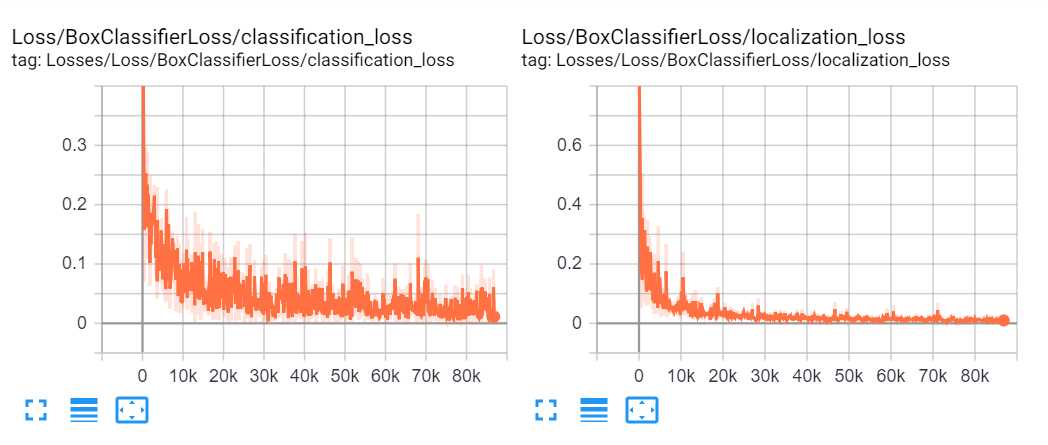
You can view the progress of the training job by using TensorBoard. To do this, open a new instance of Anaconda Prompt, activate the tensorflow1 virtual environment, change to the C:\tensorflow1\models\research\object_detection directory, and issue the following command
(test) C:\tensorflow1\models\research\object_detection>tensorboard --logdir=training
If you see nothing in the tensorboard in IE try to use chorme. Here is my result.
5. Export Inference Graph
The last step is to generate the frozen inference graph (.pb file). From the \object_detection folder, issue the following command, where “XXXX” in “model.ckpt-XXXX” should be replaced with the highest-numbered .ckpt file in the training folder:
python export_inference_graph.py --input_type image_tensor --pipeline_config_path training/faster_rcnn_inception_v2_pets.config
 --trained_checkpoint_prefix training/model.ckpt-XXXX --output_directory inference_graph
This creates a frozen_inference_graph.pb file in the \object_detection\inference_graph folder. The .pb file contains the object detection classifier.
6. Test on your own dataset
I copied some of my images into the models/object_detection/test_images directory, and renamed them to be image3.jpg, image4.jpg...etc. Booting up jupyter notebook and opening the object_detection_tutorial.ipynb with some modifications. First head to the Variables section, and let‘s change the model name, and the paths to the checkpoint and the labels:
# What model to download.
MODEL_NAME = ‘inference_graph‘

# Path to frozen detection graph. This is the actual model that is used for the object detection.
PATH_TO_CKPT = MODEL_NAME + ‘/frozen_inference_graph.pb‘

# List of the strings that is used to add correct label for each box.
PATH_TO_LABELS = os.path.join(‘training‘, ‘labelmap.pbtxt‘)

NUM_CLASSES = 1
Next, we can just delete the entire Download Model section, since we don‘t need to download anymore.
Finally, in the Detection section, change the TEST_IMAGE_PATHS var to:
TEST_IMAGE_PATHS = [ os.path.join(PATH_TO_TEST_IMAGES_DIR, ‘image{}.jpg‘.format(i)) for i in range(4, 13) ]
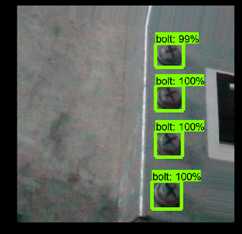
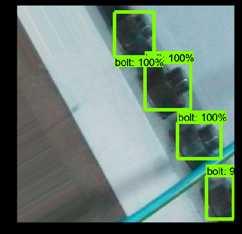
With that, you can go to the Cell menu option, and then "Run All."
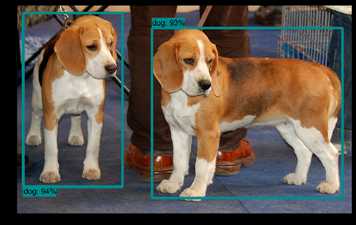
Here are a few of my results:
Install Tensorflow object detection API in Anaconda (Windows)
标签:ipa hub exit int obj jee rtu content .net
原文地址:https://www.cnblogs.com/laozhanghahaha/p/10520453.html