标签:html 选择 端口 SOS 技术 镜像 官方 路由 tail
下载完VMware Workstation 15的安装包后,直接安装即可。虽然下载的是试用版,但是我这里提供了密钥,用密钥激活后就可永久免费使用。
安装方法很简单,直接双击安装程序,默认安装即可。安装完成后,点击桌面的快捷启动图标,会提示你输入许可证密钥,把上面的密钥输入就可以激活了。
2.创建虚拟机
2.2 下载镜像
Centos镜像地址:http://mirrors.yun-idc.com/centos/6/isos/x86_64/
http://mirrors.163.com/centos/7.6.1810/isos/x86_64/
http://mirrors.aliyun.com/centos/7/isos/x86_64/
Ubuntu镜像地址:http://mirrors.yun-idc.com/ubuntu-releases/
http://mirrors.163.com/ubuntu-releases/18.10/
deepin 镜像地址: https://www.deepin.org/download/
recommended (aliyun)
http://mirrors.aliyun.com/deepin-cd/15.9/
archlinux 镜像地址: http://mirrors.163.com/archlinux/iso/
2.3 配置网络
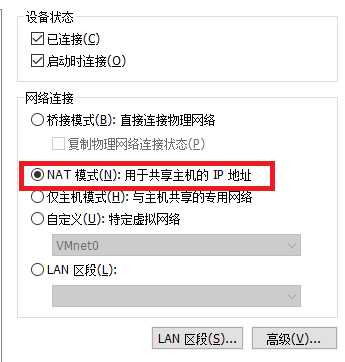
1. 选择网络连接模式NAT

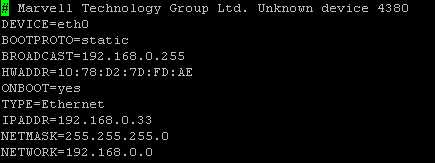
2.修改网卡配置 编辑:vi /etc/sysconfig/network-scripts/ifcfg-eth0

for centos 7 setup network please refere to the page xxx
网络配置文件
Centos6:
/etc/sysconfig/network-script/ifconfig-ethx #configure IP , netmask, mac address
/etc/sysconfig/network #configure hostname domain etc
/etc/resolv.conf #configure dns server
Centos7:
网络管理命令:
ifconfig
hostname
ifdown eth0 #禁用网卡 eth0 网卡设备名
ifup eth0 #启动网卡 eth0 网卡设备名
netstat [选项]
选项: -t: 列出tcp协议端口
-u: 列出udp协议端口
-n: 不使用域名与服务名,而使用ip地址和端口号
-l: 仅列出在在监控状态的网络服务
-a: 列出所有网络服务
route -n #查看路由信息
nslookup [域名或ip】 #查看本机DNS服务器
ping [选项] ip或域名
telnet [域名或ip】[端口号】 #远程管理或端口探测命令 Ctrl +] 推出
traceroute -n [域名或ip】
wget [url】
redhat 系列:
setup
参考文档:
https://blog.csdn.net/lamp_yang_3533/article/details/53136474
标签:html 选择 端口 SOS 技术 镜像 官方 路由 tail
原文地址:https://www.cnblogs.com/guoapeng/p/10464304.html