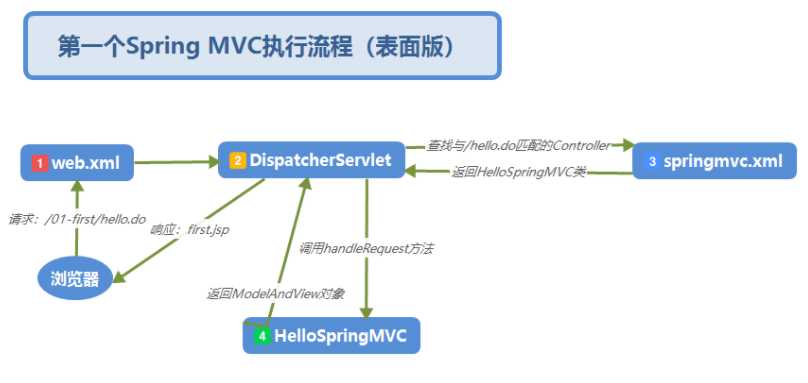
标签:新版 编写 apache 最新 request -o 图解 路径 release
1、在maven中的pom.xml中配置jar包路径。
<dependency>
<groupId>junit</groupId>
<artifactId>junit</artifactId>
<version>3.8.1</version>
<scope>test</scope>
</dependency>
<dependency>
<groupId>javax.servlet</groupId>
<artifactId>javax.servlet-api</artifactId>
<version>3.1.0</version>
</dependency>
<dependency>
<groupId>org.springframework</groupId>
<artifactId>spring-webmvc</artifactId>
<version>5.0.4.RELEASE</version>
</dependency>
<!-- 编译插件,指定编译用的的jdk版本 -->
<plugin>
<groupId>org.apache.maven.plugins</groupId>
<artifactId>maven-compiler-plugin</artifactId>
<configuration>
<!-- jdk的版本号 -->
<source>1.8</source>
<target>1.8</target>
<encoding>UTF-8</encoding>
</configuration>
</plugin>
2、在src/main/webapp/WEB-INF/下的web.xml配置springmvc的核心控制器。
<servlet>
<servlet-name>springMVC</servlet-name>
<!-- spring MVC中的核心控制器 -->
<servlet-class>org.springframework.web.servlet.DispatcherServlet</servlet-class>
<init-param>
<param-name>contextConfigLocation</param-name>
<param-value>classpath:springmvc.xml</param-value>
</init-param>
<!-- 保证该servlet是第一个执行的 -->
<load-on-startup>1</load-on-startup>
</servlet>
<servlet-mapping>
<servlet-name>springMVC</servlet-name>
<url-pattern>*.do</url-pattern>
</servlet-mapping>
3、在java resource的resource中配置springmvc.xml
<beans xmlns="http://www.springframework.org/schema/beans"
xmlns:xsi="http://www.w3.org/2001/XMLSchema-instance"
xmlns:p="http://www.springframework.org/schema/p"
xmlns:context="http://www.springframework.org/schema/context"
xsi:schemaLocation="
http://www.springframework.org/schema/beans
http://www.springframework.org/schema/beans/spring-beans.xsd
http://www.springframework.org/schema/context
http://www.springframework.org/schema/context/spring-context.xsd">
<!--注册驱动-->
<mvc:annotation-driven /> 作用:替我们配置最新版的注解的处理器映射器和处理器适配器。
<!-- 视图解析器 --> 可配可不配
<bean class="org.springframework.web.servlet.view.InternalResourceViewResolve">
<property name="prefix" value="/WEB-INF/jsp/"></property>
<bean id="/hello.do" class="com.shankai.controller.firstspring" />
</beans>
4、创建类实现接口controller

6、使用注解方式编写springmvc
第一步、这时候把springmvc.xml里面的用于找controller的bean去掉,换成
<context:component-scan base-package="com.*"></context:component-scan>
注意:这里的*只匹配一级包名 如果使用静态资源,需要加上<mvc:annotion-driven/>
第二步、controller不再实现Controller接口,而是使用注解@Controller()。

第三步、方法名前面加上@RequestMapping(“xxx.do”)。-----“”中的是访问url.
标签:新版 编写 apache 最新 request -o 图解 路径 release
原文地址:https://www.cnblogs.com/shank/p/10198579.html