标签:style blog http color io os ar 使用 java
在web应用中,文件上传是个很普遍的功能,那么今天就来小结一下asp.net中文件上传的方式。首先我们快速来回忆一下WebForm中的文件上传的方法。
Part 1 WebForm中的文件上传
 FileUpload服务器控件
aspx:
<div>
    <asp:Image ImageUrl="~/uploads/1.jpg" ID="img2" runat="server" Width="150px" Height="150px" />
    <asp:FileUpload runat="server" ID="fupImage" />
    <input type="button" value="上传" id="btnSubmit" runat="server" onserverclick="btnSubmit_ServerClick" />
</div>
aspx.cs:
protected void btnSubmit_ServerClick(object sender, EventArgs e)
{
    if (fupImage.HasFile)
    {
        Regex regex = new Regex(@".(?i:jpg|jpeg|gif|png)$");
        if (regex.IsMatch(Path.GetExtension(fupImage.FileName)))
        {
            string path = AppDomain.CurrentDomain.BaseDirectory + "uploads";
            if (!Directory.Exists(path))
                Directory.CreateDirectory(path);
            string filePath = fupImage.FileName;  //此处需要处理同名文件
            fupImage.SaveAs(Path.Combine(path, filePath));
            img2.ImageUrl = "~/uploads/" + filePath;
        }
    }
}
运行结果:

Note:如果image是普通的html服务器控件,那么后台赋值就要这样:
img1.Src = "~/uploads/" + filePath;
 Html服务器控件
aspx:
<div>
    <asp:Image ImageUrl="~/uploads/1.jpg" ID="img2" runat="server" Width="150px" Height="150px" />
     <input type="file" runat="server" id="fileimg" />
    <input type="button" value="上传" id="btnSubmit" runat="server" onserverclick="btnSubmit_ServerClick" />
</div>
aspx.cs:
if (fileimg.PostedFile.ContentLength > 0)
{
    string fileName = Path.GetFileName(fileimg.PostedFile.FileName);
    Regex regex = new Regex(@".(?i:jpg|jpeg|gif|png)$");
    if (regex.IsMatch(Path.GetExtension(fileName)))
    {
        string path = AppDomain.CurrentDomain.BaseDirectory + "uploads";
        if (!Directory.Exists(path))
            Directory.CreateDirectory(path);
        fileimg.PostedFile.SaveAs(Path.Combine(path, fileName));
        img2.ImageUrl = "~/uploads/" + fileName;
    }
}
运行也能实现同样的效果。
 普通的Html标签
aspx:
<div>
    <asp:Image ImageUrl="~/uploads/1.jpg" ID="img2" runat="server" Width="150px" Height="150px" />
     <input type="file" runat="server" id="fileimage"/>
    <input type="button" value="上传" id="btnSubmit" runat="server" onserverclick="btnSubmit_ServerClick" />
</div>
aspx.cs
if (Request.Files["fileimage"].HasFile())
{
    string fileName = Path.GetFileName(Request.Files["fileimage"].FileName);  //此处位需要处理同名文件
    Regex regex = new Regex(@".(?i:jpg|jpeg|gif|png)$");
    if (regex.IsMatch(Path.GetExtension(fileName)))
    {
        string path = AppDomain.CurrentDomain.BaseDirectory + "uploads";
        if (!Directory.Exists(path))
            Directory.CreateDirectory(path);
        Request.Files["fileimage"].SaveAs(Path.Combine(path, fileName));
        img2.ImageUrl = "~/uploads/" + fileName;
    }
}
Note:以上仅仅为了说明问题,故省去了对文件size的判断。
回过头来在看看,我们会发现如下关系:
---------------------------------------------------------------------------------------------
再来看看它们最终save的方法:
---------------------------html服务器控件------------------------------------------

---------------------------html标签------------------------------------------------

Note:由于服务器控件FileUpload,我暂时还没办法通过反序列化查看到内部细节,故缺少图片。
通过上面三种不同的标签的实现方式,可以看出基本上都是殊途同归。因为我们知道服务器控件只是封装了某些东西,(虽然通过反编译有些代码还是查看不到)我们完全可以揣测,这种实现其实就是最终第三种方式来实现的,使我们操作起来更加方便而已,它最终还是要转换成普通的html标签。因此服务器控件的性能相比较而言有所损失。但是由于它会根据不同的浏览器生成一些样式和脚本,因此兼容性会较好。那么抛开兼容性不说,既然它们最终的实现方式是一样的(HttpPostedFile对象),那么我们完全可以抽象出一个共通的方法来实现,以省去每次使用它们的时候要写不同的处理方式。一下以html控件为例:
 (注1)
(注1)
--------------------------------------------------------------------------------------------------------------------------------------------------------------------------------

---------------------------------------------------------------------------------------------------------------------------------------------------------------------------------
public static void Upload(string filePath)
{
    var request = System.Web.HttpContext.Current.Request;
    foreach (string upload in request.Files)
    {
        HttpPostedFile hp = request.Files[upload];
        if (hp.HasFile())
        {
            CreateFolderIfNeeded(filePath);
            string fileName = Path.GetFileName(hp.FileName);  //此处位需要处理同名文件
            hp.SaveAs(Path.Combine(filePath, fileName));
        }
    }
}
--------------------------------------------------------------------------------------------------------------------------------------------------------------------------------
private static void CreateFolderIfNeeded(string path) {
    if (!Directory.Exists(path)) {
        try {
            Directory.CreateDirectory(path);
        }
        catch (Exception) {
            /*TODO: You must process this exception.*/
            //throw new ArgumentException(Environment.GetResourceString("Argument_PathEmpty"));
        }
    }
}
---------------------------------------------------------------------------------------------------------------------------------------------------------------------------------
public static class HttpPostFileExtensions {   //扩展方法必须在顶级类中定义
    public static bool HasFile(this HttpPostedFile file) {
        return (file != null && file.ContentLength > 0) ? true : false;
    }
}
注1:特别注意的是由于Request.Files是名称值对的集合,而名称正是html标签的name属性的值,故使用普通的html控件的时候需要给file标签加上name属性,否则后台无法获取到它的值。
Part 2 MVC中的文件上传
如果习惯了使用WebForm服务器控件开发,那么初次接触MVC(本文以razor为例),你会发现这些服务器控件已经派不上用场了,就以文件上传为例,我们没办法像以前那样使用FileUpload愉快地拖曳来实现文件上传了。当然了所有的ASP.NET服务器控件也好,html服务器控件也好包括MVC的Htmlhelper,这些最终都要生成普通的html标签。而且MVC和WebForm都是基于ASP.NET平台的,那么从这2个点来说,我们在上文中最后提供的一个抽象封装(当然这只是一个简单的demo,它不能满足所有的实际开发中的变化了的需求)方法按道理来说也适用于MVC,那么究竟是不是这样呢?小段代码为证:
@using (Html.BeginForm("Index", "Home", FormMethod.Post, new { id = "form1", enctype = "multipart/form-data" }))
{
    <img src="/uploads/1.jpg" alt="暂无图片" id="img1" style="width:150px;height:150px;" />
    <input type=‘file‘ name=‘file‘ id=‘file‘ />
    <input type="button" value="上传" id="btnSubnit" />
}
<script src="~/Scripts/jquery-1.4.1.min.js"></script>
<script src="~/Scripts/jquery-form.js"></script>
<script type="text/javascript">
    $(document).ready(function () {
        $("#file").bind("change", function () {
            $("#form1").ajaxSubmit({
                success: function (data) {
                    $("#img1").attr("src", data.filePath);
                }
            });
        });
    });
</script>
---------------------------------------------------------------------请允许我丑陋的展现方式-------------------------------------------------------------------------------------
[HttpPost]
public ActionResult Index(HttpPostedFileBase file/*这里的参数暂时无用*/)
{
    string path = AppDomain.CurrentDomain.BaseDirectory + "uploads";
    UpLoadFileHelper.Upload(path);
    var filePath = "/uploads/" + Path.GetFileName(Request.Files["file"].FileName);
    return Json(new { filePath = filePath });
}
---------------------------------------------------------------------运行结果---------------------------------------------------------------------------------------------------

Note:以上使用了UpLoadFileHelper.Upload只是为了说明问题。实际开发中随着页面需求的变化,这个实现也要进行重构,也恳请博友能够提供完美的方案。
在WebForm中有HttpPostedFile对象,同样的在MVC中也有HttpPostedFileBase(我不知道微软是不是有意在名字上加以区分)。其实它们反应到上下文中是一样的。像这样的情况还有很多,比方说细心的你一定会发现,在Controller中取到的HttpContext是HttpContextBase而在WebForm中是HttpContext。虽然他们是两个不同的对象,但是内部实现是一样的(当然我没有查阅所有的这些类似的对象,也不保证所有的这些类似对象都是同样的实现)。那么我们就使用HttpPostedFileBase来看看MVC中如何实现单个文件的上传的:
[HttpPost]
public ActionResult Index(HttpPostedFileBase file)
{
    if (null != file && file.ContentLength>0)
    {
        string path = AppDomain.CurrentDomain.BaseDirectory + "uploads";
        if (!Directory.Exists(path))
        {
            Directory.CreateDirectory(path);
        }
        string fileName = string.Empty;
        fileName = Path.GetFileName(file.FileName);
        file.SaveAs(Path.Combine(path, fileName));
        return Json(new { filePath = "/uploads/" + fileName, code = 1 });
    }
    return Json(new { filePath = "请选择需要上传的文件", code = 0 });
}
同样也能实现同样的效果。
Note:由于HttpPostedFileBase是从Request.Files["name"]得到的,因此Action中HttpPostedFileBase的变量名必须保持和View中file标签的name属性值一致。
Part 3 问题开发
 关于input type="file"的style
众所周知,file input标签在不同的浏览器中会展现不同的样式,在实际开发中,针对这个也有很多很好的解决方案,这个可以baidu或者google(说道此,满眼是泪,希望博友可以提供海量无需FQ即可访问google的网址,在此不胜感激!!!)。我在这里引用WebMagazine网站一个解决方案,只要代码如下:
---------------------------------------------------------------------HTML标签---------------------------------------------------------------------------------------------------
<div class="file-wrapper">
    <input type="file" />
    <span class="button">Choose a file</span>
</div>
---------------------------------------------------------------------jQuery-----------------------------------------------------------------------------------------------------
<script src="jquery.js"></script>
<script type="text/javascript">
    var SITE = SITE || {};

    SITE.fileInputs = function () {
        var $this = $(this),
            $val = $this.val(),
            valArray = $val.split(‘\\‘),
            newVal = valArray[valArray.length - 1],
            $button = $this.siblings(‘.button‘),
            $fakeFile = $this.siblings(‘.file-holder‘);
        if (newVal !== ‘‘) {
            $button.text(‘File Chosen‘);
            if ($fakeFile.length === 0) {
                $button.after(‘<span class="file-holder">‘ + newVal + ‘</span>‘);
            } else {
                $fakeFile.text(newVal);
            }
        }
    };

    $(document).ready(function () {
        $(‘.file-wrapper input[type=file]‘).bind(‘change focus click‘, SITE.fileInputs);
    });
</script>
---------------------------------------------------------------------Css---------------------------------------------------------------------------------------------------------
<style type="text/css">
    .file-wrapper {
        position: relative;
        display: inline-block;
        overflow: hidden;
        cursor: pointer;
    }

        .file-wrapper input {
            position: absolute;
            top: 0;
            right: 0;
            filter: alpha(opacity=1);
            opacity: 0.01;
            -moz-opacity: 0.01;
            cursor: pointer;
        }

        .file-wrapper .button {
            color: #fff;
            background: #117300;
            padding: 4px 18px;
            margin-right: 5px;
            border-radius: 5px;
            -moz-border-radius: 5px;
            -webkit-border-radius: 5px;
            display: inline-block;
            font-weight: bold;
            cursor: pointer;
        }

    .file-holder {
        color: #000;
    }
</style>
 关于ASP.NET中input type="file"单次请求上传文件超过默认(ASP.NET为4M,IIS7为30M)时处理异常
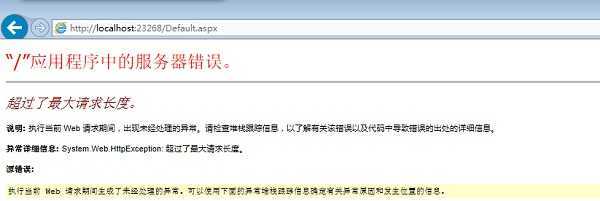
在ASP.NET Web开发中,这也不是什么新问题,在这里我想既然说到了文件上传,那么不得不在老调重弹一下,而且网上虽说对于这个问题早有定论,但是还是会看到不少对ASP.NET和IIS默认限制大小的具体说法有些混乱。测试环境为iis7+asp.net 4.0。
 Situation 1:不改默认配置的情况下使用FileUpload上传一个4.69M的文件:

 Situation 2:不改默认配置的情况下使用FileUpload上传一个40M的文件:

另外更糟糕的是甚至会出现这种情况:

从不同的错误页面不难看出,asp.net 默认限制上传大小不超过4M,运行时间不超过90s(因此会出现第三种错误的页面),iis7环境下为30M,超过默认设置,IIS会认为用户是在恶意攻击,因此会拒绝请求。当然微软考虑到上传到文件的需求,因此这个问题是可以通过配置解决的。那么针对它们的解决办法:
---------------------------------------------------------------------------------------------------------------------------------------------------------------------------------- 

Note1:关于此问题的更详细的解决办法,可以参考Large File Upload in IIS。
Note2:不仅如此ASP.NET和IIS对其它的诸如QueryString、Url也都有限制。比方说,当文本框输入的字节超过2048个字节的时候同样会引发异常。我想之所以网上关于这个问题的解读会出现偏差可能是这于这两者没有仔细查看的缘故吧。我想如果是这样的话,那么我们就需要仔细看看这两个配置借点的相信阐述了:httpRuntime、requestFiltering。
Part 4 拓展
另外说到这么多file的问题,其实我们常常看到有些网站会有上传进度条、图片剪切、拖曳上传、异步上传等,而如果要在file基础上实现这个,还是有点麻烦的。我们使用第三方组件来实现。这个在百度上也能找到能多既有的方案。我推荐一个能够实现多文件和进度条上传的组件jQuery Multiple File Upload with Progress bar Tutorial。文件上传的jQuery File Upload Demo以及jQuery File Upload。唉,好的插件确实是太多了,看得我眼花缭乱,不禁要感叹,再也不用担心文件上传了。根据自己的需要选择吧。
Part 5 参阅链接
http://www.codeproject.com/Articles/442515/Uploading-and-returning-files-in-ASP-NET-MVC
http://weblogs.asp.net/bryansampica/AsyncMVCFileUpload
http://ajaxuploader.com/large-file-upload-iis-asp-net.htm
http://ajaxuploader.com/large-file-upload-iis-asp-net.htm
http://msdn.microsoft.com/zh-cn/library/ms689462.aspx
Part 6 The end
注:由于个人技术有限,对某些概念的理解可能会存在偏差,如果你发现本文存在什么bug,请指正。谢谢!
完。
标签:style blog http color io os ar 使用 java
原文地址:http://www.cnblogs.com/fengchengjushi/p/4032972.html