标签:style blog http color io ar 使用 for sp
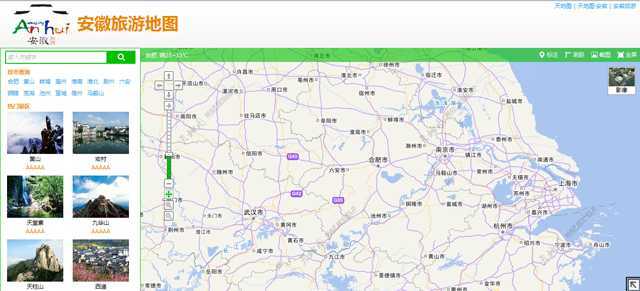
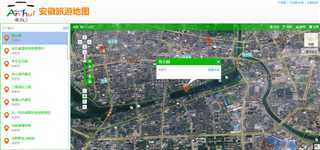
前文已完成基本的功能,该是进入美工阶段了。我也只是一个小前端程序员,没有能力把页面做的美如画,美工的原则只有两点:一是采用大众化的页面风格,配色和谐,符合大多数用户的操作习惯;二是尽可能采用自定义控件样式,不要出现flex自带的控件样式。这一节先简要介绍一下总体的样式和布局。改变一下习惯,先美工处理过后的效果图:


从最终的结果看主要由几点改变:首先是有了主题色——绿、蓝、橙为主的组合;其次是加入了一些页面元素,页面整体变得丰满;然后是很多控件样式发生了变化,如滚动条、地图切换按钮、搜索框、工具按钮等等;最后呢是增加了一些额外设计的图标、Logo等,这些就不是flex能做的了,不是重点。本节只看整体。
先介绍一下配色,配色选择的原则个人的理解是不能太花哨,旅游选用绿色作为主要色是非常符合常人习惯的,这些绿色主要用于控件主色、分割区块底色、主要文字色。注意在每一个页面设计主色时,一定要把握好主色的使用尺度,要恰当的把主色分布在页面的各个控制性区域,而不要连成一片片大饼来使用。
橙色在这个页面里主要用于提示色,就是那些需要醒目提示出来的内容用橙色表示,例如项目名称、区块名称、景区符号等,提示色就应当慎重使用,不那么需要醒目的地方就不要用,而且也要注意分布,不能几处提示挤在一起,这样就失去了点缀和提醒的作用。
蓝色主要用于链接按钮,但凡是蓝色的字就是可以点击的,蓝色的超链接是符合大众习惯的。注意,页面中的所有超链接都是用label通过样式来做的,下文详述。
此外页面里还有白色、灰色和少量黑色,这些都属于灰度元素,在任何风格的页面中都是可以适度使用的,并不会影响整体效果。白色本质是为了衬托绿色主题,绿地白字、白底彩字都符合大众习惯;灰色用于不重要内容的字体色和空间框架色,含蓄的进行展示和分割;黑色则用在少数需要明显显示,又不便采用彩色的地方,例如首页的推荐景点名。
下面提一下部分样式的做法:
1、查询搜索框
就是左侧栏那个绿色的输入关键字搜索的组件,采用的是bordercontainer为主的做法,直接上mxml布局:
AHTour.mxml
    <s:Group left="5" right="5" top="0">
        <s:BorderContainer left="0" right="60" top="0" height="28" borderColor="#00C000"
                           borderWeight="2">
            <s:TextInput id="txt_Keyword" left="0" right="0" top="0" bottom="0" borderVisible="false"
                         prompt="输入关键字"/>
        </s:BorderContainer>
        <s:BorderContainer right="0" top="0" width="60" height="28" backgroundColor="#00C000"
                           borderColor="#00C000" mouseOver="search_mouseOverHandler(event)"
                           mouseOut="search_mouseOutHandler(event)"
                           buttonMode="true" click="query_clickHandler(event)">
            <s:Image horizontalCenter="0" source="@Embed(‘image/ss_search.png‘)" verticalCenter="0"/>
        </s:BorderContainer>
    </s:Group>
mouseOut和mouseOver事件用于控制鼠标移入和移出时搜索按钮的变化,增强体验:
            protected function search_mouseOverHandler(event:MouseEvent):void
            {
                var bd:BorderContainer = event.currentTarget as BorderContainer;
                bd.setStyle("backgroundColor","#11d511");
                bd.setStyle("borderColor","#11d511");

            }

            protected function search_mouseOutHandler(event:MouseEvent):void
            {
                var bd:BorderContainer = event.currentTarget as BorderContainer;
                bd.setStyle("backgroundColor","#00C000");
                bd.setStyle("borderColor","#00C000");
            }
2、超链接按钮
Flex自带有LinkButton,我极为不喜欢这个控件,我一般都会用Label来代替它。原理就是在flex中定义两个样式作为普通和划过状态,再定义一下mouseOver、mouseOut和Click三个事件就行:
/*用于普通状态*/
.block
{
    color: #269aea;
}
/*用于鼠标划过状态*/
.blocknav
{
    color: #269aea;
    textDecoration: underline;
}
某个超链接就这么简单的定义在mxml里,如果不是用于链接,也可以用于一些按钮,比如我的地市政区的按钮,那么只要把click改一改就行了。
            <s:Label id="hb_tdt" text="天地图" styleName="block" buttonMode="true"
                     mouseOver="new function():void{hb_tdt.styleName=‘blocknav‘;}"
                     mouseOut="new function():void{hb_tdt.styleName=‘block‘;}"
                     click="navigateToURL(new URLRequest(‘http://www.tianditu.cn‘),‘_blank‘)"/>
3、热点定位按钮
左侧栏为了防止空洞,增加六个热点定位按钮,这是一种很常用的页面布局方式,用于丰富页面内容。这些按钮我定义为了HotItem.mxml。
HotItem.mxml
<?xml version="1.0" encoding="utf-8"?>
<s:Group xmlns:fx="http://ns.adobe.com/mxml/2009"
         xmlns:s="library://ns.adobe.com/flex/spark"
         xmlns:mx="library://ns.adobe.com/flex/mx" width="130" height="130"
         mouseOver="mouseOverHandler(event)"
         mouseOut="mouseOutHandler(event)" buttonMode="true">
    <fx:Script>
        <![CDATA[
            import com.esri.ags.Graphic;
            [Bindable]
            public var icon:String="image/hc.jpg";

            [Bindable]
            public var graphic:Graphic;

            [Bindable]
            private var IsOver:Boolean = false;

            [Bindable]
            public var selected:Boolean=false;

            protected function mouseOverHandler(event:MouseEvent):void
            {
                IsOver = true;
            }

            protected function mouseOutHandler(event:MouseEvent):void
            {
                IsOver = false
            }
        ]]>
    </fx:Script>
    <fx:Declarations>
        <!-- 将非可视元素(例如服务、值对象)放在此处 -->
    </fx:Declarations>
    <s:Rect left="0" right="0" top="0" bottom="0" visible="{IsOver||selected}">
        <s:fill>
            <s:SolidColor color="#e3e3e3" alpha="0.5"/>
        </s:fill>
    </s:Rect>
    <s:Image top="0" horizontalCenter="0" source="{icon}"/>
    <s:Label top="95" horizontalCenter="0" text="{graphic.attributes.NAME}"/>
    <s:Label top="113" color="#F07800" horizontalCenter="0" text="AAAAA"/>
</s:Group>
页面中调用时,把graphic和icon赋值就行了,至于click事件和前文查询中的点击事件是一样的处理。
4、工具按钮
页面为了整体的和谐,在地图和头部之间增加一条绿色的间隔,一些常用的工具就被放置在这个间隔带中,这些工具需要一个工具按钮。Flex自带的spark样式按钮可以嵌入图标+文字形式的按钮,但是,我依然不喜欢一定要自己做。同样,是一个叫ToolButton的组件:
ToolButton.mxml
<?xml version="1.0" encoding="utf-8"?>
<s:Group xmlns:fx="http://ns.adobe.com/mxml/2009"
         xmlns:s="library://ns.adobe.com/flex/spark"
         xmlns:mx="library://ns.adobe.com/flex/mx" height="22" mouseOver="mouseOverHandler(event)"
         mouseOut="mouseOutHandler(event)" buttonMode="true">
    <fx:Script>
        <![CDATA[
            [Bindable]
            public var icon:String="image/icons/i_home.png";

            [Bindable]
            public var title:String="按钮";

            [Bindable]
            public var selected:Boolean=false;

            [Bindable]
            private var IsOver:Boolean = false;

            protected function mouseOverHandler(event:MouseEvent):void
            {
                IsOver = true;
            }

            protected function mouseOutHandler(event:MouseEvent):void
            {
                IsOver = false
            }

        ]]>
    </fx:Script>
    <fx:Declarations>
        <!-- 将非可视元素(例如服务、值对象)放在此处 -->
    </fx:Declarations>
    <s:Rect left="0" right="0" top="0" bottom="0" visible="{IsOver||selected}">
        <s:stroke>
            <s:SolidColorStroke color="#e1e2e3" weight="1"/>
        </s:stroke>
        <s:fill>
            <s:SolidColor color="#f0f0f0" alpha="0.4"/>
        </s:fill>
    </s:Rect>
    <s:Image width="14" height="14" source="{icon}"
             verticalCenter="0" left="5"/>
    <s:Label left="22" right="5" color="#FFFFFF" text="{title}" verticalAlign="middle"
             verticalCenter="0"/>
</s:Group>
和HotItem非常相似,页面调用时也类似,但要注意控制selected属性,因为这个按钮是有很多个状态。
这样页面整体布局和一些简单的组件就介绍完了,后文介绍一些复杂组件的样式。
Arcgis apis for flex项目实例—美工篇(1):样式与布局
标签:style blog http color io ar 使用 for sp
原文地址:http://www.cnblogs.com/siempre1091/p/4036465.html