标签:lca 组件 属性 test 宽度 line 添加 4行 改变
实现界面的整齐摆放各种控件需要使用布局来完成
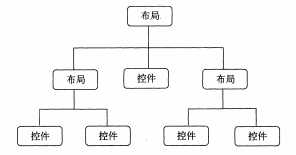
布局是一种可用于放置很多控件的容器
可以按照一定的规律调整内部的控件位置
布局的内部不仅可以放置控件还可以放置布局
LinearLayout又称线性布局,是一种常常用到的布局
会将所包含的控件再线性方向上一次排列
垂直方向上排列的
之前的代码种排列都是垂直排列
是因为再android:orientation属性制指定了排列的方向上vertical
如果指定:horizontal控件就会在水平方向上进行排列
默认不指定就是水平方向horizontal
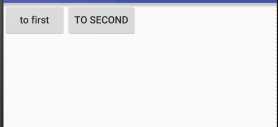
如果使用horizontal则内部的控件宽度就不能指定为match_parent单独一个控件就会占用水平方向
<?xml version="1.0" encoding="utf-8"?>
<LinearLayout xmlns:android="http://schemas.android.com/apk/res/android"
    android:orientation="horizontal"
    android:layout_width="match_parent"
    android:layout_height="match_parent">
    <Button
        android:layout_width="wrap_content"
        android:layout_height="wrap_content"
        android:id="@+id/button_first"
        android:textAllCaps="false"
        android:text="to first"/>
    <Button
        android:layout_width="wrap_content"
        android:layout_height="wrap_content"
        android:id="@+id/button_second"
        android:text="to second"/>
</LinearLayout>
android:layout_gravity:
用于指定控件再布局中的对其方式,取值和android:gravity差不多
注意:
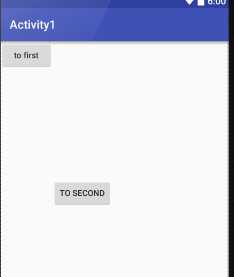
当LinerLayout的排列方向是horizontal是,只有垂直方向上的对齐方式才会生效,因为此水平方向上的对齐方式长度是不固定的
没添加一个控件、水平方向的长度都会改变,因而无法指定该方向上的对齐方式
即:水平---垂直生效 垂直---水平生效
<?xml version="1.0" encoding="utf-8"?>
<LinearLayout xmlns:android="http://schemas.android.com/apk/res/android"
    android:orientation="horizontal"
    android:layout_width="match_parent"
    android:layout_height="match_parent">
    <Button
        android:layout_width="wrap_content"
        android:layout_height="wrap_content"
        android:id="@+id/button_first"
        android:textAllCaps="false"
        android:text="to first"
        android:layout_gravity="top"
        />
    <Button
    android:layout_width="wrap_content"
    android:layout_height="wrap_content"
    android:id="@+id/button_second"
        android:layout_gravity="center"
    android:text="to second"/>
</LinerLayout>
结果如下图:
LinerLayout是水平方向的
我们只能指定垂直方向上的排列方向
android:layout_weight:
允许开发者使用比列方式来指定控件的大小
再手机适配方面可以起到非常重要的作用
<EditText
    android:id="@+id/edit_test1"
   android:layout_weight="2"
    android:hint="请输入"
    android:layout_width="0dp"
    android:layout_height="wrap_content" />

<Button
    android:layout_width="0dp"
    android:layout_weight="1"
    android:layout_height="wrap_content"
    android:id="@+id/button_first"
    android:textAllCaps="false"
    android:text="to first"
    android:layout_gravity="top"
    />
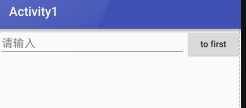
这里的EditView和Button的宽度都设置成了0dp
再设置android:layout_weight属性,此时的控件不再由android:width指定
这里设置成0dp是一种规范化的写法
dp是Android种用于指定控件大小、间距等属性的单位
这里也会根据android:layout_weight的值来等分屏幕的宽度
原理:
LinerLayout下所有指定的layout_wight的值相加
再根据每个控件的值进行求比例

    <EditText
        android:id="@+id/edit_test1"
       android:layout_weight="2"
        android:hint="请输入"
        android:layout_width="0dp"
        android:layout_height="wrap_content" />
    <Button
        android:layout_width="wrap_content"
        android:layout_height="wrap_content"
        android:id="@+id/button_first"
        android:textAllCaps="false"
        android:text="to first"
        android:layout_gravity="top"
        />
此时只有EditText种执行属性
Button的属性设置为刚好包裹住元素
EditText会沾满被Button使用之后的屏幕空间
RelativeLayout又称为相对布局
可以通过相对定位的方式让控件出现在任何位置
新建布局文件

<?xml version="1.0" encoding="utf-8"?>
<RelativeLayout xmlns:android="http://schemas.android.com/apk/res/android"
    android:layout_width="match_parent"
    android:layout_height="match_parent">
    <Button
        android:text="btn1"
        android:layout_width="wrap_content"
        android:layout_height="wrap_content"
        android:layout_alignParentLeft="true"
        android:layout_alignParentTop="true"/>
    <Button
        android:text="btn2"
        android:layout_width="wrap_content"
        android:layout_height="wrap_content"
        android:layout_alignParentRight="true"
        android:layout_alignParentTop="true"/>
    <Button
        android:text="btn3"
        android:layout_width="wrap_content"
        android:layout_height="wrap_content"
        android:layout_centerInParent="true"/>
    <Button
        android:text="btn4"
        android:layout_width="wrap_content"
        android:layout_height="wrap_content"
        android:layout_alignParentLeft="true"
        android:layout_alignParentBottom="true"/>
    <Button
        android:text="btn5"
        android:layout_width="wrap_content"
        android:layout_height="wrap_content"
        android:layout_alignParentRight="true"
        android:layout_alignParentBottom="true"/>
</RelativeLayout>
效果:
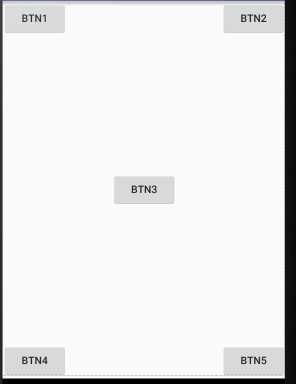
这里使用到如下的属性进行布局设置
android:layout_alignParentLeft:和父布局的左对齐
android:layout_alignParentTop:和父布局的上对齐
android:layout_alignParentRight:和父布局的右对齐
android:layout_alignParentBottom:和父布局的下对齐
android:layout_centerInParent:和父布局的居中显示
相对于父布局来说
之前的都是相对于父布局进行定位的
还可以相对控件进行定位
将代码进行修改:
<?xml version="1.0" encoding="utf-8"?>
<RelativeLayout xmlns:android="http://schemas.android.com/apk/res/android"
    android:layout_width="match_parent"
    android:layout_height="match_parent">

    <Button
        android:text="btn1"
        android:layout_width="wrap_content"
        android:layout_height="wrap_content"
        android:layout_above="@+id/btn3"
        android:layout_toLeftOf="@+id/btn3"
        android:id="@+id/btn1"/>
    <Button
        android:text="btn2"
        android:layout_width="wrap_content"
        android:layout_height="wrap_content"
        android:layout_above="@+id/btn3"
        android:layout_toRightOf="@+id/btn3"
        android:id="@+id/btn2"/>
    <Button
        android:text="btn3"
        android:layout_width="wrap_content"
        android:layout_height="wrap_content"
        android:layout_centerInParent="true"
        android:id="@+id/btn3"/>
    <Button
        android:text="btn4"
        android:layout_width="wrap_content"
        android:layout_height="wrap_content"
        android:layout_below="@+id/btn3"
        android:layout_toLeftOf="@+id/btn3"
        android:id="@+id/btn4"/>
    <Button
        android:text="btn5"
        android:layout_width="wrap_content"
        android:layout_height="wrap_content"
        android:layout_below="@+id/btn3"
        android:layout_toRightOf="@+id/btn3"
        android:id="@+id/btn5"/>
</RelativeLayout>
效果:
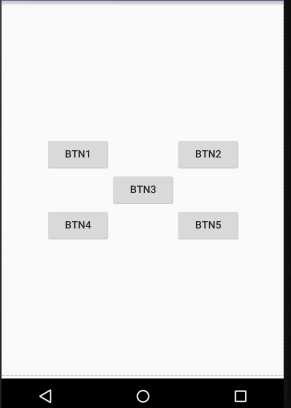
这里使用到的属性:
android:layout_above:让一个控件位于一个控件的上方
android:layout_below:让一个控件位于一个控件的下方
android:layout_toLeftOf:让一个控件位于一个控件的左侧
android:layout_toRightOf:让一个控件位于一个控件的右侧
再次使用属性:
<?xml version="1.0" encoding="utf-8"?>
<RelativeLayout xmlns:android="http://schemas.android.com/apk/res/android"
    android:layout_width="match_parent"
    android:layout_height="match_parent">

    <Button
        android:text="btn1"
        android:layout_width="wrap_content"
        android:layout_height="wrap_content"
        android:layout_above="@+id/btn3"
        android:layout_alignLeft="@+id/btn3"
        android:id="@+id/btn1"/>
    <Button
        android:text="btn2"
        android:layout_width="wrap_content"
        android:layout_height="wrap_content"
        android:layout_above="@+id/btn3"
        android:layout_toRightOf="@+id/btn3"
        android:id="@+id/btn2"/>
    <Button
        android:text="btn3"
        android:layout_width="wrap_content"
        android:layout_height="wrap_content"
        android:layout_centerInParent="true"
        android:id="@+id/btn3"/>
    <Button
        android:text="btn4"
        android:layout_width="wrap_content"
        android:layout_height="wrap_content"
        android:layout_below="@+id/btn3"
        android:layout_toLeftOf="@+id/btn3"
        android:id="@+id/btn4"/>
    <Button
        android:text="btn5"
        android:layout_width="wrap_content"
        android:layout_height="wrap_content"
        android:layout_below="@+id/btn3"
        android:layout_alignRight="@+id/btn3"
        android:id="@+id/btn5"/>


</RelativeLayout>
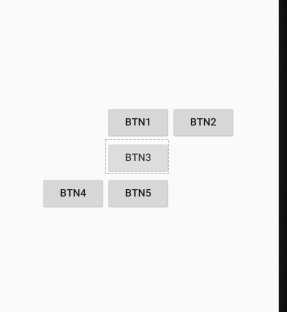
这里使用到如下属性:
android:layout_alignLeft:让一个控件的左边缘和零一控件的左边缘对齐(该控件默认位于父布局的上边)
android:layout_alignRight让一个控件的右边缘和另一控件的右边缘对齐(该控件默认位于父布局的上边)
同时还可以使用layout_alignTop和layout_alignBottom
FrameLayout成为帧布局
应用的场景也相对比较少
所有的控件都默认摆放在布局的左上角
都会从左上角开始进行占用空间
新建文件:

<?xml version="1.0" encoding="utf-8"?>
<FrameLayout xmlns:android="http://schemas.android.com/apk/res/android"
    android:layout_width="match_parent"
    android:layout_height="match_parent">

    <TextView
        android:text="TextView"
        android:layout_width="wrap_content"
        android:layout_height="wrap_content"
        android:id="@+id/text_view"/>
    <ImageView
        android:id="@+id/image_view"
        android:layout_width="wrap_content"
        android:layout_height="wrap_content"
        android:src="@mipmap/ic_launcher"/>
</FrameLayout>
效果:
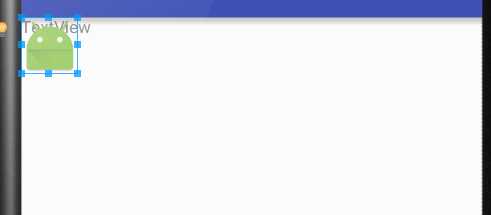
当没有准备图片资源时,可以使用下方的代码进行引用
android:src="@mipmap/ic_launcher"
上述的使用场景比较小,但是可以使用的
效果种可以发现 :
ImageView是在TextView之后添加的
但是此时的图片压在文字的上面
还可以进行修改布局中的对齐方式使用:android:gravity属性
<?xml version="1.0" encoding="utf-8"?>
<FrameLayout xmlns:android="http://schemas.android.com/apk/res/android"
    android:layout_width="match_parent"
    android:layout_height="match_parent">
    <TextView
        android:text="TextView"
        android:layout_width="wrap_content"
        android:layout_height="wrap_content"
        android:id="@+id/text_view"
        android:layout_gravity="left"/>
    <ImageView
        android:id="@+id/image_view"
        android:layout_width="wrap_content"
        android:layout_height="wrap_content"
        android:src="@mipmap/ic_launcher"
        android:layout_gravity="right"/>
</FrameLayout>
效果:

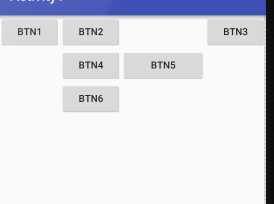
遇到排列整齐的情况就可以使用表格布局进行排列
可以使布局排列整齐
android:collapseColumns:设置需要被隐藏的列的序号
android:shrinkColumns:设置允许被收缩的列的列序号
android:stretchColumns:设置运行被拉伸的列的列序号
以上这三个属性的列号都是从0开始算的,比如shrinkColunmns = "2",对应的是第三列!
android:layout_column="2":表示的就是跳过第二个,直接显示到第三个格子处,从1开始算的!
android:layout_span="4":表示合并4个单元格,也就说这个组件占4个单元格
<?xml version="1.0" encoding="utf-8"?>
<TableLayout xmlns:android="http://schemas.android.com/apk/res/android"
    android:layout_width="match_parent"
    android:layout_height="match_parent"
    android:stretchColumns="2">

    <TableRow>
        <Button
            android:layout_width="wrap_content"
            android:layout_height="wrap_content"
            android:layout_column="0"
            android:text="btn1"/>
        <Button
            android:layout_width="wrap_content"
            android:layout_height="wrap_content"
            android:layout_column="1"
            android:text="btn2"/>
        <Button
            android:layout_width="wrap_content"
            android:layout_height="wrap_content"
            android:layout_column="3"
            android:text="btn3"/>
    </TableRow>
    <TableRow>
        <Button
            android:layout_width="wrap_content"
            android:layout_height="wrap_content"
            android:layout_column="1"
            android:text="btn4"/>
        <Button
            android:layout_width="wrap_content"
            android:layout_height="wrap_content"
            android:layout_column="2"
            android:text="btn5"/>
    </TableRow>
    <TableRow>
        <Button
            android:layout_width="wrap_content"
            android:layout_height="wrap_content"
            android:layout_column="2"
            android:text="btn6"/>
    </TableRow>
</TableLayout>
效果:
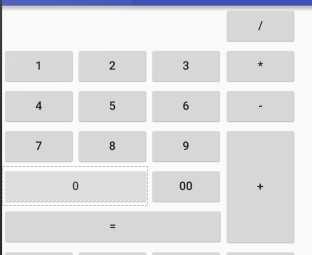
作为android 4.0 后新增的一个布局
①跟LinearLayout(线性布局)一样,他可以设置容器中组件的对齐方式
②容器中的组件可以跨多行也可以跨多列(相比TableLayout直接放组件,占一行相比较)
常用属性:
设置组件的排列方式: android:orientation=""
设置组件的对齐方式: android:layout_gravity=""
设置网格布局的行列:
设置有多少行:android:rowCount="4" //设置网格布局有4行
设置有多少列:android:columnCount="4" //设置网格布局有4列
设置控件再几行几列(都是从0开始算)
组件在第几行:android:layout_row = "2" //设置组件位于第3行
组件在第几列:android:layout_column = "2" //设置该组件位于第3列
设置组件横向/纵向占几行几列
横跨几行:android:layout_rowSpan = "2" //纵向横跨2行
横跨几列:android:layout_columnSpan = "3" //横向横跨3列
<?xml version="1.0" encoding="utf-8"?>
<GridLayout xmlns:android="http://schemas.android.com/apk/res/android"
    android:layout_width="match_parent"
    android:layout_height="match_parent"
    android:columnCount="4"
    android:orientation="horizontal"
    >

    <Button
        android:layout_column="3"
        android:text="/"/>
    <Button
        android:text="1"/>
    <Button
        android:text="2"/>
    <Button
        android:text="3"/>
    <Button
        android:text="*"/>
    <Button
        android:text="4"/>
    <Button
        android:text="5"/>
    <Button
        android:text="6"/>
    <Button
        android:text="-"
        android:id="@+id/btn_sub"/>
    <Button
        android:text="7"/>
    <Button
        android:text="8"/>
    <Button
        android:text="9"/>
    <Button
        android:layout_rowSpan="3"
        android:layout_width="wrap_content"
        android:layout_height="145dp"
        android:text="+"/>
    <Button
        android:text="0"
        android:layout_gravity="fill"
        android:layout_columnSpan="2"/>
    <Button
        android:text="00"/>
    <Button
        android:text="="
        android:layout_columnSpan="3"
        android:layout_height="wrap_content"
        android:layout_width="265dp"/>

</GridLayout>
通过指定x、y的坐标来控制组件再布局种的位置
<?xml version="1.0" encoding="utf-8"?>
<AbsoluteLayout xmlns:android="http://schemas.android.com/apk/res/android"
    android:layout_width="match_parent" android:layout_height="match_parent">

    <Button
        android:text="123"
        android:layout_x="40dp"
        android:layout_y="40dp"
        android:layout_width="wrap_content"
        android:layout_height="wrap_content" />
</AbsoluteLayout>
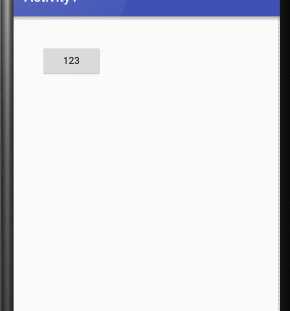
极少使用此布局
前三张布局种只有LinerLayout支持使用layout_weigh属性来指定按比例指定控件大小功能
其余两种不支持
如果使用RelativeLayout来实现两个按钮评分布局的宽度效果是比较困难的
Android引入一种百分比布局来解决这个问题
再这个布局中可以不使用warp_content、match_parent来指定控件的大小
允许直接指定控件再布局中所占的百分比实现
再FrameLayout、RalativeLayout种进行功能的扩展
提供了PercentFrameLayout、PercentRelativeLayout
待完成(............)
标签:lca 组件 属性 test 宽度 line 添加 4行 改变
原文地址:https://www.cnblogs.com/Mrchengs/p/10660636.html