标签:exception pre static 1.3 strong 目录 逻辑判断 info exp
协议,直白的说就是存在一堆字节,按照协议指定的规则解析就能得出这堆字节的意义。HTTP 解析分为两个部分:解析请求头和请求体。
请求头解析的难点在于它没有固定长度的头部,也不像其他协议那样提供数据包长度字段,判断是否读取到一个完整的头部的唯一依据就是遇到一个仅包括回车换行符的空行,好在在找寻这个空行的过程中能够完成请求行和头域的分析。
请求体的解析就是按照头域的传输编码和内容编码进行解码。那么 Tomcat 是如何设计和实现 HTTP 协议的呢?
请求头由 Ascii 码组成,包含请求行和请求头域两个部分,下面是一个简单请求的字符串格式:
POST /index.jsp?a=1&b=2 HTTP/1.1\r\n
Host: localhost:8080\r\n
Connection: keep-alive
Content-Length: 43
Content-Type: application/x-www-form-urlencoded; charset=UTF-8
Accept:*/*\r\n
Accept-Encoding: chunked, gzip\r\n
\r\n
account=Rvcg%3D%3D&passwd=f63ebe&salt=vpwMy
解析过程的本质就是遍历这些字节,以空格、回车换行符和冒号为分隔符提取内容。在具体实现时,Tomcat 使用的是一种有限状态机的编程方法,状态机在非阻塞和异步编程中很重要,因为如果因数据不完整导致处理中断,在读取更多数据后,可以很方便的从中断的地方继续。Tomcat 对请求行和头域分别设计了各种解析状态。
InternalNioInputBuffer 有一个成员变量 parsingRequestLinePhase,它的不同值表示不同的解析阶段:
解析头域信息设计了两种状态,分别是 HeaderParseStatus 和 HeaderParsePosition。HeaderParseStatus 表示整个头域解析的情况,它有三个值:
HeaderParseStatus 表示一个 Header 的 name-value 解析的状态,它有6个状态:
这块的代码实现分别在 InternalNioInputBuffer 的 parseRequestLine、parseHeaders 和 parseHeader 方法中,具体的代码注释这里不在贴出,原理就是遍历字节数组按状态取值。
那请求元素如何表示?整个解析过程都是在操作字节数组,一个简单的做法是直接转字符串存储,而 Tomcat 为了节省内存,设计了一个 MessageBytes 类,它用于表示底层 byte[] 子字节数组的视图,只在有需要的时候才转为字符串,并缓存,后续的读取操作也是尽可能的减少内存复制。
从通道读取数据的功能,由 InternalNioInputBuffer 的 fill 和 readSocket 方法完成。fill 方法主要做一些逻辑判断,读取请求体时,重置 pos 位置,以重复使用请求头数据后的缓冲区,具体代码如下:
protected boolean fill(boolean timeout, boolean block)
                    throws IOException, EOFException {
  // 尝试将一些数据读取到内部缓冲区
  boolean read = false; // 是否有数据读取
  if (parsingHeader) { // 如果当前处于解析请求头域的状态
    if (lastValid == buf.length) {
    // 判断已读字节是否超过缓冲区的大小
    // 这里应该使用 headerBufferSize 而不是 buf.length
      throw new IllegalArgumentException("Request header is too large");
    }
    // 从通道读取数据
    read = readSocket(timeout,block)>0;
  } else {
    // end 请求头数据在缓冲区结束的位置下标,也是请求体数据开始的下标
    lastValid = pos = end; // 重置 pos 的位置,重复利用 end 后的缓冲区
    read = readSocket(timeout, block)>0;
  }
  return read;
}
readSocket 执行读取操作,它有两种模式,阻塞读和非阻塞读:
private int readSocket(boolean timeout, boolean block) throws IOException {
  int nRead = 0; // 读取的字节数
  socket.getBufHandler().getReadBuffer().clear(); // 重置 NioChannel 中的读缓冲区
  if ( block ) { // true 模拟阻塞读取请求体数据
    Selector selector = null;
    try { selector = getSelectorPool().get(); }catch ( IOException x ) {}
    try {
      NioEndpoint.KeyAttachment att = (NioEndpoint.KeyAttachment)socket.getAttachment(false);
      if ( att == null ) throw new IOException("Key must be cancelled.");
      nRead = getSelectorPool().read(socket.getBufHandler().getReadBuffer(),
                        socket,selector,att.getTimeout());
    } catch ( EOFException eof ) { nRead = -1;
    } finally {
      if ( selector != null ) getSelectorPool().put(selector);
    }
  } else { // false 非阻塞读取请求头数据
    nRead = socket.read(socket.getBufHandler().getReadBuffer());
  }
  if (nRead > 0) {
    // 切换读取模式
    socket.getBufHandler().getReadBuffer().flip();
    socket.getBufHandler().getReadBuffer().limit(nRead);
    expand(nRead + pos); // 缓冲区没有必要扩展,高版本已移除
    socket.getBufHandler().getReadBuffer().get(buf, pos, nRead);
    lastValid = pos + nRead;
    return nRead;
  } else if (nRead == -1) { // 客户端关闭连接
    //return false;
    throw new EOFException(sm.getString("iib.eof.error"));
  } else { // 读取 0 个字节,说明通道数据还没准备好,继续读取
    return 0;
  }
}Tomcat 把请求体的读取和解析延迟到了 Servlet 读取请求参数的时候,此时的请求已经从 Connector 进入了 Container,需要再次从底层通道读取数据,来看下 Tomcat 是怎么设计的(可右键直接打开图片查看大图):

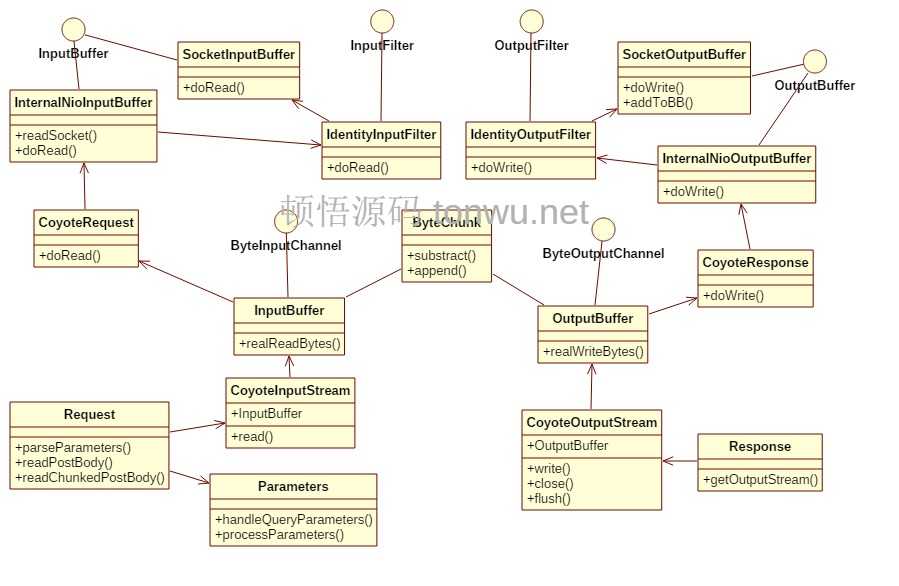
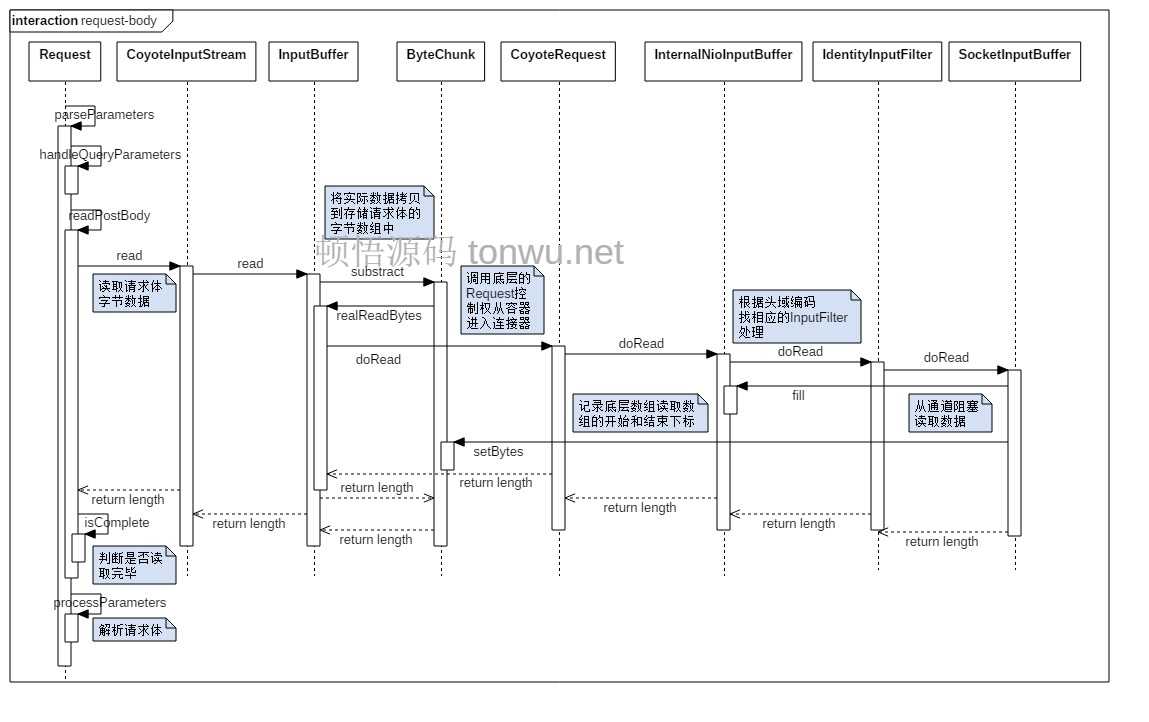
上面的类图包含了处理请求和响应的关键类、接口和方法,其中 ByteChunk 比较核心,有着承上启下的作用,它内部有 ByteInputChannel 和 ByteOutputChannel 两个接口,分别用于实际读取和实际写入的操作。请求体数据读取过程的方法调用如下(可右键直接打开图片查看大图):

identity 是定长解码,直接按照 Content-Length 的值,读取足够的字节就可以了。IdentityInputFilter 用一个成员变量 remaining 来控制是否读取了指定长度的数据,核心代码如下:
public int doRead(ByteChunk chunk, Request req) throws IOException {
  int result = -1; // 返回 -1 表示读取完毕
  if (contentLength >= 0) {
    if (remaining > 0) {
      // 使用 ByteChunk 记录底层数组读取的字节序列
      int nRead = buffer.doRead(chunk, req);
      if (nRead > remaining) { // 读太多了
        // 重新设置有效字节序列
        chunk.setBytes(chunk.getBytes(), chunk.getStart(), (int) remaining);
        result = (int) remaining;
      } else {
          result = nRead;
      }
      if (nRead > 0) {
        // 计算还要在读多少字节,可能为负数
        remaining = remaining - nRead;
      }
    } else {
      // 读取完毕,重置 ByteChunk
      chunk.recycle();
      result = -1;
    }
  }
  return result;
}
InputFilter 里的 buffer 引用的是 InternalNioInputBuffer 的内部类 SocketInputBuffer,它的作用就是控制和判断是否读取结束,实际的读取操作以及存储读取的内容都还是由 InternalNioInputBuffer 完成。一次读取完毕,容器通过 ByteChunk 类记录底层数组的引用和有效字节的位置,拉取实际的字节和判断是否还要继续读取。
chunked 是用于不确定请求体大小时的传输编码,解码读取的主要工作就是一直解析 chunk 块直到遇到一个大小为 0 的 Data chunk。rfc2616#section-3.6.1 中定义了 chunk 的格式:
Chunked-Body   = *chunk
                last-chunk
                trailer
                CRLF

chunk          = chunk-size [ chunk-extension ] CRLF
                chunk-data CRLF
chunk-size     = 1*HEX
last-chunk     = 1*("0") [ chunk-extension ] CRLF

chunk-extension= *( ";" chunk-ext-name [ "=" chunk-ext-val ] )
chunk-ext-name = token
chunk-ext-val  = token | quoted-string
chunk-data     = chunk-size(OCTET)
trailer        = *(entity-header CRLF)
其中,关键字段的意义是:
下面是一个尽可能展示上面的定义的 chunked 编码的例子:
HTTP/1.1 200 OK\r\n
Content-Type: text/html\r\n
Transfer-Encoding: chunked\r\n
Content-Encoding: gzip\r\n
Trailer: Expires\r\n
\r\n
Data chunk (15 octets)
  size: 66 0d 0a
  data: xx xx xx xx 0d 0a
Data chunk (4204 octets)
  size: 4204;ext-name=ext-val\r\n
Data chunk (3614 octets)
Data chunk (0 octets)
  size: 0d 0a
  data: 0d 0a
Expires: Wed, 21 Jan 2016 20:42:10 GMT\r\n
\r\n
rfc2616 中提供了一个解码 chunked 传输编码的伪代码:
length := 0
read chunk-size, chunk-extension (if any) and CRLF
while (chunk-size > 0) {
  read chunk-data and CRLF
  append chunk-data to entity-body
  length := length + chunk-size
  read chunk-size and CRLF
}
read entity-header
while (entity-header not empty) {
  append entity-header to existing header fields
  read entity-header
}
Content-Length := length
Remove "chunked" from Transfer-Encoding
逻辑还是比较清晰的,有问题可留言交流。Tomcat 实现 chunked 编码解析读取的类是 ChunkedInputFilter,来分析一下核心代码的实现,整个解析逻辑都在 doRead 方法中:
public int doRead(ByteChunk chunk, Request req) throws IOException {
    if (endChunk) {// 是否读取到了最后一个 chunk
      return -1; // -1 表示读取结束
  }
  checkError();
  if(needCRLFParse) {// 读取一个 chunk 前,是否需要解析 \r\n
      needCRLFParse = false;
      parseCRLF(false);
  }
  if (remaining <= 0) {
      if (!parseChunkHeader()) { // 读取 chunk-size
          throwIOException(sm.getString("chunkedInputFilter.invalidHeader"));
      }
      if (endChunk) {// 如果是最后一个块
          parseEndChunk();// 处理 Trailing Headers
          return -1;
      }
  }
  int result = 0;
  if (pos >= lastValid) { // 从通道读取数据
      if (readBytes() < 0) {
          throwIOException(sm.getString("chunkedInputFilter.eos"));
      }
  }
  // lastValid - pos 的值是读取的字节数
  if (remaining > (lastValid - pos)) {
      result = lastValid - pos;
      // 还剩多少要读取
      remaining = remaining - result;
      // ByteChunk 记录读取的数据
      chunk.setBytes(buf, pos, result);
      pos = lastValid;
  } else {
      result = remaining;
      chunk.setBytes(buf, pos, remaining); // 记录读取的数据
      pos = pos + remaining;
      remaining = 0;

      // 这时已经完成 chunk-body 的读取,解析 \r\n
      if ((pos+1) >= lastValid) {
          // 此时如果调用 parseCRLF 就会溢出缓冲区,接着会触发阻塞读取
          // 将解析推迟到下一个读取事件
          needCRLFParse = true;
      } else {
        // 立即解析 CRLF
          parseCRLF(false); //parse the CRLF immediately
      }
  }
  return result;
}
parseChunkHeader 就是读取并计算 chunk-size,对于扩展选项,Tomcat只是简单忽略:
// 十六进制字符转十进制数的数组,由 ASCII 表直接得来
private static final int[] DEC = {
    00, 01, 02, 03, 04, 05, 06, 07,  8,  9, -1, -1, -1, -1, -1, -1,
    -1, 10, 11, 12, 13, 14, 15, -1, -1, -1, -1, -1, -1, -1, -1, -1,
    -1, -1, -1, -1, -1, -1, -1, -1, -1, -1, -1, -1, -1, -1, -1, -1,
    -1, 10, 11, 12, 13, 14, 15,
};
public static int getDec(int index){
  return DEC[index - ‘0‘];
}
protected boolean parseChunkHeader() throws IOException {
  ...
  int result = 0;
  // 获取字符对应的十进制数
  int charValue = HexUtils.getDec(buf[pos]);
  if (charValue != -1 && readDigit < 8) {
    readDigit++;
    // 一个16进制数 4bit,左移4位合并低4位
    // 相当于 result = result * 16 + charValue;
    result = (result << 4) | charValue;
  }
  ...
}服务端接收到的参数形式可能有这种特殊格式:
tonwu.net/search?scope=b%20bs&q=%E5%88%9B
account=Rvcg%3D%3D&passwd=f63ebe&salt=vpwMy
这样的解析就涉及到了编码问题,GET 和 POST 请求的编码方法由页面设置的编码决定,也就是 <meta http-equiv="Content-Type" content="text/html;charset=utf-8"。如果 URL 中有查询参数,并且包含特殊字符或中文,就会使用它们的编码,格式为:%加字符的 ASCII 码,下面是一些常用的特殊符号和编码:
%2B   +     表示空格
%20   空格  也可使用 + 和编码
%2F   /     分割目录和子目录
%3F   ?     分割URI和参数
%25   %     指定特殊字符
%23   #     锚点位置
%26   &     参数间的分隔符
%3D   =     参数赋值
Tomcat 对请求参数解析的代码在 Parameters 类的 processParameters 方法中,其中要注意的是对 % 编码的处理,因为%后面跟的是实际数值的大写的16进制数字字符串,就和chunk-size类似要进行一次转换。
由于篇幅的原因下一篇将会继续分析 HTTP 响应的处理。
本文对请求头和请求体的读取和解析进行了分析。为了简单直观的理解具体的处理流程,尽可能的使用简洁的代码仿写了这部分功能。
源码地址:https://github.com/tonwu/rxtomcat 位于 rxtomcat-http 模块
标签:exception pre static 1.3 strong 目录 逻辑判断 info exp
原文地址:https://www.cnblogs.com/wskwbog/p/10698588.html