标签:enter target cond mouse blog erb style control val
原文:微信聊天和通讯录按钮样式一、先用Path画一下轮廓
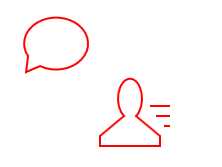
<Path Stroke="Red" StrokeThickness="1" Margin="10" StrokeDashCap="Round">
     <Path.Data>
         <GeometryGroup>
             <PathGeometry Figures="M 4,40 A 16,13 0 1 1 10,45 L 3,48 Z" />
         </GeometryGroup>
     </Path.Data>
</Path>
<Path Stroke="Red" StrokeThickness="1" StrokeDashCap="Round" Margin="50">
     <Path.Data>
         <GeometryGroup>
             <PathGeometry Figures="M 12,30 A 6,10 0 1 1 18,30 L 30,40 L 30,45 L 0,45 L 0,40Z" />
             <PathGeometry Figures="M 25,25 L 35,25"/>
             <PathGeometry Figures="M 28,30 L 35,30"/>
             <PathGeometry Figures="M 32,35 L 35,35"/>
         </GeometryGroup>
     </Path.Data>
</Path>
路径图如下

二、将路径应用的样式里
    <!--聊天按钮的样式-->
    <Style x:Key="ChatStyle" TargetType="{x:Type RadioButton}">
        <Setter Property="FocusVisualStyle" Value="{StaticResource ButtonFocusVisual}"/>
        <Setter Property="Background" Value="Transparent"/>
        <Setter Property="BorderBrush" Value="Transparent"/>
        <Setter Property="BorderThickness" Value="0"/>
        <Setter Property="Foreground" Value="{DynamicResource {x:Static SystemColors.ControlTextBrushKey}}"/>
        <Setter Property="HorizontalContentAlignment" Value="Center"/>
        <Setter Property="VerticalContentAlignment" Value="Center"/>
        <Setter Property="Padding" Value="1"/>
        <Setter Property="Template">
            <Setter.Value>
                <ControlTemplate TargetType="{x:Type RadioButton}">
                    <Border>
                        <Path x:Name="btnPath" StrokeThickness="1" Stroke="Gray" Fill="#FF3E3E40">
                            <Path.Data>
                                <GeometryGroup>
                                    <PathGeometry Figures="M 4,40 A 16,13 0 1 1 10,45 L 3,48 Z" />
                                </GeometryGroup>
                            </Path.Data>
                        </Path>
                    </Border>
                    <ControlTemplate.Triggers>
                        <Trigger Property="IsChecked" Value="true">
                            <Setter Property="Fill" Value="#FF14D212" TargetName="btnPath"/>
                            <Setter Property="Stroke" Value="#FF14D212" TargetName="btnPath"/>
                        </Trigger>
                        <Trigger Property="IsMouseOver" Value="true">
                            <Setter Property="Stroke" Value="White" TargetName="btnPath"/>
                        </Trigger>
                        <MultiTrigger>
                            <MultiTrigger.Conditions>
                                <Condition Property="IsChecked"  Value="true"/>
                                <Condition Property="IsMouseOver" Value="true"/>
                            </MultiTrigger.Conditions>
                            <MultiTrigger.Setters>
                                <Setter Property="Stroke" Value="#FF14D212" TargetName="btnPath"/>
                            </MultiTrigger.Setters>
                        </MultiTrigger>
                    </ControlTemplate.Triggers>
                </ControlTemplate>
            </Setter.Value>
        </Setter>
    </Style>

    <!--通讯录的样式-->
    <Style x:Key="FriendStyle" TargetType="{x:Type RadioButton}">
        <Setter Property="FocusVisualStyle" Value="{StaticResource ButtonFocusVisual}"/>
        <Setter Property="Background" Value="Transparent"/>
        <Setter Property="BorderBrush" Value="Transparent"/>
        <Setter Property="BorderThickness" Value="0"/>
        <Setter Property="Foreground" Value="{DynamicResource {x:Static SystemColors.ControlTextBrushKey}}"/>
        <Setter Property="HorizontalContentAlignment" Value="Center"/>
        <Setter Property="VerticalContentAlignment" Value="Center"/>
        <Setter Property="Padding" Value="1"/>
        <Setter Property="Template">
            <Setter.Value>
                <ControlTemplate TargetType="{x:Type RadioButton}">
                    <Border>
                        <Path x:Name="btnPath" StrokeThickness="1" Stroke="Gray" Fill="#FF3E3E40">
                            <Path.Data>
                                <GeometryGroup>
                                    <PathGeometry Figures="M 12,30 A 6,10 0 1 1 18,30 L 30,40 L 30,45 L 0,45 L 0,40Z" />
                                    <PathGeometry Figures="M 25,25 L 35,25"/>
                                    <PathGeometry Figures="M 28,30 L 35,30"/>
                                    <PathGeometry Figures="M 32,35 L 35,35"/>
                                </GeometryGroup>
                            </Path.Data>
                        </Path>
                    </Border>
                    <ControlTemplate.Triggers>
                        <Trigger Property="IsChecked" Value="true">
                            <Setter Property="Fill" Value="#FF14D212" TargetName="btnPath"/>
                            <Setter Property="Stroke" Value="#FF14D212" TargetName="btnPath"/>
                        </Trigger>
                        <Trigger Property="IsMouseOver" Value="true">
                            <Setter Property="Stroke" Value="White" TargetName="btnPath"/>
                        </Trigger>
                        <MultiTrigger>
                            <MultiTrigger.Conditions>
                                <Condition Property="IsChecked" Value="true"/>
                                <Condition Property="IsMouseOver" Value="true"/>
                            </MultiTrigger.Conditions>
                            <MultiTrigger.Setters>
                                <Setter Property="Stroke" Value="#FF14D212" TargetName="btnPath"/>
                            </MultiTrigger.Setters>
                        </MultiTrigger>
                    </ControlTemplate.Triggers>
                </ControlTemplate>
            </Setter.Value>
        </Setter>
    </Style>
看下效果图

注意要点有几个:
1、Path原来必须要有填充,也就是说Fill必须要有值,否则会认为是透明,点击不到。
2、一定要设置MultiTrigger,否则当button被选中的时候,鼠标划过,依然会变白色。
标签:enter target cond mouse blog erb style control val
原文地址:https://www.cnblogs.com/lonelyxmas/p/10789482.html