标签:select 记录 delete new bin 成功 tables back return
1.权限管理 1、创建账号
# 本地账号
create user ‘egon1‘@‘localhost‘ identified by ‘123‘; # mysql -uegon1 -p123
# 远程帐号
create user ‘egon2‘@‘192.168.31.10‘ identified by ‘123‘; # mysql -uegon2 -p123 -h 服务端ip
create user ‘egon3‘@‘192.168.31.%‘ identified by ‘123‘; # mysql -uegon3 -p123 -h 服务端ip
create user ‘egon3‘@‘%‘ identified by ‘123‘; # mysql -uegon3 -p123 -h 服务端ip
2、授权
user:*.*
db:db1.*
tables_priv:db1.t1
columns_priv:id,name
grant all on *.* to ‘egon1‘@‘localhost‘;
grant select on *.* to ‘egon1‘@‘localhost‘;
revoke select on *.* from ‘egon1‘@‘localhost‘;
grant select on db1.* to ‘egon1‘@‘localhost‘;
revoke select on db1.* from ‘egon1‘@‘localhost‘;
grant select on db1.t2 to ‘egon1‘@‘localhost‘;
revoke select on db1.t2 from ‘egon1‘@‘localhost‘;
grant select(id,name),update(age) on db1.t2 to ‘egon1‘@‘localhost‘;1.首先安装模块
pip install pymysql
2.准备数据
mysql> show create table userinfo\G;
*************************** 1. row ***************************
Table: userinfo
Create Table: CREATE TABLE `userinfo` (
`id` int(11) NOT NULL,
`name` varchar(10) DEFAULT NULL,
`password` varchar(20) DEFAULT NULL,
PRIMARY KEY (`id`)
) ENGINE=InnoDB DEFAULT CHARSET=utf8
1 row in set (0.00 sec)
ERROR:
No query specified
mysql>
mysql> select * from userinfo;
+----+------+----------+
| id | name | password |
+----+------+----------+
| 1 | vita | 123 |
| 2 | lili | 123 |
+----+------+----------+
2 rows in set (0.00 sec)
mysql>
3.pymysql连接数据库
#!/usr/bin/env python
# -*- coding:utf-8 -*-
# Author: vita
import pymysql
user=input(‘用户名: ‘).strip()
pwd=input(‘密码: ‘).strip()
#链接
conn=pymysql.connect(host=‘10.0.0.61‘,
user=‘root‘,
password=‘123‘,
database=‘db1‘,
charset=‘utf8‘)
#游标
#cursor=conn.cursor() #执行完毕返回的结果集默认以元组显示
cursor=conn.cursor(cursor=pymysql.cursors.DictCursor)
#执行sql语句
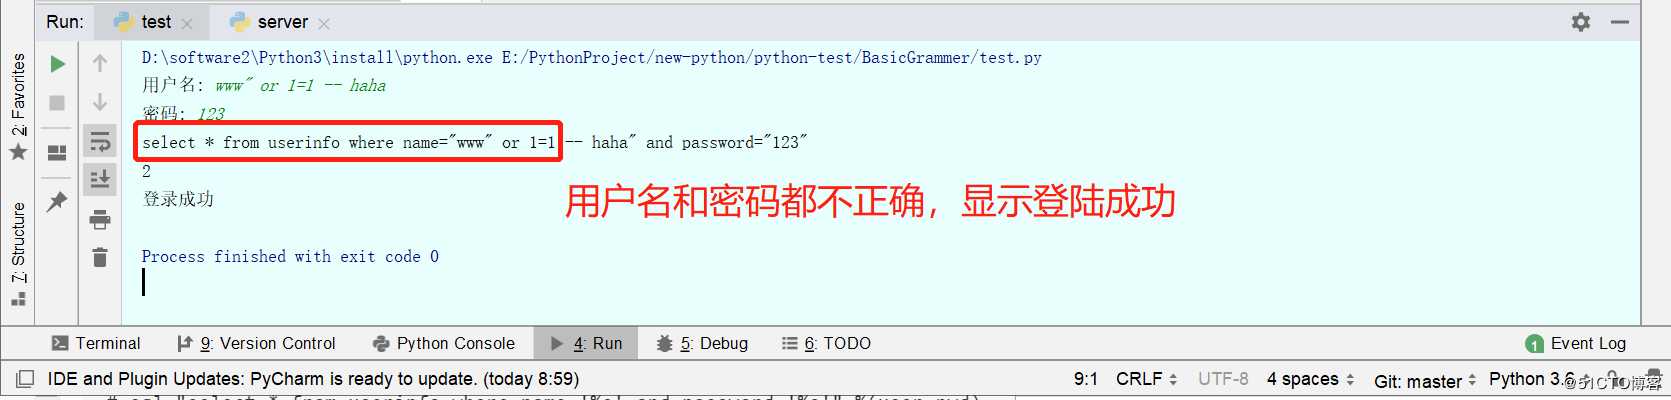
sql=‘select * from userinfo where name="%s" and password="%s"‘ %(user,pwd) #注意%s需要加引号
print(sql)
res=cursor.execute(sql) #执行sql语句,返回sql查询成功的记录数目
print(res)
cursor.close()
conn.close()
if res:
print(‘登录成功‘)
else:
print(‘登录失败‘)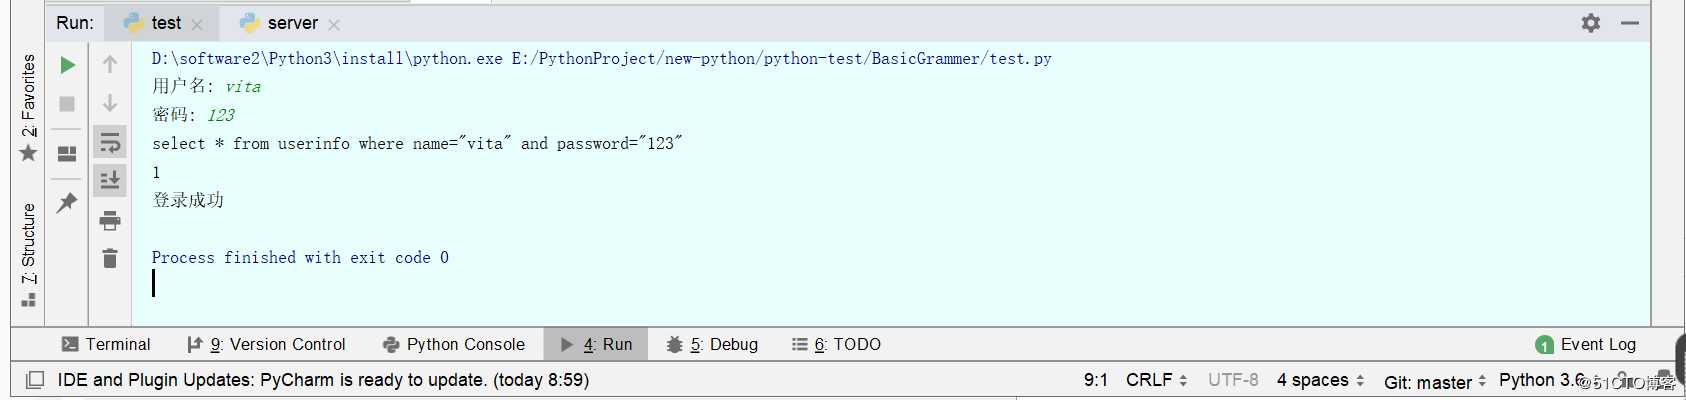
1.在sql语句中,--会注释掉后面的语句
2.sql注入之:用户存在,绕过密码
3.sql注入之:用户不存在,绕过了用户与密码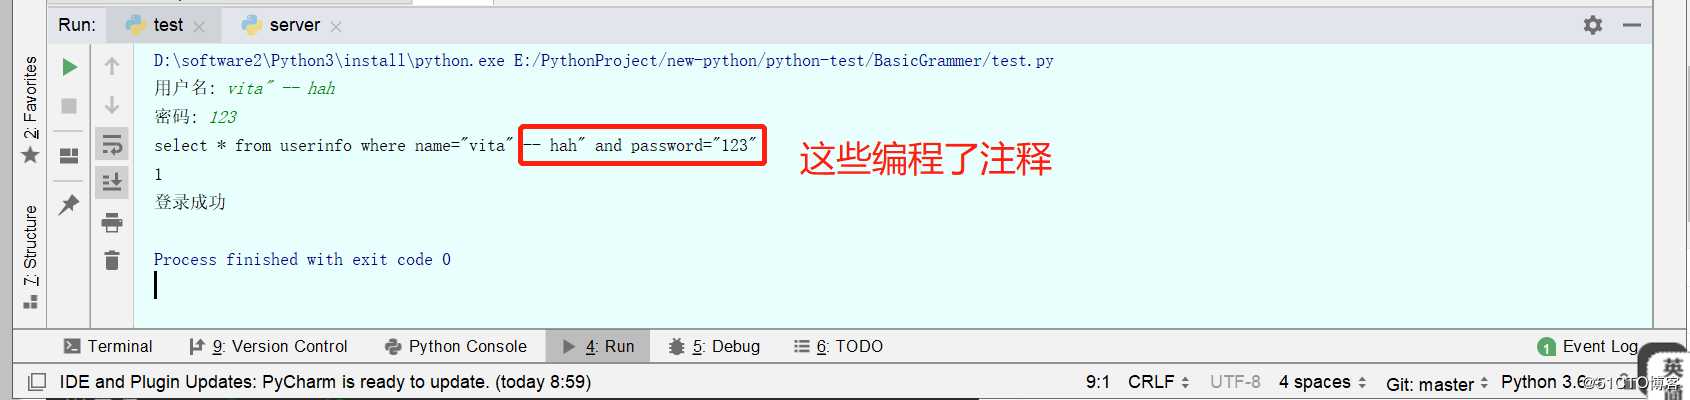
解决方法
# 原来是我们对sql进行字符串拼接
# sql="select * from userinfo where name=‘%s‘ and password=‘%s‘" %(user,pwd)
# print(sql)
# res=cursor.execute(sql)

#改写为(execute帮我们做字符串拼接,我们无需且一定不能再为%s加引号了)
sql="select * from userinfo where name=%s and password=%s"
#!!!注意%s需要去掉引号,因为pymysql会自动为我们加上
res=cursor.execute(sql,[user,pwd])
#pymysql模块自动帮我们解决sql注入的问题,只要我们按照pymysql的规矩来。import pymysql
#链接
conn=pymysql.connect(host=‘localhost‘,user=‘root‘,password=‘123‘,database=‘egon‘)
#游标
cursor=conn.cursor()
#执行sql语句
#part1
# sql=‘insert into userinfo(name,password) values("root","123456");‘
# res=cursor.execute(sql) #执行sql语句,返回sql影响成功的行数
# print(res)
#part2-插入一条语句
# sql=‘insert into userinfo(name,password) values(%s,%s);‘
# res=cursor.execute(sql,("root","123456")) #执行sql语句,返回sql影响成功的行数
# print(res)
#part3-插入多条数据
sql=‘insert into userinfo(name,password) values(%s,%s);‘
res=cursor.executemany(sql,[("root","123456"),("lhf","12356"),("eee","156")]) #执行sql语句,返回sql影响成功的行数
print(res)
conn.commit() #提交后才发现表中插入记录成功
cursor.close()
conn.close()#!/usr/bin/env python
# -*- coding:utf-8 -*-
# Author: vita
import pymysql
#链接
conn=pymysql.connect(host=‘10.0.0.61‘,
user=‘root‘,
password=‘123‘,
database=‘db1‘,
charset=‘utf8‘)
#游标
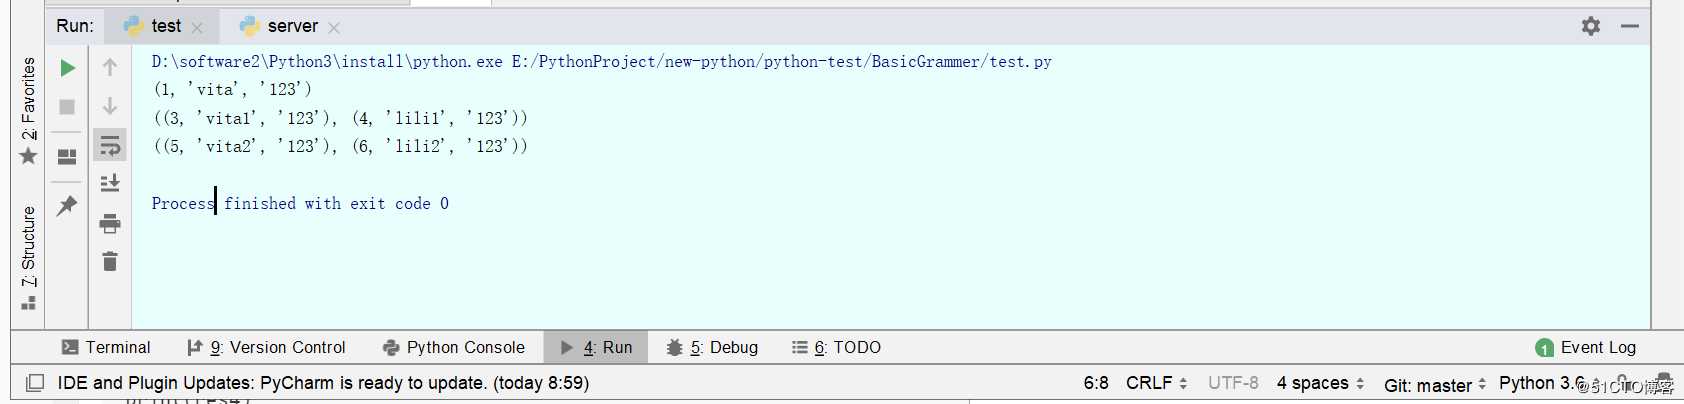
cursor=conn.cursor() #执行完毕返回的结果集默认以元组显示(1, ‘vita‘, ‘123‘)
#cursor=conn.cursor(cursor=pymysql.cursors.DictCursor)#{‘id‘: 1, ‘name‘: ‘vita‘, ‘password‘: ‘123‘}
#执行sql语句
sql=‘select * from userinfo‘
rows=cursor.execute(sql)
res1=cursor.fetchone()
cursor.scroll(2,mode=‘absolute‘) # 相对绝对位置移动,从头开始移动两个,所以下面从id=3开始
#cursor.scroll(2,mode=‘relative‘) # 相对当前位置移动
res2=cursor.fetchmany(2)
res3=cursor.fetchall()
print(res1)
print(res2)
print(res3)
mysql> show create table userinfo\G;
*************************** 1. row ***************************
       Table: userinfo
Create Table: CREATE TABLE `userinfo` (
  `id` int(11) NOT NULL AUTO_INCREMENT,
  `name` varchar(10) DEFAULT NULL,
  `password` varchar(20) DEFAULT NULL,
  PRIMARY KEY (`id`)
) ENGINE=InnoDB AUTO_INCREMENT=5 DEFAULT CHARSET=utf8
1 row in set (0.00 sec)

ERROR:
No query specified

mysql>

mysql> insert into userinfo values(‘vita2‘,‘123‘),(‘lili2‘,‘123‘),(‘vita‘,‘123‘);

#!/usr/bin/env python
# -*- coding:utf-8 -*-
# Author: vita
import pymysql
#链接
conn=pymysql.connect(host=‘10.0.0.61‘,
                     user=‘root‘,
                     password=‘123‘,
                     database=‘db1‘,
                     charset=‘utf8‘)
#游标
cursor=conn.cursor()
#执行sql语句
sql=‘insert into userinfo(name,password) values("xxx","123");‘
rows=cursor.execute(sql)
print(cursor.lastrowid)
conn.commit()
cursor.close()
conn.close()

mysql> select * from userinfo;
+----+-------+----------+
| id | name  | password |
+----+-------+----------+
|  1 | vita2 | 123      |
|  2 | lili2 | 123      |
|  3 | vita  | 123      |
|  4 | xxx   | 123      |
+----+-------+----------+
4 rows in set (0.00 sec)

mysql>
1.视图是一个虚拟表,本质是根据sql语句获取动态的数据集
2.之后就不需要写过长的sql语句,直接像使用表一样使用视图即可
3.从单个表中查询的数据创建的视图可以修改数据
4.从多个表中查询出的数据创建的视图只能用于查询
5.视图并不推荐使用,因为业务变化频繁,功能总在变如果表修改了,还要找到相应的视图进行修改。
mysql> create view user_view as select id,name from userinfo where name like ‘vita%‘;
Query OK, 0 rows affected (0.01 sec)

mysql> select * from user_view;
+----+-------+
| id | name  |
+----+-------+
|  1 | vita2 |
|  3 | vita  |
+----+-------+
2 rows in set (0.01 sec)

mysql> select * from userinfo where id in(select id from user_view);
+----+-------+----------+
| id | name  | password |
+----+-------+----------+
|  1 | vita2 | 123      |
|  3 | vita  | 123      |
+----+-------+----------+
2 rows in set (0.00 sec)

mysql>
"实际使用中,不应该修改视图,而且涉及多个表时,是无法修改视图中的记录的"
mysql> update user_view set name=‘new_vita‘ where id=1;#更改视图中的数据
Query OK, 1 row affected (0.00 sec)
Rows matched: 1  Changed: 1  Warnings: 0

mysql> insert into user_view values(6,‘add_vita‘);#往视图中插入数据
Query OK, 1 row affected (0.01 sec)

mysql> select * from user_view;#视图中被更改的数据和新加的数据都没有
+----+------+
| id | name |
+----+------+
|  3 | vita |
+----+------+
1 row in set (0.00 sec)

mysql> select * from userinfo;#修改的数据和新加的数据插入到了原表中
+----+----------+----------+
| id | name     | password |
+----+----------+----------+
|  1 | new_vita | 123      |
|  2 | lili2    | 123      |
|  3 | vita     | 123      |
|  4 | xxx      | 123      |
|  6 | add_vita | NULL     |
+----+----------+----------+
5 rows in set (0.00 sec)

mysql>

mysql> alter view user_view as select * from userinfo ;
Query OK, 0 rows affected (0.00 sec)

mysql> select * from user_view;
+----+----------+----------+
| id | name     | password |
+----+----------+----------+
|  1 | new_vita | 123      |
|  2 | lili2    | 123      |
|  3 | vita     | 123      |
|  4 | xxx      | 123      |
|  6 | add_vita | NULL     |
+----+----------+----------+
5 rows in set (0.00 sec)

mysql>
mysql> drop view user_view;
Query OK, 0 rows affected (0.00 sec)

mysql>
触发器可以为  [增删改查]  操作的前后增加一些数据操作行为
不推荐使用触发器,对于数据 [增删改查]操作前后,可以从代码层面进行控制,更加灵活。
触发器无法由用户直接调用,而是对表的增删改查操作被动引发的。# 插入前
CREATE TRIGGER tri_before_insert_tb1 BEFORE INSERT ON tb1 FOR EACH ROW
BEGIN
...
END
# 插入后
CREATE TRIGGER tri_after_insert_tb1 AFTER INSERT ON tb1 FOR EACH ROW
BEGIN
...
END
# 删除前
CREATE TRIGGER tri_before_delete_tb1 BEFORE DELETE ON tb1 FOR EACH ROW
BEGIN
...
END
# 删除后
CREATE TRIGGER tri_after_delete_tb1 AFTER DELETE ON tb1 FOR EACH ROW
BEGIN
...
END
# 更新前
CREATE TRIGGER tri_before_update_tb1 BEFORE UPDATE ON tb1 FOR EACH ROW
BEGIN
...
END
# 更新后
CREATE TRIGGER tri_after_update_tb1 AFTER UPDATE ON tb1 FOR EACH ROW
BEGIN
...
END#准备表
CREATE TABLE cmd (
id INT PRIMARY KEY auto_increment,
USER CHAR (32),
priv CHAR (10),
cmd CHAR (64),
sub_time datetime, #提交时间
success enum (‘yes‘, ‘no‘) #0代表执行失败
);
CREATE TABLE errlog (
id INT PRIMARY KEY auto_increment,
err_cmd CHAR (64),
err_time datetime
);
"NEW表示即将插入的数据行,OLD表示即将删除的数据行。"
#创建触发器
delimiter //
CREATE TRIGGER tri_after_insert_cmd AFTER INSERT ON cmd FOR EACH ROW
BEGIN
IF NEW.success = ‘no‘ THEN #等值判断只有一个等号
INSERT INTO errlog(err_cmd, err_time) VALUES(NEW.cmd, NEW.sub_time) ; #必须加分号
END IF ; #必须加分号
END//
delimiter ;
#往表cmd中插入记录,触发触发器,根据IF的条件决定是否插入错误日志
INSERT INTO cmd (
USER,
priv,
cmd,
sub_time,
success
)
VALUES
(‘egon‘,‘0755‘,‘ls -l /etc‘,NOW(),‘yes‘),
(‘egon‘,‘0755‘,‘cat /etc/passwd‘,NOW(),‘no‘),
(‘egon‘,‘0755‘,‘useradd xxx‘,NOW(),‘no‘),
(‘egon‘,‘0755‘,‘ps aux‘,NOW(),‘yes‘);
#查询错误日志,发现有两条
mysql> select * from errlog;
+----+-----------------+---------------------+
| id | err_cmd | err_time |
+----+-----------------+---------------------+
| 1 | cat /etc/passwd | 2017-09-14 22:18:48 |
| 2 | useradd xxx | 2017-09-14 22:18:48 |
+----+-----------------+---------------------+
rows in set (0.00 sec)
插入后触发触发器drop trigger tri_after_insert_cmd;存储过程包含了一系列可执行的sql语句,存储过程存放在mysql中,通过名字调用存储过程。
"使用存储过程的优点:"
1.可替代程序写的sql语句,实现了程序与sql语句的解耦。
2.基于网络传输,传输别名的数据量小,传输sql语句的数据量大。
"使用存储过程的缺点:"
1.扩展功能不便。delimiter //
create procedure p1()
BEGIN
select * from blog;
INSERT into blog(name,sub_time) values("xxx",now());
END //
delimiter ;
"mysql中调用p1存储过程"
mysql> call p1();
+----+----------+----------+
| id | name | password |
+----+----------+----------+
| 1 | new_vita | 123 |
| 2 | lili2 | 123 |
| 3 | vita | 123 |
| 4 | xxx | 123 |
| 6 | add_vita | NULL |
+----+----------+----------+
5 rows in set (0.00 sec)
Query OK, 0 rows affected (0.00 sec)
mysql>
"python中调用p1存储过程"
#!/usr/bin/env python
# -*- coding:utf-8 -*-
# Author: vita
import pymysql
#链接
conn=pymysql.connect(host=‘10.0.0.61‘,
user=‘root‘,
password=‘123‘,
database=‘db1‘,
charset=‘utf8‘)
#游标
cursor=conn.cursor()
cursor.callproc(‘p1‘)
print(cursor.fetchall())
对于存储过程,可以接收参数,其参数有三类:

#in          仅用于传入参数用
#out        仅用于返回值用
#inout     既可以传入又可以当作返回值

delimiter //
create procedure p2(
    in n1 int,
    in n2 int
)
BEGIN

    select * from userinfo where id between n1 and n2;
END //
delimiter ;

"mysql调用p2存储过程"
mysql> call p2(2,3);
+----+-------+----------+
| id | name  | password |
+----+-------+----------+
|  2 | lili2 | 123      |
|  3 | vita  | 123      |
+----+-------+----------+
2 rows in set (0.00 sec)

Query OK, 0 rows affected (0.00 sec)

mysql>

"python中调用p2存储过程"
#!/usr/bin/env python
# -*- coding:utf-8 -*-
# Author: vita
import pymysql
#链接
conn=pymysql.connect(host=‘10.0.0.61‘,
                     user=‘root‘,
                     password=‘123‘,
                     database=‘db1‘,
                     charset=‘utf8‘)
#游标
cursor=conn.cursor()
cursor.callproc(‘p2‘,(2,3))
print(cursor.fetchall())
delimiter //
create procedure p3(
    in n1 int,
    out res int
)
BEGIN

    select * from userinfo where id > n1;
    set res=1;
END //
delimiter ;

"MySQL中调用存储过程"
mysql> set @res=0;#0代表假(执行失败),1代表真(执行成功)
Query OK, 0 rows affected (0.00 sec)

mysql> call p3(2,@res);
+----+----------+----------+
| id | name     | password |
+----+----------+----------+
|  3 | vita     | 123      |
|  4 | xxx      | 123      |
|  6 | add_vita | NULL     |
+----+----------+----------+
3 rows in set (0.00 sec)

Query OK, 0 rows affected (0.00 sec)

mysql> select @res;
+------+
| @res |
+------+
|    1 |
+------+
1 row in set (0.00 sec)

mysql>

"python中调用存储过程"
#!/usr/bin/env python
# -*- coding:utf-8 -*-
# Author: vita
import pymysql
#链接
conn=pymysql.connect(host=‘10.0.0.61‘,
                     user=‘root‘,
                     password=‘123‘,
                     database=‘db1‘,
                     charset=‘utf8‘)
#游标
cursor=conn.cursor()
cursor.callproc(‘p3‘,(2,0))
print(cursor.fetchall())
cursor.execute(‘select @_p3_0,@_p3_1;‘) #@p3_0代表第一个参数,@p3_1代表第二个参数,即返回值
print(cursor.fetchall())

delimiter //
create procedure p4(
    inout n1 int
)
BEGIN
    select * from userinfo where id > n1;
    set n1 = 1;
END //
delimiter ;

"mysql调用"
mysql> set @x=2;
Query OK, 0 rows affected (0.00 sec)

mysql> call p4(@x);
+----+----------+----------+
| id | name     | password |
+----+----------+----------+
|  3 | vita     | 123      |
|  4 | xxx      | 123      |
|  6 | add_vita | NULL     |
+----+----------+----------+
3 rows in set (0.00 sec)

Query OK, 0 rows affected (0.00 sec)

mysql> select @x;
+------+
| @x   |
+------+
|    1 |
+------+
1 row in set (0.00 sec)

mysql>

"python中调用"
#!/usr/bin/env python
# -*- coding:utf-8 -*-
# Author: vita
import pymysql
#链接
conn=pymysql.connect(host=‘10.0.0.61‘,
                     user=‘root‘,
                     password=‘123‘,
                     database=‘db1‘,
                     charset=‘utf8‘)
#游标
cursor=conn.cursor()
cursor.callproc(‘p4‘,(2,))
print(cursor.fetchall())
cursor.execute(‘select @_p4_0;‘)
print(cursor.fetchall())

drop procedure proc_name;delimiter //
CREATE PROCEDURE proc_if ()
BEGIN
declare i int default 0;
if i = 1 THEN
SELECT 1;
ELSEIF i = 2 THEN
SELECT 2;
ELSE
SELECT 7;
END IF;
END //
delimiter ;
if条件语句"while循环"
delimiter //
CREATE PROCEDURE proc_while ()
BEGIN
DECLARE num INT ;
SET num = 0 ;
WHILE num < 10 DO
SELECT
num ;
SET num = num + 1 ;
END WHILE ;
END //
delimiter ;
" repeat循环"
delimiter //
CREATE PROCEDURE proc_repeat ()
BEGIN

    DECLARE i INT ;
    SET i = 0 ;
    repeat
        select i;
        set i = i + 1;
        until i >= 5
    end repeat;

END //
delimiter ;
"loop"
BEGIN

    declare i int default 0;
    loop_label: loop

        set i=i+1;
        if i<8 then
            iterate loop_label;
        end if;
        if i>=10 then
            leave loop_label;
        end if;
        select i;
    end loop loop_label;

END
事务有原子性,一致性,隔离性,持久性
其中原子性:一旦有错误,就回滚到最初样子。

create table user(
id int primary key auto_increment,
name char(32),
balance int
);

insert into user(name,balance)
values
(‘wsb‘,1000),
(‘egon‘,1000),
(‘ysb‘,1000);

#原子操作
start transaction;
update user set balance=900 where name=‘wsb‘; #买支付100元
update user set balance=1010 where name=‘egon‘; #中介拿走10元
update user set balance=1090 where name=‘ysb‘; #卖家拿到90元
commit;

#出现异常,回滚到初始状态
start transaction;
update user set balance=900 where name=‘wsb‘; #买支付100元
update user set balance=1010 where name=‘egon‘; #中介拿走10元
uppdate user set balance=1090 where name=‘ysb‘; #卖家拿到90元,出现异常没有拿到
rollback;
commit;
mysql> select * from user;
+----+------+---------+
| id | name | balance |
+----+------+---------+
|  1 | wsb  |    1000 |
|  2 | egon |    1000 |
|  3 | ysb  |    1000 |
+----+------+---------+
rows in set (0.00 sec)
#介绍
delimiter //
create procedure p4(
out status int
)
BEGIN
1. 声明如果出现异常则执行{
set status = 1;
rollback;
}
开始事务
-- 由秦兵账户减去100
-- 方少伟账户加90
-- 张根账户加10
commit;
结束
set status = 2;
END //
delimiter ;
#实现
delimiter //
create PROCEDURE p5(
OUT p_return_code tinyint
)
BEGIN
DECLARE exit handler for sqlexception
BEGIN
-- ERROR
set p_return_code = 1;
rollback;
END;
DECLARE exit handler for sqlwarning
BEGIN
-- WARNING
set p_return_code = 2;
rollback;
END;
START TRANSACTION;
DELETE from tb1; #执行失败
insert into blog(name,sub_time) values(‘yyy‘,now());
COMMIT;
-- SUCCESS
set p_return_code = 0; #0代表执行成功
END //
delimiter ;
#在mysql中调用存储过程
mysql> set @res=111;
Query OK, 0 rows affected (0.00 sec)
mysql> call p5(@res);
Query OK, 0 rows affected (0.00 sec)
mysql> select @res;
+------+
| @res |
+------+
| 1 |
+------+
1 row in set (0.00 sec)
###################################
"在python中基于pymysql调用存储过程"
#!/usr/bin/env python
# -*- coding:utf-8 -*-
# Author: vita
import pymysql
#链接
conn=pymysql.connect(host=‘10.0.0.61‘,
user=‘root‘,
password=‘123‘,
database=‘db1‘,
charset=‘utf8‘)
#游标
cursor=conn.cursor()
cursor.callproc(‘p5‘,(2,))
print(cursor.fetchall())
cursor.execute(‘select @_p5_0;‘)
print(cursor.fetchall())
mysql> SELECT DATE_FORMAT(‘2009-10-04 22:23:00‘, ‘%W %M %Y‘);
        -> ‘Sunday October 2009‘
mysql> SELECT DATE_FORMAT(‘2007-10-04 22:23:00‘, ‘%H:%i:%s‘);
        -> ‘22:23:00‘
mysql> SELECT DATE_FORMAT(‘1900-10-04 22:23:00‘,
    ->                 ‘%D %y %a %d %m %b %j‘);
        -> ‘4th 00 Thu 04 10 Oct 277‘
mysql> SELECT DATE_FORMAT(‘1997-10-04 22:23:00‘,
    ->                 ‘%H %k %I %r %T %S %w‘);
        -> ‘22 22 10 10:23:00 PM 22:23:00 00 6‘
mysql> SELECT DATE_FORMAT(‘1999-01-01‘, ‘%X %V‘);
        -> ‘1998 52‘
mysql> SELECT DATE_FORMAT(‘2006-06-00‘, ‘%d‘);
        -> ‘00‘

#2 准备表和记录
CREATE TABLE blog (
    id INT PRIMARY KEY auto_increment,
    NAME CHAR (32),
    sub_time datetime
);

INSERT INTO blog (NAME, sub_time)
VALUES
    (‘第1篇‘,‘2015-03-01 11:31:21‘),
    (‘第2篇‘,‘2015-03-11 16:31:21‘),
    (‘第3篇‘,‘2016-07-01 10:21:31‘),
    (‘第4篇‘,‘2016-07-22 09:23:21‘),
    (‘第5篇‘,‘2016-07-23 10:11:11‘),
    (‘第6篇‘,‘2016-07-25 11:21:31‘),
    (‘第7篇‘,‘2017-03-01 15:33:21‘),
    (‘第8篇‘,‘2017-03-01 17:32:21‘),
    (‘第9篇‘,‘2017-03-01 18:31:21‘);

#3. 提取sub_time字段的值,按照格式后的结果即"年月"来分组
SELECT DATE_FORMAT(sub_time,‘%Y-%m‘),COUNT(1) FROM blog GROUP BY DATE_FORMAT(sub_time,‘%Y-%m‘);

#结果
+-------------------------------+----------+
| DATE_FORMAT(sub_time,‘%Y-%m‘) | COUNT(1) |
+-------------------------------+----------+
| 2015-03                       |        2 |
| 2016-07                       |        4 |
| 2017-03                       |        3 |
+-------------------------------+----------+
rows in set (0.00 sec)
标签:select 记录 delete new bin 成功 tables back return
原文地址:https://blog.51cto.com/10983441/2399811