标签:b2b pix emc new nts stack rect controls header
除了以外观为卖点的控件库,WPF的控件库都默认使用“素颜”的外观,然后再提供一些主题包。这样做的最大好处是可以和原生控件或其它控件库兼容,而且对于大部分人来说模仿原生的主题也比自己设计一套好看的UI容易得多。
WPF有以下几种原生主题:
| 主题文件 | 桌面主题 |
|---|---|
| Classic.xaml | Windows XP 操作系统上的经典 Windows 外观(Windows 95、Windows 98 和 Windows 2000)。 |
| Luna.NormalColor.xaml | Windows XP 上的默认蓝色主题。 |
| Luna.Homestead.xaml | Windows XP 上的橄榄色主题。 |
| Luna.Metallic.xaml | Windows XP 上的银色主题。 |
| Royale.NormalColor.xaml | Windows XP Media Center Edition 操作系统上的默认主题。 |
| Aero.NormalColor.xaml | Windows Vista 操作系统上的默认主题。 |
Win8之后WPF更新了Aero2和AeroLite两种主题,关于Aero、Aero2、AeroLite具体可见这个网页。再之后微软就没有更新WPF主题了。
如果不在代码中指定主题,WPF大概就是用这段代码确定主题,也就是说默认是Aero,如果在Win8或以上自动转为Aero2:
_themeName = themeName.ToString();
_themeName = Path.GetFileNameWithoutExtension(_themeName);

if(String.Compare(_themeName, "aero", StringComparison.OrdinalIgnoreCase) == 0 && Utilities.IsOSWindows8OrNewer)
{
    _themeName = "Aero2";
}由于我暂时不想兼容Win7,而且我又不讨厌Win8的风格,所以Kino.Toolkit.Wpf直接选择了Aero2作为控件库的主题。

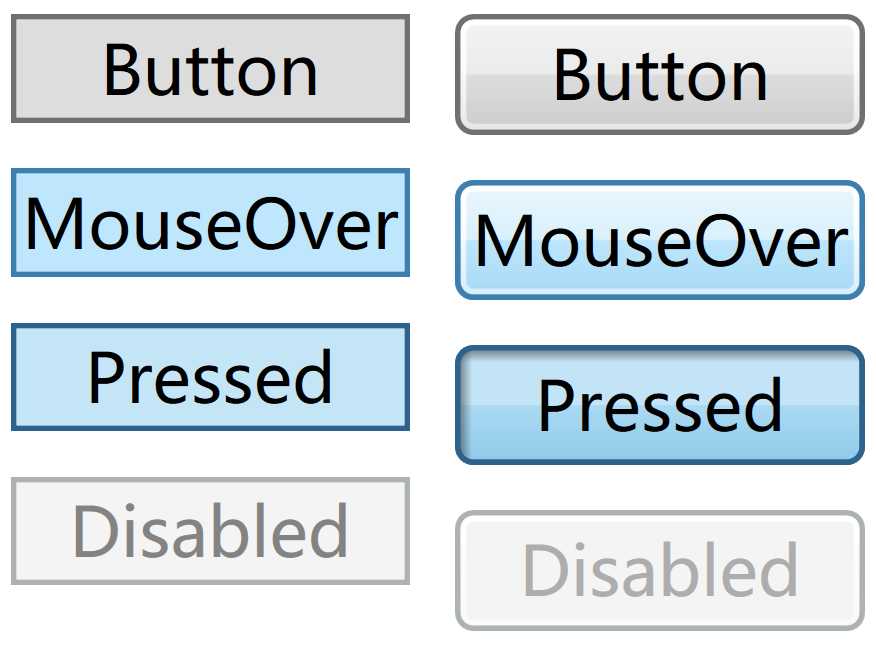
上面分别是Aero2(左)和Aero(右)的Button在几种状态下的外观,从中可以看出Aero2的设计是扁平化的风格,移除圆角、渐变等装饰性元素,以实用为目的。这样一来控件模板的结构更加简单(如Button只有Border和ContentPresenter 两个元素),移除装饰性元素更节省空间,而且渐变在质量较差或阳光下很影响阅读,圆角则是占用更多空间而且在低分辨率下表现不好。
总的来说就是以实用为目的,尽量简单,减少装饰性元素。
<Style x:Key="FocusVisual">
    <Setter Property="Control.Template">
        <Setter.Value>
            <ControlTemplate>
                <Rectangle Margin="2" SnapsToDevicePixels="true" Stroke="{DynamicResource {x:Static SystemColors.ControlTextBrushKey}}" StrokeThickness="1" StrokeDashArray="1 2"/>
            </ControlTemplate>
        </Setter.Value>
    </Setter>
</Style>
<SolidColorBrush x:Key="Button.Static.Background" Color="#FFDDDDDD"/>
<SolidColorBrush x:Key="Button.Static.Border" Color="#FF707070"/>
<SolidColorBrush x:Key="Button.MouseOver.Background" Color="#FFBEE6FD"/>
<SolidColorBrush x:Key="Button.MouseOver.Border" Color="#FF3C7FB1"/>
<SolidColorBrush x:Key="Button.Pressed.Background" Color="#FFC4E5F6"/>
<SolidColorBrush x:Key="Button.Pressed.Border" Color="#FF2C628B"/>
<SolidColorBrush x:Key="Button.Disabled.Background" Color="#FFF4F4F4"/>
<SolidColorBrush x:Key="Button.Disabled.Border" Color="#FFADB2B5"/>
<SolidColorBrush x:Key="Button.Disabled.Foreground" Color="#FF838383"/>
<Style TargetType="{x:Type Button}">
    <Setter Property="FocusVisualStyle" Value="{StaticResource FocusVisual}"/>
    <Setter Property="Background" Value="{StaticResource Button.Static.Background}"/>
    <Setter Property="BorderBrush" Value="{StaticResource Button.Static.Border}"/>
    <Setter Property="Foreground" Value="{DynamicResource {x:Static SystemColors.ControlTextBrushKey}}"/>
    <Setter Property="BorderThickness" Value="1"/>
    <Setter Property="HorizontalContentAlignment" Value="Center"/>
    <Setter Property="VerticalContentAlignment" Value="Center"/>
    <Setter Property="Padding" Value="1"/>
    <Setter Property="Template">
        <Setter.Value>
            <ControlTemplate TargetType="{x:Type Button}">
                <Border x:Name="border" BorderBrush="{TemplateBinding BorderBrush}" BorderThickness="{TemplateBinding BorderThickness}" Background="{TemplateBinding Background}" SnapsToDevicePixels="true">
                    <ContentPresenter x:Name="contentPresenter" Focusable="False" HorizontalAlignment="{TemplateBinding HorizontalContentAlignment}"
                                      Margin="{TemplateBinding Padding}" RecognizesAccessKey="True" SnapsToDevicePixels="{TemplateBinding SnapsToDevicePixels}" VerticalAlignment="{TemplateBinding VerticalContentAlignment}"/>
                </Border>
                <ControlTemplate.Triggers>
                    <Trigger Property="IsDefaulted" Value="true">
                        <Setter Property="BorderBrush" TargetName="border" Value="{DynamicResource {x:Static SystemColors.HighlightBrushKey}}"/>
                    </Trigger>
                    <Trigger Property="IsMouseOver" Value="true">
                        <Setter Property="Background" TargetName="border" Value="{StaticResource Button.MouseOver.Background}"/>
                        <Setter Property="BorderBrush" TargetName="border" Value="{StaticResource Button.MouseOver.Border}"/>
                    </Trigger>
                    <Trigger Property="IsPressed" Value="true">
                        <Setter Property="Background" TargetName="border" Value="{StaticResource Button.Pressed.Background}"/>
                        <Setter Property="BorderBrush" TargetName="border" Value="{StaticResource Button.Pressed.Border}"/>
                    </Trigger>
                    <Trigger Property="IsEnabled" Value="false">
                        <Setter Property="Background" TargetName="border" Value="{StaticResource Button.Disabled.Background}"/>
                        <Setter Property="BorderBrush" TargetName="border" Value="{StaticResource Button.Disabled.Border}"/>
                        <Setter Property="TextElement.Foreground" TargetName="contentPresenter" Value="{StaticResource Button.Disabled.Foreground}"/>
                    </Trigger>
                </ControlTemplate.Triggers>
            </ControlTemplate>
        </Setter.Value>
    </Setter>
</Style>
这是Aero2使用Blend获取的Button控件模板。因为Button是最基础最常用最具代表性的控件,所以以它为例谈谈Aero2主题中的各种细节。
首先考虑下控件是否有必要有统一的尺寸。
我记得很久很久以前微软有份文档要求桌面按钮的高度是22像素(有可能是23,已经不记得了)。微软自己有没有遵守?真是太看得起微软了。


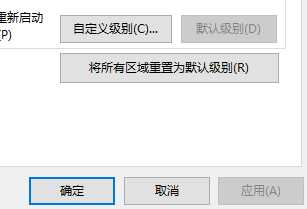
就以IE来说,上图从上到下几组按钮的高度分别是21,28,24像素。

这个页面大部分按钮都是28,只有中间那个“将所有区域重置为默认级别”是30像素。
可以看出,微软一直以来开放、包容、拥抱多元化的策略,在IE上可以说是完美体现。作为对比我看了看Chrome的类似按钮,统一为32像素,看来有很好地执行Material Design中"所有距离,尺寸都应该是8dp的整数倍"的要求(到处都是8,可以说深得中国人欢心)。
<Rectangle Height="1" Fill="Gray" />
<StackPanel Orientation="Horizontal"
            HorizontalAlignment="Center">
    <Button Content="Button" VerticalAlignment="Center" />
    <TextBox Text="TextBox" VerticalAlignment="Center" />
    <PasswordBox Password="password" VerticalAlignment="Center" />
    <ComboBox VerticalAlignment="Center">
        <ComboBoxItem Content="ComboBox" IsSelected="True"/>
    </ComboBox>
    <DatePicker VerticalAlignment="Center"/>
</StackPanel>
<Rectangle Height="1" Fill="Gray" />
顺便拿Button与WPF的其它控件、及UWP的相同控件做横向对比,使用相同的XAML产生的UI如上图所示(上为UWP,下为WPF)。可以看出UWP的表单元素基本上完全统一高度,而WPF则根据内容自适应。
总结来说,WPF原生控件通常没有设置具体的尺寸,所以模仿Aero2主题的自定义控件也不应该改变这个行为,只需控件要能够清晰展示数据及容易操作就好(也就是符合基本的UI设计原则)。
我建议在实际项目中根据需要使用样式将按钮的高度统一为24、28、32像素(The sizes, margins, and positions of UI elements should always be in multiples of 4 epx in your UWP apps.,因为Windows系统的缩放比例总是5/4(125%)、6/4(150%)、7/4(175%)、8/4(200%),所以尺寸最好是4的倍数,真不吉利)。
从Button的控件模板可以看到Button的字体颜色使用了{DynamicResource {x:Static SystemColors.ControlTextBrushKey}}。WPF为系统环境封装了三个类,用于访问系统环境设置:
使用方式可以参考资源帮助主题。
这些设置只应用作参考,可以看到Button也只是主要使用了ControlTextBrushKey,Aero2主题有自己的颜色风格,不会跟随系统而改变。

再次横向比较一下,这次试用Disabled状态作比较,可以看到每个控件的边框无论在Enabled或Disabled的状态下边框颜色都不一样(除了TextBox和PasswordBox,他们关系好)。
因为看不到Aero2在颜色上有什么要求,我的建议是,如果自定义的控件长得像TextBox就使用TextBox的颜色设置,长得像Button的就用Button,总之尽量模仿原生控件,颜色也尽量使用蓝色或灰色就可以了。
只有Menu、StatusBar、Toolbar等有限几个控件会使用SystemFonts的值,其它都可以使用继承值。这样可以方便地通过在根元素设置字体来统一字体的使用。
几乎、完全、没有。也许是为了兼顾Windows的UI,或者照顾低端配置的电脑,Aero2里真的几乎完全看不到动画效果,一眼看过去所有Storyboard的Duration都是0。也好,以和Aero2统一风格作借口我也可以不做动画啦。
最近我发现lindexi这样介绍我:

其实我也并不是那么喜欢亲自写动画,只是WPF和UWP里连最基本的都没提供所以我才在这方面鼓起干劲努力了一把。
<ControlTemplate TargetType="local:KinoButton">
    <Border x:Name="border"
            BorderBrush="{TemplateBinding BorderBrush}"
            BorderThickness="{TemplateBinding BorderThickness}"
            Background="{TemplateBinding Background}"
            SnapsToDevicePixels="true">
        <VisualStateManager.VisualStateGroups>
            <VisualStateGroup x:Name="CommonStates">
                <VisualState x:Name="Normal" />
                <VisualState x:Name="MouseOver">
                    <Storyboard>
                        <ObjectAnimationUsingKeyFrames Storyboard.TargetProperty="(Panel.Background)"
                                                       Storyboard.TargetName="border">
                            <DiscreteObjectKeyFrame KeyTime="0"
                                                    Value="{StaticResource Button.MouseOver.Background}" />
                        </ObjectAnimationUsingKeyFrames>
                        <ObjectAnimationUsingKeyFrames Storyboard.TargetProperty="(Border.BorderBrush)"
                                                       Storyboard.TargetName="border">
                            <DiscreteObjectKeyFrame KeyTime="0"
                                                    Value="{StaticResource Button.MouseOver.Border}" />
                        </ObjectAnimationUsingKeyFrames>
                    </Storyboard>
                </VisualState>
                <VisualState x:Name="Pressed">
                    <Storyboard>
                        <ObjectAnimationUsingKeyFrames Storyboard.TargetProperty="(Border.BorderBrush)"
                                                       Storyboard.TargetName="border">
                            <DiscreteObjectKeyFrame KeyTime="0"
                                                    Value="{StaticResource Button.Pressed.Border}" />
                        </ObjectAnimationUsingKeyFrames>
                        <ObjectAnimationUsingKeyFrames Storyboard.TargetProperty="(Panel.Background)"
                                                       Storyboard.TargetName="border">
                            <DiscreteObjectKeyFrame KeyTime="0"
                                                    Value="{StaticResource Button.Pressed.Background}" />
                        </ObjectAnimationUsingKeyFrames>
                    </Storyboard>
                </VisualState>
                <VisualState x:Name="Disabled">
                    <Storyboard>
                        <ObjectAnimationUsingKeyFrames Storyboard.TargetProperty="(TextElement.Foreground)"
                                                       Storyboard.TargetName="contentPresenter">
                            <DiscreteObjectKeyFrame KeyTime="0"
                                                    Value="{StaticResource Button.Disabled.Foreground}" />
                        </ObjectAnimationUsingKeyFrames>
                        <ObjectAnimationUsingKeyFrames Storyboard.TargetProperty="(Panel.Background)"
                                                       Storyboard.TargetName="border">
                            <DiscreteObjectKeyFrame KeyTime="0"
                                                    Value="{StaticResource Button.Disabled.Background}" />
                        </ObjectAnimationUsingKeyFrames>
                        <ObjectAnimationUsingKeyFrames Storyboard.TargetProperty="(Border.BorderBrush)"
                                                       Storyboard.TargetName="border">
                            <DiscreteObjectKeyFrame KeyTime="0"
                                                    Value="{StaticResource Button.Disabled.Border}" />
                        </ObjectAnimationUsingKeyFrames>
                    </Storyboard>
                </VisualState>
            </VisualStateGroup>
        </VisualStateManager.VisualStateGroups>
        <Grid   HorizontalAlignment="{TemplateBinding HorizontalContentAlignment}"
                VerticalAlignment="{TemplateBinding VerticalContentAlignment}"
                Margin="{TemplateBinding Padding}">
            <Grid.ColumnDefinitions>
                <ColumnDefinition Width="Auto" />
                <ColumnDefinition />
            </Grid.ColumnDefinitions>
            <!--comecode-->

            <ContentPresenter x:Name="contentPresenter"
                              Grid.Column="1"
                              Focusable="False"
                              RecognizesAccessKey="True"
                              VerticalAlignment="{TemplateBinding VerticalContentAlignment}"
                              SnapsToDevicePixels="{TemplateBinding SnapsToDevicePixels}" />
        </Grid>
    </Border>
    <ControlTemplate.Triggers>
        <Trigger Property="IsDefaulted"
                 Value="true">
            <Setter Property="BorderBrush"
                    TargetName="border"
                    Value="{DynamicResource {x:Static SystemColors.HighlightBrushKey}}" />
        </Trigger>
    </ControlTemplate.Triggers>
</ControlTemplate>出于好玩,我把KinoButton(主要是在Button的基础上添加了Icon的功能)的控件模板从使用Trigger改为尽量使用VisualState,这样做没什么实际意义,真的只是好玩而已,而且XAML的行数还增加了不少。
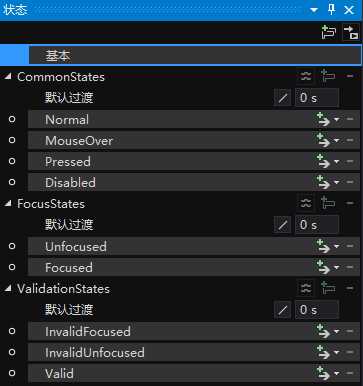
不过在实现其它自定义控件的时候我也比较倾向提供VisualState,因为这样可以明确指出控件外观有几种状态,避免了混轮,而且提供了VisualState可以更方便扩展。这点WPF原生控件也是一样的,它们很多都没有声明TemplateVisualState,而且ControlTemplate也没有使用VisualState,但使用Blend编辑控件模板还是可以在“状态”面板看到它的TemplateVisualState(其中FocusStates和ValidationStates可以不使用,如果修改了这两组状态也就是让控件外观更个性化而已)。对最终用户来说多一个选择并不是坏事。

通过这篇文章读者应该对Aero2的风格有了一定程度的了解。更多Aero和Aero2的相关信息可以看这个Github项目。
很多控件库都会提供额外的主题包,这点可以放到后面再考虑。
Control样式和模板
资源帮助主题
PresentationTheme.Aero
[WPF自定义控件库]以Button为例谈谈如何模仿Aero2主题
标签:b2b pix emc new nts stack rect controls header
原文地址:https://www.cnblogs.com/dino623/p/Aero2Theme.html