标签:简单的 编译安装 vim OWIN may 关键字 confirm sele 使用
由于准备把个人电脑的整体环境转到Linux下,所以准备做一个记录来记录在Linux下要配置的一些奇奇怪怪的插件或者环境。考虑到以后工作中可能会没有su权限,所以整体安装尽量采用源码编译的方式,但会比较吃配置,有些情况下编译还是比较花时间的,尽量不要在虚拟机中。
原文地址
有可能会出现的问题:
You may need to install a package called 'curses-devel' or 'ncurses-devel' on your system. 相关内容
一般情况下都会有这个库,也可以采用源码安装方式:link
在最后的设置成默认的shell中我的做法和原博主有些不一样,我修改了~/.bashrc中相关内容,即启动bash后再启动zsh
默认的zsh是不显示绝对路径只显示当前目录的名字,这一点比较难受;
修改方法
原文地址
当然原博主安装的位置有一丢丢的奇怪,所以可以在./configure的时候把安装位置修改到一个合适的位置。
tmux比较简单,安装好了应该没什么需要额外配置的了,当然有兴趣的也可以把按键改到顺手的地方
记得把tmux加到~/.bashrc 或者 ~/.zshrc中,这样子每次启动就是在tmux环境下了
使用教程
vim确实可以算整个配置中的大头了,详细弄弄花上一整天的时间也不是没有可能。其中vim里最烦人的就要算youcompleteme的配置了,我的方法可能并不能全部work。
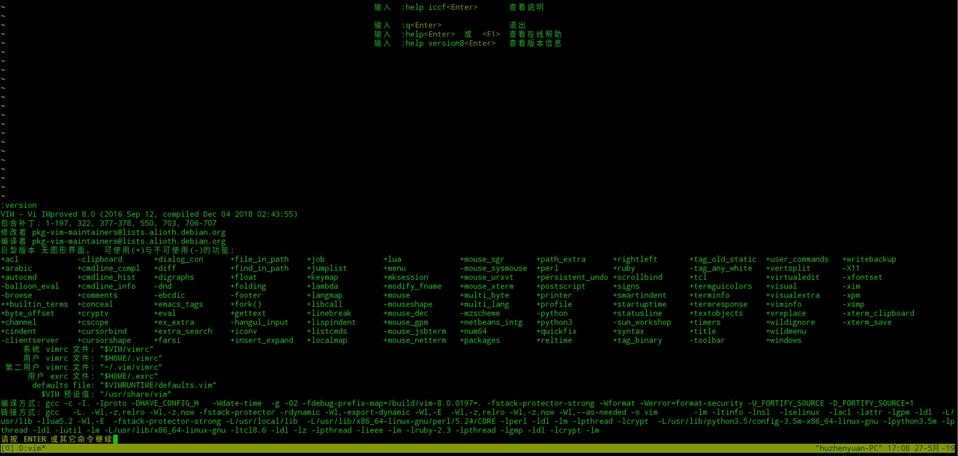
首先我们需要一个支持python/python3的vim,版本要 >= 7.4.1578
打开vim后直接:version查看版本

注意python/python3之前要有一个加号,不然需要重装vim
当然我们假设以后的工作环境是会主动提供支持python的vim的,不然源码安装比较麻烦,就不在这里展开了
apt-get 安装支持python的vim:
先卸载:sudo apt remove vim
再安装:sudo apt install vim-nox
配置vim第一步:
github地址
教程还是比较详细的,简单来说就是先
git clone https://github.com/VundleVim/Vundle.vim.git ~/.vim/bundle/Vundle.vim然后在~/.vimrc最顶上加上这么一段话
set nocompatible              " be iMproved, required
filetype off                  " required

" set the runtime path to include Vundle and initialize
set rtp+=~/.vim/bundle/Vundle.vim
call vundle#begin()
" alternatively, pass a path where Vundle should install plugins
"call vundle#begin('~/some/path/here')

" let Vundle manage Vundle, required
Plugin 'VundleVim/Vundle.vim'

" All of your Plugins must be added before the following line
call vundle#end()            " required
filetype plugin indent on    " required
" To ignore plugin indent changes, instead use:
"filetype plugin on
"
" Brief help
" :PluginList       - lists configured plugins
" :PluginInstall    - installs plugins; append `!` to update or just :PluginUpdate
" :PluginSearch foo - searches for foo; append `!` to refresh local cache
" :PluginClean      - confirms removal of unused plugins; append `!` to auto-approve removal
"
" see :h vundle for more details or wiki for FAQ
" Put your non-Plugin stuff after this line然后保存,然后:PluginInstall
Vundle就安装完成了。
之后就是重头戏:
github地址
首先,在vundle中加入对应的配置
Plugin 'Valloric/YouCompleteMe'安装分两种,源码编译安装与apt-get安装
比较简单的apt-get安装:
sudo apt install build-essential cmake python3-dev装就完事了
之后加上c-family的语义支持
cd ~/.vim/bundle/YouCompleteMe
python3 install.py --clang-completer
至于源码安装...
先要安装libclang
相关教程
然后将编译好的相关文件(bin,lib,include之类)放入~/ycm_temp/llvm_root_dir
编译ycm_core:
建立临时文件夹
cd ~
mkdir ycm_build
cd ycm_build
然后编译:
cmake -G "<generator>" -DPATH_TO_LLVM_ROOT=~/ycm_temp/llvm_root_dir . ~/.vim/bundle/YouCompleteMe/third_party/ycmd/cppgenerator即指Makefiles
在vimrc中加入let g:ycm_clangd_binary_path = "/path/to/clangd"
配置ycm相关:
在vimrc中加入相关配置:链接
ycm_extra_conf.py:链接
vim nerdtree相关:链接
配色相关:链接
全部配置:
set nocompatible              " be iMproved, required
filetype off                  " required

" set the runtime path to include Vundle and initialize
set rtp+=~/.vim/bundle/Vundle.vim
call vundle#begin()
" alternatively, pass a path where Vundle should install plugins
"call vundle#begin('~/some/path/here')

" let Vundle manage Vundle, required
Plugin 'VundleVim/Vundle.vim'
Plugin 'Valloric/YouCompleteMe'
Plugin 'git://github.com/scrooloose/nerdtree.git'

" All of your Plugins must be added before the following line
call vundle#end()            " required
filetype plugin indent on    " required
" To ignore plugin indent changes, instead use:
"filetype plugin on
"
" Brief help
" :PluginList       - lists configured plugins
" :PluginInstall    - installs plugins; append `!` to update or just :PluginUpdate
" :PluginSearch foo - searches for foo; append `!` to refresh local cache
" :PluginClean      - confirms removal of unused plugins; append `!` to auto-approve removal
"
" see :h vundle for more details or wiki for FAQ
" Put your non-Plugin stuff after this line

syntax on
set number
set softtabstop=4
set shiftwidth=4
set ignorecase

color desert

set cursorline
set cursorcolumn
"highlight CursorLine ctermfg=black ctermbg=red
"highlight CursorColumn ctermbg=darkGrey

" 当光标一段时间保持不动了,就禁用高亮
autocmd cursorhold * set nohlsearch
" 当输入查找命令时,再启用高亮
noremap n :set hlsearch<cr>n
noremap N :set hlsearch<cr>N
noremap / :set hlsearch<cr>/
noremap ? :set hlsearch<cr>?
noremap * *:set hlsearch<cr>

" NERDTree config
map <F3> :NERDTreeToggle<CR>
autocmd bufenter * if (winnr("$") == 1 && exists("b:NERDTreeType") &&b:NERDTreeType == "primary") | q | endif
"第一条是说使用F3键快速调出和隐藏它;
"第二条是关闭vim时,如果打开的文件除了NERDTree没有其他文件时,它自动关闭,减少多次按:q!。
"如果想打开vim时自动打开NERDTree,可以如下设定
"autocmd vimenter * NERDTree

" YouCompleteMe
" Python Semantic Completion
let g:ycm_python_binary_path='/usr/bin/python3'
" C family Completion Path
let g:ycm_global_ycm_extra_conf='~/.ycm_extra_conf.py'
" 跳转快捷键
nnoremap <c-k> :YcmCompleter GoToDeclaration<CR>|
nnoremap <c-h> :YcmCompleter GoToDefinition<CR>|
nnoremap <c-j> :YcmCompleter GoToDefinitionElseDeclaration<CR>|
" 停止提示是否载入本地ycm_extra_conf文件
let g:ycm_confirm_extra_conf=0
" 语法关键字补全
let g:ycm_seed_identifiers_with_syntax=1
" 开启 YCM 基于标签引擎
let g:ycm_collect_identifiers_from_tags_files=1
" 从第2个键入字符就开始罗列匹配项
let g:ycm_min_num_of_chars_for_completion=2
" 在注释输入中也能补全
let g:ycm_complete_in_comments=1
" 在字符串输入中也能补全
let g:ycm_complete_in_strings=1
" 注释和字符串中的文字也会被收入补全
let g:ycm_collect_identifiers_from_comments_and_strings=1
" 弹出列表时选择第1项的快捷键(默认为<TAB>和<Down>)
let g:ycm_key_list_select_completion=['<C-n>', '<Down>']
" 弹出列表时选择前1项的快捷键(默认为<S-TAB>和<UP>)
let g:ycm_key_list_previous_completion=['<C-p>', '<Up>']
" 主动补全, 默认为<C-Space>
"let g:ycm_key_invoke_completion=['<C-Space>']
" 停止显示补全列表(防止列表影响视野), 可以按<C-Space>重新弹出
"let g:ycm_key_list_stop_completion=['<C-y>']

autocmd BufWrite * execute ':s/\s*$//'

set tags=tags;
set autochdir
set fdm=indent标签:简单的 编译安装 vim OWIN may 关键字 confirm sele 使用
原文地址:https://www.cnblogs.com/master-of-blue-pictures/p/10932263.html