标签:而且 service this dde dev image tran seq contex

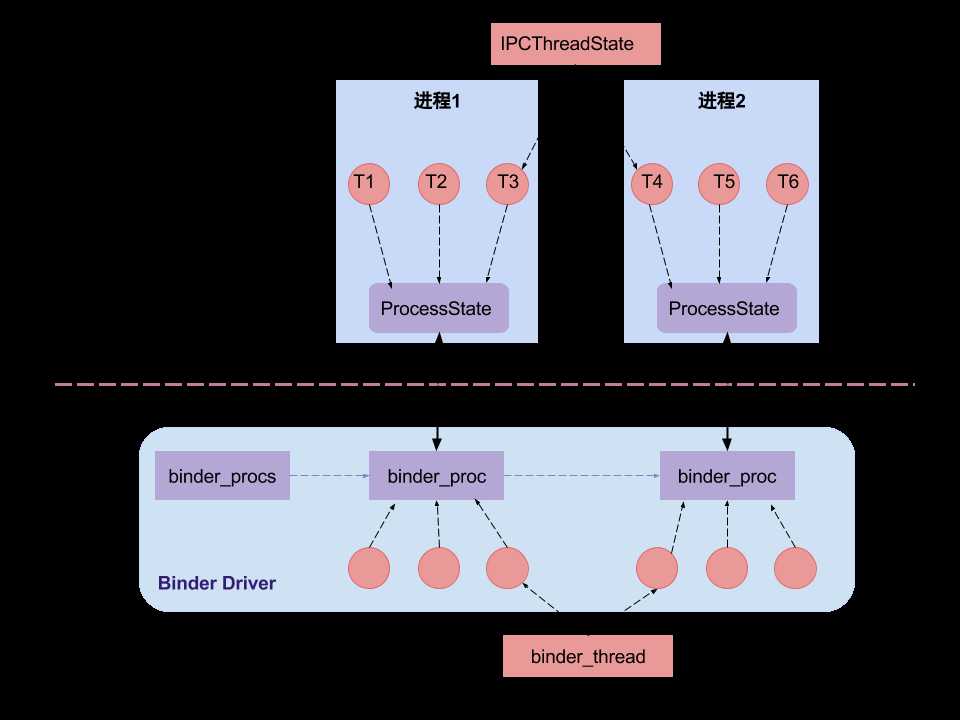
ProcessState是负责打开Binder节点并做mmap映射,IPCThreadState是负责与Binder驱动进行具体的命令交互。
sp<ProcessState> ProcessState::self()
{
    if (gProcess != NULL) return gProcess;

    AutoMutex _l(gProcessMutex);
    if (gProcess == NULL) gProcess = new ProcessState;
    return gProcess;
}
可以看到,在这里也是先检查是否存在一个已经实例化的prosessstate,否则创建一个,所以获取ProcessState对象,需要通过这个self方法。
接下来需要一步步的观察这个新建的过程当中实现的原理。
ProcessState::ProcessState()
    : mDriverFD(open_driver())
    , mVMStart(MAP_FAILED)
    , mManagesContexts(false)
    , mBinderContextCheckFunc(NULL)
    , mBinderContextUserData(NULL)
    , mThreadPoolStarted(false)
    , mThreadPoolSeq(1)
{
    if (mDriverFD >= 0) {
        mVMStart = mmap(0, BINDER_VM_SIZE, PROT_READ, MAP_PRIVATE | MAP_NORESERVE, mDriverFD, 0);
        if (mVMStart == MAP_FAILED) {
            // *sigh*
            LOGE("Using /dev/binder failed: unable to mmap transaction memory.\n");
            close(mDriverFD);
            mDriverFD = -1;
        }
#else
        mDriverFD = -1;
#endif
    }
    if (mDriverFD < 0) {
        // Need to run without the driver, starting our own thread pool.
    }
}
可以看到有两个之前学习的时候了解到了,与Binder驱动紧密相关的方法:
一个是open_driver(),另一个是下面的mmap(),也就是最终打开了Binder结点以及进行了内存块的映射。
sp<IBinder> ProcessState::getContextObject(const sp<IBinder>& /*caller*/)
{
    return getStrongProxyForHandle(0);
}
ProcessState::getStrongProxyForHandle
sp<IBinder> ProcessState::getStrongProxyForHandle(int32_t handle)
{
    sp<IBinder> result;

    AutoMutex _l(mLock);

    handle_entry* e = lookupHandleLocked(handle);

    if (e != NULL) {
        ......
        IBinder* b = e->binder;
        if (b == NULL || !e->refs->attemptIncWeak(this)) {
            if (handle == 0) {
               ......
                Parcel data;
                status_t status = IPCThreadState::self()->transact(
                        0, IBinder::PING_TRANSACTION, data, NULL, 0);
                if (status == DEAD_OBJECT)
                   return NULL;
            }

            b = new BpBinder(handle);
            e->binder = b;
            if (b) e->refs = b->getWeakRefs();
            result = b;
        } else {
            // This little bit of nastyness is to allow us to add a primary
            // reference to the remote proxy when this team doesn‘t have one
            // but another team is sending the handle to us.
            result.force_set(b);
            e->refs->decWeak(this);
        }
    }

    return result;
}
ProcessState::lookupHandleLocked
ProcessState::handle_entry* ProcessState::lookupHandleLocked(int32_t handle)
{
    const size_t N=mHandleToObject.size();
    if (N <= (size_t)handle) {
        handle_entry e;
        e.binder = NULL;
        e.refs = NULL;
        status_t err = mHandleToObject.insertAt(e, N, handle+1-N);
        if (err < NO_ERROR) return NULL;
    }
    return &mHandleToObject.editItemAt(handle);
}
从这儿看,先调用lookupHandleLocked方法,由于是第一次调用,因此新建一个handle_entry,并返回,而且其binder和refs为NULL
那么getStrongProxyForHandle方法接着往下走,由于binder为NULL,mHandle传入的是0,因此进入判断条件中,最后new BpBinder,且参数为0
因此,返回的是new BpBinder(0)
sp<IBinder> b = ProcessState::self()->getContextObject(NULL);
代码位置:/frameworks/native/libs/binder/IPCThreadState.cpp
IPCThreadState* IPCThreadState::self()
{
    if (gHaveTLS) {
    //当执行完第一次之后,再次运行的时候就已经有IPCThreadState实例,只需要获取就可以使用
restart:
        const pthread_key_t k = gTLS;
        IPCThreadState* st = (IPCThreadState*)pthread_getspecific(k);
        if (st) return st;
        return new IPCThreadState;
    }

    if (gShutdown) {
        ALOGW("Calling IPCThreadState::self() during shutdown is dangerous, expect a crash.\n");
        return NULL;
    }

    pthread_mutex_lock(&gTLSMutex);
    if (!gHaveTLS) {
    //初始的gHaveTLS的值false,所以第一次调用的时候,会执行这里的代码
    //随后将gHaveTLS设置为true
        int key_create_value = pthread_key_create(&gTLS, threadDestructor);
        if (key_create_value != 0) {
            pthread_mutex_unlock(&gTLSMutex);
            ALOGW("IPCThreadState::self() unable to create TLS key, expect a crash: %s\n",
                    strerror(key_create_value));
            return NULL;
        }
        gHaveTLS = true;
    }
    pthread_mutex_unlock(&gTLSMutex);
    goto restart;
}
通过上面的方法,就能保证“线程单实例”的目的
Binder进程与线程ProcessState以及IPCThreadState
标签:而且 service this dde dev image tran seq contex
原文地址:https://www.cnblogs.com/mingfeng002/p/10989200.html