标签:dashboard 中心 request sig 集群管理 hpa aml 参数 sage
一、Docker相关内容Docker三剑客:Compse、swarm、machine
    docker compose:适用于单机,容器编排定义
    docker swarm:对所有Docker宿主机资源整合,集群管理
    docker machine:初始化Docker环境,跨平台支持
mesos+marathon
mesos:主机资源整合分配调度管理工具的框架
marathon:基于Mesos的私有PaaS
kubernets:
Docker_Compse: https://docs.docker.com/compose/overview/
Compose定义的Yaml格式资源定义
version: ‘3‘
services:
  web:
    build: .
    ports:
    - "5000:5000"
    volumes:
    - .:/code
    - logvolume01:/var/log
    links:
    - redis
  redis:
    image: redis
volumes:
logvolume01: {}CI:持续集成Continnuous Intergration //Dev提交代码->测试->通过[合并主线到代码仓库]
CD:持续交付Continnuous Delivery //将应用发布出去(灰度) 目的是最小化部署或发布过程中团队固有的摩擦
CD:持续部署Continnuous Deployment //一种更高程度的自动化,无论何时代码有较大改动,都会自动进行构建/部署
图1 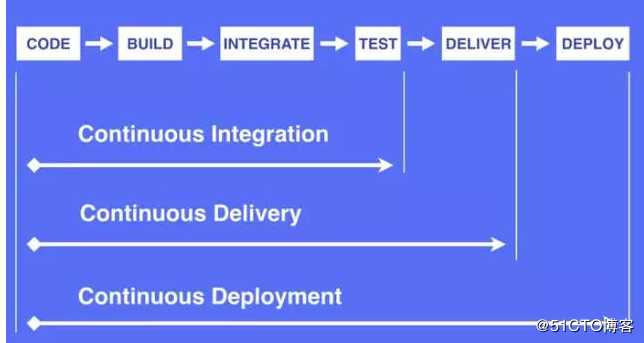
kubernets为多个主机资源整合,提供一个统一的资源管理、调度
k8s为Google内部Borg的翻版,CoreOS被RedHat收购
官网介绍:https://kubernetes.io/zh/docs/
1)自动装箱、自我修复,水平扩展,服务发现和负载均衡,自动发布和回滚
2)密钥和配置管理
之前是基于原生file文件修改配置,最好是基于环境变量修改 //entrypoint 脚本(用户传递的环境变量替换到配置文件中)
镜像启动时,动态加载配置信息 //
假如要修改一个配置 //ansible推送 或者 应用程序的配置信息保存在配置服务器上,启动时加载(修改只需要修改配置服务器即可)
3)存储编排、任务批量处理
有中心节点 //master+多slave,k8s:一般三个master(HA),其他都是node
无中心节点 //任何一个shard,都可以接受请求,并路由到其他节点
控制器:监控容器状态->有控制器管理器->控制器管理器(冗余HA)
Controller manager:监控每一个控制器的健康,Controller manager自身做冗余
- Master:集群控制节点,一般建议3HA
API Server:集群内增删改查的入口
Scheduler:调度Pod
Controller-Manager:所有资源对象的自动化控制中心(大总管)- Node:(也被称作Minion),实际的工作节点
kubelet: 负责Pod的创建,启动等;并且与Master节点密切协作,实现集群管理(向master注册自己,周期汇报自身情况)
kube-proxy:实现Kubernets Service的通信与负载均衡机制
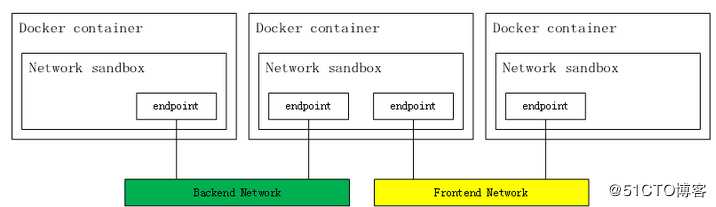
docker:Docker引擎- Pod: Pod是容器的外壳,对容器的封装,k8s最小的调度单位
pod内放容器,一个pod内可以包含多个容器;
pod内容器共享网络名称空间 //net ,ups,ipc空间 uer ,mnt和pid是隔离的
volume属于pod,不再属于同一个容器;一个pod内的所有容器,只能运行在同一个node上
一般一个pod内只放一个容器, 如果需要一个pod内放置多个容器,一般是有一个主的,其他的是slave的
为了方便Pod管理,可以为pod打上标签(label,key/value格式) ; label selector :标签选择器Label:
对各种资源对象添加的属性(可以对Pod,Node,Service,RC等添加)
Label Selector:实现复杂的条件选择,类似于sql的where查询
kube-controller进程通过Service定义的Label Selector监控Pod副本个数
kube-proxy通过Service的label selector选择对应的PodReplicatin Controller:一个期望的场景
Pod期待的副本数
用于筛选目标的Pod的Label selector
当Pod的数量小于预期数量时,用于创建新的Pod的Pode模板
kubernetes v1.2后升级修改名称为Replica Sets(下一代的RC)Deployment: 解决Pod编排问题
内部使用Replication Set来实现
对无状态Pod集合管理
和RC功能非常接近Horizontal Pod Autoscaler:(HPA)
HPA:自动根据流量、负载等,自动扩缩容StatefulSet:
Pod的管理对象:RC,Deploymnet、DaemonSet、Job都是无状态的。
有状态服务特点:
1)每个节点有固定的身份ID,集群中的成员需要相互发现和通信,例如MySQL、zk等
2)集群规模固定,不能随意变动
3)每个节点都是有状态的,通常会持久化数据到永久存储中
4)如果磁盘损坏,则集群的某个节点无法正常运行,集群功能受损
Statefuleset从本质上来说和Deployment/RC一样,但是具有以下特点:
StatefulSet中的每个Pod都有稳定的、唯一的网络标识,用来发现集群内的其他成员;示例pod1的StatefuleSet名称为(mq-0),第二个为mq-1,第三个为mq-2
StatefulSet中容器的启停顺序是受控的,操作第n个时,前n-1个Pod已经启动
StatefulSet中的每个Pod采用稳定的持久化存储卷,通过PV/PVC来实现,删除Pod时默认不会删除 StatefulSet相关的存储卷
还要与Headless Service结合使用,格式为:${podname}.${headless service name}Service:服务,也称为微服务
前端应用->[label selector]--->{[Pod1(label=bk1)],[Pod2(label=bk1],[],[]...}
kube-proxy,负责接收Service的请求兵转发到后端Pod实例上,内部实现负载均衡和会话保持
k8s在此基础上提升:使用Cluster IP解决TCP网络通信问题
kubectl get endpoints;获取容器暴露端口Job
控制一组Pod去完成类似于批处理的任务,其中每个Docker只运行一次,当Job控制的所有Pod副本都运行结束时,对应的Job也就结束了
k8s在1.5version之后提供了CronJob来实现定时反复执行的能力Persistent Volume:
Volume: Pod中能够被多个容器访问的共享目录,支持Ceph、ClusterFS等分布式文件系统
Persistent Volume(PV)&Persistent Volume Chain(PVC):网络存储,并且支持读写权限隔离Namespace:
实现多租户的资源隔离,默认namespace为defaut
kubectl get namespacesAnnotation:
注解和Label类似,key/value形式定义;Label具有更严格的命名规则,定义的对象为元数据,Annotation则是用户任意定义的附加信息configMap
配置信息key/value,存储在etcd数据库中,然后提供API方便k8s相关组件或客户应用CRUD操作这些数据- 其他相关概念
etcd:存储Master数据信息,类zookeeper,需要HA
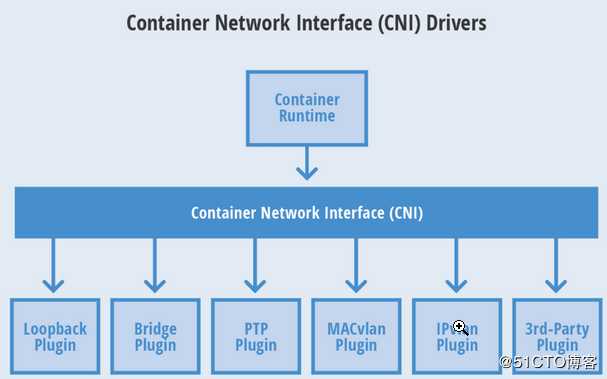
CNI(Conteinre Network Interface) 是 google 和 CoreOS 主导制定的容器网络标准
图4:
这个协议连接了两个组件:容器管理系统和网络插件。它们之间通过 JSON 格式的文件进行通信,实现容器的网络功能。具体的事情都是插件来实现的,包括:创建容器网络空间(network namespace)、把网络接口(interface)放到对应的网络空间、给网络接口分配 IP 等等。
flannel:支持网络配置,不支持网络策略,简单
calico:网络配置、网络策略,较为复杂
canel:集合flannel和calico
Docker公司提供 CNM 标准。目前 CNM 只能使用在 docker 中,CNI应用场景更广
图6
有兴趣的可以了解下
* K8s网络 8
Pod级别
多个Pod内部容器见通信:lo
各Pod间的通信:桥接、overlay network、
Service级别
Node级别
图2 
其他组件:https://github.com/kubernetes/
图3: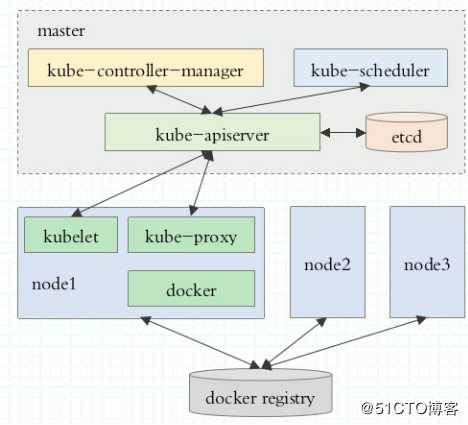
安装方式1:使用进程方式,接受systemctl管控(比较繁琐)
安装方式2:使用kubeadm方式,所有节点都安装docker和kubelet,k8s的管控节点也运行为Pod
controller-manager,scheduler,apiserver,etcd
kube-proxy,kubelet,flannel都要运行为Pod
============================
主机ip    主机名 主机配置
192.168.170.135 master  (2c2g)
192.168.170.137 node1   (2c2g)
192.168.170.139 node2   (2c2g)
============================1)hostnamectl set-hostname $hostname //设置主机名
2)设置hosts
[root@master ~]# cat /etc/hosts
127.0.0.1   localhost localhost.localdomain localhost4 localhost4.localdomain4
::1         localhost localhost.localdomain localhost6 localhost6.localdomain6
192.168.170.135 matser
192.168.170.137 node1
192.168.170.139 node2
3)关闭iptable和SELinux
systemctl stop fireward;systemctl disbale fireward
setenforce 0;sed -i ‘s@SELINUX=.*@SELINUX=disabled@‘  /etc/selinux/config
4)关闭swap
swapoff -a;sed -i ‘s/.*swap.*/#&/‘ /etc/fstab5)配置yum
kubernets源
[kubernetes]
name=Kubernetes
baseurl=https://mirrors.aliyun.com/kubernetes/yum/repos/kubernetes-el7-x86_64/
enabled=1
gpgcheck=1
repo_gpgcheck=1
gpgkey=https://mirrors.aliyun.com/kubernetes/yum/doc/yum-key.gpg https://mirrors.aliyun.com/kubernetes/yum/doc/rpm-package-key.gpg
Docker源:
wget https://mirrors.aliyun.com/docker-ce/linux/centos/docker-ce.repo -O /etc/yum.repos.d/docker-ce.repo6)安装工具
yum install docker
yum -y install  kubelet kubeadm kubectl --disableexcludes=kubernetes
systemctl enable docker //node1和node2;Kubelet负责与其他节点集群通信,并进行本节点Pod和容器生命周期的管理kubeadm config print init-defaults > /etc/kubernetes/init.default.yaml
cp init.default.yaml init-config.yaml并且修改init-config.yaml
示例:
[root@master kubernetes]# cat init-config.yaml
apiVersion: kubeadm.k8s.io/v1beta1
kind: ClusterConfiguration
imageRepository: registry.aliyuncs.com/google_containers
kubernetesVersion: v1.14.0
networking:
  podSubnet: "192.168.3.0/24"
advertiseAddress:master机器ip
image-repository:镜像仓库,建议修改为registry.aliyuncs.com/google_containers
service-cidr:服务发现地址
pod-network-cidr:pod网段
其他参数可自行设置
下载镜像
[root@master kubernetes]# kubeadm config images pull --config=/etc/kubernetes/init-config.yaml
[config/images] Pulled registry.aliyuncs.com/google_containers/kube-apiserver:v1.14.0
[config/images] Pulled registry.aliyuncs.com/google_containers/kube-controller-manager:v1.14.0
[config/images] Pulled registry.aliyuncs.com/google_containers/kube-scheduler:v1.14.0
[config/images] Pulled registry.aliyuncs.com/google_containers/kube-proxy:v1.14.0
[config/images] Pulled registry.aliyuncs.com/google_containers/pause:3.1
[config/images] Pulled registry.aliyuncs.com/google_containers/etcd:3.3.10
[config/images] Pulled registry.aliyuncs.com/google_containers/coredns:1.3.1

[root@master kubernetes]# kubeadm init --config=init-config.yaml
[root@master kubernetes]# kubeadm init --config=init-config.yaml
[init] Using Kubernetes version: v1.14.0
[preflight] Running pre-flight checks
    [WARNING IsDockerSystemdCheck]: detected "cgroupfs" as the Docker cgroup driver. The recommended driver is "systemd". Please follow the guide at https://kubernetes.io/docs/setup/cri/
    [WARNING Hostname]: hostname "i" could not be reached
    [WARNING Hostname]: hostname "i": lookup i on 192.168.170.2:53: server misbehaving
error execution phase preflight: [preflight] Some fatal errors occurred:
    [ERROR DirAvailable--var-lib-etcd]: /var/lib/etcd is not empty
[preflight] If you know what you are doing, you can make a check non-fatal with `--ignore-preflight-errors=...`
[root@master kubernetes]# rm -rf /var/lib/etcd/
[root@master kubernetes]# kubeadm init --config=init-config.yaml
[init] Using Kubernetes version: v1.14.0
[preflight] Running pre-flight checks
    [WARNING IsDockerSystemdCheck]: detected "cgroupfs" as the Docker cgroup driver. The recommended driver is "systemd". Please follow the guide at https://kubernetes.io/docs/setup/cri/
    [WARNING Hostname]: hostname "i" could not be reached
    [WARNING Hostname]: hostname "i": lookup i on 192.168.170.2:53: server misbehaving
[preflight] Pulling images required for setting up a Kubernetes cluster
[preflight] This might take a minute or two, depending on the speed of your internet connection
[preflight] You can also perform this action in beforehand using ‘kubeadm config images pull‘
[kubelet-start] Writing kubelet environment file with flags to file "/var/lib/kubelet/kubeadm-flags.env"
[kubelet-start] Writing kubelet configuration to file "/var/lib/kubelet/config.yaml"
[kubelet-start] Activating the kubelet service
[certs] Using certificateDir folder "/etc/kubernetes/pki"
[certs] Generating "front-proxy-ca" certificate and key
[certs] Generating "front-proxy-client" certificate and key
[certs] Generating "etcd/ca" certificate and key
[certs] Generating "apiserver-etcd-client" certificate and key
[certs] Generating "etcd/server" certificate and key
[certs] etcd/server serving cert is signed for DNS names [i localhost] and IPs [192.168.170.135 127.0.0.1 ::1]
[certs] Generating "etcd/healthcheck-client" certificate and key
[certs] Generating "etcd/peer" certificate and key
[certs] etcd/peer serving cert is signed for DNS names [i localhost] and IPs [192.168.170.135 127.0.0.1 ::1]
[certs] Generating "ca" certificate and key
[certs] Generating "apiserver" certificate and key
[certs] apiserver serving cert is signed for DNS names [i kubernetes kubernetes.default kubernetes.default.svc kubernetes.default.svc.cluster.local] and IPs [10.96.0.1 192.168.170.135]
[certs] Generating "apiserver-kubelet-client" certificate and key
[certs] Generating "sa" key and public key
[kubeconfig] Using kubeconfig folder "/etc/kubernetes"
[kubeconfig] Writing "admin.conf" kubeconfig file
[kubeconfig] Writing "kubelet.conf" kubeconfig file
[kubeconfig] Writing "controller-manager.conf" kubeconfig file
[kubeconfig] Writing "scheduler.conf" kubeconfig file
[control-plane] Using manifest folder "/etc/kubernetes/manifests"
[control-plane] Creating static Pod manifest for "kube-apiserver"
[control-plane] Creating static Pod manifest for "kube-controller-manager"
[control-plane] Creating static Pod manifest for "kube-scheduler"
[etcd] Creating static Pod manifest for local etcd in "/etc/kubernetes/manifests"
[wait-control-plane] Waiting for the kubelet to boot up the control plane as static Pods from directory "/etc/kubernetes/manifests". This can take up to 4m0s
[apiclient] All control plane components are healthy after 29.511659 seconds
[upload-config] storing the configuration used in ConfigMap "kubeadm-config" in the "kube-system" Namespace
[kubelet] Creating a ConfigMap "kubelet-config-1.14" in namespace kube-system with the configuration for the kubelets in the cluster
[upload-certs] Skipping phase. Please see --experimental-upload-certs
[mark-control-plane] Marking the node i as control-plane by adding the label "node-role.kubernetes.io/master=‘‘"
[mark-control-plane] Marking the node i as control-plane by adding the taints [node-role.kubernetes.io/master:NoSchedule]
[bootstrap-token] Using token: ls1ey1.uf8m218idns3bjs8
[bootstrap-token] Configuring bootstrap tokens, cluster-info ConfigMap, RBAC Roles
[bootstrap-token] configured RBAC rules to allow Node Bootstrap tokens to post CSRs in order for nodes to get long term certificate credentials
[bootstrap-token] configured RBAC rules to allow the csrapprover controller automatically approve CSRs from a Node Bootstrap Token
[bootstrap-token] configured RBAC rules to allow certificate rotation for all node client certificates in the cluster
[bootstrap-token] creating the "cluster-info" ConfigMap in the "kube-public" namespace
[addons] Applied essential addon: CoreDNS
[addons] Applied essential addon: kube-proxy

Your Kubernetes control-plane has initialized successfully!

To start using your cluster, you need to run the following as a regular user:

  mkdir -p $HOME/.kube
  sudo cp -i /etc/kubernetes/admin.conf $HOME/.kube/config
  sudo chown $(id -u):$(id -g) $HOME/.kube/config

You should now deploy a pod network to the cluster.
Run "kubectl apply -f [podnetwork].yaml" with one of the options listed at:
  https://kubernetes.io/docs/concepts/cluster-administration/addons/

Then you can join any number of worker nodes by running the following on each as root:

kubeadm join 192.168.170.135:6443 --token ls1ey1.uf8m218idns3bjs8 --discovery-token-ca-cert-hash sha256:ef81ea9df5425aeb92ac34c08bb8a8646f82f50445cccdb6eff1e6c84aa00101 [root@node1 kubernetes]# kubeadm config print init-defaults &> ./init.default.yaml
[root@node1 kubernetes]# cp init.default.yaml init-config.yaml
[root@node1 kubernetes]# cat init-config.yaml //修改后的配置
apiVersion: kubeadm.k8s.io/v1beta1
kind: JoinConfiguration
discovery:
bootstrapToken:
apiServerEndpoint: 192.168.170.135:6443
token: ls1ey1.uf8m218idns3bjs8
unsafeSkipCAVerification: true
tlsBootstrapToken: ls1ey1.uf8m218idns3bjs8
[root@node1 kubernetes]# kubeadm join --config=init-config.yaml
[preflight] Running pre-flight checks
[WARNING IsDockerSystemdCheck]: detected "cgroupfs" as the Docker cgroup driver. The recommended driver is "systemd". Please follow the guide at https://kubernetes.io/docs/setup/cri/
[preflight] Reading configuration from the cluster...
[preflight] FYI: You can look at this config file with ‘kubectl -n kube-system get cm kubeadm-config -oyaml‘
[kubelet-start] Downloading configuration for the kubelet from the "kubelet-config-1.14" ConfigMap in the kube-system namespace
[kubelet-start] Writing kubelet configuration to file "/var/lib/kubelet/config.yaml"
[kubelet-start] Writing kubelet environment file with flags to file "/var/lib/kubelet/kubeadm-flags.env"
[kubelet-start] Activating the kubelet service
[kubelet-start] Waiting for the kubelet to perform the TLS Bootstrap...
This node has joined the cluster:
* Certificate signing request was sent to apiserver and a response was received.
* The Kubelet was informed of the new secure connection details.
Run ‘kubectl get nodes‘ on the control-plane to see this node join the cluster.在node1和node2上分别做同样的操作
[root@master kubernetes]# kubectl get nodes
NAME    STATUS     ROLES    AGE     VERSION
i       NotReady   master   13m     v1.14.3
node1   NotReady   <none>   4m46s   v1.14.3
node2   NotReady   <none>   74s     v1.14.3

[root@master kubernetes]# kubectl get cs
NAME                 STATUS    MESSAGE             ERROR
scheduler            Healthy   ok
controller-manager   Healthy   ok
etcd-0               Healthy   {"health":"true"}

[root@master kubernetes]# kubectl apply -f   "https://cloud.weave.works/k8s/net?k8s-version=$(kubectl version |base64 |tr -d ‘\n‘)"
serviceaccount/weave-net created
clusterrole.rbac.authorization.k8s.io/weave-net created
clusterrolebinding.rbac.authorization.k8s.io/weave-net created
role.rbac.authorization.k8s.io/weave-net created
rolebinding.rbac.authorization.k8s.io/weave-net created
daemonset.extensions/weave-net created

[root@master kubernetes]# kubectl get nodes --all-namespaces
NAME    STATUS   ROLES    AGE   VERSION
i       Ready    master   24m   v1.14.3
node1   Ready    <none>   15m   v1.14.3
node2   Ready    <none>   11m   v1.14.3
[root@master kubernetes]# kubectl get pods --all-namespaces
NAMESPACE     NAME                        READY   STATUS    RESTARTS   AGE
kube-system   coredns-8686dcc4fd-cvd7k    1/1     Running   0          24m
kube-system   coredns-8686dcc4fd-ntb22    1/1     Running   0          24m
kube-system   etcd-i                      1/1     Running   0          23m
kube-system   kube-apiserver-i            1/1     Running   0          23m
kube-system   kube-controller-manager-i   1/1     Running   0          23m
kube-system   kube-proxy-fvd2t            1/1     Running   0          15m
kube-system   kube-proxy-jcfvp            1/1     Running   0          24m
kube-system   kube-proxy-jr6lj            1/1     Running   0          12m
kube-system   kube-scheduler-i            1/1     Running   0          23m
kube-system   weave-net-bjmt2             2/2     Running   0          104s
kube-system   weave-net-kwg5l             2/2     Running   0          104s
kube-system   weave-net-v54m4             2/2     Running   0          104s

[root@master kubernetes]# kubectl --namespace=kube-system describe pod etcd-i  //如果发现pod状态问题,可查看错误原因

kubeadmin reset 可作用于主机恢复原状,然后重新执行kubeadm init再次安装
容器分布情况:
master:pause 8个、apiserver、controller、scheduler、kube-proxy、etcd、weave-npc、weave-kube、coredns
node1和node2:kube-proxy、kube-proxy(pause)、weave-npc、weave-kube、weave-kube(pause)
wget https://raw.githubusercontent.com/kubernetes/dashboard/v1.10.1/src/deploy/recommended/kubernetes-dashboard.yaml
[root@master kubernetes]# sed -i ‘s/k8s.gcr.io/loveone/g‘ kubernetes-dashboard.yaml
[root@master kubernetes]# sed -i "160a \ \ \ \ \ \ nodePort: 30001" kubernetes-dashboard.yaml
[root@master kubernetes]# sed -i "161a \ \ type:\ NodePort" kubernetes-dashboard.yaml
[root@master kubernetes]# kubectl create -f kubernetes-dashboard.yaml
[root@master kubernetes]# kubectl get deployment kubernetes-dashboard -n kube-system
[root@master kubernetes]# kubectl get pods -n kube-system -o wide
[root@master kubernetes]# kubectl get services -n kube-system
[root@master kubernetes]# netstat -ntlp|grep 30001
获取令牌:使用令牌方式登陆
[root@master kubernetes]# kubectl describe secrets -n kube-system $(kubectl -n kube-system get secret | awk ‘/dashboard-admin/{print $1}‘)图5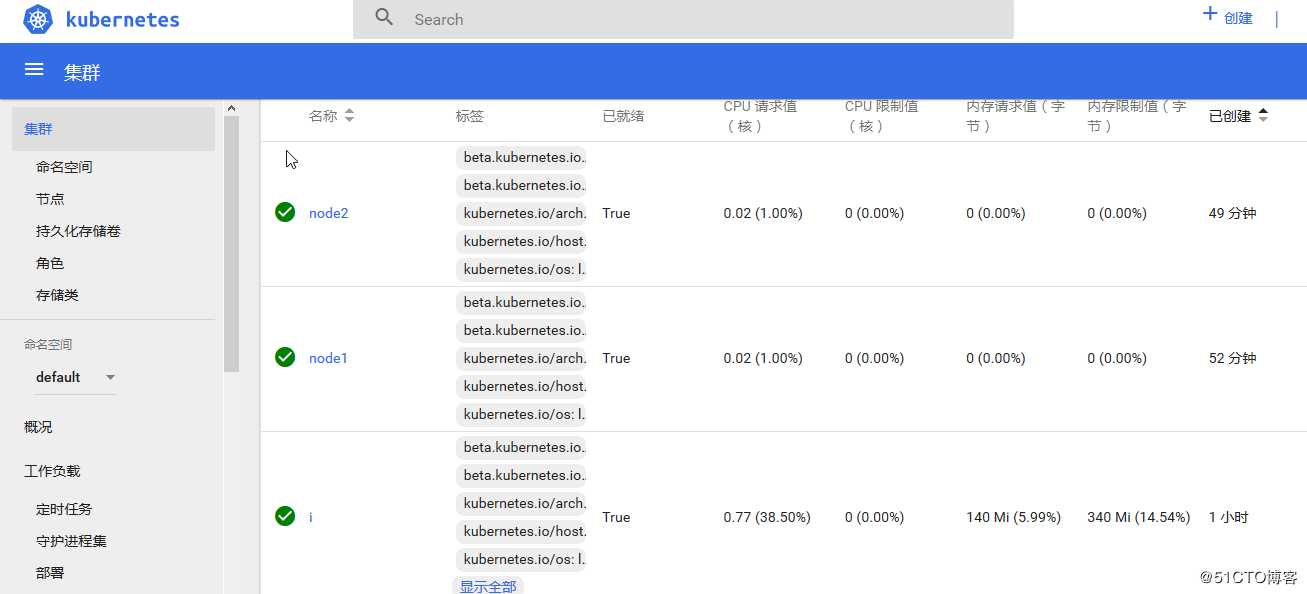
[root@master kubernetes]# kubectl create deployment nginx --image=nginx
[root@master kubernetes]# kubectl expose deployment nginx --port=80 --type=NodePort
[root@master kubernetes]# kubectl get pod,svc
[root@master kubernetes]# kubectl get pods
NAME                     READY   STATUS    RESTARTS   AGE
nginx-65f88748fd-9tgtv   1/1     Running   0          4m19s
** 问题1:***
[root@master kubernetes]# docker  images
REPOSITORY          TAG                 IMAGE ID            CREATED             SIZE
centos              latest              49f7960eb7e4        12 months ago       200MB
swarm               latest              ff454b4a0e84        12 months ago       12.7MB
[root@master kubernetes]# docker rmi -f ff454b4a0e84
Error: No such image: ff454b4a0e84
解决方法:
systemctl stop docker;rm -rf /var/lib/docker;systemctl start docker 参考链接:
Kubernets中文社区:https://www.kubernetes.org.cn/doc-16
Kubernets官网:https://kubernetes.io/zh/docs/
Kubernets Git:https://github.com/kubernetes/kubernetes
kuadm安装k8s:https://www.kubernetes.org.cn/5462.html
kubernetes下载链接:https://github.com/kubernetes/kubernetes/releases
标签:dashboard 中心 request sig 集群管理 hpa aml 参数 sage
原文地址:https://blog.51cto.com/hmtk520/2406576