标签:text img bundle tool create 逻辑 etl nta 资源
⒈使用XML布局文件控制UI界面【推荐】
Android推荐使用XML布局文件来控制视图,这样不仅简单、明了,而且可以将应用的视图控制逻辑从Java或Kotlin代码中分离出来,放入XML文件中控制,从而更好的体现MVC原则。
Android把用户界面放在XML文档中定义,就可以让XML文档专门负责用户UI设置,而Java程序则专门负责业务实现,这样可以降低程序的耦合性。
当我们在Android应用的\res\layout目录下定义一个主文件名任意的XML布局文件之后(R.java会自动收录该布局资源),java或Kotlin代码可通过以下方法在Activity中显示该视图。
setContentView(R.layout.资源文件名称)
当在布局文件中添加多个UI组件时,都可以为该UI组件指定android:id属性,该属性的属性值代表该组件的唯一标识。接下来如果希望在Java或Kotlin代码中访问指定的UI组件,则可通过如下代码来实现。
findViewById(R.id.属性值)
一旦在程序中获得到了指定的UI组件之后,接下载就可以通过代码来控制各UI组件的外观行为,包括为UI组件绑定事件监听器等。
⒉在代码中控制UI界面【不推荐】
Android推荐使用XML布局文件来控制UI界面,Android也支持使用代码控制UI界面,只需将UI组件创建出来并以合适的方式组合在一起。
 1 package com.example.myapplication;
 2
 3 import androidx.appcompat.app.AppCompatActivity;
 4
 5 import android.os.Bundle;
 6 import android.view.ViewGroup;
 7 import android.widget.Button;
 8 import android.widget.LinearLayout;
 9 import android.widget.TextView;
10
11 public class MainActivity extends AppCompatActivity {
12
13     //当第一次创建该Activity时回调该方法
14     @Override
15     protected void onCreate(Bundle savedInstanceState) {
16         super.onCreate(savedInstanceState);
17         //创建一个线性布局管理器
18         LinearLayout layout = new LinearLayout(this);
19         //设置该Activity显示layout
20         setContentView(layout);
21         layout.setOrientation(LinearLayout.VERTICAL);
22         //创建一个TextView
23         TextView show = new TextView(this);
24         //创建一个Button
25         Button bn = new Button(this);
26         bn.setText("单击我");
27         bn.setLayoutParams(new ViewGroup.LayoutParams(ViewGroup.LayoutParams.WRAP_CONTENT,ViewGroup.LayoutParams.WRAP_CONTENT));
28         //向layout容器中添加TextView
29         layout.addView(show);
30         //向layout容器中添加Button
31         layout.addView(bn);
32         //为按钮绑定一个事件监听器
33         bn.setOnClickListener((view) -> {
34             show.setText("Hello World!");
35         });
36     }
37 }
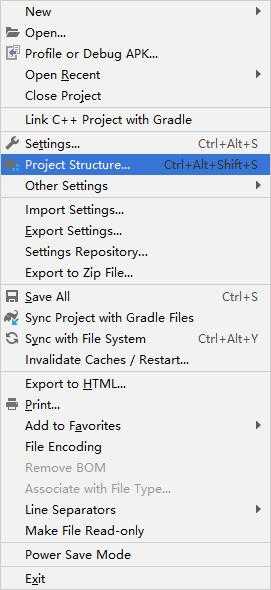
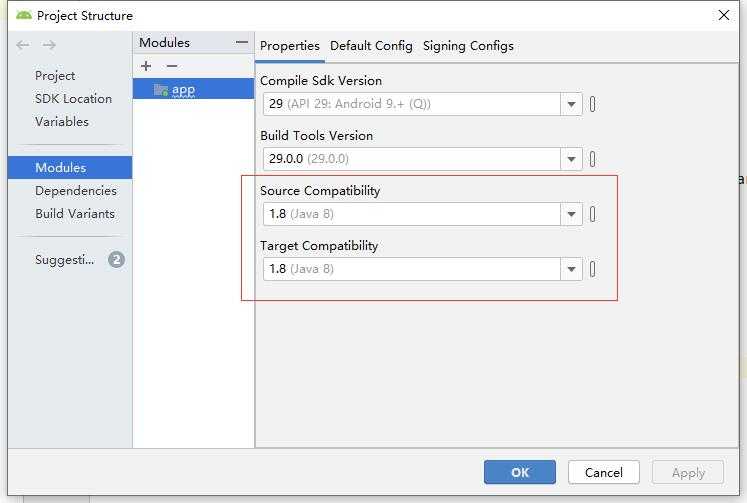
**上面代码使用JDK 8的Lambda表达式,需要对项目做以下更改以支持JDK 8
**创建UI组件时需要传入一个Context参数,可以让UI组件通过该Context参数获取Android应用环境的全面信息。Context本身是一个抽象类,Android中的Activity、Service都继承了Context,因此Activity、Service都可以直接作为Context使用,本例中直接传入当前实例this即可。
⒊使用XML布局文件和代码混合控制UI界面
完全利用XML布局文件来控制UI虽然方便、便捷,但难免有失灵活。
完全使用Java代码来控制UI界面不仅繁琐,而且不利用解耦。
因此很多时候需要混合使用XML布局文件和代码来控制UI界面。
当混合使用XML布局文件和代码来控制UI界面时,习惯上把变化小、行为比较固定的组件放在XML布局文件中管理,而那些变化较多、行为控制比较复杂的组件则交给代码来管理。
<?xml version="1.0" encoding="utf-8"?>
<androidx.constraintlayout.widget.ConstraintLayout xmlns:android="http://schemas.android.com/apk/res/android"
    xmlns:app="http://schemas.android.com/apk/res-auto"
    xmlns:tools="http://schemas.android.com/tools"
    android:layout_width="match_parent"
    android:layout_height="match_parent"
    tools:context=".MainActivity">

    <TextView
        android:id="@+id/textView"
        android:layout_width="wrap_content"
        android:layout_height="wrap_content"
        android:text="Hello World!"
        app:layout_constraintBottom_toBottomOf="parent"
        app:layout_constraintLeft_toLeftOf="parent"
        app:layout_constraintRight_toRightOf="parent"
        app:layout_constraintTop_toTopOf="parent" />

    <Button
        android:id="@+id/show"
        android:layout_width="wrap_content"
        android:layout_height="wrap_content"
        android:layout_marginStart="8dp"
        android:layout_marginTop="8dp"
        android:layout_marginEnd="164dp"
        android:layout_marginBottom="288dp"
        android:text="单击我"
        app:layout_constraintBottom_toBottomOf="parent"
        app:layout_constraintEnd_toEndOf="parent"
        app:layout_constraintHorizontal_bias="1.0"
        app:layout_constraintStart_toStartOf="parent"
        app:layout_constraintTop_toTopOf="parent"
        app:layout_constraintVertical_bias="1.0" />

</androidx.constraintlayout.widget.ConstraintLayout>
 1 package com.example.myapplication;
 2
 3 import androidx.appcompat.app.AppCompatActivity;
 4
 5 import android.os.Bundle;
 6 import android.widget.Button;
 7
 8 public class MainActivity extends AppCompatActivity {
 9
10     //当第一次创建该Activity时回调该方法
11     @Override
12     protected void onCreate(Bundle savedInstanceState) {
13         super.onCreate(savedInstanceState);
14         //设置该Activity显示activity_main.xml文件定义的View
15         setContentView(R.layout.activity_main);
16         Button bn = findViewById(R.id.show);
17         bn.setOnClickListener(view -> {
18             bn.setText("Hello");
19         });
20     }
21 }
标签:text img bundle tool create 逻辑 etl nta 资源
原文地址:https://www.cnblogs.com/fanqisoft/p/11012719.html