标签:blog http color io os ar 使用 for strong
上一篇文章讲了“e2e 自动化集成测试 架构 京东 商品搜索 实例 WebStorm Node.js Mocha WebDriverIO Selenium Step by step 一 京东 商品搜索”
关于图片验证码的识别, 有多种方法, 之前有在Google, baidu上找了非常多的文章, 有非常多的方法去实现 ,但我学得使用 Google赞助的tesseract 工具,是比较不错的选择。tesseract是一个exe, 其实本文章实际上与Node.js已经没有太大的关系。因为我们要做的是如果调用这个exe.
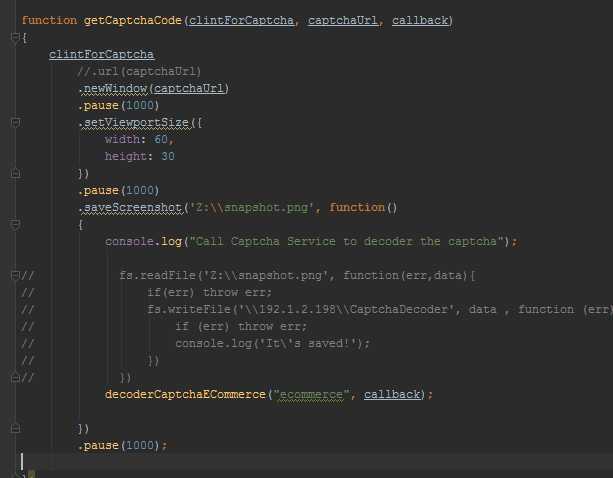
WebdriverIo, 提供了一个接口为 saveScreenshot 就是可以保证当前页面的屏幕截图。 如下:

首先是打开一个新的窗口, captchaUrl,就是图片验证码的url地址, 如JD的是 https://authcode.jd.com/verify/image?a=1&acid=72c69aa3-7ffc-4934-b8cc-199750307af6&uid=72c69aa3-7ffc-4934-b8cc-199750307af6&yys=1413969656908%22, 放在IE中, F5,不停的刷新,你会发现,他在不停的变化。
就是保存屏幕截图。将图片存放在本地, Node.js 支持调用本地的exe, 请参考 http://nodejs.org/api/process.html 实际上就是执行CMD命令。tesseract 执行如 CMD > tesseract z:\snapshot.pgn result 执行后会在当前目录生成一个txt文件,内容就是识别后的文本。
但是在此, 为了提高识别的概率, 我会先将图片灰度化,然后再生成一张黑白图片, 最后给tesseract 支识别, 使用Node.js会比较麻烦, 所以我使用的.net c#实现, 然后做成一个服务 API, 然后,让Node.js去调用。
C#的内容如下:
[RoutePrefix("api/CaptchaDecoder")]
public class CaptchaDecoderController : ApiController
{
ILog log = LogManager.GetLogger("AppLog");
TesseractService _tesseract;
public CaptchaDecoderController()
{
log4net.Config.DOMConfigurator.Configure();
_tesseract = new TesseractService();
}
public CaptchaDecoderController(TesseractService tesseract)
{
_tesseract = tesseract;
}
[HttpPost]
public ServicePostResponse CaptchaDecoder(ServicePostRequest<CaptchaModel> request)
{
var response = new ServicePostResponse();
try
{
if(request == null)
{
throw new Exception("request is null");
}
if (string.IsNullOrEmpty(request.ExtraData.SystemId))
{
throw new Exception("request.ExtraData.SystemId is null or empty");
}
if (string.IsNullOrEmpty(request.ExtraData.FilePath))
{
throw new Exception("request.ExtraData.FilePath is null or empty");
}
var filePath = request.ExtraData.FilePath;
if (!File.Exists(filePath))
{
throw new Exception("File:" + request.ExtraData.FilePath + " doesn‘t exist");
}
using (Bitmap sourceBmp = new Bitmap(filePath))
{
GetGrayBitmap(sourceBmp);
GetBackWhiteBitmapNew(sourceBmp);
Bitmap bmp = ClearNoise(sourceBmp, 3);
bmp.Save(filePath + "_new.jpg");
fnOCR(@_tesseract.exePath, @filePath + "_new.jpg " + filePath + "_result nobatch digits");
if (File.Exists(filePath + "_result.txt"))
{
using (StreamReader file = File.OpenText(filePath + "_result.txt"))
{
response.ExtraData = file.ReadLine();
file.Close();
}
}
else
{
throw new Exception("generate the result fail");
}
bmp.Dispose();
sourceBmp.Dispose();
}
response.IsSuccess = true;
response.Total = 1;
}
catch (Exception ex)
{
log.Error(ex);
response.Errors = ex.Message;
response.IsSuccess = false;
response.Total = 0;
}
finally
{
}
return response;
}
private string GetCurrentSeqValue()
{
return System.DateTime.Now.Month.ToString("00");
}
private void GetGrayBitmap(Bitmap bmp)
{
for (int i = 0; i < bmp.Width; i++)
{
for (int j = 0; j < bmp.Height; j++)
{
//获取该点的像素的RGB的颜色
Color color = bmp.GetPixel(i, j);
//利用公式计算灰度值
int gray = (int)(color.R * 0.3 + color.G * 0.59 + color.B * 0.11);
Color newColor = Color.FromArgb(gray, gray, gray);
bmp.SetPixel(i, j, newColor);
}
}
}
private void GetBackWhiteBitmap(Bitmap bitmap)
{
int v = ImageHelper.ComputeThresholdValue(bitmap);
ImageHelper.PBinary(bitmap, v);
}
private void GetBackWhiteBitmapNew(Bitmap bmp)
{
int average = 0;
for (int i = 0; i < bmp.Width; i++)
{
for (int j = 0; j < bmp.Height; j++)
{
Color color = bmp.GetPixel(i, j);
average += color.B;
}
}
average = (int)(average * 1.0 / (bmp.Width * bmp.Height));
}
public Bitmap ClearNoise(Bitmap bmpobj, int MaxNearPoints)
{
int dgGrayValue = ImageHelper.ComputeThresholdValue(bmpobj);
Color piexl;
Bitmap bmp = new Bitmap(bmpobj);
int nearDots = 0;
//逐点判断
for (int i = 0; i < bmpobj.Width; i++)
for (int j = 0; j < bmpobj.Height; j++)
{
piexl = bmpobj.GetPixel(i, j);
if (piexl.R <= dgGrayValue)
{
nearDots = 0;
//判断周围8个点是否全为空
if (i == 0 || i == bmpobj.Width - 1 || j == 0 || j == bmpobj.Height - 1) //边框全去掉
{
bmp.SetPixel(i, j, Color.White);
}
else
{
if (bmpobj.GetPixel(i - 1, j - 1).R < dgGrayValue) nearDots++;
if (bmpobj.GetPixel(i, j - 1).R < dgGrayValue) nearDots++;
if (bmpobj.GetPixel(i + 1, j - 1).R < dgGrayValue) nearDots++;
if (bmpobj.GetPixel(i - 1, j).R < dgGrayValue) nearDots++;
if (bmpobj.GetPixel(i + 1, j).R < dgGrayValue) nearDots++;
if (bmpobj.GetPixel(i - 1, j + 1).R < dgGrayValue) nearDots++;
if (bmpobj.GetPixel(i, j + 1).R < dgGrayValue) nearDots++;
if (bmpobj.GetPixel(i + 1, j + 1).R < dgGrayValue) nearDots++;
}
if (nearDots <= MaxNearPoints)
bmp.SetPixel(i, j, Color.White); //去掉单点 && 粗细小3邻边点
}
else //背景
bmp.SetPixel(i, j, Color.White);
}
return bmp;
}
private void fnOCR(string v_strTesseractPath, string v_Arguments)
{
using (Process process = new System.Diagnostics.Process())
{
process.StartInfo.FileName = v_strTesseractPath;
process.StartInfo.Arguments = v_Arguments;
process.StartInfo.UseShellExecute = false;
process.StartInfo.CreateNoWindow = true;
process.StartInfo.RedirectStandardOutput = true;
process.Start();
process.WaitForExit();
}
}
}
public class TesseractService
{
public virtual string exePath { get {
return @"C:\Program Files (x86)\Tesseract-OCR\tesseract.exe";
} }
}
上面的代码是ASP.NET WEBAPI应用。
最后,通Node.js的Http模块的功能,可以调用这个服务如下:
var http = require(‘http‘)
, fs = require(‘fs‘)
function decoderCaptchaECommerce(siteName, callback){
var requestData = {
ExtraData: {
SystemId : siteName,
FilePath : ‘Z:\\snapshot.png‘
}
};
var requestDataString = JSON.stringify(requestData);
var headers = {
‘Content-Type‘: ‘application/json‘,
‘Content-Length‘: requestDataString.length
};
var options = {
host: ‘127.1.1.1‘
, port: 80
, path: ‘/api/CaptchaDecoder/CaptchaDecoder‘
, method : ‘POST‘
, headers: headers
};
var responseString = ‘‘;
var req = http.request(options, function(res){
res.setEncoding(‘utf-8‘);
res.on(‘data‘, function(data){
responseString += data;
console.log("验证服务结果:"+responseString);
});
res.on(‘end‘, function(){
var resultObject = JSON.parse(responseString);
callback(resultObject.ExtraData);
})
});
req.on(‘error‘, function(e) {
// TODO: handle error.
});
req.write(requestDataString);
req.end();
return responseString;
};
e2e 自动化集成测试 架构 京东 商品搜索 实例 WebStorm Node.js Mocha WebDriverIO Selenium Step by step (二) 图片验证码的识别
标签:blog http color io os ar 使用 for strong
原文地址:http://www.cnblogs.com/Stephending/p/4043848.html