标签:blog http io os ar 使用 for strong sp
JBOSS通过Apache负载均衡方法一:使用mod_jk
本文第一、二节分别对Linux环境下前端使用Apache以及windows环境下前端使用IIS通过AJP协议和后端的JBOSS通信实现负载均衡进行说明,第三节对相应的参数做了解释。
一、 Linux环境下Apache + mod_jk + JBOSS
Apache和JBOSS使用AJP协议,利用8009端口通过mod_jk来实现通信。
下载apache代码包,上传到服务器。
解开代码包
[root@jboss01 app]#cd /opt/app
[root@jboss01 app]#tar -zxvf httpd-2.2.23.tar.gz
[root@jboss01 app]#cd /opt/app/httpd-2.2.23
在[root@jboss01 httpd-2.2.23]#下编译
./configure -prefix=/usr/local/apache2 -enable-module=so -enable-module=setenvif -enable-module=rewrite -enable-rewrite=shared -enable-proxy=shared -with-mpm=prefork -enable-so -enable-auth-anon -enable-file-cache=shared -enable-cache=shared -enable-disk-cache=shared -enable-mem-cache=shared
make clean
make
make install
修改配置。本例中,提供服务的监听端口是8090,请根据实际情况修改。
vi /usr/local/apache2/conf/httpd.conf
将Listen 80 改成Listen 8090
将User daemon和Group daemon 改为User apache和Group apache
删除ServerName前的#,将该行改为 ServerName 172.18.49.181:8090
添加用户和用户组
groupadd apache
useradd apache –g apache
apache mod_jk配置
下载mod_jk,将其改名为mod_jk.so,拷贝到/usr/local/apache2/modules下
mod_jk的下载路径:http://archive.apache.org/dist/tomcat/tomcat-connectors/jk/binaries/
chmod +x /usr/local/apache2/modules/mod_jk.so
在/usr/local/apache2/conf/httpd.conf的末尾增加:
Include conf/mod_jk.conf
建立空文件 /usr/local/apache2/conf/uriworkermap.properties
vi /usr/local/apache2/conf/mod_jk.conf 输入以下内容:
_____________________________________________________________________
# Load mod_jk module
# Specify the filename of the mod_jk lib
LoadModule jk_module modules/mod_jk.so
# Where to find workers.properties
JkWorkersFile conf/workers.properties
# Where to put jk logs
JkLogFile logs/mod_jk.log
# Set the jk log level [debug/error/info]
JkLogLevel info
# Select the log format
JkLogStampFormat “[%a %b %d %H:%M:%S %Y]”
# JkOptions indicates to send SSK KEY SIZE
JkOptions +ForwardKeySize +ForwardURICompat -ForwardDirectories
# JkRequestLogFormat
JkRequestLogFormat “%w %V %T”
# Mount your applications
JkMount /* loadbalancer
# You can use external file for mount points.
# It will be checked for updates each 60 seconds.
# The format of the file is: /url=worker
# /examples/*=loadbalancer
JkMountFile conf/uriworkermap.properties
# Add shared memory.
# This directive is present with 1.2.10 and
# later versions of mod_jk, and is needed for
# for load balancing to work properly
JkShmFile logs/jk.shm
# Add jkstatus for managing runtime data
<Location /jkstatus/>
JkMount status
Order deny,allow
Deny from all
Allow from 172.18.49.181
</Location>
____________________________________________________________________________
vi /usr/local/apache2/conf/workers.properties,增加以下内容:
_______________________________________________
# Define list of workers that will be used
# for mapping requests
worker.list=loadbalancer
# Define Node1
# modify the host as your host IP or DNS name.
worker.node1.port=8009
worker.node1.host=172.18.49.183
worker.node1.type=ajp13
worker.node1.lbfactor=1
worker.node1.connection_pool_timeout=600
#worker.node1.connection_pool_size=500
#worker.node1.connection_pool_minsize=250
worker.node1.socket_timeout=5
# Define Node2
# modify the host as your host IP or DNS name.
worker.node2.port=8009
worker.node2.host=172.18.49.184
worker.node2.type=ajp13
worker.node2.lbfactor=1
worker.node2.connection_pool_timeout=600
#worker.node2.connection_pool_size=500
#worker.node2.connection_pool_minsize=250
worker.node2.socket_timeout=5
# Load-balancing behaviour
worker.loadbalancer.type=lb
worker.loadbalancer.balance_workers=node1,node2
____________________________________________________
如果有更多的节点,顺序定义更多的node段,并在worker.loadbalancer.balance_workers后全部列出.
lbfactor是负载分配权重,值越大分配的负载越多.
配置apache自动启动
ln –s /usr/local/apache2/bin/apachectl /etc/init.d/apache
chmod 777 /etc/init.d/apache
ln –s /etc/init.d/apache /etc/rc3.d/S80apache
ln –s /etc/init.d/apache /etc/rc3.d/K20apache
ln –s /etc/init.d/apache /etc/rc4.d/S80apache
ln –s /etc/init.d/apache /etc/rc4.d/K20apache
ln –s /etc/init.d/apache /etc/rc5.d/S80apache
ln –s /etc/init.d/apache /etc/rc5.d/K20apache
先启动负载均衡器apache,然后启动各jboss节点。各jboss节点的启动顺序没有要求。对于apache的启动,参考如下:
在/usr/local/apache2/bin目录下执行./httpd –k start (终止命令: ./httpd –k stop),在/usr/local/apache2/logs/mod_jk.log中,看到如下信息则表明apache对mod_jk加载成功:
“[info] init_jk::mod_jk.c (2743): mod_jk/1.2.23 initialized”
如有mod_jk相关的错误信息,一般是由于mod_jk的版本与apache版本不兼容,需在apache官网上下载合适的版本。用netstat检查8090监听端口存在,则说明apache启动成功.

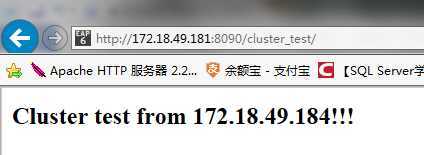
在172.18.49.183/184上分别部署了简单的测试页面,显示如下:


此时,在IE中输入http://172.18.49.181:8090/cluster_test/,并不断刷新,应该会交替出现如下两个页面,则说明负载均衡配置成功,如果此时关闭184上的JBOSS,则每次访问只会出现图1,重新打开184上的JBOSS,不断刷新访问,则图1和图2重新交替显示。

图1

图2
二、 Windows环境下IIS + isapi_redirect + JBOSS
IIS和JBOSS使用AJP协议,利用8009端口通过加载isapi_redirect.dll来实现通信。
Windows Registry Editor Version 5.00
[HKEY_LOCAL_MACHINE\SOFTWARE\Wow6432Node\Apache Software Foundation]
[HKEY_LOCAL_MACHINE\SOFTWARE\Wow6432Node\Apache Software Foundation\Jakarta Isapi Redirector]
[HKEY_LOCAL_MACHINE\SOFTWARE\Wow6432Node\Apache Software Foundation\Jakarta Isapi Redirector\1.0]
"extension_uri"="/jakarta/isapi_redirect.dll"
"log_file"="E:\\ajp\\logs\\isapi_redirect.log"
"log_level"="info"
"worker_file"="E:\\ajp\\conf\\workers.properties"
"worker_mount_file"="E:\\ajp\\conf\\uriworkermap.properties"
workers.properties的内容与linux中基本一致,只需添加worker.node1.connection_pool_size=500
worker.node1.connection_pool_minsize=250
worker.node2.connection_pool_size=500
worker.node2.connection_pool_minsize=250
而uriworkermap.properties需要添加所要访问的JBOSS部署的WEB路径,如:/*.*=loadbalancer,则表示访问所负载的JBOSS上的任何web。
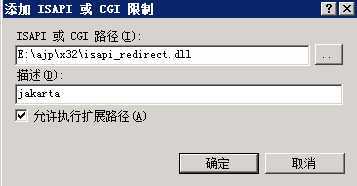
在IIS管理器中,双击ISAPI和CGI限制,

点添加,在弹出框中选择isapi_redirect.dll路径,并选择允许执行扩展路径

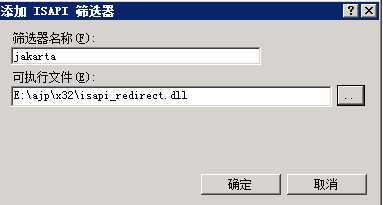
在IIS管理器中,双击ISAPI筛选器,点添加,在弹出框中,填写名称为”Jakarta”,此处必须与注册表中一致。

在网站中添加测试站点

在网站中添加虚拟目录,如下图所示,物理路径为isapi_redirect.dll所在路径。

双击处理程序映射,编辑权限功能,勾选“执行”

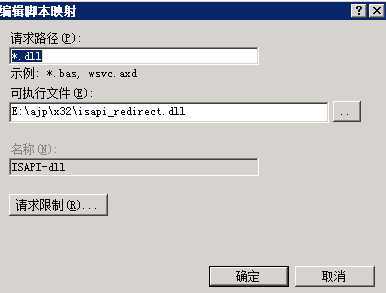
编辑ISAPI-dll,添加路径

重启IIS,并查看E:\ajp\logs\isapi_redirect.log,如无该文件生成,说明isapi_redirect.dll没有被正确加载,需检查以上步骤是否有误,如果去人无误还无法加载,可尝试重启windows服务器,直到isapi_redirect被正确加载,此时,isapi_redirect.log中会生成“[Fri Apr 25 10:03:49.863 2014] [16260:16312] [emerg] init_jk::jk_isapi_plugin.c (2867): Unable to read worker file E:\ajp\conf\workers.properties. (errno=0, err=No error)”类似的信息。
验证方法参加第一部分Linux环境下Apache + mod_jk + JBOSS相关的内容。
三、 参数说明
表示要通过apache或IIS做负载的JBOSS集群或其它集群的名称列表,多个直接用逗号隔开。本文只有一个JBOSS集群,命名为loadbalancer。
worker.node1.connection_pool_size=500,表示所允许的与后端JBOSS的最大连接数,需要注意的是,如果使用Apache,该参数不推荐使用,因为apache是自适应的去分配连接。
worker.node1.connection_pool_minsize=250,表示当资源池被收缩时,可以保持的空闲连接数,apache官方推荐值为最大连接数的一半。如果使用Apache,该参数同样不推荐使用。
worker.node1.socket_timeout=5,表示TCP传输的超时为5s,如不设置该参数,则表示超时值为无穷大,此时,如果网络状况不佳,可能会存在很多死连接,导致JBOSS压力偏低,性能发挥不出来。但该值如果设置太小,会使得JK connector对网络状况过于敏感,不仅增大JBOSS压力,还会错误的杀掉因为网络或其它原因而响应稍慢的一些连接。Apache的官方推荐值为1到5秒。
标签:blog http io os ar 使用 for strong sp
原文地址:http://www.cnblogs.com/liulei058/p/4045709.html